10g (9.0.4)
Part Number B10313-01
Home |
Solution Area |
Contents |
Index |
| Oracle Application Server TopLink Application Developer's Guide 10g (9.0.4) Part Number B10313-01 |
|
Oracle Application Server TopLink includes several tools that help you build and deploy an OracleAS TopLink application. This chapter introduces these tools and includes discussions on:
The OracleAS TopLink Web Client provides a Web-based interface that allows you to work with any OracleAS TopLink server session (see "Session Management Services") that is deployed on Oracle Application Server Containers for J2EE, IBM WebSphere 5.0, and BEA WebLogic 6.1, 7.0 or 8.1 application servers.

The Web Client leverages Java objects, database and OracleAS TopLink metadata to automatically create a browser based user interface to display and allow the manipulation of persistent objects obtained through server sessions. In addition, the Web Client offers utilities to profile the performance of your server session, as well as interactively execute SQL on the database connected to your server session.
The Web Client can access the following types of server sessions:
sessions.xml file
Before you access server sessions, all the XML files and classes used by the server session must be accessible to the Web Client. This includes:
sessions.xml file
project.xml file (or the class files specified in the sessions.xml file)
Before you build the Web Client, edit the following properties in the <ORACLE_HOME>\toplink\config\toplinkwc\build.properties file:
| Property | Description |
|---|---|
|
deployment.dir |
Directory into which the EAR file is copied after you build the Web Client. Normally, this is your application server deployment directory. |
|
domain.jar.path |
The full path to your To deploy the Web Client without any domain classes, leave this property blank. |
|
use.weblogic |
When you deploy to WebLogic, set to true. |
|
defaultwebapp.dir |
The location of the When running on WebLogic, the Web Client needs to extract resources here so that they are available to the web application. |
If your OracleAS TopLink project uses a datasource, add the datasource information to the <ORACLE_HOME>\config\toplinkwc\web.xml file, as follows:
<resource-ref>
    <description>DataSource</description>
    <res-ref-name>jdbc/DataSourceName</res-ref-name>
    <res-type>javax.sql.DataSource</res-type>
    <res-auth>SERVLET</res-auth>
</resource-ref>
In addition to the standard OracleAS TopLink .jar files, add the following to your application server class path:
<ORACLE_HOME>\jlib\uix2.jar<ORACLE_HOME>\jlib\share.jar
Use the Web Client in either of the following ways to build and deploy the Web Client .ear file:
<ORACLE_HOME>\toplink\config\toplinkwc\build.properties file, leave the domain.jar.path setting blank.
assembleWebClient script located in the <ORACLE_HOME>\toplink\bin directory.
The system assembles and deploys toplinkwc.ear file, as specified in the build.properties file.
For more information, see "Configuring the Web Client".
project.xml file, the sessions.xml file and any other necessary artifacts into a .jar file (called the domain jar).
domain.jar file in the Web Client build.properties file (as specified in "Configuring the Web Client").
assembleWebClient script located in the <ORACLE_HOME>\toplink\bin directory.
The system assembles and deploys toplinkwc.ear as specified in the build.properties file.
For more information, see "Configuring the Web Client".
Before using the OracleAS TopLink Web Client, configure your application server.
toplinkwc.ear file to the <ORACLE_HOME>\toplink\examples\oc4j\904\server\applications directory.
server.xml file located in the <ORACLE_HOME>\toplink\examples\oc4j\904\server\config directory:
<application name="toplinkwc" path="../applications/toplinkwc.ear"
auto-start="true" />
http-web-site.xml file located in the <ORACLE_HOME>\toplink\examples\oc4j\904\server\config directory:
<web-app application="toplinkwc" name="toplinkwc" root="/toplinkwc" />
startServer script located in the <ORACLE_HOME>\toplink\examples\oc4j\904\server directory.
This step deploys all the OracleAS TopLink Examples, including the OracleAS TopLink Web Client.
http://localhost:8888/toplinkwc into a Web browser.
toplinkwc.ear file into the <WEBSPHERE_INSTALL_DIR>\installableApps directory.
.ear file and start the Web module.
For more information about the WebSphere Administration Console, see the IBM WebSphere documentation.
http://localhost:9080/toplinkwc into a Web browser.
In the following steps, the wlsXX refers to your version of BEA WebLogic. Use 61 for BEA WebLogic version 6.1, 70 for BEA WebLogic version 7.0. or 81 for BEA WebLogic version 8.1.
toplinkwc.ear file into the <ORACLE_HOME>\toplink\examples\weblogic\wlsXX\server\config\TopLink_Domain\applications directory.
startWebLogic script located in the <ORACLE_HOME>\toplink\examples\weblogic\wlsXX\server\config\TopLink_Domain\ directory.
This step deploys all the OracleAS TopLink Examples, including the OracleAS TopLink Web Client.
http://localhost:7001/toplinkwc into a Web browser.
Use the Web Client Home tab to display and access the available OracleAS TopLink sessions.
Click Refresh
 to refresh the session list.

 .
.
To select a session, click the appropriate radio button under the Select column.
 .
.
Use the Search tab to display objects within a specific descriptor.

The Web Client displays all the objects that match the search criteria.
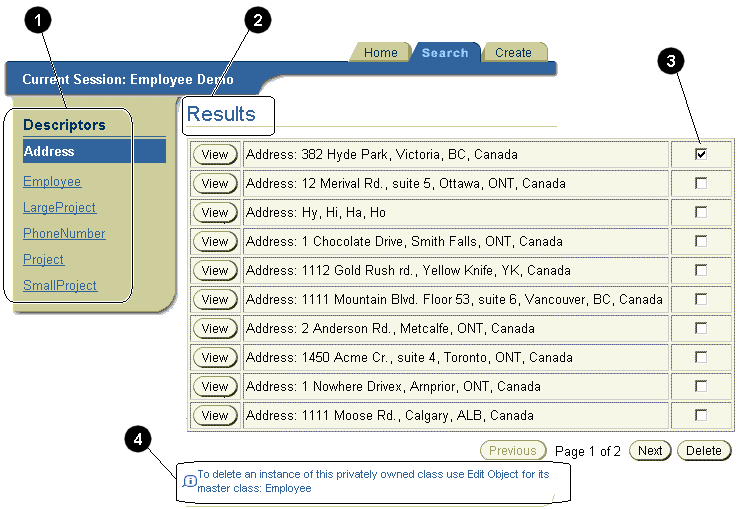
Figure A-4 identifies the following user-interface elements:
For more information about creating and editing objects, see "Creating and Editing Objects".
Use the Create tab to create a new object. The information you enter on this tab is validated by the database--not the OracleAS TopLink Web Client.

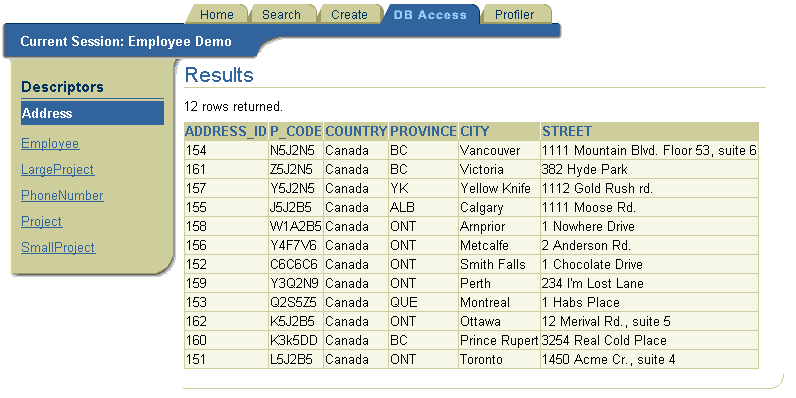
Use the DB Access tab to enter specific SQL queries to execute on the database.
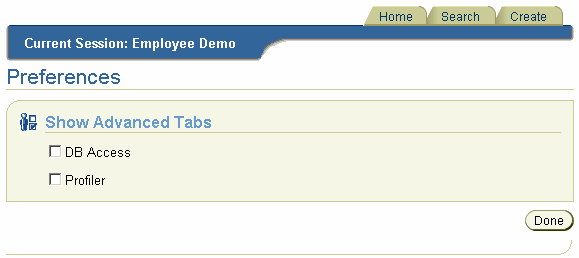
For more information about setting Web Client preferences, see "Setting Web Client Preferences".
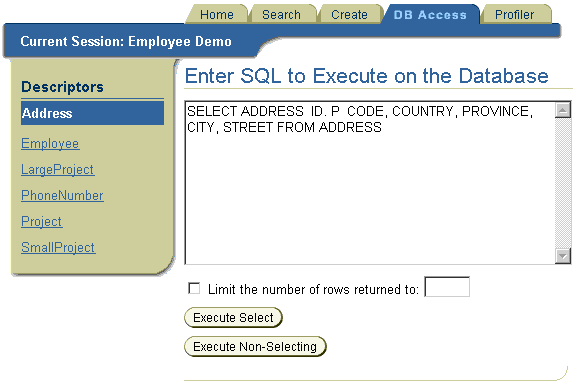
The Web Client displays the SQL results.
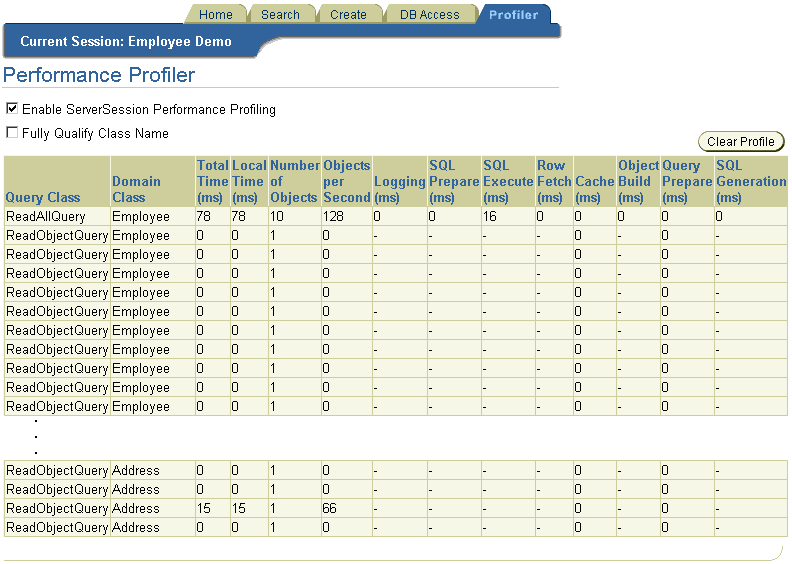
Use the Profiler tab to specify the OracleAS TopLink Performance Profiler settings that appear in Figure A-9 and to display performance information.
For more information about the OracleAS TopLink Performance Profiler settings, see "Profiling Performance".
For more information about setting Web Client preferences, see "Setting Web Client Preferences".
Use the Web Client Preferences to specify which advanced properties are available.
This section contains information on how to configure OracleAS TopLink for Oracle JDeveloper.
Oracle JDeveloper is a J2EE development environment with end-to-end support to develop, debug, and deploy e-business applications and Web Services.
When you use OracleAS TopLink with Oracle JDeveloper, use the following procedures to add the OracleAS TopLink JAR files to your JDeveloper projects:
The Project Settings pane appears.
A list of predefined and user-defined libraries appears.
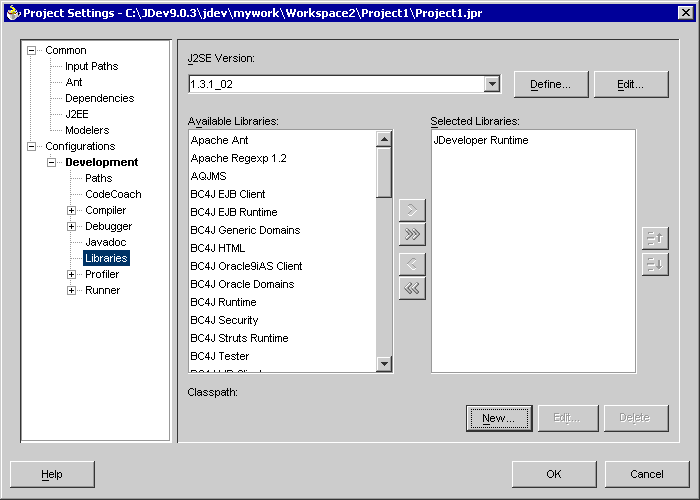
.jar files.
The New Library dialog box appears.
Ensure that the default choice for Libraries remains as User Libraries.
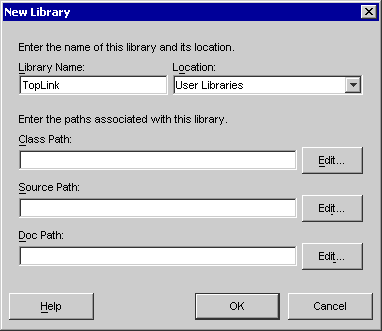
.jar files, click the Edit button.
Add the following to the beginning of your Class Path:
<ORACLE_HOME>\toplink\jlib\toplink.jar<ORACLE_HOME>\toplinkjlib\antlr.jar<ORACLE_HOME>\lib\xmlparserv2.jar
After a user library is created, it can be re-referenced by any other project. Revisit the Libraries window of the Project Settings, and add the OracleAS TopLink Library to any project with which you want to use OracleAS TopLink.
OracleAS TopLink integration for IBM WebSphere Server includes a deployment tool that helps you deploy your projects to WebSphere. The Deploy Tool for WebSphere is a graphical tool that makes project deployment to WebSphere easier to configure and execute. The deploy tool also includes a command-line option that enables you to deploy your project while bypassing the graphical interface element of the tool.
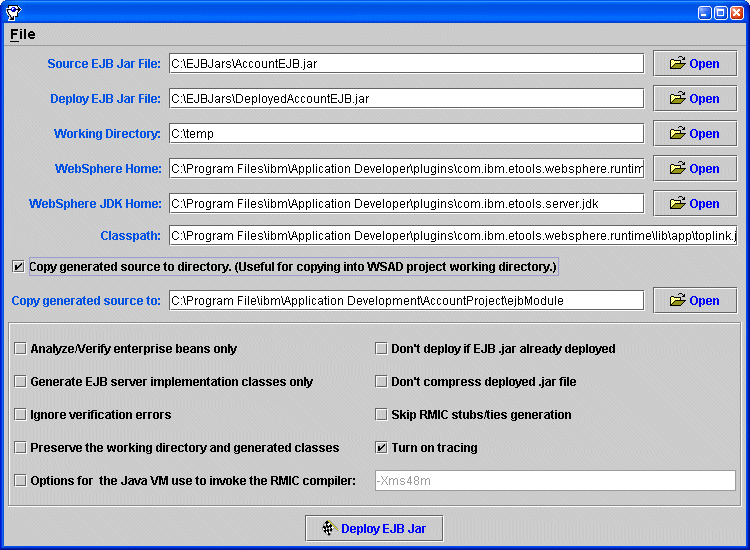
The Deploy tool is compatible with the WebSphere Studio Application Developer (WSAD).
toplink-ejb-jar.xml files are included in the EJB JAR.
wasDeployTool.cmd/sh script in the <ORACLE_HOME>\toplink\bin directory.
The most common error you might encounter when you use the deploy tool is the NoClassDefFoundError exception. To resolve this error condition, add the required resources to the Classpath. The Turn on tracing option also helps to debug errors during deployment code generation.
When an obscure error appears during the generating stub phase, copy the Java command and run it at the command prompt. This gives a more detailed error message.
The Schema Manager creates and modifies tables in a database from a Java application. As a a Java code batch facility, the Schema Manager can also create sequence numbers on an existing database and generate stored procedures.
Use the Schema Manager to re-create a production database in a nonproduction environment. Doing this enables you to build models of your existing databases, and modify and test them during development.
The Schema Manager table creation mechanism uses Java types rather than database types, it is database-independent. However, this mechanism does not account for database specific optimizations, it is best-suited for development purposes rather than production.
The OracleAS TopLink TableDefinition class enables you to create new database table schemas in a generic format. At runtime, OracleAS TopLink determines the database type, and uses the generic schemas to create the appropriate fields for that database.
The TableDefinition class includes all the information required to create a new table, including the names and properties of a table and all its fields.
The TableDefinition class has the following methods:
setName()
addField()
addPrimaryKeyField()
addIdentityField()
addForeignKeyConstraint()
All table definitions must call the setName() method to set the name of the table that is described by the TableDefinition.
Use the addField() method to add fields to the TableDefinition. To add the primary key field to the table, use the addPrimaryKeyField() method rather than the addField() method.
To maintain compatibility among different databases, the type parameter requires a Java class rather than a database field type. OracleAS TopLink translates the Java class to the appropriate database field type at runtime. For example, the String class translates to the CHAR type for dBase databases. However, if you are connecting to Sybase, the String class translates to VARCHAR.
The addField() method can also be called with the fieldSize or fieldSubSize parameters for column types that require size and subsize to be specified.
Some databases require a subsize, but others do not. OracleAS TopLink automatically provides the required information, as necessary.
The addIdentityField() methods have the following definitions:
addIdentityField(String fieldName, Class type)
addIdentityField(String fieldName, Class type, int fieldSize)
These methods enable you to add fields representing a generated sequence number from Sybase or Microsoft SQL Server native sequencing.
The OracleAS TopLink Two-Tier Example illustrates the table creation mechanism in the EmployeeTableCreator.java file located in the <ORACLE_HOME>\toplink\examples\foundation\twotier\src\examples\sessions\twotier\ directory.
OracleAS TopLink offers two methods that enable you to pass the initialized TableDefinition object to the DatabaseSession Schema Manager:
SchemaManager schemaManager = new SchemaManager(session);
schemaManager.createObject(Tables.employeeTable());
SchemaManager schemaManager = new SchemaManager(session);
schemaManager.replaceObject(Tables.addressTable());
If your application requires a sequence table, invoke the createSequences() method on the Schema Manager:
SchemaManager schemaManager = new SchemaManager(session);
schemaManager.createSequences();
The preceding code:
Table A-1 lists the field types that match a given class for each database that OracleAS TopLink supports. This list is specific to the Schema Manager and does not apply to mappings. OracleAS TopLink automatically performs conversions between any database types within mappings.
OracleAS TopLink provides statistical reporting and runtime configuration systems through two public APIs: oracle.toplink.service.RuntimeServices and oracle.toplink.services.DevelopmentServices.
The RuntimeServices API enables you to monitor a running in-production system. It offers statistical functions and reporting, as well as logging functions. Typical uses for RuntimeServices include turning logging on or off and generating real time reports on the number and type of objects in a given cache or subcache.
For more information, see the RuntimeServices class in the Oracle Application Server TopLink API Reference.
The DevelopmentServices API enables you to make changes to a running nonproduction application that can destabilize or even crash the application. For example, use the DevelopmentServices API to change the states of selected objects and modify and reinitialize identity maps. This feature is useful for stress and performance testing of preproduction applications and also enables you to build prototypes quickly and easily.
For more information, see the RuntimeServices class in the Oracle Application Server TopLink API Reference.
To instantiate a session management service, you pass a session to the constructor. After instantiating the service, you can attach a graphical interface or other applications to the object to provide statistical feedback and runtime option settings.
import oracle.toplink.services.RuntimeServices;
import oracle.toplink.publicinterface.Session;
...
...
RuntimeServices service = newRuntimeServices ((session) session);
java.util.List classNames = service.getClassesInSession();
OracleAS TopLink support for BEA WebLogic Server automatically deploys the session management services to the JMX server. You can retrieve the JMX Mbeans with the following object names:
WebLogicObjectName("TopLink_Domain:Name=Development <Session><Name> Type=Configuration");
WebLogicObjectName("TopLink_Domain:Name=Runtime <Session><Name> Type=Reporting");
Session Name represents the session type and name under which you store the required session configuration in the toplink-ejb-jar.xml file.
For more information about the WebLogicObjectName API, see
http://e-docs.bea.com/wls/docs70/javadocs/weblogic/management/WebLogicObjectName
.html
You can generate stored procedures based on the dynamic SQL that is associated with descriptors and mappings. After you generate the stored procedures, attach them to the mappings and descriptors of the domain object. At that point, access to the database is accomplished through stored procedures, rather than through SQL.
You can generate stored procedures for all descriptors and most relationship mappings with the exception of many-to-many mappings, which are not supported by the stored procedure generator and stored procedures for Read operations for the Oracle platform.
You can generate stored procedures for sequence number updates and selects. To enable these stored procedures in OracleAS TopLink, create an amendment class that contains a method attaching the stored procedures to each descriptor.
OracleAS TopLink creates an amendment class called com.demo.Tester in the file C:/temp/Tester.java.
SchemaManager manager = new SchemaManager(session);
manager.outputDDLToDatabase();
manager.generateStoredProceduresAndAmendmentClass("C:/temp/","com.demo.Tester");
SchemaManager manager = new SchemaManager(session);
manager.outputDDLToFile("C:\Temp\test.sql");
manager.generateStoredProceduresAndAmendmentClass("C:/temp/","com.demo.Tester");
For more information about creating an amendment class, see "Customizing OracleAS TopLink Descriptors with Amendment Methods".
After you create the stored procedures on the database, and after you create the amendment file, enable them on the descriptors:
Session session = project.createDatabaseSesssion();
com.demo.Tester.amendDescriptors(project);
For more information about creating an amendment class, see "Customizing OracleAS TopLink Descriptors with Amendment Methods".
|
|
 Copyright © 2000, 2003 Oracle Corporation. All Rights Reserved. |
|