| Oracle9i Net Services Administrator's Guide Release 2 (9.2) Part Number A96580-02 |
|


|
View PDF |
| Oracle9i Net Services Administrator's Guide Release 2 (9.2) Part Number A96580-02 |
|
|
View PDF |
This chapter describes how to configure connectivity information for client connections to the database server.
This chapter contains these topics:
| See Also:
"Naming" for an overview of naming methods |
To connect to a service, clients use a connect identifier in the connect string to connect to a service. The connect identifier can be a connect descriptor or a simple name that maps to a connect descriptor. The connect descriptor contains:
A simple name is resolved to a connect descriptor by a naming method. Naming method configuration consists of the following steps:
A connect descriptor is comprised of one or more protocol addresses of the listener and connect data information for the destination service.
The following example shows a connect descriptor mapped to simple name called sales:
sales=
 (DESCRIPTION=
  (ADDRESS= (PROTOCOL=tcp)(HOST=sales-server)(PORT=1521))
  (CONNECT_DATA=
     (SERVICE_NAME=sales.us.acme.com)))
The ADDRESS section contains the listener protocol address, and the CONNECT_DATA section contains the destination service information. In this example, the destination service is a database service named sales.us.acme.com.
When creating a connect descriptor to an Oracle9i or Oracle8i database service, you must identify the service with the SERVICE_NAME parameter. Optionally, you can identify an instance with the INSTANCE_NAME parameter, as shown in the following:
sales=
 (DESCRIPTION=
  (ADDRESS=(PROTOCOL=tcp)(HOST=sales-server)(PORT=1521))
  (CONNECT_DATA=
     (SERVICE_NAME=sales.us.acme.com)
     (INSTANCE_NAME=sales)))
The values for these parameters come from the SERVICE_NAMES (with an S) and INSTANCE_NAME parameters in the initialization parameter file. The SERVICE_NAMES parameter in the initialization parameter file is typically the global database name, a name comprising the database name and domain name, entered during installation or database creation. For example, sales.us.acme.com has a database name of sales and a domain of us.acme.com. The INSTANCE_NAME parameter in the initialization parameter file defaults to the SID entered during installation or database creation.
When creating a connect a descriptor for an Oracle release 8.0 or version 7 database, you identify the service with the SID parameter. The following example shows a connect descriptor for an Oracle release 8.0 database with a SID of sales:
sales=
 (DESCRIPTION=
  (ADDRESS=(PROTOCOL=tcp)(HOST=sales-server)(PORT=1521))
  (CONNECT_DATA=
     (SID=sales)))
Table 9-1 describes the naming methods that Oracle Net supports.
| Naming Method | Description |
|---|---|
|
Local Naming |
Resolves a net service name stored in a Local naming is most appropriate for simple distributed networks with a small number of services that change infrequently. See Also: "Configuring the Local Naming Method" |
|
Directory Naming |
Resolves a database service name, net service name, or net service alias stored in a centralized LDAP-compliant directory server |
|
Oracle Names |
Resolves a database or alias objects stored in an Oracle Names server See Also: "Configuring the Oracle Names Method" Note: In future releases, Oracle Names will not be supported as a centralized naming method. |
|
Host Naming |
Enables users to connect to an Oracle server by using a host name alias. Host names are mapped to a connect descriptor in an existing names resolution service or a centrally-maintained set of No client configuration is required to take advantage of this feature. This method is recommended for simple TCP/IP environments. See Also: "Configuring the Host Naming Method" |
|
External Naming |
Resolves service information stored in an a third-party naming service See Also: "Configuring External Naming Methods" |
The local naming method adds net service names to the tnsnames.ora file. Each net service name maps to a connect descriptor. The example a net service name mapped to a connect descriptor:
sales=
(DESCRIPTION=
  (ADDRESS=(PROTOCOL=tcp)(HOST=sales-server)(PORT=1521))
  (CONNECT_DATA=
     (SERVICE_NAME=sales.us.acme.com)))
In this example, the net service name sales is mapped to the connect descriptor contained in DESCRIPTION. DESCRIPTION contains the protocol address and identifies the destination database service.
You can configure local naming during or after installation, as described in these topics:
Oracle Net Configuration Assistant enables you to configure net service names for clients. Oracle Universal Installer launches Oracle Net Configuration Assistant after software installation. The configuration varies depending on the installation mode.
Oracle Net Configuration Assistant prompts you to configure net service names in the tnsnames.ora file to connect to an Oracle database service.
Oracle Net Configuration Assistant prompts you to select naming methods to use. If Local is selected, then Oracle Net Configuration Assistant prompts you to configure net service names in a tnsnames.ora file to connect to an Oracle database service.
You can add net service names to the tnsnames.ora file at any time. To configure the local naming method, perform the following tasks:
Task 1: Configure Net Service Names
Task 2: Configure TNSNAMES as the First Naming Method
Task 3: Distribute Configuration
Task 4: Configure the Listener
Task 5: Connect to the Database
| Note:
The underlying network connection must be operational before attempting to configure connectivity with Oracle Net. |
To configure with the local naming method, use either of the following tools:
To configure net service names in the tnsnames.ora file with Oracle Net Manager:
The Welcome page of the Net Service Name Wizard appears.
You can qualify the net service name with the client's domain. The net service name is automatically domain qualified if the sqlnet.ora file parameter NAMES.DEFAULT_DOMAIN is set.
The Protocol page appears.
The Protocol Settings page appears.
| See Also:
Oracle9i Net Services Reference Guide for protocol parameter settings |
The Service page appears.
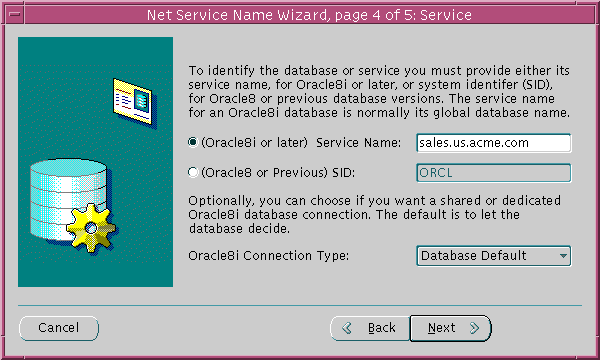
Text description of the illustration netwiz4.gif
If the destination service is Oracle9i or Oracle8i database, then select Oracle8i or later, and enter a service name in the Service Name field. If destination service is an Oracle release 8.0 database, then select Oracle8 or Previous, and enter an Oracle System Identifier for an instance in the Database SID field.
| See Also:
"About Connect Descriptors" for further information about the service name string to use |
Oracle Corporation recommends that you use the default setting of Database Default for the connection type. If shared server is configured in the initialization parameter file, you can select Dedicated Server to force the listener to spawn a dedicated server, bypassing shared server configuration. If shared server is configured in the initialization parameter file and you want to guarantee the connection always uses shared server, select Shared Server.
| See Also:
Chapter 14, "Configuring Shared Server" for further information about shared server configuration |
The Test page appears.
If you click Test, then Oracle Net connects to the database server by using the connect descriptor information you configured. Therefore, the database and the listener must be running for a successful test. If they are not, see "Starting Oracle Net Services Components" to start components before testing. During testing, a Connection Test dialog box appears, providing status and test results. A successful test results in the following message:
The connection test was successful.
If the test was successful, click Close to dismiss the Connect Test dialog box, and proceed to Step 13.
If the test was not successful:
See Also:
|
To configure net service names in the tnsnames.ora file with Oracle Net Configuration Assistant:
The Welcome page appears.
The Net Service Name Configuration page appears.
The Net Service Name Configuration, Database Version page appears.
Configure local naming as the first method specified in the NAMES.DIRECTORY_PATH parameter in the sqlnet.ora file. This parameter specifies the order of naming methods Oracle Net uses to resolve connect identifiers to connect descriptors.
To specify local naming as the first naming method:
The sqlnet.ora file updates with the NAMES.DIRECTORY_PATH parameter, listing tnsnames first:
NAMES.DIRECTORY_PATH=(tnsnames, onames, hostname)
After one client is configured, it is best simply to copy the tnsnames.ora and sqlnet.ora configuration files to the same location on the other clients. This ensures that the files are consistent. Alternatively, you can use Oracle Net Manager or Oracle Net Configuration Assistant on every client.
Ensure that the listener (located on the server) is configured to "listen on" the same protocol address you configured for the net service name. By default, the listener should already be configured for the TCP/IP protocol on port 1521.
| See Also:
Chapter 12, "Configuring and Administering the Listener" for listener configuration details |
Clients can connect to the database using the following syntax:
CONNECT username/password@net_service_name
With the directory naming method, connect identifiers are mapped to connect descriptors contained in an LDAP-compliant directory server, including Oracle Internet Directory and Microsoft Active Directory. A directory provides central administration of database services and net service names, making it easier to add or relocate services.
A database service entry is created with Database Configuration Assistant during installation; net service name and net service alias entries can be created with Oracle Net Manager. To modify Oracle Net attributes of a database service entry and the net service name entries, use Oracle Net Manager.
Clients configured to access the directory can use these entries to connect to the database.
This section contains these topics:
To configure the directory naming method, perform the following tasks:
Task 1: Configure Directory Usage on Server and Clients
Task 2: Create Net Service Name Entries (Optional)
Task 3: Configure LDAP as the First Naming Method
Task 4: Configure the Listener
Task 5: Connect to the Database
Before a directory naming entry can be created to a directory, you must complete directory usage configuration with the Select the directory server you want to use, and configure the directory server for Oracle usage option in Oracle Net Configuration Assistant. Likewise, before a directory naming entry can be looked up by a client, you must complete directory usage configuration with the Select the directory server you want to use option in Oracle Net Configuration Assistant. You can configure directory server usage during or after installation.
| See Also:
Chapter 8, "Setting Up Directory Server Usage" for further information about configuring directory server usage |
|
Notes:
|
You can configure clients to use a net service name rather than the database service entry created by Database Configuration Assistant.
To create a net service name in a directory server:
| See Also:
"Configuring Directory Usage After Installation" for instructions on using the Select the directory server you want to use, and configure the directory server for Oracle usage option "Starting Oracle Net Manager" for instructions on using Oracle Net Manager |
The Welcome page of the Net Service Name Wizard appears.
The Protocol page appears.
The Protocol Settings page appears.
| See Also:
Oracle9i Net Services Reference Guide for protocol parameter settings |
The Service page appears.
Text description of the illustration netwiz4.gif
If the destination service is Oracle9i or Oracle8i database, then select Oracle8i or later, and enter a service name in the Service Name field. If destination service is an Oracle release 8.0 database, then select Oracle8 or Previous, and enter an Oracle System Identifier for an instance in the Database SID field.
| See Also:
"About Connect Descriptors" for further information about the service name string to use |
Oracle Corporation recommends that you use the default setting of Database Default for the connection type. If shared server is configured in the initialization parameter file, you can select Dedicated Server to force the listener to spawn a dedicated server, bypassing shared server configuration. If shared server is configured in the initialization parameter file and you want to guarantee the connection always uses shared server, select Shared Server.
| See Also:
Chapter 14, "Configuring Shared Server" for further information about shared server configuration |
The Test page appears.
If you click Test, then Oracle Net connects to the database server by using the connect descriptor information you configured. Therefore, the database and the listener must be running for a successful test. If they are not, see "Starting Oracle Net Services Components" to start components before testing. During testing, a Connection Test dialog box appears, providing status and test results. A successful test results in the following message:
The connection test was successful.
If the test was successful, click Close to dismiss the Connect Test dialog box, and proceed to Step 12.
If the test was not successful:
See Also:
|
Configure directory naming as the first method specified in the NAMES.DIRECTORY_PATH parameter in the sqlnet.ora file. This parameter specifies the order of naming methods Oracle Net uses to resolve connect identifiers to connect descriptors.
To specify directory naming as the first naming method:
The sqlnet.ora file updates with the NAMES.DIRECTORY_PATH parameter, listing ldap first:
NAMES.DIRECTORY_PATH=(ldap, tnsnames, onames, hostname)
Ensure that the listener (located on the server) is configured to listen on the same protocol address configured for the net service name. By default, the listener is configured to listen on the TCP/IP protocol, port 1521.
| See Also:
Chapter 12, "Configuring and Administering the Listener" for listener configuration details |
Clients that are configured with a default directory entry that matches the directory location of the database service or net service name can connect to the database using the following syntax:
CONNECT username/password@connect_identifier
Clients that are configured with a default directory entry that does not match the entry's directory location cannot use the connect identifier in the connect string. Instead, these connections require the entry's distinguished name or its absolute name.
See Also:
|
|
Note:
|
When database registration with the directory completes, Database Configuration Assistant creates a database service entry in the directory. By default, this entry contains network route information that includes the location of the listener through a protocol address. You can re-create this information, if it has been removed, or modify the existing network route information.
To create or modify network route information for a database service:
| See Also:
"Configuring Directory Usage After Installation" for instructions on using the Select the directory server you want to use, and configure the directory server for Oracle usage option "Starting Oracle Net Manager" for instructions on using Oracle Net Manager |
A new Address tab appears.
| See Also:
Oracle9i Net Services Reference Guide for protocol parameter settings |
|
Notes:
|
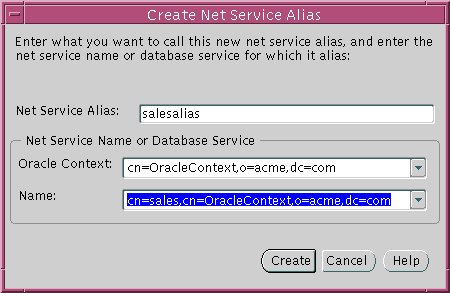
Net service aliases in a directory server enable clients to refer to a database service or a net service name by an alternative name. For example, a net service alias of salesalias can be created for a net service name of sales. When salesalias is used to connect to a database, as in CONNECT scott/tiger@salesalias, it will actually resolve to and use the connect descriptor information for sales.
There are two main uses of net service aliases:
| See Also:
"Net Service Alias Entries" for an overview of net service aliases |
To create a net service alias:
| See Also:
"Configuring Directory Usage After Installation" for instructions on using the Select the directory server you want to use, and configure the directory server for Oracle usage option "Starting Oracle Net Manager" for instructions on using Oracle Net Manager |
The Create Alias dialog box appears.
The Aliases folder updates with the created net service alias.

|
Note: In future releases, Oracle Names will not be supported as a centralized naming method. Because no new enhancements are being added to Oracle Names, consider using directory naming or migrating an existing Oracle Names configuration to directory naming, as described in Chapter 10, "Exporting Naming Data to a Directory Server". The material presented here is primarily for reference to enable you to maintain your current Oracle Names environment. |
| See Also:
Oracle9i Database Migration for the procedures for upgrading previous release of Oracle Names to 9i |
Oracle Names simplifies the setup and administration of global, client/server computing networks. Oracle Names makes network address and database link information available to all nodes throughout the network. Each database server network address is identified with a simple service name. Client applications then can request a database connection with that name rather than a lengthy address. Oracle Names shields users and applications from changes to the network infrastructure. It provides for centralized administration of network service names.
Configuring Oracle Names involves these tasks:
Task 1: Consider Oracle Names Options
Task 2: Install Necessary Components
Task 3: Create an Oracle Names Server
Task 4: Configure Clients and Database Servers To Use Oracle Names Servers
Task 5: (Optional) Configure Client Caches
Task 6: Configure the Listener
Task 7: Register Data with the Oracle Names Server
Task 8: Delegate Domains to Delegated Administrative Regions
Task 9: Specify Domain Hints to Forward Requests to Remote Oracle Names Servers
Prior to creating an Oracle Names server, you must decide whether:
Ensure that the following are installed:
How an Oracle Names server is created depends upon how you want region data stored. You can have the data:
When information is added to an Oracle Names server, the information is stored in the database and in the Oracle Names server checkpoint files. If the database is unavailable, the information in these files is used.
When information is added to an Oracle Names server, the information is stored in checkpoint files, and then replicated to the other Oracle Names servers.
By default, the checkpoint files are stored in $ORACLE_HOME/network/names on UNIX operating systems, and ORACLE_HOME\network\names on Windows NT. Table 9-3 describes the checkpoint files.
The following sections cover both modes, as well as a default Oracle Names server that requires no configuration:
Whichever method you select, Oracle Corporation recommends that you create more than one Oracle Names server for the network, in case one should go down.
An Oracle Names server can run without any configuration. Its name defaults to ONAMES_host if its name is configured in the names.ora file. The protocol address defaults to TCP/IP, port 1575 on the local host.
If the NAMES.DOMAINS parameter is not configured in the names.ora file, the Oracle Names server assumes authority for the root domain.
If you would like to use this Oracle Names server, proceed to "Task 2: Discover Oracle Names Servers".
To store service data in an Oracle database, perform the following tasks:
To configure the database server:
SYSTEM user:
SQL> CONNECT system/password
where password is MANAGER for the SYSTEM user account by default.
users and the temporary tablespace is temp:
CREATE USER user
IDENTIFIED BY password
DEFAULT TABLESPACE users
TEMPORARY TABLESPACE temp;
GRANT CREATE SESSION TO user;
users tablespace:
GRANT RESOURCE users TO user;
GRANT CREATE SYNONYM TO user;
| See Also:
Oracle9i Database Administrator's Guide for further information about creating users |
namesini.sql script located in $ORACLE_HOME/network/admin on UNIX operating systems and ORACLE_HOME\network\admin\names on Windows NT. This script creates the tables needed by Oracle Names to store information. Optionally, run namesupg.sql to upgrade old tables.
SQL> CONNECTuser/passwordSQL> @oracle_home/network/admin/namesini.sql;
For each computer where Oracle Names is installed and where you want an Oracle Names server, create an Oracle Names server from Oracle Net Manager.
The Names Wizard starts.
The wizard guides you through the creation and configuration process, prompting for:
If you select TCP/IP, then Oracle Corporation recommends using the default and officially registered port of 1575 for the Oracle Names server.
(Click Use a region database.)
If you select TCP/IP, then Oracle Corporation recommends using the default and officially registered port of 1521 for the listener.
If you specify that this Oracle Names server is in the root administrative region, configuration completes.
If you specify that this Oracle Names server is not in the root administrative region, it assumes that this Oracle Names server is in a delegated administrative region. The wizard then prompts you for the local administrative region's domain name and the address of an Oracle Names server in the root administrative region before completing.
When the wizard completes, the following message appears:
A Names Server, onames_server, has been created with default settings. Use the Configure Server section to modify the default configuration.
Oracle Net Manager creates a names.ora file with the following settings:
NAMES.SERVER_NAME)NAMES.ADDRESSES)NAMES.ADMIN_REGION)NAMES.DOMAIN_HINTS)NAMES.DOMAINS)The names.ora file is created in the $ORACLE_HOME/network/admin directory on UNIX operating systems and the ORACLE_HOME\network\admin directory on Windows NT.
A names.ora file follows with annotations of content:
#Oracle Names server name. The name should include the name of the domain this Oracle Names server is in.NAMES.SERVER_NAME=namesvr2.us.acme.com #Oracle Names server listening protocol addressNAMES.ADDRESSES=[(ADDRESS_LIST=](ADDRESS=(PROTOCOL=tcp)(HOST=namesrv2-server)(PORT=1575))[(ADDRESS=...))][)] #Database repository informationNAMES.ADMIN_REGION=(REGION=(DESCRIPTION=(ADDRESS=(PROTOCOL=tcp)(HOST=sales-server)(PORT=1521))(CONNECT_DATA=(SERVICE_NAME=sales.us.acme.com))(USERID=system) (PASSWORD=password) (NAME=local_region)(REFRESH=86400)(RETRY=60)(EXPIRE=600))#If an Oracle Names server is in a delegated administrative region, identify the address of an Oracle Names server in the root administrative region. NAMES.DOMAIN_HINTS= (HINT_DESC= (HINT_LIST= (HINT= (NAME=namesvr1) (ADDRESS=(PROTOCOL=tcp)(HOST=namesvr1-server)(PORT=1575)) # Specify the domain controlled by this region and the time to live (TTL). If this is the root administrative region, specify NAME=(null) or NAME=. to identify the root domain.NAMES.DOMAINS=(DOMAIN=(NAME=us.acme.com)(MIN_TTL=86400))
| See Also:
Oracle9i Net Services Reference Guide for |
If you want the region to administer more than one domain, specify the additional domains in the NAMES.DOMAINS parameter with Oracle Net Manager:
In the following example, NAMES.DOMAINS contains a listing for the root (value of null), com, acme.com, and hq.acme.com domains. all the domain precedent to hq.acme.com must be defined in order to define hq.acme.com.
NAMES.DOMAINS=(DOMAIN_LIST=(DOMAIN=(NAME=)(MIN_TTL=86400))(DOMAIN=(NAME=com)(MIN_TTL=86400))(DOMAIN=(NAME=acme.com)(MIN_TTL=86400))(DOMAIN=(NAME=hq.acme.com)(MIN_TTL=86400)))
To start the Oracle Names server, use either Oracle Net Manager or Oracle Names Control utility:
To replicate data among Oracle Names server in checkpoint files, perform these tasks:
For each computer where Oracle Names is installed and where you want an Oracle Names server, create an Oracle Names server from Oracle Net Manager:
The Names Wizard starts.
The wizard guides you through the creation and configuration process, prompting you for:
If you select TCP/IP, then Oracle Corporation recommends using the default and officially registered port of 1575 for the Oracle Names server.
(Click Don't use a region database.)
If this is not the first Oracle Names server in the region, the wizard then prompts you to discover the other Oracle Names servers or to specify the address of another Oracle Names server in the region.
If you specify that this Oracle Names server is in the root administrative region, configuration completes.
If you specify that this Oracle Names server is not in the root administrative region, it assumes that this Oracle Names server is in a delegated administrative region. The wizard then prompts you for the local administrative region's domain name and the address of an Oracle Names server in the root administrative region before completing.
When the wizard completes, the following message appears:
A Names Server, onames_server, has been created with default settings. Use the Configure Server section to modify the default configuration.
Oracle Net Manager creates a names.ora file with the following settings:
NAMES.SERVER_NAME)NAMES.ADDRESSES)NAMES.DOMAIN_HINTS)NAMES.DOMAINS)The names.ora file is created in the $ORACLE_HOME/network/admin directory on UNIX operating systems and the ORACLE_HOME\network\admin directory on Windows NT.
A names.ora file follows with annotations of content:
#Oracle Names server name. The name should include the name of the domain this Oracle Names server is in.NAMES.SERVER_NAME=namesvr2.us.acme.comNAMES.ADDRESSES=[(ADDRESS_LIST=](ADDRESS=(PROTOCOL=tcp)(HOST=namesrv2-server)(PORT=1575))[(ADDRESS=...))][)] #If an Oracle Names server is in a delegated administrative region, identify the address of an Oracle Names server in the root administrative region. NAMES.DOMAIN_HINTS= (HINT_DESC= (HINT_LIST= (HINT= (NAME=namesrv1) (ADDRESS=(PROTOCOL=tcp)(HOST=namesrv1-svr)(PORT=1575)) # Specify the domain controlled by this region and the time to live (TTL). If this is the root administrative region, you must have NAME= (null) to identify the root domain properly.NAMES.DOMAINS=(DOMAIN=(NAME=us.acme.com)(MIN_TTL=86400))
| See Also:
Oracle9i Net Services Reference Guide for |
If you want the region to administer more than one domain, specify the additional domains in the NAMES.DOMAINS parameter with Oracle Net Manager:
In the following example, NAMES.DOMAINS contains a listing for the root (value of null), com, acme.com, and hq.acme.com domains. all the domain precedent to hq.acme.com must be defined in order to define hq.acme.com.
NAMES.DOMAINS=(DOMAIN_LIST=(DOMAIN=(NAME=)(MIN_TTL=86400))(DOMAIN=(NAME=com)(MIN_TTL=86400))(DOMAIN=(NAME=acme.com)(MIN_TTL=86400))(DOMAIN=(NAME=hq.acme.com)(MIN_TTL=86400)))
After all the Oracle Names servers are created, have each Oracle Names server, except the first one in the region, discover the other Oracle Names servers in a region.
To discover other Oracle Names servers, use either Oracle Net Manager or Oracle Names Control utility:
To configure client and database server computers to use Oracle Names servers:
sqlnet.ora file, as described in "Configuring Preferred Oracle Names Servers"..sdns.ora file in $ORACLE_HOME\network\names on UNIX operating systems, and sdns.ora file in ORACLE_HOME\network\names on Windows operating systems. This file contains the order of names and addresses of the Oracle Names server(s) to contact. Client computers read this file to find the addresses of Oracle Names servers to contact.Preferred Oracle Names servers take precedence over the Oracle Names servers configured in the .sdns.ora or sdns.ora file.
| See Also:
"About Discovery" for a description of discovery |
To create an .sdns.ora file or an sdns.ora file, use either Oracle Net Manager or Oracle Names Control utility:
| Use Oracle Net Manager... | Use Oracle Names Control utility... |
|---|---|
|
Discover the other Oracle Names servers:
The If an Oracle Names server cannot be found, and you know the network address of a particular Oracle Names server, enter the address at the prompt. For example:
|
NAMES.DIRECTORY_PATH parameter in the sqlnet.ora file in the following manner:
The sqlnet.ora file should contain an entry that lists onames first in the NAMES.DIRECTORY_PATH parameter:
NAMES.DIRECTORY_PATH=(onames, tnsnames, hostname)
sqlnet.ora file settings for Oracle Names.
To add or configure these features:
To avoid clients sending requests to Oracle Names server for name lookups, you can create a client cache process local to the client. A client cache:
The most optimal environment for the client cache is a large multiuser computer where the users are running a particular Oracle client application. Clients on a single-user computer with wide-ranging interests in the databases will also derive some benefit from a cache.
A client cache involves running a local Oracle Names cache process on the client. The client cache has no authoritative data but uses the discovery list file (.sdns.ora or sdns.ora) to find Oracle Names server in the local region. Requests from clients are forwarded to the Oracle Names server, and the results are cached by the cache process so that subsequent requests for that object can be answered directly by the cache process
In a sense, the client cache is a client version of the Oracle Names server. The client cache is distinguished from an Oracle Names server in the following ways:
(ADDRESS=(PROTOCOL=ipc)(KEY=onames)).sqlnet.ora file rather than the names.ora fileonrsd that is smaller in size and functionalityTo create and start a client cache:
sqlnet.ora file.
The client cache does not require anything beyond what is usually present in sqlnet.ora file or the discovery list file (.sdns.ora or sdns.ora). However, many of the parameters from names.ora file can also be set in sqlnet.ora for the client cache.
| See Also:
Oracle9i Net Services Reference Guide for |
namesctl
NAMESCTL> START_CLIENT_CACHE
On Windows NT, the client cache may also be started through the Control Panel:
OracleHOME_NAMEClientCache service.The START_CLIENT_CACHE command starts a client cache process. The client cache process finds a list of the local Oracle Names servers in static list of preferred Oracle Names server in the sqlnet.ora file or in the discovery list file (.sdns.ora or sdns.ora) the first time it runs. Afterwards, it relies on its cache checkpoint file if restarted. Once the client cache has contact with the local region server(s), it will begin to cache data on all local servers, various foreign servers, and all the data it has been asked to find.
Once configuration is complete, administration for a client cache is essentially the same as it ia for an Oracle Names server, that is, you can use the Oracle Names Control utility commands to control and administer the client cache.
| See Also:
Oracle9i Net Services Reference Guide for a complete list of administrative commands |
In terms of starting and stopping, the client cache behaves essentially the same as an Oracle Names server, except that is usually accessible locally through an IPC protocol address.
Starting the client cache requires the START_CLIENT_CACHE command rather than the START command.
Stopping the client cache requires specifying the protocol address of the client cache with the SET SERVER command or the STOP command:
namesctl
NAMESCTL> SET SERVER (ADDRESS=(PROTOCOL=ipc)(KEY=onames))
NAMESCTL> STOP
namesctl
NAMESCTL> STOP (ADDRESS=(PROTOCOL=ipc)(KEY=onames))
On Windows NT, stopping the OracleHOME_NAMEClientCache service stops caching for all Oracle Names servers.
To verify that the client cache is working, query an Oracle Names server from the client as follows:
namesctl
NAMESCTL> SET SERVER onames_server
If the client cache process does not find an Oracle Names server, every query it receives will fail with the following error message:
NNC-00419: authoritative server is unreachable
The STATUS command shows how many requests the client cache has received, how many of those were forwarded, and how many items are cached. For example:
namesctl
NAMESCTL> STATUS
     Version banner is "Oracle Names Client Cache for Solaris: Version 9.0...

     Server name:                              ""
     Server has been running for:              2 minutes 39.92 seconds
     Request processing enabled:               yes
     Request forwarding enabled:               yes
     Requests received:                        53
     Requests forwarded:                       2
     Foreign data items cached:                4
...
If you are not using your operating system's primary protocol, configure the listener with listening protocol addresses.
| See Also:
Chapter 12, "Configuring and Administering the Listener" for listener configuration details |
As described in Table 3-7, an Oracle Names server stores many kinds of information, including database locations, Oracle Names server locations, net service names, aliases, and global database links. If you would like to store any of the following kinds of information, you must register it using either Oracle Net Manager or the Oracle Names Control utility:
Registration needs to occur with only one Oracle Names server in an administrative region. The other Oracle Names servers see the information if data is stored in a region database, or the information is propagated to other Oracle Names if you chose not to use a region database.
After registering these kinds of information, you should query them, as described in "Testing Network Objects with Oracle Net Manager or Oracle Names Control Utility".
Oracle Corporation advises creating a net service name for each service. If a net service name is not created, a user trying to connect to a database service must pass the database service name to make a connection. Rather than provide this information to your end users, create a net service name for the service.
To create a net service name, use either Oracle Net Manager or Oracle Names Control utility:
| Use Oracle Net Manager... | Use Oracle Names Control utility... |
|---|---|
|
From the operating system command prompt, enter:
For example, to register a net service name of
You can qualify the net service name with the client's domain. The net service name is automatically domain qualified if the s Note: The connect descriptor cannot contain any spaces. |
See Also:
|
If you have been using local naming as your configuration method and want to migrate to an Oracle Names configuration, you can upload the net service name information used in the tnsnames.ora file to an Oracle Names server. To load information from a local naming configuration file into an Oracle Names server, use either Oracle Net Manager or Oracle Names Control utility:
| Use Oracle Net Manager... | Use Oracle Names Control utility... |
|---|---|
|
From the operating system command line, enter:
|
A global database link that is the same as the global database name is automatically registered with an Oracle Names server. Any client in the network can use a global database link to access an object in a database. For example, if the global database name is sales.us.acme.com, a global database link of sales.us.acme.com is created and registered with an Oracle Names server. A client can then use sales.us.acme.com to perform a SELECT statement on a table, for example:
SQL> SELECT * FROM emp@sales.us.acme.com
| See Also:
Oracle9i Database Administrator's Guide for further information about how database links are used |
Unless you want to specify username and password credentials, no additional configuration is required to use the default global database link. To define a username and password for the default global database link, or create a new global database link:
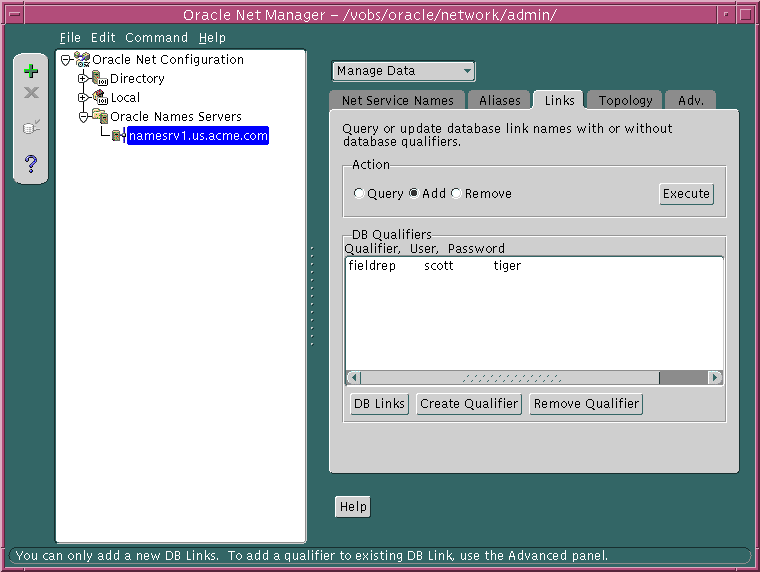
While one global database link for each database is recommended, there is no limit on the number of link qualifiers that may be added. Link qualifiers are appended to global database links to a provide alternate settings for the database username and password credentials. For example, a link qualifier of fieldrep can be appended to sales.us.acme.com. A connection to a remote database with the global database link and link qualifier would be:
SQL> SELECT * FROM emp@sales.us.acme.com@fieldrep
Link qualifiers are primarily for older Oracle database environments where multiple database links are used to get to the different schemas in the database. Rather than use multiple database links, multiple link qualifiers can be created for a database link. Multiple link qualifiers enable the global database links to comply with the GLOBAL_NAMES=true setting in the initialization parameter file. This setting checks to ensure that the global database link (between the @ signs) is the same as the global database name.
To create a global link qualifier for a global database link, use Oracle Net Manager. The Oracle Names Control utility does not support creation of link qualifiers.
The Database Qualifier dialog box appears:
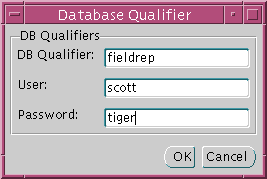
The link qualifier is added to the DB Qualifiers list box:
To verify that a global database link and link qualifier is working correctly, perform a SELECT statement on a table the user is authorized for:
SQL> SELECT * FROM  table@db_link;
SQL> SELECT * FROM  table@db_link@link_qualifier;
For example:
SQL> SELECT * FROM EMP@sales.us.acme.com;
SQL> SELECT * FROM EMP@sales.us.acme.com@fieldrep;
You can create aliases for almost any type of object stored in an Oracle Names server. An alias is an alternative name for an object. It stores the name of the object it is referencing. When a client requests a lookup of an alias, Oracle Names completes the lookup as if it was actually the entry it is the referenced. For example, an alias of db1alias can be created for an object named db1. When db1alias is used to connect to a database service, as in CONNECT scott/tiger@db1alias, it will actually resolve to and use the connect descriptor information for db1.
There are two main uses of aliases:
To create an alias, use Oracle Net Manager:
Each Oracle Names server is responsible for being able to forward a client request to:
If delegated administrative regions are configured, the upper-level administrative region must delegate subdomains to the delegated administrative regions. If domain delegation is not done, then the Oracle Names servers in the upper-level administrative region assume authority over all subdomains.
To delegate a domain, use either Oracle Net Manager or Oracle Names Control utility:
| Use Oracle Net Manager... | Use Oracle Names Control utility... |
|---|---|
|
Create and register an alias with the Oracle Names server:
Note: The protocol address cannot contain any spaces. See Also: Oracle9i Net Services Reference Guide for more information about protocol syntax needed for address information For example, to delegate domain
NAMESCTL>
|
A domain hint contains the name of the domain and at least one address of an Oracle Names server in that domain. This enables an Oracle Names server to forward the client requests to a specific address, reducing network traffic.
It is necessary for all Oracle Names servers in delegated administrative regions to be configured with a domain hint to an Oracle Names server in the root administration region. This enables an Oracle Names server to forward requests anywhere outside their own subtrees, because all name lookups can be found by forwarding through the root. If a domain hint to the root administrative region is not specified, then the local Oracle Names server will be unable to forward requests to other regions.
If you want to forward requests directly to other administrative regions, configure additional domain hints. Without additional hints, initial requests to remote regions will route through the root Oracle Names server in the region. Domain data will be cached for all regions in the forward chain by all Oracle Names servers in the forward chain. Subsequent requests may then be sent directly to the appropriate region.
To configure a domain hint, manually configure the names.ora file with the NAMES.DOMAIN_HINTS parameter. The syntax for this parameter follows:
NAMES.DOMAIN_HINTS=
 (HINT_DESC=
   (HINT_LIST=
    (HINT=(NAME=onames_server)(ADDRESS=...)))
   (DOMAIN_LIST=
    (DOMAIN=domain)))
The HINT_LIST specifies the list of Oracle Names servers to forward the initial set of queries for the domains listed in the DOMAIN_LIST. A hint contains the name and address of an Oracle Names server in the remote administrative region. The Oracle Names server caches the results of those queries in its memory. If the queries fail, the Oracle Names servers listed in the HINT_LIST will not be cached and the local Oracle Names server continues to run without information about the root administrative region. The HINT_LIST should include enough Oracle Names servers to guarantee that the local Oracle Names server can resolve the query for the root or other Oracle Names servers.
In the following example, NAMES.DOMAIN_HINTS contains a domain hint for Oracle Names server rootsvr.com that is located in the root domain of the remote administrative region. The DOMAIN parameter is left null, meaning that the hint is for the root domain.
NAMES.DOMAIN_HINTS=
 (HINT_DESC=
   (HINT_LIST=
    (HINT=
      (NAME=rootsvr.com)
      (ADDRESS=(PROTOCOL=tcp)(HOST=root-server)(PORT=1575))))
   (DOMAIN_LIST=
    (DOMAIN=)))
When the local Oracle Names server is started:
NAMES.DOMAIN_HINTS parameter. For each domain listed in the DOMAIN_LIST, it calls the Oracle Name server listed in the HINT_LIST and queries for all Oracle Names servers in the domain.The following example shows a hint to query two domains, the root domain and the us.acme.com domain, for Oracle Names servers rootsvr.com and namesvr.us.acme.com.
NAMES.DOMAIN_HINTS=
 (HINT_DESC=
   (HINT_LIST=
    (HINT=
     (NAME=rootsvr.com)
     (ADDRESS=(PROTOCOL=tcp)(HOST=root-server)(PORT=1575)))
    (HINT=
     (NAME=namesrv.us.acme.com)
     (ADDRESS=(PROTOCOL=tcp)(HOST=hr-server)(PORT=1575))))
   (DOMAIN_LIST=
    (DOMAIN=)
    (DOMAIN=us.acme.com)))
In this query, the local Oracle Names server:
HINT.us.acme.com domain, using the same addresses from the HINT descriptor.Clients can connect to the database using the following syntax:
CONNECT username/password@net_service_nameCONNECT username/password@database_service
To remove an Oracle Names server:
UNREGISTER_NS command. From the command line, enter:
namesctl
NAMESCTL> UNREGISTER_NS {onames_server}{domain}
For example, to unregister a Oracle Names server named namesrv1 in domain us.acme.com, enter the following:
NAMESCTL> UNREGISTER_NS namesrv1.us.acme.com us.acme.com
| Use Oracle Net Manager... | Use Oracle Names Control utility... |
|---|---|
|
From the command line, enter:
|
names.ora file from the $ORACLE_HOME/network/admin directory on UNIX or the ORACLE_HOME\network\admin directory on Windows NT.ckp*.ora file. By default the checkpoint files are stored in the $ORACLE_HOME/network/names directory on UNIX and the ORACLE_HOME\network\names directory on Windows NT.See Also:
|
In environments where simple connectivity is desired, host naming can eliminate the need for service name lookup in the tnsnames.ora files. However, for large or complex environments where advanced features such as connection pooling, external procedure calls, or Heterogeneous Services, which require additional connect information, are desired, host naming is not suitable. In these cases, another naming method is recommended.
The host naming method is available for TCP/IP network environments only. With host naming, clients use an alias for the service name in connect string to connect to the database.
Clients can connect to a server using host naming if the following conditions are met:
hosts file, to resolve namesTo configure the host naming method, perform these tasks:
Task 1: Configure the Listener with the Database Service Information
Task 2: Configure HOSTNAME as the First Naming Method
Task 3: Set Up Host Name Resolution Environment
You must register database service information with the listener. How this registration takes place depends upon the release of the database:
If the database can find the listener, then information about the database service is dynamically registered with the listener during service registration, including the service name. The listener is found if:
LISTENER running on TCP/IP, port 1521 is runningLOCAL_LISTENER parameter is set in the initialization fileIf the database cannot find the listener, then configure the listener.ora file with the GLOBAL_DBNAME parameter, as described in "Oracle8 Release 8.0 or Previous".
If the database is an Oracle8 release 8.0 database or Oracle7 database, then database information is registered with the listener through the listener.ora file. For these databases, statically configure the SID_LIST_listener_name section to include the GLOBAL_DBNAME parameter, as shown next:
SID_LIST_listener=
(SID_LIST=
 (SID_DESC=
  (GLOBAL_DBNAME=sales.us.acme.com)
  (SID_NAMe=db1)
  (ORACLE_HOME=/u01/app/oracle/8.0.5))
Configure host naming as the first method specified in the NAMES.DIRECTORY_PATH parameter in the sqlnet.ora file. This parameter specifies the order of naming methods Oracle Net can use to resolve connect identifiers to connect descriptors.
To specify host naming as the first naming method:
The sqlnet.ora file updates with the NAMES.DIRECTORY_PATH parameter, listing hostname first:
NAMES.DIRECTORY_PATH=(hostname, tnsnames)
The service name must be resolved through an IP address translation mechanism, such as DNS, NIS, or a centrally-maintained TCP/IP host file, /etc/hosts.
For example, if a service name of sales.us.acme.com for a database exists on a computer named sales-server, the entry in the /etc/hosts file would look like the following:
#IP address of server     host name       alias
144.25.219.146            sales-server    sales.us.acme.com
Note that the domain section of the service name must match the network domain.
Clients can connect to the database using the alias. Using the example in "Task 3: Set Up Host Name Resolution Environment", the client can use sales.us.acme.com in the connect string:
CONNECT username/password@sales.us.acme.com
If the client and server are in the same domain of us.acme.com, the client needs to enter only sales in the connect string.
External naming refers to the method of resolving a net service name, stored in a non-Oracle naming service, to a network address. External naming services include:
Organizations and corporations already using NIS as part of their systems infrastructure have the option to store net service names and addresses in NIS, using NIS external naming.
When a user gives a command such as
sqlplus scott/tiger@payroll
(where payroll is an Oracle service) NIS external naming on the node running the client program (or database server acting as a client program) contacts an NIS server located somewhere in the network, and passes the net service name to the NIS server. The NIS server resolves the net service name into a Oracle Net address and returns this address to the client program (or server acting as a client program). The client program then uses this address to connect to the Oracle database.
A computer that acts as an NIS server runs a program called ypserv, which handles name requests. The ypserv program stores different types of data in special files called maps. For example, passwords are stored in a map called passwd.byname. Oracle database service names are stored in a map called tnsnames.
When a user issues a connect string, NIS external naming uses an RPC call to contact the ypserv program and passes the Oracle net service name payroll and the name of the map--tnsnames. The ypserv program looks in the tnsnames map for the name payroll and its corresponding value, which is the address for the net service name. The address is returned to the client, and the client program (or server acting as a client program) uses this address to contact the database server.
Before configuring servers to support the NIS external naming, make sure that NIS is configured and running on the NIS servers that need to resolve Oracle database net service names. Consult your NIS documentation for specifics.
To add the tnsnames map to the existing set of NIS maps:
tnsnames.ora file, as specified in "Configuring the Local Naming Method".
tnsnames.ora file to a tnsnames map using the tns2nis program.
|
Note: The |
For example, run tns2nis on the command line with one argument:
tns2nis tnsnames.ora
The tns2nis program reads the tnsnames.ora file from the current directory. (If tnsnames.ora file is not located in the current directory, you can use a full path name to specify its location--for example, /etc/tnsnames.ora or $ORACLE_HOME/network/admin/tnsnames.ora).
The "tnsnames" map is then written into the current working directory.
tnsnames to the NIS server, if it is not already there.tnsnames map using makedbm, which is an NIS program.
The makedbm program converts the tnsnames map into two files that the NIS server can read. The location of these files is operating system specific.
For example, to generate and install a tnsnames map on the Solaris Operating System, as the root user, enter the following at the command line:
# makedbm tnsnames /var/yp/'domainname'/tnsnames
You can test the NIS server to see if the map has been installed properly by typing a command with the format:
ypmatch net_service_name tnsnames
For example, you might enter:
ypmatch payroll.com tnsnames
This returns the length of the address (in characters) followed by the address; for example:
99 (description=(address=(protocol=tcp)
 (host=garlic)(port=1999)))
 (connect_data=(service_name=dirprod)))
To configure clients, configure NIS as the first method specified in the NAMES.DIRECTORY_PATH parameter in the sqlnet.ora file. This parameter specifies the order of naming methods Oracle Net can use to resolve connect identifiers to connect descriptors.
The sqlnet.ora file updates with the NAMES.DIRECTORY_PATH parameter, listing nis first:
NAMES.DIRECTORY_PATH=(nis, hostname, tnsnames)
| See Also:
Oracle Advanced Security Administrator's Guide for instructions about how to configure Cell Directory Services (CDS) |
|
 Copyright © 2001, 2002 Oracle Corporation. All Rights Reserved. |
|

