Release 2 (9.2)
Part Number A96568-01
 Home |
 Book List |
 Contents |
 Index |
 Master Index |
 Feedback |
| Oracle9i Replication Management API Reference Release 2 (9.2) Part Number A96568-01 |
|
This chapter illustrates how to define conflict resolution methods for your replication environment. This chapter contains these topics:
Though you may take great care in designing your database and front-end application to avoid conflicts that may arise between multiple sites in a replication environment, you may not be able to completely eliminate the possibility of conflicts. One of the most important aspects of replication is to ensure data convergence at all sites participating in the replication environment.
When data conflicts occur, you need a mechanism to ensure that the conflict is resolved in accordance with your business rules and that the data converges correctly at all sites.
Advanced Replication lets you define a conflict resolution system for your database that resolves conflicts in accordance with your business rules. If you have a unique situation that Oracle's pre-built conflict resolution methods cannot resolve, then you have the option of building and using your own conflict resolution methods.
Before you begin implementing conflict resolution methods for your replicated tables, analyze the data in your system to determine where the most conflicts may occur. For example, static data such as an employee number may change very infrequently and is not subject to a high occurrence of conflicts. An employee's customer assignments, however, may change often and would therefore be prone to data conflicts.
After you have determined where the conflicts are most likely to occur, you need to determine how to resolve the conflict. For example, do you want the latest change to have precedence, or should one site have precedence over another?
As you read each of the sections describing the different conflict resolution methods, you will learn what each method is best suited for. So, read each section and then think about how your business would want to resolve any potential conflicts.
After you have identified the potential problem areas and have determined what business rules would resolve the problem, use Oracle's conflict resolution methods (or one of your own) to implement a conflict resolution system.
| See Also:
Oracle9i Replication for conceptual information about conflict resolution methods and detailed information about data convergence for each method |
The most common data conflict occurs when the same row at two or more different sites are updated at nearly the same time, or before the deferred transaction from one site was successfully propagated to the other sites.
One method to avoid update conflicts is to implement a synchronous replication environment, though this solution requires large network resource.
The other solution is to use the Oracle conflict resolution methods to deal with update conflicts that may occur when the same row receives two or more updates.
|
Creating Conflict Resolution Methods and Quiescing: The instructions in the following sections specify that you must quiesce your master group to add conflict resolution methods. However, if your master site is running Oracle release 8.1.7 or higher in a single master environment, then you may not need to quiesce the master group to add conflict resolution methods. See the "What's New in Replication?" section at the beginning of Oracle9i Replication for information about when quiesce is not required. |
The overwrite and discard methods ignore the values from either the originating or destination site and therefore can never guarantee convergence with more than one master site. These methods are designed to be used by a single master site and multiple materialized view sites, or with some form of a user-defined notification facility.
The overwrite method replaces the current value at the destination site with the new value from the originating site. Conversely, the discard method ignores the new value from the originating site.
| See Also:
"ADD_conflicttype_RESOLUTION Procedure" and Oracle9i Replication for more information about overwrite and discard |
Complete the following steps to create an overwrite or discard conflict resolution method. This example illustrates the use of the discard conflict resolution method at the master site. Therefore, in the event of a conflict, the data from a materialized view site is discarded and the master site data remains.
/************************* BEGINNING OF SCRIPT ******************************
*/

SET ECHO ON

SPOOL discard_conflictres.out

CONNECT repadmin/repadmin@orc1.world

/*
*/

BEGIN
   DBMS_REPCAT.SUSPEND_MASTER_ACTIVITY (
      gname => 'hr_repg');
END;
/

/*
DBMS_REPCAT.MAKE_COLUMN_GROUP procedure. All Oracle conflict resolution methods are based on logical column groupings called column groups.*/ BEGIN DBMS_REPCAT.MAKE_COLUMN_GROUP ( sname => 'hr', oname => 'departments', column_group => 'dep_cg', list_of_column_names => 'manager_id,location_id'); END; / /*
DBMS_REPCAT.ADD_UPDATE_RESOLUTION procedure to define the conflict resolution method for a specified table. This example creates an OVERWRITE conflict resolution method.*/ BEGIN DBMS_REPCAT.ADD_UPDATE_RESOLUTION ( sname => 'hr', oname => 'departments', column_group => 'dep_cg', sequence_no => 1, method => 'DISCARD', parameter_column_name => 'manager_id,location_id'); END; / /*
*/

BEGIN
    DBMS_REPCAT.GENERATE_REPLICATION_SUPPORT (
      sname => 'hr',
      oname => 'departments',
      type => 'TABLE',
      min_communication => TRUE);
END;
/

/*
*/

BEGIN
   DBMS_REPCAT.RESUME_MASTER_ACTIVITY (
      gname => 'hr_repg');
END;
/

SET ECHO OFF

SPOOL OFF

/************************* END OF SCRIPT **********************************/
When Advanced Replication detects a conflict with a column group and calls either the minimum or maximum value conflict resolution methods, it compares the new value from the originating site with the current value from the destination site for a designated column in the column group. You must designate this column when you define your conflict resolution method.
If the new value of the designated column is less than or greater than (depending on the method used) the current value, then the column group values from the originating site are applied at the destination site, assuming that all other errors were successfully resolved for the row. Otherwise the rows remain unchanged.
Complete the following steps to create an maximum or minimum conflict resolution method.
/************************* BEGINNING OF SCRIPT ******************************
*/

SET ECHO ON

SPOOL min_conflictres.out

CONNECT repadmin/repadmin@orc1.world

/*
*/

BEGIN
   DBMS_REPCAT.SUSPEND_MASTER_ACTIVITY (
      gname => 'hr_repg');
END;
/

/*
DBMS_REPCAT.MAKE_COLUMN_GROUP procedure. All Oracle conflict resolution methods are based on logical column groupings called column groups.*/ BEGIN DBMS_REPCAT.MAKE_COLUMN_GROUP ( sname => 'hr', oname => 'jobs', column_group => 'job_minsal_cg', list_of_column_names => 'min_salary'); END; / /*
DBMS_REPCAT.ADD_UPDATE_RESOLUTION procedure to define the conflict resolution method for a specified table. This example creates a MINIMUM conflict resolution method.*/ BEGIN DBMS_REPCAT.ADD_UPDATE_RESOLUTION ( sname => 'hr', oname => 'jobs', column_group => 'job_minsal_cg', sequence_no => 1, method => 'MINIMUM', parameter_column_name => 'min_salary'); END; / /*
*/

BEGIN
    DBMS_REPCAT.GENERATE_REPLICATION_SUPPORT (
      sname => 'hr',
      oname => 'jobs',
      type => 'TABLE',
      min_communication => TRUE);
END;
/

/*
RESUME_MASTER_ACTIVITY procedure.*/ BEGIN DBMS_REPCAT.RESUME_MASTER_ACTIVITY ( gname => 'hr_repg'); END; / SET ECHO OFF SPOOL OFF /************************* END OF SCRIPT **********************************/
The earliest timestamp and latest timestamp methods are variations on the minimum and maximum value methods. To use the timestamp method, you must designate a column in the replicated table of type DATE. When an application updates any column in a column group, the application must also update the value of the designated timestamp column with the local SYSDATE. For a change applied from another site, the timestamp value should be set to the timestamp value from the originating site.
Two elements are needed to make timestamp conflict resolution work well:
Complete the following steps to create a timestamp conflict resolution method.
/************************* BEGINNING OF SCRIPT ******************************
*/

SET ECHO ON

SPOOL timestamp_conflictres.out

CONNECT repadmin/repadmin@orc1.world

/*
*/

BEGIN
   DBMS_REPCAT.SUSPEND_MASTER_ACTIVITY (
      gname => 'hr_repg');
END;
/

/*
ALTER_MASTER_REPOBJECT procedure to apply the DDL to the target table. Simply issuing the DDL may cause the replicated object to become invalid.*/ BEGIN DBMS_REPCAT.ALTER_MASTER_REPOBJECT ( sname => 'hr', oname => 'countries', type => 'TABLE', ddl_text => 'ALTER TABLE hr.countries ADD (timestamp DATE)'); END; / /*
*/

BEGIN
    DBMS_REPCAT.GENERATE_REPLICATION_SUPPORT (
      sname => 'hr',
      oname => 'countries',
      type => 'TABLE',
      min_communication => TRUE);
END;
/

/*
DBMS_REPCAT.CREATE_MASTER_REPOBJECT procedure to create the trigger and add it to your master group.|
Note: You cannot use columns of |
*/

BEGIN
   DBMS_REPCAT.CREATE_MASTER_REPOBJECT (
      gname => 'hr_repg',
      type => 'TRIGGER',
      oname => 'insert_time',
      sname => 'hr',
      ddl_text => 'CREATE TRIGGER hr.insert_time
                      BEFORE
                         INSERT OR UPDATE ON hr.countries FOR EACH ROW
                      BEGIN
                         IF DBMS_REPUTIL.FROM_REMOTE = FALSE THEN
                            :NEW.TIMESTAMP := SYSDATE;
                         END IF;
                      END;');
END;
/

/*
DBMS_REPCAT.MAKE_COLUMN_GROUP procedure. All Oracle conflict resolution methods are based on logical column groupings called column groups.*/ BEGIN DBMS_REPCAT.MAKE_COLUMN_GROUP ( sname => 'hr', oname => 'countries', column_group => 'countries_timestamp_cg', list_of_column_names => 'country_name,region_id,timestamp'); END; / /*
DBMS_REPCAT.ADD_UPDATE_RESOLUTION procedure to define the conflict resolution method for a specified table. This example specifies the LATEST TIMESTAMP conflict resolution method using the timestamp column that you created earlier.*/ BEGIN DBMS_REPCAT.ADD_UPDATE_RESOLUTION ( sname => 'hr', oname => 'countries', column_group => 'countries_timestamp_cg', sequence_no => 1, method => 'LATEST TIMESTAMP', parameter_column_name => 'timestamp'); END; / /*
*/

BEGIN
    DBMS_REPCAT.GENERATE_REPLICATION_SUPPORT (
      sname => 'hr',
      oname => 'countries',
      type => 'TABLE',
      min_communication => TRUE);
END;
/

/*
RESUME_MASTER_ACTIVITY procedure.*/ BEGIN DBMS_REPCAT.RESUME_MASTER_ACTIVITY ( gname => 'hr_repg'); END; / SET ECHO OFF SPOOL OFF /************************* END OF SCRIPT **********************************/
The additive and average methods work with column groups consisting of a single numeric column only. Instead of "accepting" one value over another, this conflict resolution method either adds the two compared values together or takes an average of the two compared values.
Complete the following steps to create an additive or average conflict resolution method. This example averages the commission percentage for an employee in the event of a conflict.
/************************* BEGINNING OF SCRIPT ******************************
*/

SET ECHO ON

SPOOL average_conflictres.out

CONNECT repadmin/repadmin@orc1.world

/*
*/

BEGIN
   DBMS_REPCAT.SUSPEND_MASTER_ACTIVITY (
      gname => 'hr_repg');
END;
/

/*
DBMS_REPCAT.MAKE_COLUMN_GROUP procedure. All Oracle conflict resolution methods are based on logical column groupings called column groups.*/ BEGIN DBMS_REPCAT.MAKE_COLUMN_GROUP ( sname => 'hr', oname => 'employees', column_group => 'commission_average_cg', list_of_column_names => 'commission_pct'); END; / /*
DBMS_REPCAT.ADD_UPDATE_RESOLUTION procedure to define the conflict resolution method for a specified table. This example specifies the ADDITIVE conflict resolution method using the sal column.*/ BEGIN DBMS_REPCAT.ADD_UPDATE_RESOLUTION ( sname => 'hr', oname => 'employees', column_group => 'commission_average_cg', sequence_no => 1, method => 'AVERAGE', parameter_column_name => 'commission_pct'); END; / /*
*/

BEGIN
    DBMS_REPCAT.GENERATE_REPLICATION_SUPPORT (
      sname => 'hr',
      oname => 'employees',
      type => 'TABLE',
      min_communication => TRUE);
END;
/

/*
RESUME_MASTER_ACTIVITY procedure.*/ BEGIN DBMS_REPCAT.RESUME_MASTER_ACTIVITY ( gname => 'hr_repg'); END; / SET ECHO OFF SPOOL OFF /************************* END OF SCRIPT **********************************/
Priority groups allow you to assign a priority level to each possible value of a particular column. If Oracle detects a conflict, then Oracle updates the table whose "priority" column has a lower value using the data from the table with the higher priority value.
Complete the following steps to create a priority groups conflict resolution method.
/************************* BEGINNING OF SCRIPT ******************************
*/

SET ECHO ON

SPOOL priority_groups_conflictres.out

CONNECT repadmin/repadmin@orc1.world

/*
*/

BEGIN
   DBMS_REPCAT.SUSPEND_MASTER_ACTIVITY (
      gname => 'hr_repg');
END;
/

/*
job column is part of the column group for which your site priority conflict resolution mechanism is used. Use the ADD_GROUPED_COLUMN procedure to add this field to an existing column group. If you do not already have a column group, then you can create a new column group using the DBMS_REPCAT.MAKE_COLUMN_GROUP procedure.*/ BEGIN DBMS_REPCAT.MAKE_COLUMN_GROUP ( sname => 'hr', oname => 'employees', column_group => 'employees_priority_cg', list_of_column_names => 'manager_id,hire_date,salary,job_id'); END; / /*
*/

BEGIN
   DBMS_REPCAT.DEFINE_PRIORITY_GROUP (
      gname => 'hr_repg',
      pgroup => 'job_pg',
      datatype => 'VARCHAR2');
END;
/

/*
DBMS_REPCAT.ADD_PRIORITY_datatype procedure is available in several different versions. There is a version for each available datatype (NUMBER, VARCHAR2, and so on). Execute this procedure as often as necessary until you have defined a priority value for all possible table values.| See Also:
"ADD_PRIORITY_datatype Procedure" for more information |
*/

BEGIN
   DBMS_REPCAT.ADD_PRIORITY_VARCHAR2(
      gname => 'hr_repg',
      pgroup => 'job_pg',
      value => 'ad_pres',
      priority => 100);
END;
/

BEGIN
   DBMS_REPCAT.ADD_PRIORITY_VARCHAR2(
      gname => 'hr_repg',
      pgroup => 'job_pg',
      value => 'sa_man',
      priority => 80);
END;
/

BEGIN
   DBMS_REPCAT.ADD_PRIORITY_VARCHAR2(
      gname => 'hr_repg',
      pgroup => 'job_pg',
      value => 'sa_rep',
      priority => 60);
END;
/

BEGIN
   DBMS_REPCAT.ADD_PRIORITY_VARCHAR2(
      gname => 'hr_repg',
      pgroup => 'job_pg',
      value => 'pu_clerk',
      priority => 40);
END;
/

BEGIN
   DBMS_REPCAT.ADD_PRIORITY_VARCHAR2(
      gname => 'hr_repg',
      pgroup => 'job_pg',
      value => 'st_clerk',
      priority => 20);
END;
/

/*
PRIORITY GROUP resolution method to your replicated table. The following example shows that it is the second conflict resolution method for the specified column group (sequence_no parameter).*/ BEGIN DBMS_REPCAT.ADD_UPDATE_RESOLUTION ( sname => 'hr', oname => 'employees', column_group => 'employees_priority_cg', sequence_no => 2, method => 'PRIORITY GROUP', parameter_column_name => 'job_id', priority_group => 'job_pg'); END; / /*
*/

BEGIN
    DBMS_REPCAT.GENERATE_REPLICATION_SUPPORT (
      sname => 'hr',
      oname => 'employees',
      type => 'TABLE',
      min_communication => TRUE);
END;
/

/*
RESUME_MASTER_ACTIVITY procedure.*/ BEGIN DBMS_REPCAT.RESUME_MASTER_ACTIVITY ( gname => 'hr_repg'); END; / SET ECHO OFF SPOOL OFF /************************* END OF SCRIPT **********************************/
Site priority is a specialized form of a priority group. Therefore, many of the procedures associated with site priority behave similarly to the procedures associated with priority groups. Instead of resolving a conflict based on the priority of a field's value, the conflict is resolved based on the priority of the sites involved.
For example, if you assign orc2.world a higher priority value than orc1.world and a conflict arises between these two sites, then the value from orc2.world is used.
Complete the following steps to create a site priority conflict resolution method.
/************************* BEGINNING OF SCRIPT ******************************
*/

SET ECHO ON

SPOOL site_priority_conflictres.out

CONNECT repadmin/repadmin@orc1.world

/*
*/

BEGIN
   DBMS_REPCAT.SUSPEND_MASTER_ACTIVITY (
      gname => 'hr_repg');
END;
/

/*
site column to your table to store the site value. Use the DBMS_REPCAT.ALTER_MASTER_REPOBJECT procedure to apply the DDL to the target table. Simply issuing the DDL may cause the replicated object to become invalid.*/ BEGIN DBMS_REPCAT.ALTER_MASTER_REPOBJECT ( sname => 'hr', oname => 'regions', type => 'TABLE', ddl_text => 'ALTER TABLE hr.regions ADD (site VARCHAR2(20))'); END; / /*
*/

BEGIN
    DBMS_REPCAT.GENERATE_REPLICATION_SUPPORT (
      sname => 'hr',
      oname => 'regions',
      type => 'TABLE',
      min_communication => TRUE);
END;
/

/*
DBMS_REPCAT.CREATE_MASTER_REPOBJECT procedure to create the trigger and add it to your master group.*/ BEGIN DBMS_REPCAT.CREATE_MASTER_REPOBJECT ( gname => 'hr_repg', type => 'TRIGGER', oname => 'insert_site', sname => 'hr', ddl_text => 'CREATE TRIGGER hr.insert_site BEFORE INSERT OR UPDATE ON hr.regions FOR EACH ROW BEGIN IF DBMS_REPUTIL.FROM_REMOTE = FALSE THEN SELECT global_name INTO :NEW.SITE FROM GLOBAL_NAME; END IF; END;'); END; / /*
ADD_GROUPED_COLUMN procedure to add this column to an existing column group. If you do not already have a column group, then you can create a new column group using the DBMS_REPCAT.MAKE_COLUMN_GROUP procedure.*/ BEGIN DBMS_REPCAT.MAKE_COLUMN_GROUP ( sname => 'hr', oname => 'regions', column_group => 'regions_sitepriority_cg', list_of_column_names => 'region_id,region_name,site'); END; / /*
*/

BEGIN
   DBMS_REPCAT.DEFINE_SITE_PRIORITY (
      gname => 'hr_repg',
      name => 'regions_sitepriority_pg');
END;
/

/*
DBMS_REPCAT.ADD_SITE_PRIORITY_SITE procedure. Execute this procedure as often as necessary until you have defined a site priority value for each of the sites in our replication environment.*/ BEGIN DBMS_REPCAT.ADD_SITE_PRIORITY_SITE ( gname => 'hr_repg', name => 'regions_sitepriority_pg', site => 'orc1.world', priority => 100); END; / BEGIN DBMS_REPCAT.ADD_SITE_PRIORITY_SITE ( gname => 'hr_repg', name => 'regions_sitepriority_pg', site => 'orc2.world', priority => 50); END; / BEGIN DBMS_REPCAT.ADD_SITE_PRIORITY_SITE ( gname => 'hr_repg', name => 'regions_sitepriority_pg', site => 'orc3.world', priority => 25); END; / /*
SITE PRIORITY resolution method to your replicated table. The following example shows that it is the third conflict resolution method for the specified column group (sequence_no parameter).*/ BEGIN DBMS_REPCAT.ADD_UPDATE_RESOLUTION ( sname => 'hr', oname => 'regions', column_group => 'regions_sitepriority_cg', sequence_no => 1, method => 'SITE PRIORITY', parameter_column_name => 'site', priority_group => 'regions_sitepriority_pg'); END; / /*
*/

BEGIN
    DBMS_REPCAT.GENERATE_REPLICATION_SUPPORT (
      sname => 'hr',
      oname => 'regions',
      type => 'TABLE',
      min_communication => TRUE);
END;
/

/*
RESUME_MASTER_ACTIVITY procedure.*/ BEGIN DBMS_REPCAT.RESUME_MASTER_ACTIVITY ( gname => 'hr_repg'); END; / SET ECHO OFF SPOOL OFF /************************* END OF SCRIPT **********************************/
In a replication environment, you may have situations where you encounter a conflict on a unique constraint, often resulting from an insert. If your business rules allow you to delete the duplicate row, then you can define a resolution method with Oracle's pre-built conflict resolution methods.
More often, however, you probably want to modify the conflicting value so that it no longer violates the unique constraint. Modifying the conflicting value ensures that you do not lose important data. Oracle's pre-built uniqueness conflict resolution method can make the conflicting value unique by appending a site name or a sequence number to the value.
An additional component that accompanies the uniqueness conflict resolution method is a notification facility. The conflicting information is modified by Oracle so that it can be inserted into the table, but you should be notified so that you can analyze the conflict to determine whether the record should be deleted, or the data merged into another record, or a completely new value be defined for the conflicting data.
A uniqueness conflict resolution method detects and resolves conflicts encountered on columns with a UNIQUE constraint. The example in this section uses the employees table in the hr sample schema, which has the unique constraint emp_email_uk on the email column.
|
Note: To add unique conflict resolution method for a column, the name of the unique index on the column must match the name of the unique or primary key constraint. |
Complete the following steps to create a uniqueness conflict resolution method.
/************************* BEGINNING OF SCRIPT ******************************
*/

SET ECHO ON

SPOOL unique_conflictres.out

CONNECT repadmin/repadmin@orc1.world

/*
*/

BEGIN
   DBMS_REPCAT.SUSPEND_MASTER_ACTIVITY (
      gname => 'hr_repg');
END;
/

/*
conf_report.*/ BEGIN DBMS_REPCAT.EXECUTE_DDL ( gname => 'hr_repg', ddl_text => 'CREATE TABLE hr.conf_report ( line NUMBER(2), txt VARCHAR2(80), timestamp DATE, table_name VARCHAR2(30), table_owner VARCHAR2(30), conflict_type VARCHAR2(7))'); END; / /*
*/

CONNECT hr/hr@orc1.world

/*
conf_report table when a conflict is detected. In this example, the package name is notify.| See Also:
Appendix B, "User-Defined Conflict Resolution Methods" describes the conflict resolution notification package that is created in this script |
*/

CREATE OR REPLACE PACKAGE notify AS
   FUNCTION emp_unique_violation (email IN OUT VARCHAR2,
      discard_new_values IN OUT BOOLEAN)
   RETURN BOOLEAN;
END notify;
/

CREATE OR REPLACE PACKAGE BODY notify AS
   TYPE message_table IS TABLE OF VARCHAR2(80) INDEX BY BINARY_INTEGER;
   PROCEDURE report_conflict(conflict_report IN MESSAGE_TABLE,
      report_length IN NUMBER,
      conflict_time IN DATE,
      conflict_table IN VARCHAR2,
      table_owner IN VARCHAR2,
      conflict_type IN VARCHAR2) IS
      BEGIN
         FOR idx IN 1..report_length LOOP
            BEGIN
              INSERT INTO hr.conf_report
              (line, txt, timestamp, table_name, table_owner, conflict_type)
              VALUES (idx, SUBSTR(conflict_report(idx),1,80), conflict_time,
              conflict_table, table_owner, conflict_type);
            EXCEPTION WHEN others THEN NULL;
            END;
         END LOOP;
      END report_conflict;
   FUNCTION emp_unique_violation(email IN OUT VARCHAR2,
      discard_new_values IN OUT BOOLEAN)
   RETURN BOOLEAN IS
      local_node VARCHAR2(128);
      conf_report MESSAGE_TABLE;
      conf_time DATE := SYSDATE;
   BEGIN
      BEGIN
         SELECT global_name INTO local_node FROM global_name;
      EXCEPTION WHEN others THEN local_node := '?';
      END;
      conf_report(1) := 'UNIQUENESS CONFLICT DETECTED IN EMPLOYEES ON ' ||
         TO_CHAR(conf_time, 'MM-DD-YYYY HH24:MI:SS');
      conf_report(2) := ' AT NODE ' || local_node;
      conf_report(3) := 'ATTEMPTING TO RESOLVE CONFLICT USING' ||
         ' APPEND SITE NAME METHOD';
      conf_report(4) := 'EMAIL: ' || email;
      conf_report(5) := NULL;
      report_conflict(conf_report,5,conf_time,'employees','hr','UNIQUE');
      discard_new_values := FALSE;
      RETURN FALSE;
   END emp_unique_violation;
END notify;
/

/*
*/

CONNECT repadmin/repadmin@orc1.world

/*
*/

BEGIN
   DBMS_REPCAT.CREATE_MASTER_REPOBJECT (
      gname => 'hr_repg',
      type =>  'PACKAGE',
      oname => 'notify',
      sname => 'hr');
END;
/

BEGIN
   DBMS_REPCAT.CREATE_MASTER_REPOBJECT (
      gname => 'hr_repg',
      type =>  'PACKAGE BODY',
      oname => 'notify',
      sname => 'hr');
END;
/

/*
USER FUNCTION.*/ BEGIN DBMS_REPCAT.ADD_UNIQUE_RESOLUTION( sname => 'hr', oname => 'employees', constraint_name => 'emp_email_uk', sequence_no => 1, method => 'USER FUNCTION', comment => 'Notify DBA', parameter_column_name => 'email', function_name => 'hr.notify.emp_unique_violation'); END; / /*
APPEND SITE NAME uniqueness conflict resolution method to your replicated table.*/ BEGIN DBMS_REPCAT.ADD_UNIQUE_RESOLUTION( sname => 'hr', oname => 'employees', constraint_name => 'emp_email_uk', sequence_no => 2, method => 'APPEND SITE NAME', parameter_column_name => 'email'); END; / /*
*/

BEGIN
    DBMS_REPCAT.GENERATE_REPLICATION_SUPPORT (
      sname => 'hr',
      oname => 'employees',
      type => 'TABLE',
      min_communication => TRUE);
END;
/

/*
RESUME_MASTER_ACTIVITY procedure.*/ BEGIN DBMS_REPCAT.RESUME_MASTER_ACTIVITY ( gname => 'hr_repg'); END; / SET ECHO OFF SPOOL OFF /************************* END OF SCRIPT **********************************/
Unlike update conflicts, where there are two values to compare, simply deleting a row makes the update conflict resolution methods described in the previous section ineffective because only one value would exist.
The best way to deal with deleting rows in a replication environment is to avoid the conflict by marking a row for deletion and periodically purging the table of all marked records. Because you are not physically removing this row, your data can converge at all master sites if a conflict arises because you still have two values to compare, assuming that no other errors have occurred. After you are sure that your data has converged, you can purge marked rows using a replicated purge procedure.
When developing the front-end application for your database, you probably want to filter out the rows that have been marked for deletion, because doing so makes it appear to your users as though the row was physically deleted. Simply exclude the rows that have been marked for deletion in the SELECT statement for your data set.
For example, a select statement for a current employee listing might be similar to the following:
SELECT * FROM hr.locations WHERE remove_date IS NULL;
This section describes how to prepare your replicated table to avoid delete conflicts. You also learn how to use procedural replication to purge those records that have been marked for deletion.
Complete the following steps to create a conflict avoidance method for delete conflicts.
/************************* BEGINNING OF SCRIPT ******************************
*/

SET ECHO ON

SPOOL delete_conflictres.out

CONNECT repadmin/repadmin@orc1.world

/*
*/

BEGIN
   DBMS_REPCAT.SUSPEND_MASTER_ACTIVITY (
      gname => 'hr_repg');
END;
/

/*
DATE datatype. Use the DBMS_REPCAT.ALTER_MASTER_REPOBJECT procedure to add the remove_date column to your existing replicated table.*/ BEGIN DBMS_REPCAT.ALTER_MASTER_REPOBJECT ( sname => 'hr', oname => 'locations', type => 'TABLE', ddl_text => 'ALTER TABLE hr.locations ADD (remove_date DATE)'); END; / /*
*/

BEGIN
    DBMS_REPCAT.GENERATE_REPLICATION_SUPPORT (
      sname => 'hr',
      oname => 'locations',
      type => 'TABLE',
      min_communication => TRUE);
END;
/

/*
*/

BEGIN
   DBMS_REPCAT.CREATE_MASTER_REPOBJECT (
      gname => 'hr_repg',
      type => 'PACKAGE',
      oname => 'purge',
      sname => 'hr',
      ddl_text => 'CREATE OR REPLACE PACKAGE hr.purge AS
                      PROCEDURE remove_locations(purge_date DATE);
                   END;');
END;
/

BEGIN
   DBMS_REPCAT.CREATE_MASTER_REPOBJECT (
      gname => 'hr_repg',
      type => 'PACKAGE BODY',
      oname => 'purge',
      sname => 'hr',
      ddl_text => 'CREATE OR REPLACE PACKAGE BODY hr.purge AS
                      PROCEDURE remove_locations(purge_date IN DATE) IS
                      BEGIN
                         DBMS_REPUTIL.REPLICATION_OFF;
                         LOCK TABLE hr.locations IN EXCLUSIVE MODE;
                         DELETE hr.locations WHERE remove_date IS NOT NULL
                            AND remove_date < purge_date;
                         DBMS_REPUTIL.REPLICATION_ON;
                      EXCEPTION WHEN others THEN
                         DBMS_REPUTIL.REPLICATION_ON;
                      END;
                   END;');
END;
/

/*
defer_purge.remove_locations.*/ BEGIN DBMS_REPCAT.GENERATE_REPLICATION_SUPPORT ( sname => 'hr', oname => 'purge', type => 'PACKAGE', min_communication => TRUE); END; / BEGIN DBMS_REPCAT.GENERATE_REPLICATION_SUPPORT ( sname => 'hr', oname => 'purge', type => 'PACKAGE BODY', min_communication => TRUE); END; / /*
DO_DEFERRED_REPCAT_ADMIN procedure in the DBMS_REPCAT package several times, because some administrative operations have multiple steps. The following is an example:BEGIN DBMS_REPCAT.DO_DEFERRED_REPCAT_ADMIN ( gname => 'hr_repg', all_sites => FALSE); END; / */ PAUSE Press <RETURN> to continue when you have verified that there are no pending administrative requests in the DBA_REPCATLOG data dictionary view. /*
RESUME_MASTER_ACTIVITY procedure.*/ BEGIN DBMS_REPCAT.RESUME_MASTER_ACTIVITY ( gname => 'hr_repg'); END; / SET ECHO OFF SPOOL OFF /************************* END OF SCRIPT **********************************/
This section describes a more advanced method of designing your applications to avoid conflicts. This method, known as token passing, is similar to the workflow method described below. Although this section describes how to use this method to control the ownership of an entire row, you can use a modified form of this method to control ownership of the individual column groups within a row.
Both workflow and token passing allow dynamic ownership of data. With dynamic ownership, only one site at a time is allowed to update a row, but ownership of the row can be passed from site to site. Both workflow and token passing use the value of one or more "identifier" columns to determine who is currently allowed to update the row.
With workflow partitioning, you can think of data ownership as being "pushed" from site to site. Only the current owner of the row is allowed to push the ownership of the row to another site, by changing the value of the "identifier" columns.
Take the simple example of separate sites for ordering, shipping, and billing. Here, the identifier columns are used to indicate the status of an order. The status determines which site can update the row. After a user at the ordering site has entered the order, the user updates the status of this row to ship. Users at the ordering site are no longer allowed to modify this row -- ownership has been pushed to the shipping site.
After shipping the order, the user at the shipping site updates the status of this row to bill, thus pushing ownership to the billing site, and so on.
To successfully avoid conflicts, applications implementing dynamic data ownership must ensure that the following conditions are met:
With workflow partitioning, only the current owner of the row can push the ownership of the row to the next site by updating the "identifier" columns. No site is given ownership unless another site has given up ownership; thus ensuring there is never more than one owner.
Because the flow of work is ordered, ordering conflicts can be resolved by applying the change from the site that occurs latest in the flow of work. Any ordering conflicts can be resolved using a form of the priority conflict resolution method, where the priority value increases with each step in the work flow process. The priority conflict resolution method successfully converges for more than one master site as long as the priority value is always increasing.
Token passing uses a more generalized approach to meeting these criteria. To implement token passing, instead of the "identifier" columns, your replicated tables must have owner and epoch columns. The owner column stores the global database name of the site currently believed to own the row.
Once you have designed a token passing mechanism, you can use it to implement a variety of forms of dynamic partitioning of data ownership, including workflow.
You should design your application to implement token passing for you automatically. You should not allow the owner or epoch columns to be updated outside this application.
Whenever you attempt to update a row, your application should:
For example, Figure 6-1 illustrates how ownership of employee 100 passes from the acct_sf database to the acct_ny database.
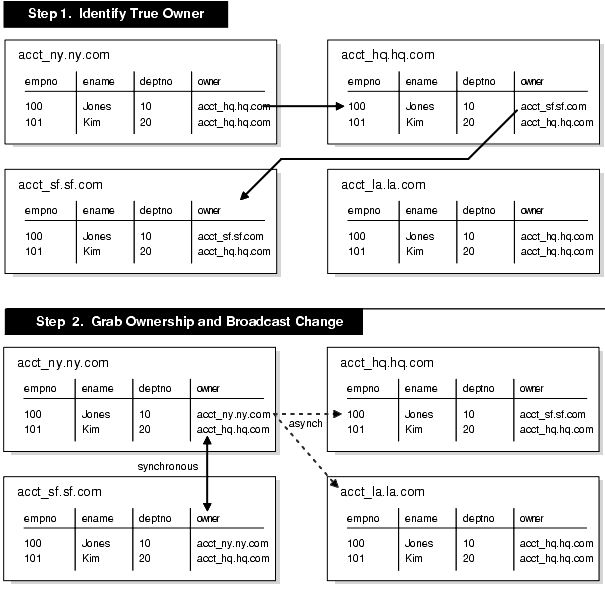
Text description of the illustration repma009.gif
To obtain ownership, the acct_ny database uses a simple recursive algorithm to locate the owner of the row. The sample code for this algorithm is shown below:
-- Sample code for locating the token owner.
-- This is for a table TABLE_NAME with primary key PK.
-- Initial call should initialize loc_epoch to 0 and loc_owner
-- to the local global name.
get_owner(PK IN primary_key_type, loc_epoch IN OUT NUMBER,
          loc_owner IN OUT VARCHAR2)
{
  -- use dynamic SQL (dbms_sql) to perform a select similar to
  -- the following:
  SELECT owner, epoch into rmt_owner, rmt_epoch
     FROM TABLE_NAME@loc_owner
     WHERE primary_key = PK FOR UPDATE;
  IF rmt_owner = loc_owner AND rmt_epoch >= loc_epoch THEN
   loc_owner := rmt_owner;
   loc_epoch := rmt_epoch;
   RETURN;
  ELSIF rmt_epoch >= loc_epoch THEN
   get_owner(PK, rmt_epoch, rmt_owner);
   loc_owner := rmt_owner;
   loc_epoch := rmt_epoch;
   RETURN;
  ELSE
   raise_application_error(-20000, 'No owner for row');
  END IF;
}
After locating the owner of the row, the acct_ny site gets ownership from the acct_sf site by completing the following steps:
sf site to prevent any changes from occurring while ownership is being exchanged.sf and ny sites. This operation ensures that only one site considers itself to be the owner at all times. The update at the sf site should not be replicated using DBMS_REPUTIL.REPLICATION_OFF. The replicated change of ownership at the ny site in Step 4 will ultimately be propagated to all other sites in the replication environment, including the sf site, where it will have no effect.ny, with the information from the current owner site, sf. This data is guaranteed to be the most recent. This time, the change at the ny site should not be replicated. Any queued changes to this data at the sf site are propagated to all other sites in the usual manner. When the sf change is propagated to ny, it is ignored because of the values of the epoch numbers, as described in the next bullet point.When the sf changes (that were in the deferred queue in Step 2 above) are ultimately propagated to the ny site, the ny site ignores them because they have a lower epoch number than the epoch number at the ny site for the same data.
As another example, suppose the hq site received the sf changes after receiving the ny changes, the hq site would ignore the sf changes because the changes applied from the ny site would have the greater epoch number.
You should design your application to implement this method of token passing for you automatically whenever you perform an update. You should not allow the owner or epoch columns to be updated outside this application. The lock that you grab when you change ownership is released when you apply your actual update. The changed information, along with the updated owner and epoch information, are asynchronously propagated to the other sites in the usual manner.
Whenever Oracle detects and successfully resolves an update, delete, or uniqueness conflict, you can view information about what method was used to resolve the conflict by querying the ALL_REPRESOLUTION_STATISTICS data dictionary view. This view is updated only if you have enabled conflict resolution statistics gathering for the table involved in the conflict.
| See Also:
The |
Use the REGISTER_STATISTICS procedure in the DBMS_REPCAT package to collect information about the successful resolution of update, delete, and uniqueness conflicts for a table. The following example gathers statistics for the employees table in the hr schema:
BEGIN
    DBMS_REPCAT.REGISTER_STATISTICS (
      sname => 'hr',
      oname => 'employees');
END;
/
After calling REGISTER_STATISTICS for a table, each conflict that is successfully resolved for that table is logged in the ALL_REPRESOLUTION_STATISTICS data dictionary view. Information about unresolved conflicts is always logged in the DEFERROR view, whether the object is registered or not.
| See Also:
The |
Use the CANCEL_STATISTICS procedure in the DBMS_REPCAT package if you no longer want to collect information about the successful resolution of update, delete, and uniqueness conflicts for a table. The following example cancels statistics gathering on the employees table in the hr schema:
BEGIN
    DBMS_REPCAT.CANCEL_STATISTICS (
      sname => 'hr',
      oname => 'employees');
END;
/
If you registered a table to log information about the successful resolution of update, delete, and uniqueness conflicts, then you can remove this information from the DBA_REPRESOLUTION_STATISTICS data dictionary view by calling the PURGE_STATISTICS procedure in the DBMS_REPCAT package.
The following example purges the statistics gathered about conflicts resolved due to inserts, updates, and deletes on the employees table between January 1 and March 31:
BEGIN
    DBMS_REPCAT.PURGE_STATISTICS (
      sname  => 'hr',
      oname  => 'employees',
      start_date => '01-JAN-2001',
      end_date => '31-MAR-2001');
END;
/
|
 Copyright © 1996, 2002 Oracle Corporation. All Rights Reserved. |
|

