A
Installing the Discoverer tutorial EUL, data, and workbook
Installing the Discoverer tutorial EUL, data, and workbook
This section explains how to install the Discoverer tutorial EUL, data, and workbook so that you can do the Discoverer Administrator Tutorial. This procedure also installs the Video Tutorial Workbook, which is used in the Discoverer Plus Tutorial.
This section contains the following topics:
What must exist in the database before Discoverer Administrator tutorial users can start using the tutorial lessons?
Before Discoverer Administrator tutorial users can start using the tutorial lessons, the following must exist in the database:
- an End User Layer (EUL)
- the VIDEO5 database user
- the VIDEO5 data
Note: When you use Discoverer Administrator for the first time, the VIDEO5 database user might not exist. If the VIDEO5 database user does not exist, you can create it when you install the tutorial (for more information, see "How to install the Discoverer tutorial").
What happens when you install the Discoverer tutorial EUL, data, and workbook?
When you install the Discoverer EUL, data, and workbook Discoverer Administrator does the following:
- creates a new database user with a name that you specify (this user will own the EUL)
- creates a new EUL
- if the VIDEO5 database user does not already exist, Discoverer:
- creates a new database user called VIDEO5
- creates tutorial tables in the VIDEO5 database user's tablespace
- populates the tutorial tables with tutorial data
- populates the new EUL with metadata about the VIDEO5 tables (i.e. it imports the tutorial business area from the file vidstr.eex, located in the \demo directory)
The following figure illustrates events that can occur when you install the tutorial.
Figure A-1 Events that can occur when you install the tutorial
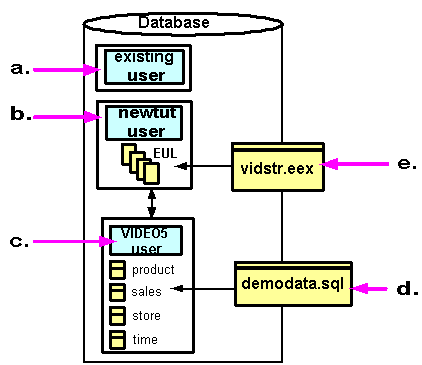
Text description of the illustration tutdiag.gif
Key to the above figure:
- Connect to Discoverer Administrator as an existing database user with sufficient privileges to install the tutorial (for more information, see "What privileges do you need to install the tutorial data?").
- Create an EUL for a new database user.
- If you choose to install the tutorial data in the EUL, Discoverer Administrator creates the VIDEO5 user (if not already created).
- Discoverer Administrator creates the VIDEO5 user tables (e.g. Product, Sales Fact, Store, Time) and populates them with data from the file demodata.sql (located in the \demo directory).
- Discoverer Administrator populates the EUL for the new database user with metadata about the video stores tutorial business area from the file vidstr.eex.
Note: If you are using a non-Oracle database, you must create the VIDEO5 database user in the database before installing the tutorial.
The choices you can make when you install the tutorial are illustrated in the figure below:
Figure A-2 Flow chart of the choices you can make when you install the Discoverer tutorial
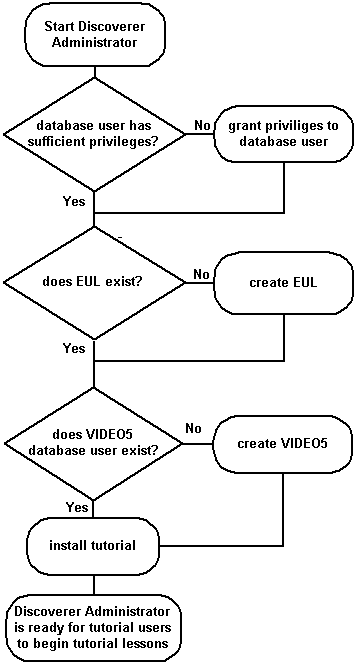
Text description of the illustration flow.gif
What privileges do you need to install the tutorial data?
To install the tutorial data in the current EUL, the database user that you use to connect to Discoverer Administrator must have a number of database privileges:
- CREATE TABLE
- CREATE VIEW
- CREATE PROCEDURE
Hint: You can grant the above privileges to the database user by running the script <ORACLE_HOME>\discoverer\util\eulasm.sql.
What conditions apply when you connect to Discoverer Administrator for the first time?
When you connect to Discoverer Administrator for the first time the following conditions apply:
When the VIDEO5 database user does not exist, you must create it and populate the VIDEO5 tables with tutorial data before you can begin the tutorial lessons. For more information, see "What happens when you install the Discoverer tutorial EUL, data, and workbook?".
Why must you create an EUL?
You must create an EUL (if an EUL does not already exist) to enable you to:
- install the Discoverer tutorial
- create the VIDEO5 user and populate the VIDEO5 tables with data
- complete the Discoverer Administrator tutorial
Installing the tutorial into an EUL makes the tutorial data available to all users who have access privileges to that EUL.
What steps do I follow to install the Discoverer tutorial EUL, data, and workbook?
To install the Discoverer tutorial EUL, data and workbook, follow these steps:
- Create a private EUL - see "How to create a private EUL for the tutorial".
- Install the Discoverer tutorial data into the private EUL that you have just created - see "How to install the Discoverer tutorial".
- Make sure that the VIDEO5 user has the necessary privileges to access the tutorial EUL - see "How to grant access privileges to the VIDEO5 database user for the tutorial EUL".
How to create a private EUL for the tutorial
You must create an EUL if one does not already exist. To create the tutorial EUL, you must connect to Discoverer as a database user with sufficient privileges (for more information, see "What privileges do you need to install the tutorial data?") and create an EUL for a new database user.
To create the tutorial EUL:
- Choose Programs | Oracle Developer Suite - <HOME_NAME> | Discoverer Administrator from the Windows Start menu to display the Connect dialog.
Figure A-3 Connect dialog
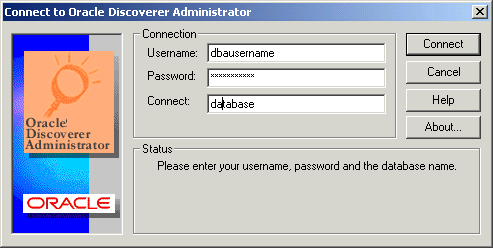
Text description of the illustration conndba.gif
- Enter a database username with sufficient privileges (e.g. a DBA user).
For more information, see "What privileges do you need to install the tutorial data?".
- Enter the password.
- In the Connect field:
- Click Connect.
Discoverer Administrator behaves differently depending on whether an EUL has already been created for the database user you use to connect with.
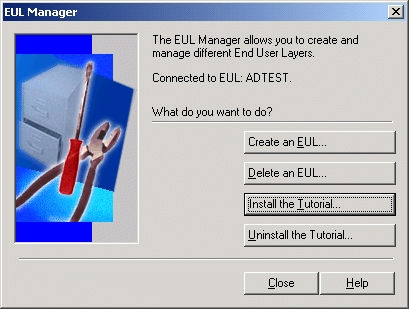
If no EUL exists, Discoverer Administrator displays a message asking Do you want to create an EUL now?
- Click Yes to display the EUL Manager dialog.
Hint: If one or more EULs already exist, Discoverer Administrator displays the Load Wizard. Click Cancel in the Load Wizard and choose Tools | EUL Manager to display the EUL Manager dialog.
Figure A-4 EUL Manager dialog
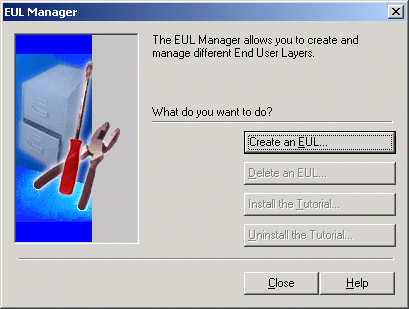
Text description of the illustration eulmgr.gif
- Click Create an EUL to display the Create EUL Wizard dialog.
Figure A-5 Create EUL Wizard dialog
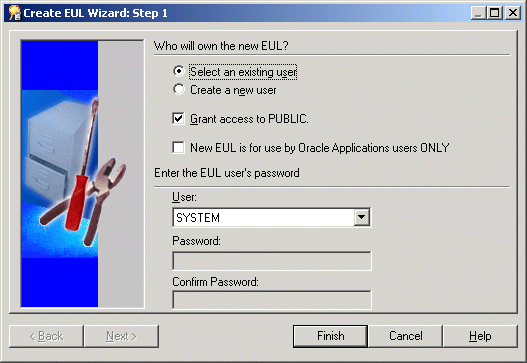
Text description of the illustration eulwz1.gif
Use this wizard to create an EUL and a new database user. You need to create the new EUL and database user before you can install the tutorial data into the VIDEO5 user.
- Select the Create a new user radio button.
- Clear the following check boxes:
- Grant EUL access to PUBLIC check box
- New EUL is for use by Oracle Applications users ONLY check box
- Enter a name for the new database user in the User field.
You can use any name for the new database user. For example, you might enter 'TUTEUL' to identify the tutorial user.
- Enter a password into both the Password and Confirm Password fields.
Hint: You could use same username that you entered in the previous step in both the Password and Confirm Password fields.
- Make sure that the Create EUL Wizard displays the settings for radio buttons and check boxes as shown below.
Figure A-6 Create EUL Wizard dialog
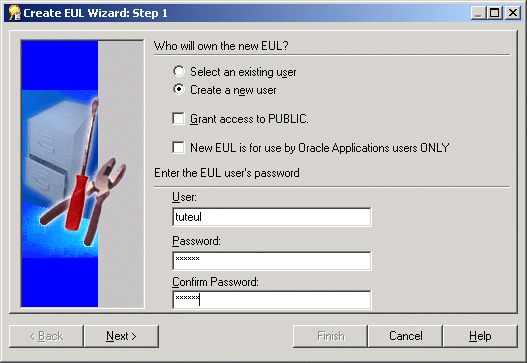
Text description of the illustration eulwz101.gif
- Click Next to display the Create EUL Wizard: Step 2 dialog.
Figure A-7 Create EUL Wizard: Step 2 dialog

Text description of the illustration eulwz2.gif
- Select the default and temporary tablespaces.
For example, select USR as the default tablespace and TEMP as the temporary tablespace.
Figure A-8 Create EUL Wizard: Step 2 dialog
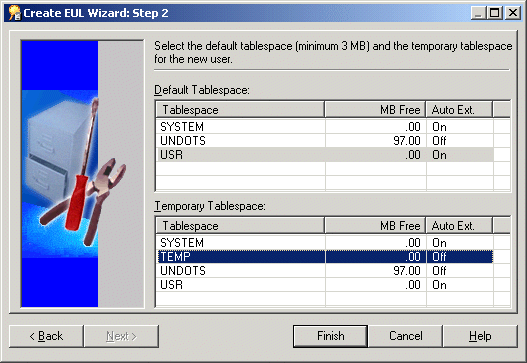
Text description of the illustration eulwiz2.gif
- Click Finish for Discoverer Administrator to build the EUL
Discoverer Administrator displays a progress bar.
Figure A-9 Creating EUL progress bar
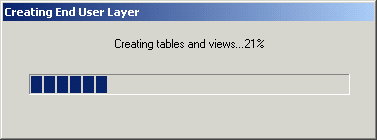
Text description of the illustration eulprog.gif
Once Discoverer Administrator has created the new EUL Discoverer Administrator displays a message that the EUL has been created successfully.
Figure A-10 EUL created successfully dialog
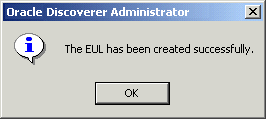
Text description of the illustration eulsuc.gif
- Click OK.
You have just created the first EUL and you must now install the tutorial.
Figure A-11 Do you want to install the tutorial data? dialog
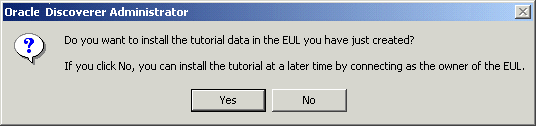
Text description of the illustration instut.gif
- Click Yes to display the Install Tutorial dialog.
Figure A-12 Install Tutorial dialog
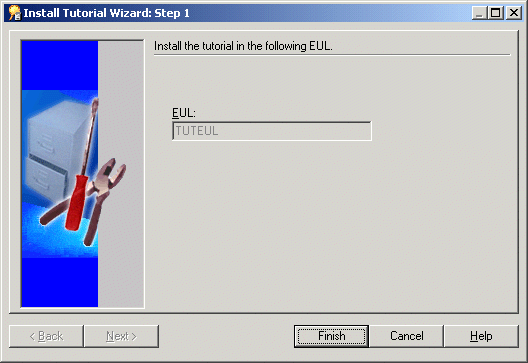
Text description of the illustration instep1.gif
- Complete the steps in the following section "How to install the Discoverer tutorial".
How to install the Discoverer tutorial
Having created a private EUL for the tutorial, you can install the Discoverer tutorial into the private EUL (for more information, see "How to create a private EUL for the tutorial").
How you install the Discoverer tutorial depends on when you decide to install the tutorial:
- to install the Discoverer tutorial immediately after creating the tutorial EUL, start at step 5 of the following procedure
- to install the Discoverer tutorial into an existing EUL, start at step 1 of the following procedure
- Connect to Discoverer Administrator as the owner of the EUL that you want to contain the tutorial business area (for more information, see Chapter , "Exercise 1: Connecting to Discoverer Administrator").
Note: Make sure that the database user you connect with has sufficient privileges to install the tutorial (for more information, see "What privileges do you need to install the tutorial data?")
Discoverer Administrator displays the Load Wizard.
Figure A-13 Load Wizard dialog
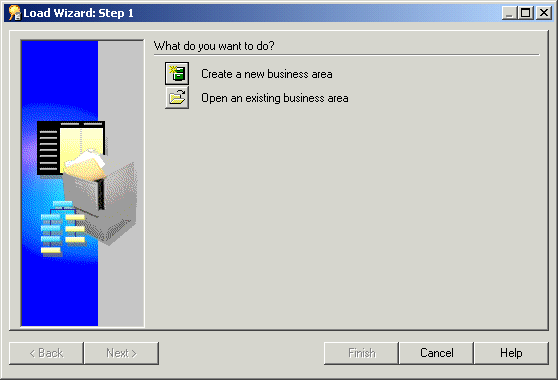
Text description of the illustration lw1a.gif
- Click Cancel to close the Load Wizard.
- Choose Tools | EUL Manager to display the EUL Manager dialog.
Figure A-14 EUL Manager dialog
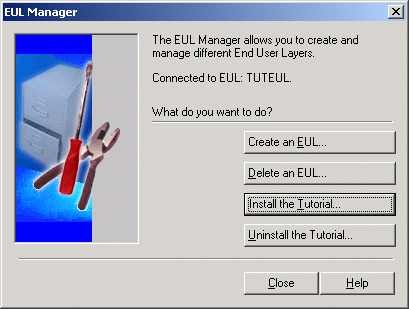
Text description of the illustration eulmgr1.gif
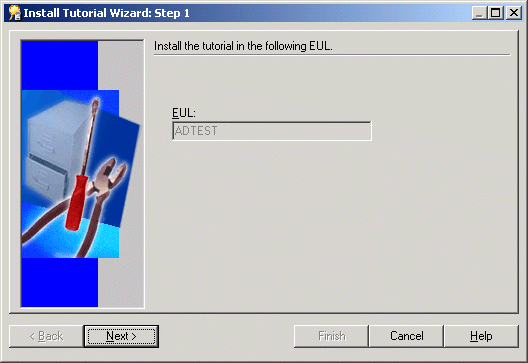
- Click Install the Tutorial to display the Install Tutorial Wizard: Step 1 dialog.
Figure A-15 Install Tutorial Wizard: Step 1 dialog
Text description of the illustration instep1.gif
Note that the EUL displayed in the EUL field is the EUL into which Discoverer Administrator imports the tutorial business area.
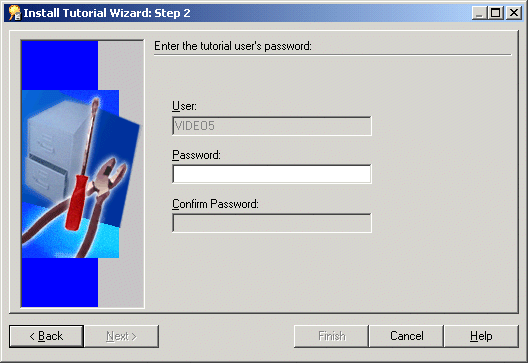
- Click Next to display the Install Tutorial Wizard: Step 2 dialog.
Figure A-16 Install Tutorial Wizard: Step 2 dialog
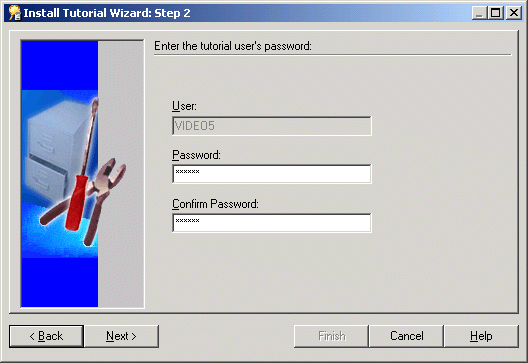
Text description of the illustration instep2.gif
- Type
VIDEO5 in both the Password and Confirm Password fields.
Note: You will use the password VIDEO5 if you uninstall or reinstall the tutorial.
Note: If you are using a non-Oracle database, create the VIDEO5 user in the database and restart the Install Tutorial Wizard.
Note: You may want to use a different password to the one given above.
- Click Next to display the Install Tutorial Wizard: Step 3 dialog where you specify the default and temporary tablespaces for the VIDEO5 database user.
Figure A-17 Install Tutorial Wizard: Step 3 dialog
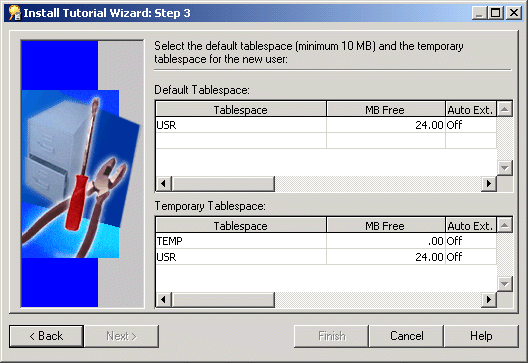
Text description of the illustration instep3.gif
Note: If you are not creating VIDEO5 as a new database user, Discoverer Administrator does not display the Install Tutorial Wizard: Step 3 dialog.
- Choose a default and temporary tablespace.
For example, select USR as the default tablespace and TMP as the temporary tablespace.
Figure A-18 Install Tutorial Wizard: Step 3 dialog
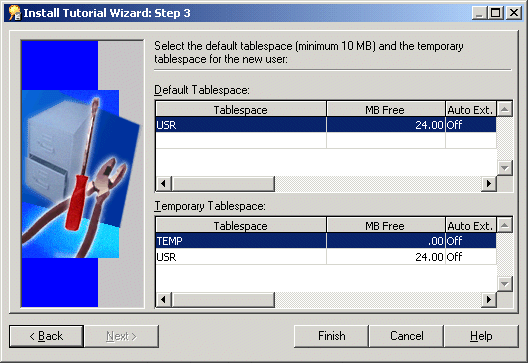
Text description of the illustration instep3s.gif
- Click Finish, Discoverer Administrator displays the Commit Status dialog.
Figure A-19 Commit Status message dialog
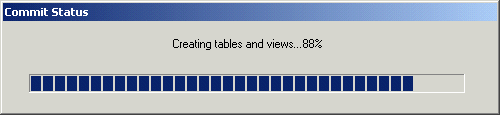
Text description of the illustration insprog.gif
Discoverer Administrator populates the VIDEO5 database user tables with default data using the file demodata.sql (located in the \demo directory) and imports the video stores tutorial business area into the new EUL using the file vidstr.eex (located in the \demo directory).
When the process is complete, Discoverer Administrator displays a dialog indicating that the tutorial data has been successfully installed.
Figure A-20 Tutorial successfully installed dialog
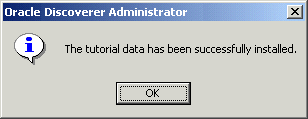
Text description of the illustration tutsuc.gif
- Click OK.
Discoverer displays the following dialog.
Figure A-21 Connect as the EUL owner?
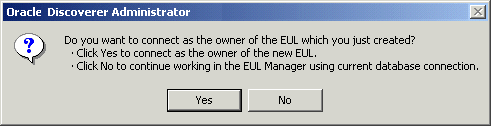
Text description of the illustration coneul.gif
- Click No to display the EUL Manager dialog.
Figure A-22 EUL Manager dialog
Text description of the illustration eulmgr.gif
- Click Close to close the EUL Manager dialog.
You have just completed the following tasks:
- created the VIDEO5 database user
- populated the VIDEO5 tables with data
- imported the tutorial business area into the new EUL
Discoverer Administrator is now correctly configured so that tutorial users can complete the tutorial lessons described in the following chapters.
How to grant access privileges to the VIDEO5 database user for the tutorial EUL
Now that you have created a private EUL and installed the Discoverer tutorial data, you must make sure that the VIDEO5 database user has access to the tutorial EUL. This enables Discoverer end users connecting to Discoverer as the VIDEO5 database user to access the tutorial data, EUL, and workbook.
To make sure that the VIDEO5 database user has access to the tutorial EUL:
- Connect to Discoverer Administrator as the owner of the private tutorial EUL that you created in "How to create a private EUL for the tutorial" (TUTEUL).
- Choose Tools | Security to display the Security dialog.
- Display the Business Area -> User tab.
You must make sure that the VIDEO5 database user is displayed in the Selected users/roles list.
- If the VIDEO5 database user is not displayed in the Selected users/roles list, move the VIDEO5 user from the Available users/roles list to the Selected users/roles list.
Figure A-23 Security dialog
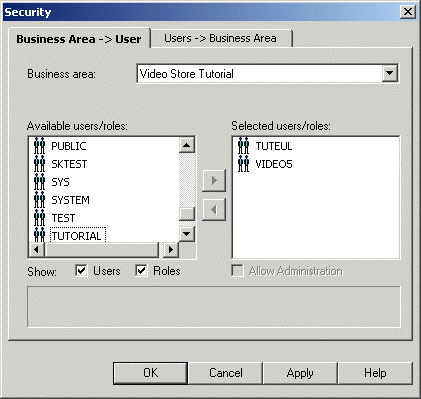
Text description of the illustration sec.gif
- Click OK to save the details and close the Security dialog.
- Choose Tools | Privileges to display the Privileges dialog.
- Display the Privileges tab.
- Click the drop down list of users/roles to display the database users/roles.
- Choose the VIDEO5 database user.
You must make sure that the VIDEO5 user has Desktop and Plus privileges, but not Administration privileges.
- Make sure that the Administration Privilege check box is cleared, and the Desktop and Plus Privilege check box is selected.
- In the Desktop privileges list, clear the Schedule Workbooks check box.
Figure A-24 Privileges dialog: Privileges tab
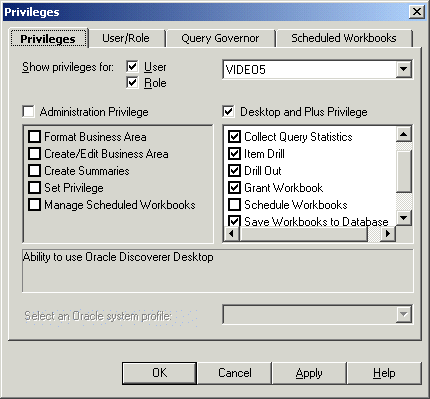
Text description of the illustration sec2.gif
- Click OK to save the details and close the Privileges dialog.
The VIDEO5 database user now has the required privileges for accessing the tutorial EUL, data and workbook.
How to install the tutorial business area in another End User Layer
Having installed the tutorial business area into one EUL, you can install it in other EULs (for more information, see "How to install the Discoverer tutorial").
If you want users to have access to the tutorial business area but not to the EUL in which you originally installed the tutorial, you can install the tutorial in one (or more) alternative EULs to enable each EUL owner to have their own tutorial business area. Each time you install the tutorial in a different EUL, another tutorial business area is created in that EUL. Note that every tutorial business area accesses data from the same set of tables in the database. Only one version of each table is created in the database (i.e. in the VIDEO5 database user's tablespace).
To install the tutorial business area in another EUL:
- Connect to Discoverer Administrator as the database user that owns the EUL in which you want to install the tutorial (for more information, see Chapter , "Exercise 1: Connecting to Discoverer Administrator").
Note: Make sure that the database user you connect with has sufficient privileges to install the tutorial (for more information, see "What privileges do you need to install the tutorial data?")
Discoverer Administrator displays the Load Wizard.
Figure A-25 Load Wizard dialog
Text description of the illustration lw1a.gif
- Click Cancel to close the Load Wizard.
- Choose Tools | EUL Manager to display the EUL Manager dialog.
Figure A-26 EUL Manager dialog

Text description of the illustration eulmgr2.gif
- Click Install the Tutorial to display the Install Tutorial Wizard: Step 1 dialog.
Figure A-27 Install Tutorial Wizard: Step 1 dialog
Text description of the illustration intut12.gif
Note that the EUL displayed in the EUL field is the EUL into which Discoverer Administrator imports the tutorial business area.
- Click Next to display the Install Tutorial Wizard: Step 2 dialog.
Figure A-28 Install Tutorial Wizard: Step 2 dialog
Text description of the illustration instp2.gif
- Type
VIDEO5 in the Password field.
Note: The password can be whatever you have specified for the VIDEO5 database user.
- Click Finish.
Discoverer Administrator displays the Commit Status dialog.
Figure A-29 Commit Status dialog
Text description of the illustration insprog.gif
Discoverer Administrator imports the video stores tutorial business area into the EUL using the file vidstr.eex (located in the \demo directory).
When the process is complete Discoverer Administrator displays a dialog indicating that the tutorial data has been successfully installed.
Figure A-30 Tutorial successfully installed dialog
Text description of the illustration tutsuc.gif
- Click OK.
Discoverer displays the EUL Manager dialog.
Figure A-31 EUL Manager dialog
Text description of the illustration euladtst.gif
- Click Close to close the EUL Manager dialog.
Discoverer Administrator has created a copy of the tutorial business area in the current EUL. You can create multiple copies of the tutorial business area in an EUL by repeating the previous steps.
Note: All copies of the tutorial business area access data in the same set of tables in the database.
How to uninstall the tutorial business area, tables and data
When you uninstall the tutorial, you remove:
- the tutorial business area from the current EUL
- the tutorial tables from the database
Note the following:
- the VIDEO5 user is not removed from the database
- if the tutorial was installed in other EULs, the tutorial business areas are not removed from the other EULs (even though the tables that those business areas point to have been dropped from the database)
- removing copies of the tutorial from multiple EULs must be done one at a time
To uninstall the tutorial data:
- Connect to Discoverer Administrator as the database user that owns the EUL from which you want to remove the tutorial business area.
Discoverer Administrator displays the Load Wizard.
Figure A-32 Load Wizard dialog
Text description of the illustration lw1a.gif
- Click Cancel to close the Load Wizard.
- Choose Tools | EUL Manager to display the EUL Manager dialog.
Figure A-33 EUL Manager dialog
Text description of the illustration eulmgr1.gif
- Click Uninstall the Tutorial to display the Uninstall Tutorial Wizard: Step 1 dialog.
Figure A-34 Uninstall Tutorial Wizard: Step 1 dialog
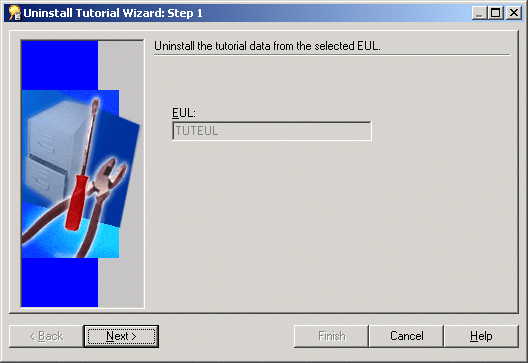
Text description of the illustration unwz1.gif
Make sure that the EUL named in the EUL field is the EUL from which you want to remove the tutorial business area.
If the EUL name is not correct, click Cancel and re-connect to Discoverer Administrator as the owner of the EUL from which you want to remove the tutorial business area.
- Click Next to display the Uninstall Tutorial Wizard: Step 2.
Figure A-35 Uninstall Tutorial Wizard: Step 2 dialog
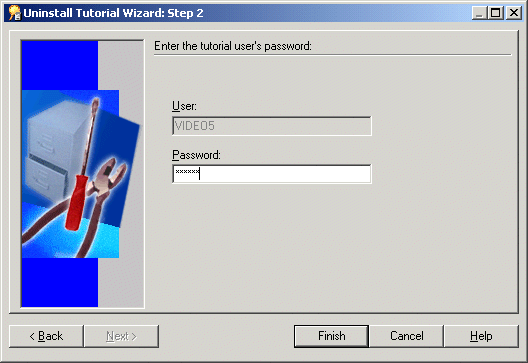
Text description of the illustration unwz2.gif
- Type
VIDEO5 in the Password field for the VIDEO5 database user.
Or this can be whatever password you specified when you installed the tutorial for the first time (i.e. when you created the VIDEO5 database user).
- Click Finish.
Discoverer Administrator warns you that uninstalling the tutorial removes the tutorial data and tables from the database, and the tutorial business area from the current EUL.
- Click Yes to delete the tutorial business area and database tables.
How to reinstall the tutorial data
If you have previously uninstalled the tutorial and you want to reinstall it, follow the steps in "How to install the tutorial business area in another End User Layer".
