10g (9.0.4)
Part Number B10314-01
Home |
Contents |
Index |
| Oracle Application Server Reports Services Publishing Reports to the Web 10g (9.0.4) Part Number B10314-01 |
|
Oracle Enterprise Manager, included with Oracle Application Server, provides managing and monitoring services for OracleAS Reports Services.
This chapter describes the managing and monitoring capabilities of Oracle Enterprise Manager as they relate to OracleAS Reports Services and tells you how to configure the Reports Server with Oracle Enterprise Manager. It includes the following main sections:
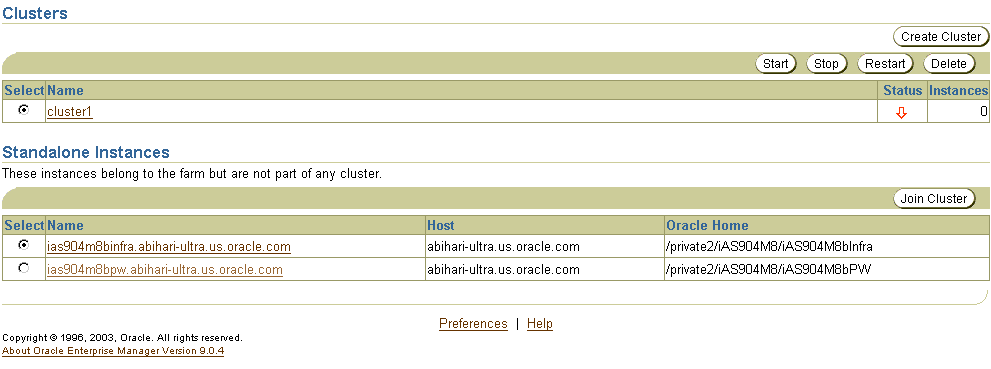
Reports Servers are automatically configured in OPMN and registered with Oracle Enterprise Manager during installation of Oracle Application Server. If you add any Reports Servers after installing Oracle Application Server, you must register the new server(s) in:
targets.xml file. Refer to Configuring Reports Server with the Oracle Process Manager and Notification Server and Oracle Enterprise Manager for more information on the targets.xml file and its usage.
opmn.xml file. Refer to opmn.xml for more information on the opmn.xml file and its usage.
This section describes how to get to the Reports Server page:
You can get to the Reports Server page in a variety of ways. This procedure is just one possible way.
Text description of the illustration oem_rprtsrver_stand.gif
To start, stop, or restart a Reports Server:
Navigating to the Reports Server Page in the Application Server Control for more information.
See Also:
These buttons appear on a Reports Server main page according to the server's current state:
Refer to the Oracle Enterprise Manager Application Server Control section for more information on the various tabs displayed on the Reports Server home page.
Note:
You can view and manage your job queues in the Application Server Control.
If you want to manage the job queue (e.g., cancel jobs or rerun jobs), you must do so from the Application Server Control. To get to the Application Server Control, return to the Reports Server main page and click Administration under Related Links. Once there, follow the instructions in Viewing and Managing Job Queues in the Application Server Control.
Note:
The following sections describe:
The reports Current Jobs queue lists all jobs currently running on a particular Reports Server.
Use Oracle Enterprise Manager for:
To view a current jobs queue:
Navigating to the Reports Server Page for more information.
See Also:
If there are no current jobs, a zero appears next to Current Jobs and there will be no link because the queue is empty.
Table 19-1 lists and describes information provided in the current jobs queue.
To cancel a current job:
If you wish to rerun the job, you can do so from the Finished Jobs page.
The scheduled jobs queue lists all jobs scheduled to run on a particular Reports Server.
Use Oracle Enterprise Manager for:
To view a scheduled jobs queue:
Navigating to the Reports Server Page for more information.
See Also:
If there are no scheduled jobs, a zero appears next to Scheduled Jobs and there will be no link because the queue is empty.
Table 19-2 lists and describes information provided in the scheduled jobs queue.
To cancel a scheduled job:
This button does not display in Oracle Enterprise Manager if there are no scheduled jobs.
If you wish to rerun the job, you can do so from the Finished Jobs page.
The finished jobs queue lists all successfully completed jobs on a particular Reports Server.
Use Oracle Enterprise Manager for:
To view a finished jobs queue:
Navigating to the Reports Server Page for more information.
See Also:
If there are no finished jobs, a zero appears next to Finished Jobs and there will be no link because the queue is empty.
Table 19-3 lists and describes information provided in the finished jobs queue.
| Item | Description |
|---|---|
|
Select |
Use this radio button to select a particular job. On the Finished Job Queue page, this function is most useful for selecting a job and: Click the Select radio button next to a job you want to view, then click the View Result button near the top of the page. Viewing its trace results, provided that you included a trace command in the runtime command.
Click the Select radio button next to a job with trace results you want to view, then click the View Trace button near the top of the page. Reports Server displays the Click the Select radio button next to a job you want to rerun, then click the Rerun Report button near the top of the page. |
|
Id |
Use this link to view the trace files for the job. This displays a unique job identifier assigned to this job by the Reports Server. This number is strictly under the server's control and cannot be reset by a user. |
|
Job Name |
Use this link to view the results of the job. If you specified a job name in the command line you used to run this job, that name is listed here; otherwise, it is the name of the job provided for the " |
|
Owner |
This displays the user ID under which this job was run. |
|
Output Type |
Lists the destination type ( |
|
Output Format |
Lists the output format ( |
|
Queued At |
Lists the date and time this request was placed in the job queue. |
|
Started At |
Lists the date and time this job started running. |
|
Finished At |
Displays the date and time this job completed. |
|
Status |
Displays the finished status of the job. In the Finished Jobs Queue, status is always Finished Successfully. |
The trace file contains tracing information about the report's execution. You set which tracing options you want the Reports Server to use in the job command line via the traceopts argument.
|
See Also:
View trace for more information about available tracing options. |
To view a job's trace file:
Reports Server displays the
Note:
No Log File Found error if the trace file is not found. Refer to trace for more information on how to specify the trace options for a job.
When monitoring you Reports Server, it can sometimes be useful to quickly check a report's output to verify that it produced the desired output. To view a job result from the Report Server cache:
The result opens in a separate browser window.
In some cases, you may want to quickly resubmit a report for execution (e.g., to refresh the contents of the cache). To rerun a job from the Finished Jobs page:
The failed jobs queue lists all jobs that were cancelled or terminated with errors on a particular Reports Server.
Use Oracle Enterprise Manager for:
To view a failed jobs queue:
Navigating to the Reports Server Page for more information.
See Also:
If there are no failed jobs, a zero appears next to Failed Jobs and there will be no link because the queue is empty.
Table 19-4 lists and describes information provided in the failed jobs queue.
To aid you in determining why a job failed, you can view the trace file for the failed job. To view a failed job's trace file:
Reports Server displays the
Note:
No Log File Found error if the trace file is not found. Refer to trace for more information on how to specify the trace options for a job.
In order to quickly check whether the problem with a failed job has been resolved, you can rerun the job from the Failed Jobs page. To rerun a failed job:
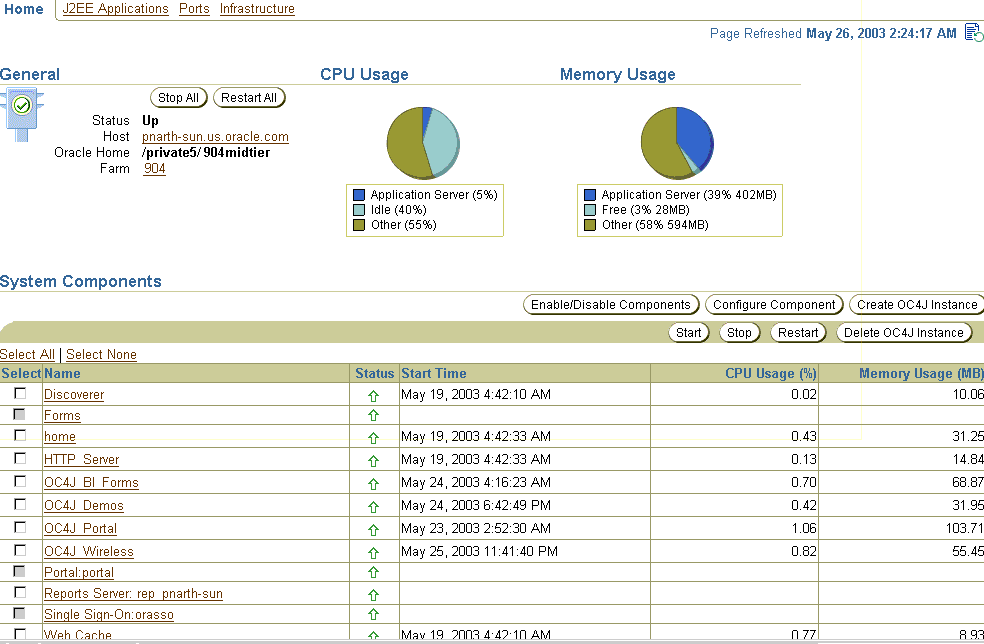
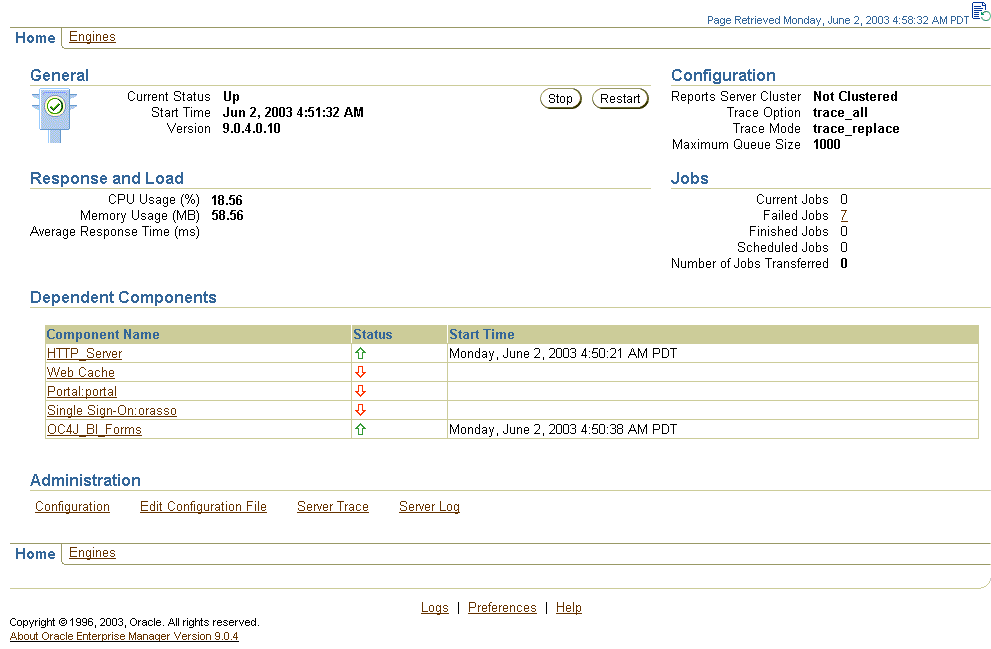
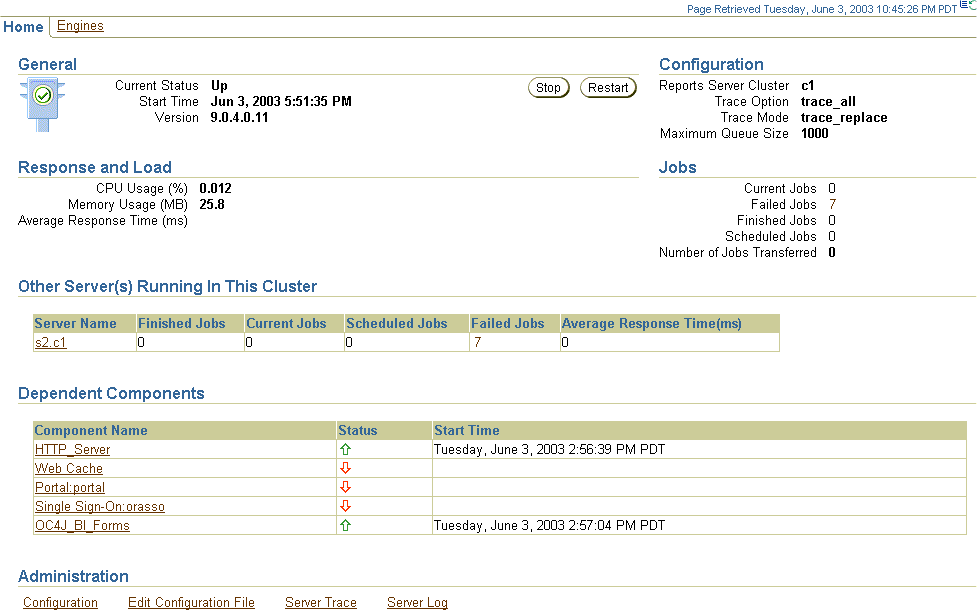
Each Reports Server registered with Oracle Enterprise Manager has its own main page that summarizes general information about the server's status and performance. You can monitor Reports Server performance from the following place:
The Reports Server main page in the Application Server Control has two tabs:
Text description of the illustration oem_rprtsrver_stand1.gif
The Home tab contains the following sections:
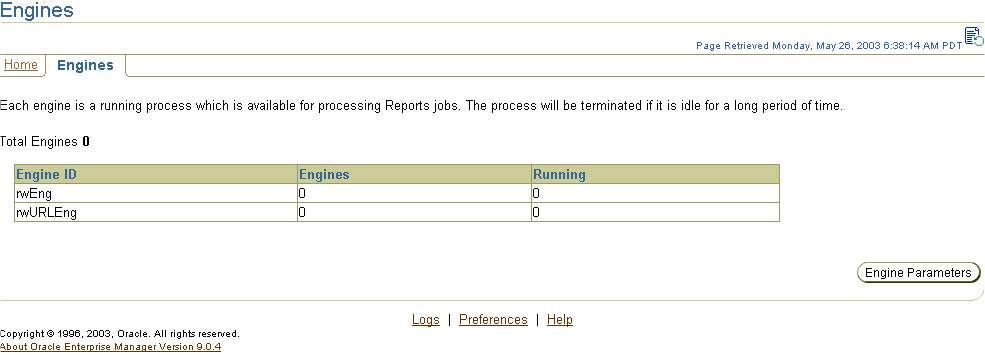
Text description of the illustration oem_standfarm_engines.gif
The Engines tab contains the following sections:
You can modify/view the Reports Server Configuration in either of the following ways:
To view and modify some of the most commonly used engine and server parameters through Oracle Enterprise Manager:
server_name.conf).
Engine ID: Displays the valid Engine IDs for the selected server.
Select the Engine ID from a drop down menu to edit the engine parameters for the selected engine. Only those engines that are already present in the server configuration file are displayed in the drop down list.
Classpath(Optional): The directory path to the Java class specified in the class attribute. Refer to engine for more information on the various engine properties available for the Reports Server.
(initEngine): The number of engines you want the Reports Server to start at initialization. Refer to engine for more information on the various engine properties available for the Reports Server.
(maxEngine): The maximum number of this type of engine that can run on the server. Refer to engine for more information on the various engine properties available for the Reports Server.
(minEngine): The minimum number of this type of engine maintained on the server. . Refer to engine for more information on the various engine properties available for the Reports Server.
(engLife): Displays the ceiling of jobs that must be completed before the engine is shut down. Refer to engine for more information on the various engine properties available for the Reports Server.
(maxIdle)(minutes): The number of minutes of allowable idle time before the engine is shut down, provided the current number of engines is higher than minEngine. Refer to engine for more information on the various engine properties available for the Reports Server.
JVM Option(Optional): The Java Virtual Machine (JVM) options to be used by the Reports Server when it starts an engine in the JVM. Refer to engine for more information on the various engine properties available for the Reports Server.
Cache Size(MB): The file size in mega bytes (MB) for the Reports Server's cache. Refer to cache for more information on the cache properties.
Cache Directory (Optional): The location of the Reports Server cache. Refer to cache for more information on the cache properties.
Maximum Cached Files (Optional): The ceiling on the number of files allowed in the cache. Refer to cache for more information on the cache properties.
Ignore Parameters (Optional): Any report parameters you want to be ignored when the Reports Server constructs the cache key. (The cache key is used by the Reports Server to determine if an incoming job request matches existing output in the cache.) Refer to cache for more information on the cache properties.
Idle Timeout (minutes) (Optional): Allowable amount of time in minutes the connection can be idle. Refer to connection for more information on the various connection properties.
Maximum Connections (Optional): The maximum number of requests that the server can service simultaneously. Requests in excess of the maxConnect value return a Java exception. Refer to connection for more information on the various connection properties.
Maximum Queue Size: The maximum number of jobs that can be held in a given Reports Server job queue. Refer to queue for more information on the various queue properties.
Trace Options: Refer to trace for more information on the available trace options. The default trace option considered when no option is specified is trace_replace.
To view and change a Reports Server's configuration file through Oracle Enterprise Manager:
Navigating to the Reports Server Page in the Application Server Control for more information.
See Also:
Changes take effect after the next server startup or restart.
|
See Also:
Chapter 3, "Configuring OracleAS Reports Services" For more information about the attributes and values in the Reports Server configuration file. |
When you cluster Reports Servers together, it's reflected on each cluster member's page in Oracle Enterprise Manager under the Other Servers Running in This Cluster heading. Each listed cluster member links to the page for that member.
Table 19-5 lists and describes the information the Other Servers ... section provides for each cluster member:
In many cases, you need to quickly discover the port numbers in use by the Reports Server. The Application Server Control lets you quickly find port numbers by following these steps:
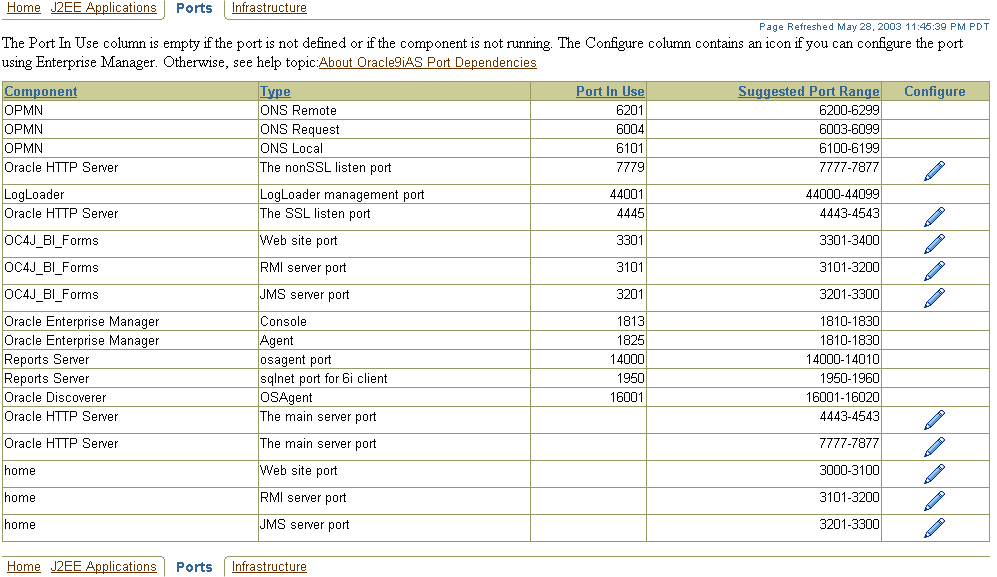
Text description of the illustration oem_ports_standalone.gif
In some cases, you might want to change the Infrastructure Services used by a middle-tier instance. For example, you may want to use a different Oracle Internet Directory or Metadata Repository than the ones you chose during installation. For instructions on how to change the Infrastructure Services used by a middle-tier instance, refer to Oracle Application Server 10g Administrator's Guide.
|
|
 Copyright © 2003 Oracle Corporation. All Rights Reserved. |
|