24
Building a Report with Dynamic Graphics
Figure 24-1 Dynamic graphics report output
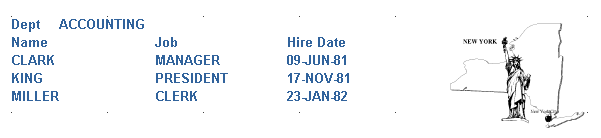
Text description of the illustration dyngraph_fin.gif
In this chapter, you will build an employee report that displays a different graphic depending on the location of the employee's department.
Concepts
- This chapter discusses how Oracle Reports enables you to link to and display drawings and images that are "dynamic." That is, any changes made to the graphics will be reflected in your report output at runtime.
Data Relationships
- One way to display dynamic graphics in a report involves creating a database column that stores the names of the graphics files you want to display. You do this in the Data Model view.
- In the Data Model view, Oracle Reports provides a property called Read from File that enables you to pull the latest versions of the graphics into your report. When you set the Read from File property for a column listing file names, Oracle Reports displays the graphic contained within the named file, rather than the file name itself. Doing so enables Oracle Reports to pull into the report the latest version of the graphic at runtime.
- Another way to include dynamic graphics in your report is to use the File Link tool in the Paper Layout view. This tool enables you to create a boilerplate object used to contain an external file, such as graphics and text. This example does not show you how to use this method, but you can read more about this tool in the Reports Builder Online Help.
Layout
- This report uses a simple Group Above layout.
Example Scenario
This chapter will show you how to create a simple report using the Group Above layout to display data about an employee and a department, and display an image for the relevant region.
To see a sample report containing dynamic graphics, open the examples folder called dynamicgraphics, then open the Oracle Reports example report named dynamicgraphics.rdf. For details on how to open it, see "Accessing the example reports" in the Preface.
Table 24-1 Features demonstrated in this example
24.1 Prerequisites for this example
To build this example report, you will need access to the data source and the graphics we've provided. You will also need to install an extra table into the database, which contains the pictures for this report.
24.1.1 Access to the data source and installing the Pictures table
To build the example in this chapter, you must have access to the EMP and DEPT schema, which is provided by default with the Oracle9i database. The user ID and password for accessing this schema is scott/tiger.
You will also need to ask your database administrator to install the Pictures table by using the provided file called pictures.dmp.
24.1.2 Graphics for the report
Before you build this report, make sure the following images are in the dynamicgraphics directory where the sample report file is located:
NEW_YORK.TIF
BOSTON.TIF
DALLAS.TIF
CHICAGO.TIF
Although we've chosen to use TIF files in this example, you can use other graphic file formats, such as GIF, JPEG, and BMP.
Then, update your REPORTS_PATH in the Windows registry to include the directory where these images are located. The REPORTS_PATH is located under the Oracle Home entry in the Windows entry. When you edit the entry, add the full directory path of the location of your images.
On UNIX, you can set REPORTS_PATH from the command line or in a shell script.
24.2 Create the data model with two linked queries
The steps in this section will show you how to build a simple data model with two queries in a master/detail relationship.
To create a data model
- After you've updated the REPORTS_PATH with the images directory path, launch Reports Builder.
- Choose File > New > Report.
- Select Build a new report manually, then click OK.
- In the Data Model view that displays, click the SQL tool in the tool palette, then click an open area of the Data Model view to display the SQL Query Statement dialog box.
- In the SQL Query Statement field, enter the following SELECT statement:
SELECT ALL DEPT.DEPTNO, DEPT.DNAME, PICTURES.PICTURE
FROM DEPT, PICTURES
WHERE (DEPT.DEPTNO = PICTURES.DEPTNO)
ORDER BY DEPT.DEPTNO
Note:
You can enter this query in any of the following ways:
- Copy and paste the code from the provided text file called
dynamicgraphics_code.txt into the SQL Query Statement field.
- Click Query Builder to build the query without entering any code manually.
- Type the code in the SQL Query Statement field.
Also note that if you have not installed the Pictures table into the sample schema, you will not be able to create this query.
|
- Click OK.
Note:
If you are not already connected to a database, you will be prompted to connect to the database when you click Next. Ensure that you connect to a database that has the appropriate schema for this example. Section 24.1, "Prerequisites for this example" describes the sample schema requirements for this example.
|
- When the query displays in the Data Model view, right-click the query name (Q_1), then choose Property Inspector from the pop-up menu to display the Property Inspector, and set properties:
- Under General Information, set the Name property to Q_PICTURES.
- In the Data Model view, double-click the pictures column in the Q_PICTURES query to display the Property Inspector, and set properties:
- Under Column, set the Read from File property to Yes, and set the File Format property to Image.
- In the Data Model view, follow the steps above to create another query named Q_EMPLOYEES with the following code:
SELECT ALL EMP.DEPTNO, EMP.ENAME, EMP.JOB, EMP.HIREDATE
FROM EMP
ORDER BY DEPTNO, ENAME
Note:
You can enter this query in any of the following ways:
- Copy and paste the code from the provided text file called
dynamicgraphics_code.txt into the SQL Query Statement field.
- Click Query Builder to build the query without entering any code manually.
- Type the code in the SQL Query Statement field.
|
- In the Data Model view, click the Data Link tool in the tool palette.
- Drag a link between DEPTNO in Q_PICTURES and DEPTNO1 in Q_EMPLOYEES. Your data model should now look like this:
Figure 24-2 Data Model view for the dynamic graphics report
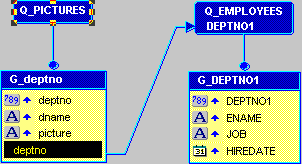
Text description of the illustration dyngraph_dm.gif
- Save your report as
dynamicgraphics_<your initials>.rdf.
24.3 Create the layout of the report using the Report Wizard
In this section, you will create a default layout for your report using the Report Wizard. You will then modify all the necessary layout objects for your graphics.
24.3.1 Create the initial layout of your report using the Report Wizard
To create the initial layout:
- In the Paper Layout view, choose Tools > Report Wizard to display the Report Wizard.
- In the Report Wizard, on the Report Type page, select Create Paper Layout only.
- On the Style page, select Group Above.
- On the Groups page, click the following groups in the Available Groups list and click Down to specify the Print Direction and move them to the Displayed Groups list:
- On the Fields page:
- Click the double right arrows (>>) to move all of the fields to the Displayed Fields list.
- In the Displayed Fields list, click deptno, then click the left arrow (<) to move this field back to the Available Fields list.
- Do the same for DEPTNO1.
- On the Labels page, delete the label for the Picture field.
- On the Template page, select No template, then click Finish to display your report layout in the Paper Layout view. It should look something like this:
Figure 24-3 Initial Paper Layout view for the dynamic graphics report

Text description of the illustration dyngraph_lay.gif
- Save your report as
dynamicgraphics_<your initials>.rdf.
24.3.2 Modify the layout of your report
Now that you've created an initial layout for your report, you can rearrange your layout objects and add dynamic graphics.
To modify your layout:
- In the Paper Layout view, select all the objects by pressing Ctrl+A on your keyboard.
- Use the arrow keys on your keyboard to move all the objects 0.5 inches to the right.
- In the Paper Layout view, expand the screen so that you can see down to 7 inches on the ruler.
- In the Object Navigator, find your report name, then navigate to Paper Layout > Main Section > Body > M_G_DEPTNO_GRPFR.
- Click R_G_DEPTNO. In the Paper Layout view, the R_G_DEPTNO repeating frame should also be selected.
- While the R_G_DEPTNO repeating frame is selected, click on the right part of the frame, and drag it to 6.5 inches (you can see where you are by looking at the top ruler). The repeating frame should now expand from the 0.0 inch mark to the 6.5 inch mark on the top ruler.
- Now, click the bottom part of the frame, and drag it to 2.0 inches (you can see where you are by looking at the left-hand ruler). The repeating frame should now expand from the 0.0 inch mark to the 6.0 inch mark on the left-hand ruler.
Figure 24-4 Paper Layout view of the modified layout
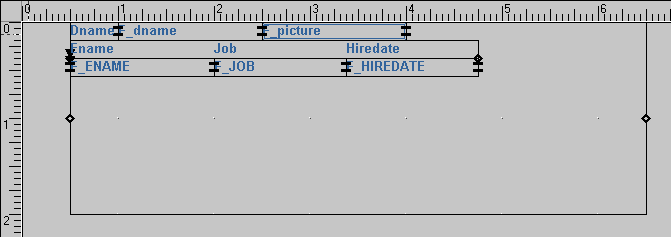
Text description of the illustration dyngraph_laymv.gif
- Click the Flex Off button in the toolbar.
- Move the Picture field to the right, and enlarge it to about 1.5 by 1.5 inches.
- In the Object Navigator, navigate to Paper Layout > Main Section > Body, then select the M_G_DEPTNO_GRPFR frame.
- In the Paper Layout view, click the right edge of the frame and drag it to the right to include the Picture field.
- Do the same for the R_G_DEPTNO repeating frame.
- While R_G_DEPTNO is selected, press F4 to open its Property Inspector
- Under Repeating Frame, set the Maximum Records per Page property to
1.
Note:
By setting the maximum records per page to 1, only one state will display per page in your report.
|
- Save your report.
24.4 Run your report to paper
To run your report:
- Click the Run Paper Layout button in the toolbar.
Your report displays in the Paper Design view and should look something like this:
Figure 24-5 Final Dynamic Graphics Report
Text description of the illustration dyngraph_fin.gif
- Click the Next Page button in the toolbar to see how the other pages of the report display different graphics depending on the location of the department.
Note:
The image displayed by the Picture field is updated for each region.
|
24.5 Summary
Congratulations! You have successfully built a report that displays graphics depending on the data in the report. You now know how to:
- manually create and link two queries.
- use the Read from File property to make graphics dynamic.
- create a default layout in the Report Wizard.
- modify a paper layout to display desired information.
For more information on any of the wizards, views, or properties used in this example, refer to the Reports Builder Online Help, which you can access in two ways:
