|
Oracle® Business Intelligence Discoverer Plus User's Guide
10g Release 2 (10.1.2.1) B13915-04 |
|
 Previous |
 Next |
|
Oracle® Business Intelligence Discoverer Plus User's Guide
10g Release 2 (10.1.2.1) B13915-04 |
|
 Previous |
 Next |
This chapter explains how to use Discoverer Plus Relational parameters to answer typical business questions, and contains the following topics:
Parameters are workbook items that allow Discoverer users to analyze worksheets by entering dynamic input values (see figure below). Input values are typically used to:
provide input to conditions that are used to filter worksheets - for example, when a workbook or worksheet is opened or refreshed, the parameter is used to first ask the worksheet user 'What month do you want to analyze?'. A worksheet user can choose to look at data for the month of January only.
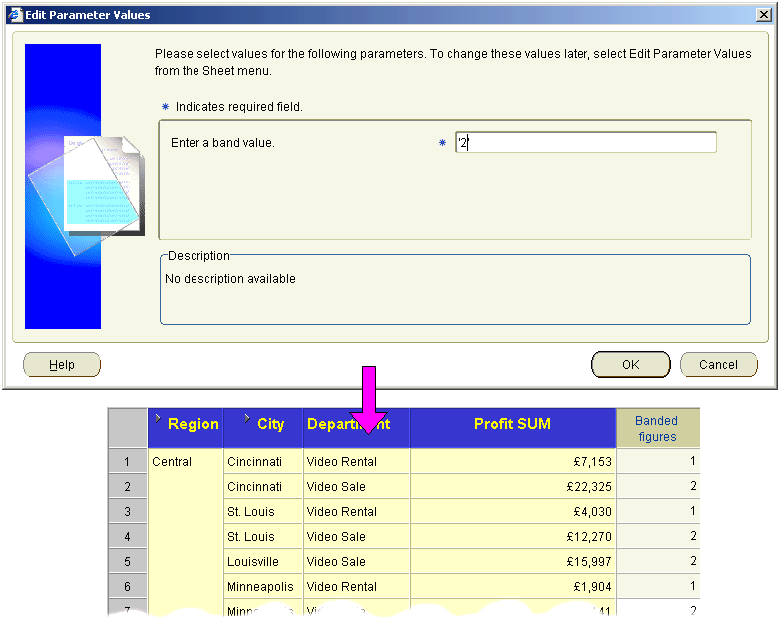
provide input to calculations - for example, a worksheet user can enter the value '3' when prompted, which is then used to divide data into three bands using a predefined calculation containing a banding function (see "About using parameters to collect dynamic user input")
Figure 11-1 Parameters dialog used to set parameters
The main benefits of using parameters are:
Worksheet data can be analyzed using dynamic user input.
Workbooks can be targeted easily to specific groups of users.
Worksheets open more quickly because the amount of data on a worksheet is minimized.
If several Discoverer users are using a worksheet, each user can open the worksheet and display only the data that they are interested in. This enables users to customize worksheets to match their needs.
When opening or refreshing a workbook or worksheet with active parameters, the "Edit Parameter Values dialog" is displayed so that you can enter parameter values.
You can change the parameter value at any time by choosing Tools | Refresh Sheet and entering a different parameter value (or choose Tools | Parameter Values).
Parameters that are part of an active condition are automatically activated.
If you do not need to use parameters, you can deactivate them (see "How to deactivate parameters")
You can create your own parameters (see "How to create parameters").
When creating parameters, the following points apply:
You can create parameters at two levels:
Workbook level - here, the parameter applies to all worksheets in a workbook. Changes to the parameter in any worksheet apply to all worksheets in the workbook that use the same parameter.
Worksheet level - here, the parameter applies to the current worksheet only.
When you create a parameter for filtering worksheets, you typically create a condition also. The Create condition with operator check box is selected by default on the "New Parameter dialog".
When a condition is created with a parameter, you can deactivate the parameter by deactivating the condition. Deleting the condition deletes the parameter and vice versa.
If you select the Create Condition with operator check box in the "New Parameter dialog", a new condition is created and activated. Therefore, the parameter is also activated.
Sometimes you want worksheet users to enter a dynamic value, typically for use in calculations. For example, to enter a value to specify the number of bands in which to group data (for more information, see "Examples of parameters").
To collect dynamic user input, do the following:
Create a new parameter, and choose the following:
choose <NONE> from the Which item do you want to base your parameter on? drop down list (for more information, see "New Parameter dialog")
clear the Let other users select multiple values check box
Note: If a Discoverer end user enters more than one parameter value, only the first parameter value is used.
Notice that you cannot activate the parameter. Before it can be activated, a parameter not based on a worksheet item must be used in a calculation or condition.
Create a calculation and insert the parameter name as an argument.
For example, if you create a parameter called Band Value for use in a sales banding function, you might create a calculation called Banded Sales based on the following function:
NTILE(:Band Value) OVER(ORDER BY SUM(Sales))
Notice that the Band Value parameter is prefixed with a colon ':' to indicate that it is a parameter value (e.g. :Band Value).
When the worksheet is opened or refreshed, the worksheet user is prompted to enter a banding value. If they enter the parameter value '3', the Sales SUM values on the worksheet are grouped into three bands.
For an example of a parameter being used in a calculation, see "Example: Calculate hypothetical rank".
Discoverer enables you set up cascading parameters in a worksheet. For example, you might have a parameter for Region and a parameter for City. If an end user selects the East region as a parameter value, you might want the LOV for the City parameter to display only cities in the East region.
Worksheet items in the cascading parameters must be in the same item hierarchy, and must have a list of values (LOV).
You set up cascading parameters when you create parameters (for more information, see "How to create parameters". For example, to create a cascading parameter relationship between Region and City worksheet items, you might do the following:
Create a parameter on the Region worksheet item called ChooseRegion, and make sure that the Create condition with operator check box is selected.
Discoverer creates an underlying condition called Region=:ChooseRegion.
Create a parameter on the City worksheet item called ChooseCity, and on the "New Parameter dialog" dialog do the following:
select the Create condition with operator check box
select the Filter the list of values based on the selected conditions radio button
in the conditions list below the Filter the list of values based on the selected conditions radio button, select the check box next to Region=:ChooseRegion
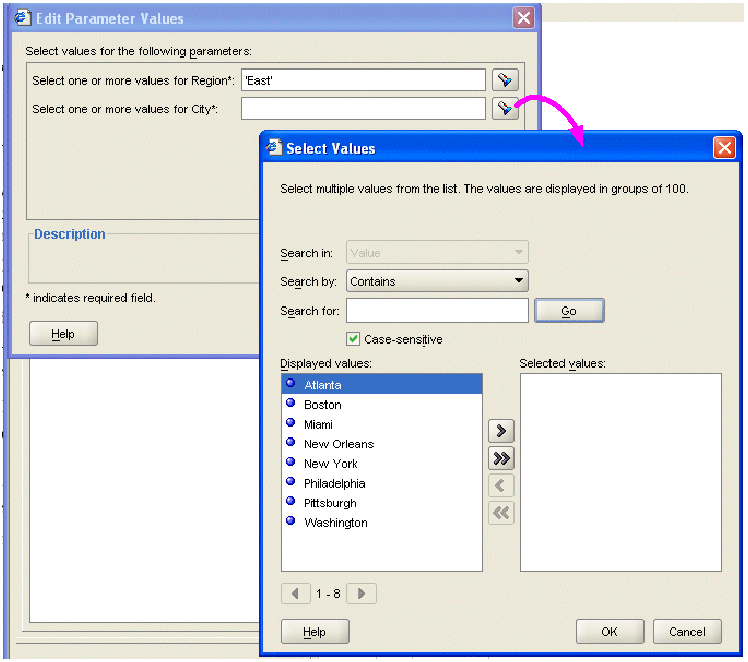
Discoverer will use the value specified for the Region parameter to filter the list of values for the City parameter. In the figure below, East is selected as the Region parameter value in the Edit Parameter Values dialog. Therefore, when an end user displays the LOV for the City parameter in the Select Values dialog, Discoverer displays only cities in the East region (e.g. Atlanta, Boston, Miami).
Figure 11-2 Using a cascading parameter to filter a list of values
When you open or refresh a worksheet that contains active parameters, you must enter parameter values to set the parameters. If default values are defined, you might also accept default values. The values entered are typically used to filter the data displayed on the worksheet, or are used to provide dynamic input to calculations.
To set parameters:
Open a worksheet.
If the worksheet has active parameters, these are displayed automatically by the "Edit Parameter Values dialog". If defined, a default value is displayed in the text field next to each parameter.

Enter a value for each parameter by doing one of the following:
Type a value as prompted.
(optional) Click OK to accept the default value, if a default value is defined.
(optional) If a flashlight button is displayed next to a parameter field, click this button to display the "Select Value dialog", which enables you to search for and select the values that you want to use. For more information, see "Using lists of values (LOVs)".
(optional) Click the <Index and Value> drop down list to choose whether Discoverer displays parameter values with index numbers (e.g. (0) Central, (1) East) or without index numbers (e.g. Central, East).
Note: The <Index and Value> drop down list is only displayed if the worksheet builder selected the Enable users to select either indexes or values check box in the "Edit Parameter dialog".
For more information about the <Index and Value> drop down list, see "About using indexes and values in parameters".
Click OK to close the dialog and display the worksheet.
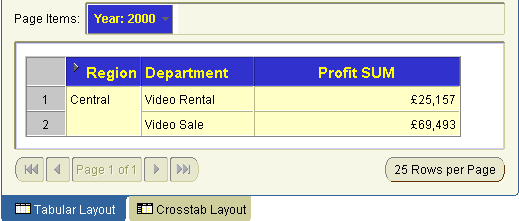
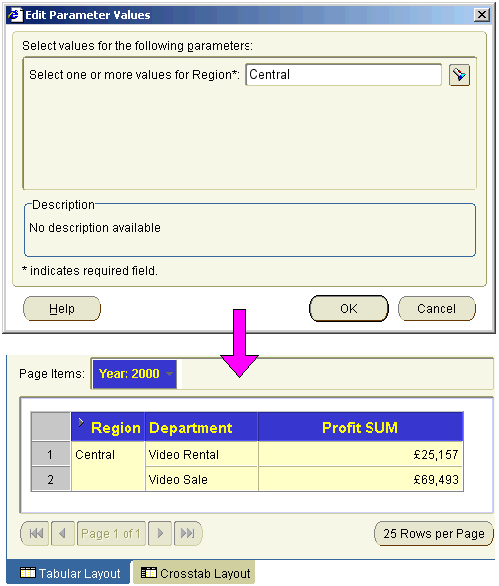
The worksheet is updated according to the parameter values selected. For example, if the parameter value Central is used to filter the worksheet data on Region, the worksheet displays only data for the Central region 2000 (see figure below).
Figure 11-3 A worksheet filtered by a parameter value
You activate parameters when you want Discoverer users to be prompted to enter parameter values when they open or refresh worksheets. For example, to choose how to filter worksheet data.
Parameters are activated by association. In other words, if parameters are included in active conditions or calculations, the parameters become active. When you activate parameters, they remain active until they are deactivated (see "How to deactivate parameters").
To activate parameters:
Open the worksheet containing the parameter.
To see which parameters are available, choose Tools | Parameters to display the "Edit Worksheet dialog: Parameters tab".
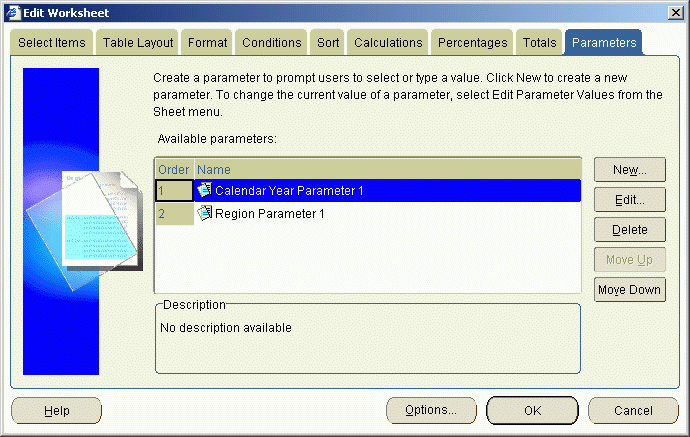
The Parameters tab shows parameters available in the worksheet.
Activate the condition or calculation used with the parameter:
If the parameter uses a condition, display the Conditions tab and select the check box next to the condition used in the parameter, then click OK to close the dialog.
If the parameter is used in a calculation, display the Calculations tab and select the check box next to the calculation that uses the parameter, then click OK to close the dialog.
When the "Edit Parameter Values dialog" is displayed, enter parameter values as prompted, then click OK.
The worksheet is updated according to parameter values entered.
Notes
To update the workbook or worksheet with a different parameter value, choose Tools | Parameter Values to display the "Edit Parameter Values dialog" and enter a new value.
On the "Edit Worksheet dialog: Parameters tab", the status of parameters is displayed in the Order column. To activate and deactivate parameters you must modify the condition or calculation used with a parameter to change the parameter status.
You deactivate parameters when you do not want Discoverer users to be prompted to enter parameter values when they open or refresh workbooks or worksheets.
Parameters become deactivated when they are not included in active conditions or calculations.
Note: If you want to disable the parameter permanently, delete the parameter (see "How to delete parameters").
To deactivate parameters:
Open the worksheet containing the parameter that you want to deactivate.
To see which parameters are available, choose Tools | Parameters to display the "Edit Worksheet dialog: Parameters tab".

The Parameters tab shows parameters available in the worksheet. The text in the Order column indicates whether a parameter is activated.
Deactivate the condition or calculation used with the parameter:
If the parameter uses a condition, display the Conditions tab and clear the check box next to the condition used in the parameter, then click OK to close the dialog.
If the parameter is used in a calculation, display the Calculation tab and clear the check box next to the calculation that uses the parameter, then click OK to close the dialog.
Click OK to close Edit Worksheet dialog.
Discoverer deactivates the parameter associated with the condition or calculation.
Notes
To update the workbook or worksheet with a different parameter value, choose Tools | Parameter Values to display the "Edit Parameter Values dialog" and enter a new value.
On the "Edit Worksheet dialog: Parameters tab", the status of parameters is displayed in the Order column. To activate and deactivate parameters you must modify the condition or calculation used with a parameter to change the parameter status.
You create parameters to enable Discoverer users to enter input values when a worksheet is opened or refreshed. For example, to provide dynamic input to a condition or calculation.
To create a parameter:
Open the Discoverer workbook containing the worksheet to which you want apply a parameter.
Choose Tools | Parameters to display the "Edit Worksheet dialog: Parameters tab".
Click New to display the "New Parameter dialog".
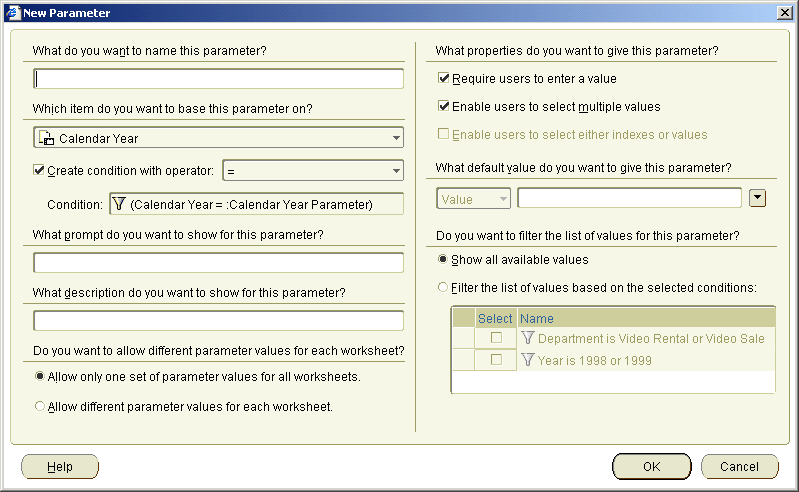
Enter a parameter name into the What do you want to name this Parameter? field. If you do not enter a name, Discoverer creates a default Parameter name for you.
Choose the item on which to base the parameter from the Which item do you want to base your parameter on? list, as follows:
If you want the parameter to use a condition to filter the worksheet, select the item that you want to filter on. Make sure that the Create condition with operator check box is selected so that a condition is automatically created to filter the worksheet using the item selected. For example, to filter a worksheet on calendar year, you might choose Calendar Year here.
If you want to use the parameter to provide input to a calculation, select the <NONE> option. For example, to enable worksheet users to choose how much percentage increase they want to display on a worksheet (for more information, see "About using parameters to collect dynamic user input".
Use the Create condition with operator check box to specify whether Discoverer creates a condition to use with this parameter as follows:
Select the Create condition with operator check box to create a condition based on the item that you selected for this parameter. Select an operator to use with the condition from the drop down list (e.g. =, <, >).
When a parameter uses a condition it enables you to filter worksheets according to parameter values that you enter when you run the worksheet. For example, if you create a parameter based on year called Choose Year and select the > operator, a condition is created: Year > :Choose Year. The :Choose Year value is the value entered by the worksheet user.
Clear the Create condition with operator check box not to create a condition to use with this parameter.
(optional) Enter an instruction or question into the What prompt do you want to show for this parameter? field.
Discoverer displays this prompt to users when they open or refresh the worksheet, and tells them what value to enter.
(optional) Enter a brief description into the What description do you want to show for this parameter? field.
Discoverer displays this text on the Edit Parameter Values dialog to help users decide what parameter value to enter.
(optional) Click one of the following radio buttons:
Click the Allow only one set of parameter values for all worksheets radio button to apply the same set of parameter values to all worksheets in the workbook.
Click the Allow different parameter values for each worksheet radio button to enable different parameter values to be specified for each worksheet.
(optional) Select the Require users to enter a value check box to make worksheet users enter a parameter value.
When you select this check box, users must enter a value for the parameter to display the worksheet.
(optional) Select the Enable users to select multiple values check box to enable worksheet users to select multiple parameter values for the parameter.
For example, if a parameter is used to filter a worksheet on year, a user might want to look at data for 2001 and 2002.
(optional) Select the Enable users to select either indexes or values check box to enable users to choose whether they want Discoverer to display parameter values with index numbers (e.g. (1) January, (2) February) or without index numbers (e.g. January, February) in the "Edit Parameter Values dialog".
Note: The Enable users to select either indexes or values check box is only displayed if the item that is used as a parameter has been set up by the Discoverer Manager to reference an indexed item.
For more information about the <Index and Value> drop down list, see the "About using indexes and values in parameters".
(optional) If required, enter a default value in the What default value do you want to give this Parameter? field.
Here, you can do the following:
Select either Index or Value from the drop down list (only displayed if you selected the Enable users to select either indexes or values check box) to display parameter values with or without index numbers.
Enter a default value directly into the <values> field.
If a list of values is available for this parameter, click the drop down arrow and select a parameter value from the list.
If the list of values in the drop down list is too long to display on screen, the "Select Value dialog" or "Select Values dialog" is displayed. These dialogs enable you to search for and select the values that you want to use. For more information, see "Using lists of values (LOVs)".
(optional) Click one of the following radio buttons:
Click the Show all available values radio button to display all parameter values to the user.
Click the Filter the list of values based on the selected conditions radio button to activate a list of conditions that can be used to filter the parameter values displayed to the user.
Note: You might use this setting if you have very long lists of parameter values, and you want to improve performance by reducing the number of values that are displayed to the user.
Select a check box for each condition that you want to use to filter the list of parameter values displayed to the user (only available if you clicked the Filter the list of values based on the selected conditions radio button).
For more information, see "About filtering lists of parameter values based on selected conditions (cascading parameters)".
Click OK to save the details and display the "Edit Worksheet dialog".
If you created a parameter to filter the worksheet, the check box next to the parameter is selected (i.e. parameter is active).
Click OK to close the Edit Worksheet dialog and return to the worksheet.
If the new parameter is active, Discoverer displays the "Edit Parameter Values dialog", which enables you to specify parameter values for active parameters. The worksheet is updated according to parameter values entered (for more information, see "How to set parameters").
Notes
You can also create a parameter in the following ways:
Select the New Parameter option on the Standard toolbar to display the "New Parameter dialog". For more information about the Standard toolbar, see "About the Standard toolbar".
You delete a parameter when you no longer want to use it, and want to remove it permanently from the worksheet.
Note: If you only want to disable the parameter temporarily, deactivate the parameter (for more information, see "How to deactivate parameters").
To delete a parameter:
Display the worksheet that contains the parameter that you want to remove.
Choose Tools | Parameters to display the "Edit Worksheet dialog".

Select the parameter that you want to remove from the Available Parameters list.
Click Delete to remove the parameter from the worksheet, and click Yes at the confirmation dialog.
Click OK to close the Edit Worksheet dialog and return to the worksheet.
When you open this workbook again, or refresh the worksheet, Discoverer will not prompt you to enter a value for this parameter.
Notes
If the parameter that you delete is included in conditions or calculations, those conditions and calculations are also deleted.
This section contains examples of using parameters in Discoverer.
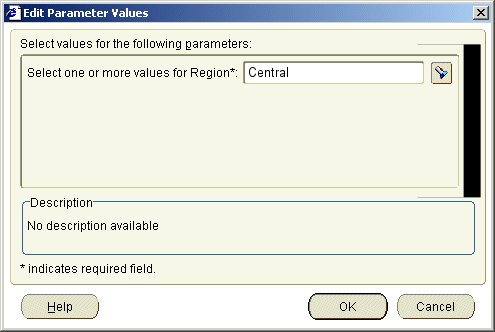
In this example you want worksheet users to be able to select which region's data they want to analyze. In the figure below, the value Central is entered in the Edit Parameter Values dialog. This displays only data for the Central region on the worksheet.
Figure 11-4 A parameter value being used to filter a worksheet
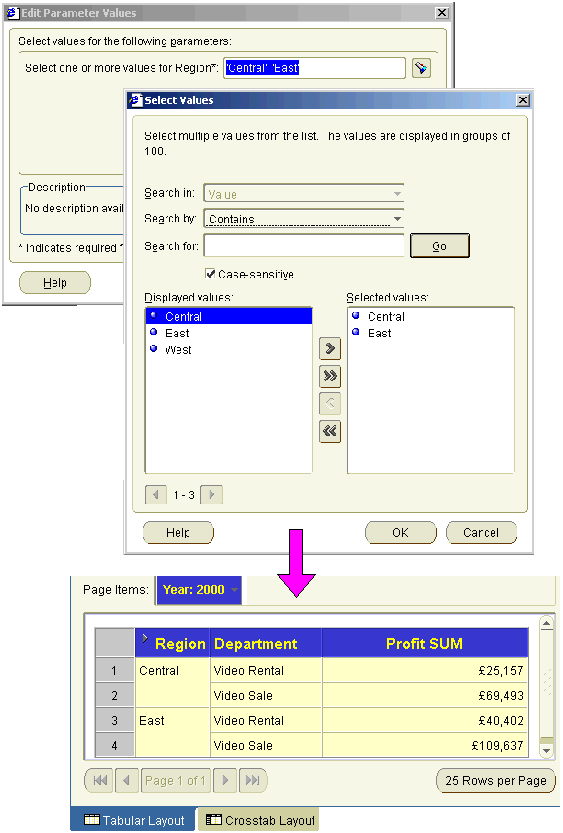
In this example you want worksheet users to select more than one region with which to analyze data. In the figure below, the values Central and East are entered at the Edit Parameter Values dialog. This displays only data for the Central and East region on the worksheet.
Figure 11-5 A parameter enabling multiple values being used to filter a worksheet
In this example you might want worksheet users to be able to select how many bands worksheet data is arranged into. When the value '2' is entered, the Profit SUM figures are placed into two bands.
Figure 11-6 A parameter used to provide dynamic input to a banding calculation
