22
Building a Conditional Form Letter Report
Figure 22-1 Conditional form letter report output, base version
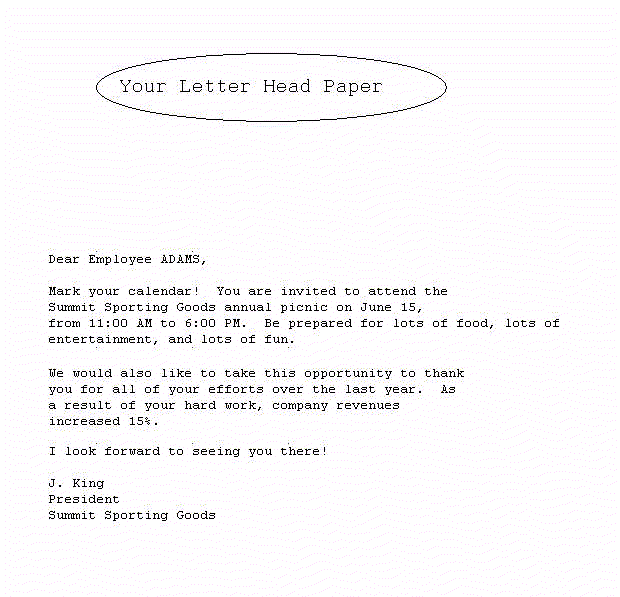
Text description of the illustration cndfrm_fin.gif
Figure 22-2 Conditional form letter report output, alternate version
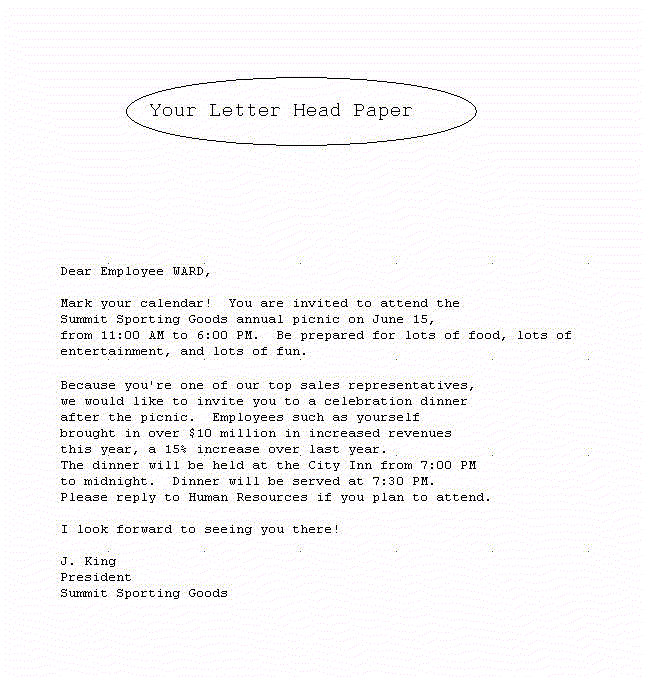
Text description of the illustration cndfrm_out2.gif
The two form letters above were generated from the same report. As you can see, the two letters share a number of features. Hence, it is more convenient to create a base form letter and then apply conditions to certain parts to determine whether they should be displayed for the current record, in this case, employees.
Concepts
- Conditional printing is useful when you want to display a section of a report only if certain conditions are met at run time. Conversely, you may wish to use conditional printing to suppress certain information for those who don't need it.
Data Relationships
- This report uses one query to select all data.
Layout
- This report uses the Form Letter layout style. You'll also create the various pieces of boilerplate that will comprise the letter. To govern the printing of these boilerplate objects, you'll use vertically collapsing anchors and PL/SQL format triggers to conditionally produce different form letters for employees who meet the specified criteria.
Example Scenario
Suppose that you want to create a form letter to invite all of your employees to the company picnic. For your top sales representatives, though, you also want to include a special invitation to a dinner party in the form letter. For all other employees, you want to include a thank you without the dinner invitation.
To see a sample conditional form letter report, open the examples folder named condform, then open the Oracle Reports example named condforml.rdf. For details on how to access it, see "Accessing the example reports" in the Preface.
Table 22-1 Features demonstrated in this example
22.1 Prerequisites for this example
To build the example in this chapter, you must have access to the EMP and DEPT schema, which is provided by default with the Oracle9i database. The default user ID and password for accessing this schema is scott/tiger.
22.2 Create the data model and layout
When you are creating a single-query report, such as this one, you can use the Report Wizard to create the data model and layout simultaneously.
To create a data model and layout:
- Launch Reports Builder (or, if already open, choose File > New > Report)
- In the Welcome or New Report dialog box, select Use the Report Wizard, then click OK.
- If the Welcome page displays, click Next.
- On the Report Type page, select Create Paper Layout Only, then click Next.
- On the Style page, type a Title for your report, select Form Letter, then click Next.
- On the Data Source page, click SQL Query, then click Next.
- On the Data page, enter the following SELECT statement in the Data Source definition field:
SELECT ENAME, COMM FROM EMP
ORDER BY ENAME
Note:
You can enter this query in any of the following ways:
- Copy and paste the code from the provided text file called
condform1_code.txt into the Data Source definition field.
- Click Query Builder to build the query without entering any code manually.
- Type the code in the Data Source definition field.
|
Click Next.
Note:
If you are not already connected to a database, you will be prompted to connect to the database when you click Next. Ensure that you connect to a database that has the appropriate schema for this example. Section 22.1, "Prerequisites for this example" describes the sample schema requirements for this example.
|
- Type the first paragraph of your letter in the Form Letter Text window:
Dear Employee  &<ENAME>,

Mark your calendar! You are invited to
attend the Summit Sporting Goods annual
picnic on June 15, from 11:00 AM to
6:00 PM.  Be prepared for lots of food,
lots of entertainment, and lots of fun.
|
Tip:
Be sure to include hard returns at the end of each line.
|
- Click Next.
- On the Template page, select No template, then click Finish to preview your report output in the Paper Design view.
22.3 Add additional text
After you add the basic text in the Report Wizard, you need to create some additional text. The text must reside inside of the repeating frame, so before you add text, you will resize the repeating frame.
To resize the repeating frame:
- Click the Paper Layout button in the toolbar to display the Paper Layout view.
- In the Object Navigator, type
R_G_ENAME in the Find field to locate it.
- Click R_G_ENAME to select it. It is simultaneously selected in the Paper Layout view.
- Click the title bar of the Report Editor to make it the active window.
- Click the bottom handle of R_G_ENAME and drag it down about 4 inches.
To add more text:
- Click the Text tool in the tool palette.
- Click about 0.25 inches below the first text object.
- Type the following text:
Because you're one of our top sales
representatives, we would like to
invite you to a celebration dinner
after the picnic. Employees such as
yourself brought in over $10 million
in increased revenues this year, a
15% increase over last year. The
dinner will be held at the City Inn
from 7:00 PM to midnight. Dinner will
be served at 7:30 PM. Please reply to
Human Resources if you plan to
attend.
- Click once in an open area of the Paper Layout view.
- Choose Tools > Property Inspector to display the Property Inspector for the boilerplate text object:
- Under General Information, set the Name property to B_SALESREP.
- Click on the title bar of the Report Editor to make it the active window again.
- Repeat the steps above, but this time use the following text and name it
B_ALL2:
We would also like to take this
opportunity to thank you for all of
your efforts over the last year.  As
a result of your hard work, company
revenues increased 15%.
- Again, repeat the steps above, but this time use the following text and name it
B_ALL3:
I look forward to seeing you there!

J. King
President
Summit Sporting Goods
- Rename the original text object to
B_ALL by selecting it and choosing Tools > Property Inspector to set the Name property.
22.4 Add logic for text
The text in B_SALESREP and B_ALL2 applies only to some employees. Hence, you need to apply a condition to each one to determine when it should appear. You also need to ensure that objects (e.g., B_ALL2 and B_ALL3) move up in the layout whenever objects above them (e.g., B_SALESREP and B_ALL2) do not print. Otherwise, you will have large gaps in your report output for employees who do not get all of the objects. To achieve this, you must anchor the text objects together.
To create collapsing anchors:
- In the Paper Layout view, click the Anchor tool in the tool palette.
- Click and drag a line from the top left corner of B_SALESREP (the second text object) to the top left corner of B_ALL (the first text object). Double-click to create the new anchor object.
- Choose Tools > Property Inspector to display the Property Inspector for the anchor object:
- Set the Child Edge Percent and Parent Edge Percent properties are set to 0.
- Set the Collapse Vertically property to Yes.
- Click the title bar of the Report Editor to make it the active window again.
- Repeat the steps above, but this time drag from top left corner of B_ALL2 to the top left corner of B_SALESREP.
- Again, repeat the steps above, but this time drag from top left corner of B_ALL3 to the top left corner of B_ALL2.
Figure 22-3 Property Inspector with anchor properties displayed
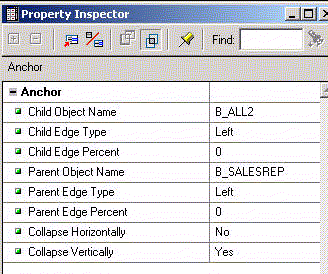
Text description of the illustration cndfrm_pi.gif
To create format triggers:
- In the Paper Layout view, double-click B_SALESREP to display the Property Inspector, and set properties:
- Under Advanced Layout, click the Format Trigger property field to display the PL/SQL Editor.
- In the PL/SQL Editor, use the template to enter the following PL/SQL code:
function B_SalesrepFormatTrigger return boolean is
begin
  if :comm >= 500 then return(TRUE);
   else return(FALSE);
  end if;
end;
This boilerplate will print only in the letters to employees whose commissions are greater than $500.
- Repeat the steps above, but this time enter the following PL/SQL for B_ALL2:
function B_ALL2FormatTrigger return boolean is
begin
   if ((:comm < 500) or (:comm is null)) then
     return(TRUE);
   else return(FALSE);
   end if;
end;
Figure 22-4 Paper Layout view of modified report
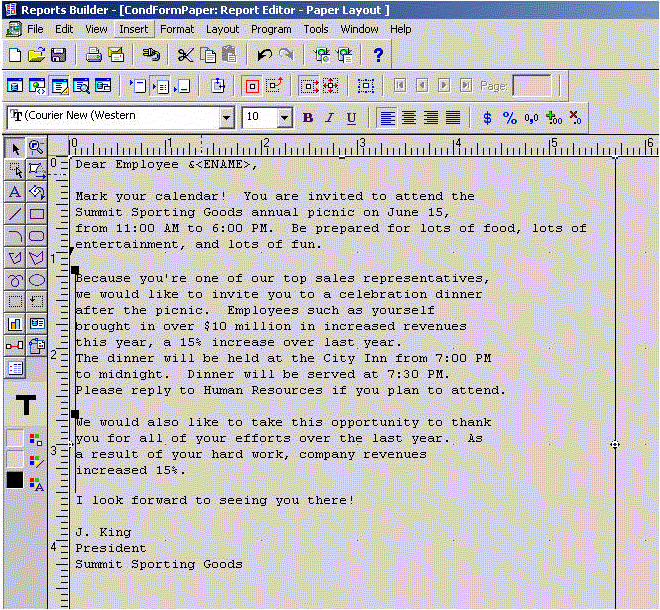
Text description of the illustration cndfrm_lm.gif
- Compile, save, and run your report. Page through the form letters to see that some have the dinner invitation while others have the "thank you" message.
|
Tip:
When viewing this report on your screen, you may wish to specify a Destination Type of Preview. Your report output will display as though using Postscript fonts instead of screen display fonts, and you can get a clearer indication of the appearance (e.g., line wrapping) of the printed report.
In addition, when you print a conditional form letter report on stationery as illustrated, be sure to take into account the position of the letterhead, etc., when creating the layout so the text of the letter fits into the overall design of the stationery.
|
22.5 Summary
Congratulations! You have successfully created a conditional form letter report. You now know how to:
- create a data model and a layout.
- add text.
- anchor objects together and create format triggers to control whether the text displays.
For more information on any of the wizards, views, or properties used in this example, refer to the Reports Builder Online Help, which you can access in two ways:
