32
Building an Invoice Report
Figure 32-1 Invoice report output
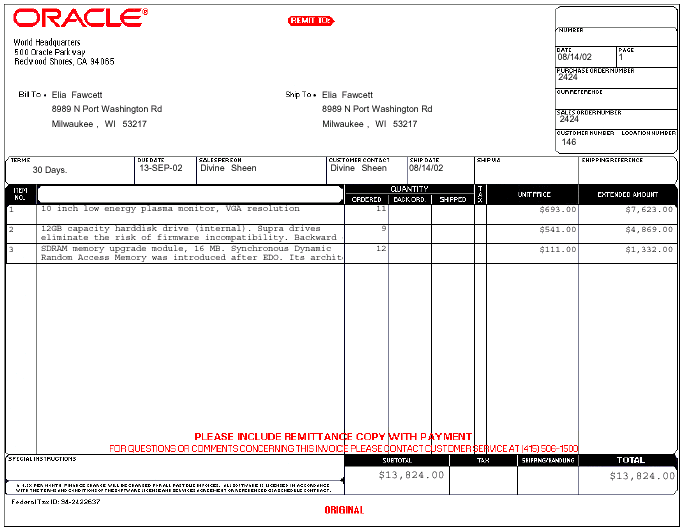
Text description of the illustration invoice_fin.gif
This report displays several distinguishing characteristics of a typical invoice, such as customer name and address, sales order number, billing information, and billing totals.
In this chapter, you will build an invoice report where you will learn how to import an image of a pre-printed form (in this case, a blank invoice image) and use the tools in the Paper Layout view to print your report on such a form.
Note:
Many of the same concepts are used in the following three example reports
- This example, where you import an image of an invoice and use it as a guide to position fields in the Paper Layout view.
- Chapter 30, "Building a Check Printing Report with Spelled-Out Cash Amounts", where you import an image of a check and use it as a guide to position fields in the Paper Layout view. In addition, you learn how to create a PL/SQL function that returns spelled-out numerical values
- Chapter 31, "Building a Report Using a Pre-Printed Form", where you learn formatting techniques for printing reports on pre-printed forms when you do not have access to a computer readable version of the forms. Such reports must be designed so that the data prints in exact positions on the form.
|
Concepts
- Invoice reports are master/detail reports with billing amounts that print conditionally. The customer name, address, and related information are derived from the master query (or group, if there is only one query). The line-items come from the detail query. The billing amounts are printed in the page footer.
- This information must all print on specific line and column positions on the pre-printed invoice form. To format your information correctly, you'll use many of the same techniques as you used in Chapter 31, "Building a Report Using a Pre-Printed Form".
- As an additional aid to formatting this report, you will link to a TIFF image of the invoice. This will enable you to position your fields more precisely.
Data Relationships
- The data for this report is fetched using two queries, linked together in a master/detail relationship. You'll also define a break and two summaries.
Layout
- This layout is similar to the layout for the pre-printed form report, but in this case you will also link to a TIFF image of your form to use as a guide while adjusting the positions of several fields.
Example Scenario
Suppose that you want to create a report that prints an invoice for each customer, listing items purchased, subtotals, and total cost. This report would include the following on an invoice form for each customer:
- standard billing information such as name, address, date, purchase order number, and so on
- a list of items purchased, including item number, description, and price
- the total cost of all items purchased
To see a sample invoice report, open the examples folder named invoice, then open the Oracle Reports example named invoice.rdf. For details on how to open it, see "Accessing the example reports" in the Preface.
Table 32-1 Features demonstrated in this example
32.1 Prerequisites for this example
To build the example in this chapter, you must have access to the sample schema provided with the Oracle9i database. If you don't know if you have access to this sample schema, contact your database administrator. You should have access to the "Order Entry" portion of the schema to complete this example.
32.2 Create a new report manually
In this case, it is easier to create the data model and layout separately. Hence, we will create an empty report first, then add the queries, and then create the layout.
To create a blank report:
- Launch Reports Builder (or, if already open, choose File > New > Report).
- In the Welcome or New Report dialog box, select Build a new report manually, then click OK.
32.3 Create a data model with a data link
When you create a report with multiple queries, it is typically easier to create all of the queries with the Data Wizard in the Data Model view. In this report, you will create two queries, linked with a group-to-group data link.
To create the queries:
- In the Data Model view, choose Insert > Query to display the Data Wizard.
- If the Welcome page displays, click Next.
- On the Query page, type
Q_Order for the Query name, then click Next.
- On the Data Source page, select SQL Query, then click Next.
- On the Data page, in the Data Source definition field, enter the following SELECT statement:
SELECT
   ORDER_ID,
   ORDER_DATE,
   ORDER_TOTAL,
   ORDERS.CUSTOMER_ID,
   SALES_REP_ID,
   C1.CUST_FIRST_NAME,
   C1.CUST_LAST_NAME,
   C1.CUST_ADDRESS,
   C1.CUSTOMER_ID,
   C2.CUST_FIRST_NAME,
   C2.CUST_LAST_NAME,
   C2.CUST_ADDRESS,
   C2.CUSTOMER_ID
FROM ORDERS, CUSTOMERS C1, CUSTOMERS C2
WHERE ORDERS.CUSTOMER_ID = C1.CUSTOMER_ID AND
   ORDERS.SALES_REP_ID = C2.CUSTOMER_ID
- Click Next.
Note:
If you are not already connected to a database, you will be prompted to connect to the database when you click Next. Ensure that you connect to a database that has the appropriate schema for this example. Section 32.1, "Prerequisites for this example" describes the sample schema requirements for this example.
|
- On the Groups page, click Next.
- Click Finish to display your first query in the Data Model view.
- Repeat the steps above for a second query, but this time name your query
Q_Item and use the following SELECT statement:
SELECT
   O.ORDER_ID,
   O.LINE_ITEM_ID,
   O.PRODUCT_ID,
   O.QUANTITY,
   O.UNIT_PRICE,
   TRANSLATED_DESCRIPTION,
   P.PRODUCT_ID,
   O.QUANTITY * O.UNIT_PRICE
FROM ORDER_ITEMS O, PRODUCT_DESCRIPTIONS P
WHERE  O.PRODUCT_ID = P.PRODUCT_ID
   AND P.LANGUAGE_ID = 'US'
Your data model should now look something like this:
Figure 32-2 Queries in the Data Model view
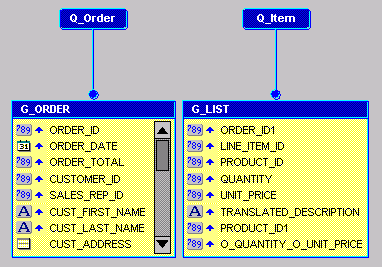
Text description of the illustration invoice_dm1.gif
To add the data link:
- In the Data Model view, click the Data Link tool in the tool palette.
- Click and drag from the ORDER_ID column in the G_ORDER group to the ORDER_ID1 column in the G_LIST group. Notice that a line is drawn from the bottom of the G_ORDER group to the Q_Item query. Labels for ORDER_ID and ORDER_ID1 are created at each end of the line to indicate they are the columns linking G_ORDER to Q_Item.
32.4 Create summary and formula columns
To provide the necessary information for the invoice, you need to create summary and formula columns for subtotal amounts, a total amount, and due dates.
To create the invoice summary and formula columns:
- Click the Summary Column tool in the tool palette, then click in an open area of the Data Model view to create a summary column.
- Double-click the new summary column object to display the Property Inspector, and set properties:
- Under General Information, set the Name property to CS_SUB_TOTAL.
- Under Summary, set the Source property to O_QUANTITY_O_UNIT_PRICE, and set the Reset At property to Page.
This summary is used for subtotal amounts on each page of the invoice.
- Click the G_ORDER group, and drag the bottom edge handle down to create an empty space at the bottom of the group.
- Again, click the Summary Column tool in the tool palette, then click in the empty space in the G_ORDER group to create a second summary column.
- Double-click the new summary column object to display the Property Inspector, and set properties:
- Under General Information, set the Name property to CS_TOTAL.
- Under Summary, set the Source property to O_QUANTITY_O_UNIT_PRICE and set the Reset At property to G_ORDER.
This summary is used for a total amount of each invoice.
- Click the Formula Column tool in the tool palette, then click in an open area of the Data Model view to create a formula column.
- Double-click the new formula column object to display the Property Inspector, and set properties:
- Under General Information, set the Name property to CF_DUE_DATE.
- Under Column, set the Datatype property to Date.
- Under Placeholder/Formula, click the PL/SQL Formula property field to display the PL/SQL Editor.
- In the PL/SQL Editor, use the template to enter the following PL/SQL code:
function CF_DUE_DATEFormula return Date is
today date;
begin
 select sysdate into today from dual;
  return today + 30;
end;
This formula is used to calculate the due date, which is 30 days after today.
Your data model should now look something like this:
Figure 32-3 Data Model view with data link, summary and formula columns
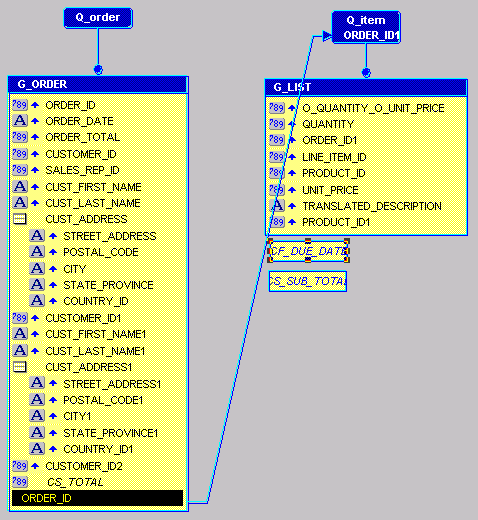
Text description of the illustration invoice_dm2.gif
32.5 Prepare the layout
The layout for an invoice report is created by importing an image of the invoice form, then creating desired fields and frames on top of the image. First, you need to set up your layout with the invoice form.
To prepare the invoice report layout:
- Click the Paper Layout button in the toolbar to display the Paper Layout view.
- In the Paper Layout view, choose Insert > Image, and browse to select the provided file
invdemo.tif. Position the image at the top left corner of the Paper Layout view
- Double-click the new image object to display the Property Inspector.
- In the Property Inspector, under Advanced Layout, set the Print Object On property to All Pages.
- In the Object Navigator, expand the Paper Layout node, and double-click the properties icon next to Main Section to display the Property Inspector, and set properties:
- Under Section, set the Width property to 11 and the Height property to 8.5 for landscape paper orientation to fit the invoice image.
- In the Paper Layout view, click the Repeating Frame tool in the tool palette, then drag a repeating frame around the invoice image so that the image falls just inside the repeating frame. The repeating frame that you create should cover the image.
- Double-click the repeating frame to display the Property Inspector, and set properties:
- Under General Information, set the Name property to R_ORDER.
- Under Repeating Frame, set the Source property to G_ORDER, the Print Direction property to Down, and the Maximum Records per Page property to 1.
- Click the Frame tool in the tool palette, then create a frame just inside the borders of the R_ORDER repeating frame.
- Double-click the frame object to display the Property Inspector, and set properties:
- Under General Information, set the Name property to M_INVOICE.
- Under Advanced Layout, set the Print Object On property to All Pages.
- Click the repeating frame, then click the Fill Color tool in the tool palette and choose No Fill. Do the same for the frame. You should now see the invoice image, even though it is still layered behind the frame and repeating frame.
32.6 Insert invoice information
You are now ready to create fields on the invoice image to retrieve desired information for the invoice report. When you print the report, the field values will be correctly positioned on the invoice form. As you complete the steps below, use the figure below as a guide (you can also open the provided example report invoice.rdf in Reports Builder).
Figure 32-4 Invoice report layout
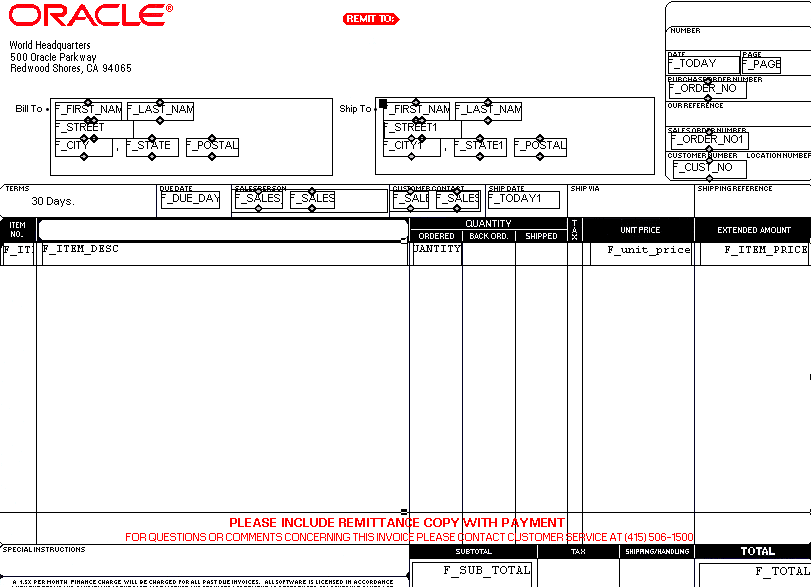
Text description of the illustration invoice_lay.gif
To insert the information for the invoice report:
- In the Paper Layout view, click the Text tool in the tool palette, then create a boilerplate text object on top of the invoice image, in the area labeled Terms. In the boilerplate text object, type:
30 days.
- Click the Field tool in the tool palette, and create fields on top of the invoice image, in the following areas:
- Bill To (6 fields, one for element of the name and address):
Set Name property to F_FIRST_NAME, Source property to CUST_FIRST_NAME.
Set Name property to F_LAST_NAME, Source property to CUST_LAST_NAME.
Set Name property to F_STREET, Source property to C_STREET_ADDRESS.
Set Name property to F_CITY, Source property to C_CITY.
Set Name property to F_STATE, Source property to C_STATE_PROVINCE.
Set Name property to F_POSTAL, Source property to C_POSTAL_CODE.
- Ship To (6 fields, one for element of the name and address):
Set Name property to F_FIRST_NAME1, Source property to CUST_FIRST_NAME.
Set Name property to F_LAST_NAME1, Source property to CUST_LAST_NAME.
Set Name property to F_STREET1, Source property to C_STREET_ADDRESS.
Set Name property to F_CITY1, Source property to C_CITY.
Set Name property to F_STATE1, Source property to C_STATE_PROVINCE.
Set Name property to F_POSTAL1, Source property to C_POSTAL_CODE.
- Date: Set Name property to F_TODAY, Source property to Current Date, and Format Mask property to MM/DD/RR.
- Page: Set Name property to F_PAGE, Source property to Page Number, and Page Numbering property (in the Page Numbering dialog box) to Reset at: R_ORDER
- Purchase Order Number: Set Name property to F_ORDER_NO, Source property to ORDER_ID.
- Sales Order Number: Set Name property to F_ORDER_NO1, Source property to ORDER_ID.
- Customer Number: Set Name property to F_CUST_NO, Source property to CUSTOMER_ID.
- Due Date: Set Name property to F_DUE_DAY, Source property to CF_DUE_DATE.
- Salesperson (2 fields, one for first name, one for last name):
Set Name property to F_SALES_REP_FNAME, Source property to CUST_FIRST_NAME.
Set Name property to F_SALES_REP_LNAME, Source property to CUST_LAST_NAME.
- Customer Contact: (2 fields, one for first name, one for last name):
Set Name property to F_SALES_REP_FNAME1, Source property to CUST_FIRST_NAME.
Set Name property to F_SALES_REP_LNAME1, Source property to CUST_LAST_NAME.
Note: this examples assumes that the customer contact is same person as the sales representative.
- Ship Date: Set Name property to F_TODAY1, Source property to Current Date, and Format Mask property to MM/DD/RR.
- Item No.: Set Name property to F_ITEM_NO, Source property to LINE_ITEM_ID. With the field selected, click the Align Right button in the toolbar.
- Description: Set Name property to F_ITEM_DESC, Source property to TRANSLATED_DESCRIPTION.
- Quantity Ordered: Set Name property to F_QUANTITY, Source property to QUANTITY. With the field selected, click the Align Right button in the toolbar.
- Unit Price: Set Name property to F_UNIT_PRICE, Source property to UNIT_PRICE, and Format Mask property to $NNN,NN0.00. With the field selected, click the Align Right button in the toolbar.
- Extended Amount: Set Name property to F_ITEM_PRICE, Source property to O_QUANTITY_O_UNIT_PRICE, and Format Mask property to $NNN,NN0.00. With the field selected, click the Align Right button in the toolbar.
- Subtotal: Set Name property to F_SUB_TOTAL, Source property to CS_SUB_TOTAL.
- Total: Set Name property to F_TOTAL, Source property to CS_TOTAL.
- Click the Frame tool in the tool palette, and draw a frame around the following fields to group them:
- Bill To: F_FIRST_NAME, F_LAST_NAME, F_STREET, F_CITY, F_STATE, and F_POSTAL. Set the Frame's Name property to M_BILL_TO.
- Ship To: F_FIRST_NAME1, F_LAST_NAME1, F_STREET1, F_CITY1, F_STATE1, and F_POSTAL1. Set the Frame's Name property to M_SHIP_TO.
- Salesperson: F_SALES_REP_FNAME and F_SALES_REP_LNAME. Set the Frame's Name property to M_SALES_REP.
- Customer Contact: F_SALES_REP_FNAME1 and F_SALES_REP_LNAME1. Set the Frame's Name property to M_CUST_CONTACT.
- Item list: F_ITEM_NO, F_ITEM_DESC, F_QUANTITY, F_UNIT_PRICE, and F_ITEM_PRICE, including all the empty space below these fields to the bottom border of the list area. Set the Frame's Name property to M_ORDER_LIST. This frame is used to position and size the detail item list repeating frame.
Note: Using a frame ensures that other objects will not be pushed by the variable horizontal size of the name fields.
- Click the Repeating Frame tool in the tool palette, and draw a repeating frame around the following fields to group them:
- Item list: F_ITEM_NO, F_ITEM_DESC, F_QUANTITY, F_UNIT_PRICE, and F_ITEM_PRICE, including just the fields and not the empty space below the fields. Set the Repeating Frame's Name property to R_ORDER_LIST, and the Source property to G_LIST.
- Save and run your report. Adjust the position of objects if necessary to fit to the background of the invoice image. Your final report output should look something like this:
Figure 32-5 Final invoice report output
Text description of the illustration invoice_fin.gif
32.7 Summary
Congratulations! You have successfully created an invoice report. You now know how to:
- create two queries with a data link between them.
- add two summary columns and a formula column to the data model to include on the invoice.
- prepare a report layout for adding information onto an image of a invoice.
- create and position fields in the correct locations on an invoice form.
For more information on any of the wizards, views, or properties used in this example, refer to the Reports Builder Online Help, which you can access in two ways:
