27
Building a Matrix with Group Above Report
Figure 27-1 Matrix with group above report output
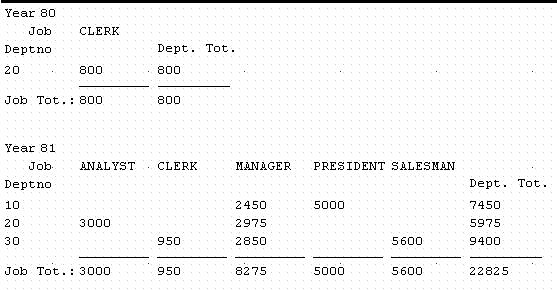
Text description of the illustration matgrp_fin.gif
This report shows department, job, and salary information for each employee by the year they were hired using a matrix break format.
Concepts
A matrix with group above report is a combination of a matrix and a group above report layout. Essentially, a matrix report is printed for each master group record. A matrix with group is similar to the multiquery nested matrix, except that in a matrix with group report, the parent exists above the cross product. In a multiquery nested matrix report with groups, the parent/child relationship exists within the across or down dimension of the cross product.
Data Relationships
- This example of a matrix with group above report uses one query and at least five groups. At least one group is placed above the cross product to serve as the Master group.
Layout
- This report uses the Matrix with Group layout style.
Example Scenario
Suppose that you want to create report that cross tabulates salaries by department and by job for each year. The result would be a group report where year is the master and the detail is a matrix with job functions listed across the top, departments down the side, and sums of salaries in the cells. Thus, you could quickly determine the sum of all of the salaries for clerks in department 20 for any particular year.
To see a sample matrix with group above report, open the examples folder named matrixgroup, then open the Oracle Reports example named matrixgroup.rdf. For details on how to access it, see "Accessing the example reports" in the Preface.
Table 27-1 Features demonstrated in this example
27.1 Prerequisites for this example
To build the example in this chapter, you must have access to the EMP and DEPT schema, which is provided by default with the Oracle9i database. The userid and password for accessing this schema is scott/tiger.
27.2 Create a matrix group data model and layout
Since this report is a single-query report, it is easiest to build it with the Report Wizard.
To create the data model and layout with the Report Wizard:
- Launch Reports Builder (or, if already open, choose File > New > Report).
- In the Welcome or New Report dialog box, select Use the Report Wizard, then click OK.
- If the Welcome page displays, click Next.
- On the Report Type page, select Create Paper Layout Only, then click Next.
- On the Style page, type a Title for your report, select Matrix with Group, then click Next.
- On the Data Source page, click SQL Query, then click Next.
- On the Data page, enter the following SELECT statement in the Data Source definition field:
SELECT TO_CHAR(HIREDATE, 'YY') YEAR, DEPTNO, JOB, SUM(SAL)
FROM EMP
GROUP BY TO_CHAR(HIREDATE, 'YY'), DEPTNO, JOB
Note:
You can enter this query in any of the following ways:
- Copy and paste the code from the provided text file called
matrixgroup_code.txt into the Data Source definition field.
- Click Query Builder to build the query without entering any code manually.
- Type the code in the Data Source definition field.
|
Click Next.
Note:
If you are not already connected to a database, you will be prompted to connect to the database when you click Next. Ensure that you connect to a database that has the appropriate schema for this example. Section 27.1, "Prerequisites for this example" describes the sample schema requirements for this example.
|
- On the Groups page, click YEAR in the Available Fields list and click the right arrow (>) to move this field to the Matrix Group Fields list, then click Next.
- On the Rows page, click DEPTNO in the Available Fields list and click the right arrow (>) to move this field to the Matrix Row Fields list, then click Next.
- On the Columns page, click JOB in the Available Fields list and click the right arrow (>) to move this field to the Matrix Column Fields list, then click Next.
- On the Cell page, click SUM_SAL in the Available Fields list and click the right arrow (>) to move this field to the Matrix Cell Fields list, then click Next.
.
Note:
In this case, the query itself performs the summary via the SUM function. Hence, you should not use the Sum button in this instance.
|
- On the Totals page, click SUM_SAL in the Available Fields list and click Sum to move this field to the Matrix Totals list, then click Next.
- On the Labels page, remove the label for SUM_SAL, then click Next.
- On the Template page, select No Template, then click Finish to display your report output in the Paper Design view. It should look something like this:
Figure 27-2 Paper Design view for matrix with group above report
Text description of the illustration matgrp_out1.gif
27.3 Add labels and lines for summaries
To make your report more readable, it would be useful to add labels for the row and column summaries. It would also be nice to have lines above the column summaries to better distinguish them from the cell values.
To add text:
- In the Paper Design view, click on the Text tool from the toolbar on the left.
- Click in the open space just below the first department number and to the left of the first total.
- Enter
Job Tot.:, then click in a blank area of the Paper Design view. If you perform this step correctly, the label should now appear for all of the column summaries in the report.
- If necessary, use the arrow keys to better align the label with the summaries.
|
Tip:
If you want more precise movements, turn off Snap to Grid in the View menu. It may also be helpful for this step to turn off Flex mode by clicking the Flex Off button in the toolbar.
|
- Click on the Text tool from the toolbar on the left.
- Click in the open space just above the row summaries.
- Enter
Dept. Tot., then click in a blank area of the Paper Design view. If you perform this step correctly, the label should now appear for all of the column summaries in the report.
- If necessary, use the arrow keys to better align the label with the summaries.
Figure 27-3 Matrix with group above report output with summary labels
Text description of the illustration matgrp_out2.gif
To add lines above column summaries
- In the Paper Design view, click the Job Tot. label that you created in the previous section.
- Shift-click the summaries to the right of Job Tot.
- Click the Flex On button in the toolbar to set Flex mode on.
- Click and drag Job Tot. and the summary fields down about 0.25 inches.
- Click the Paper Layout button in the toolbar to display the Paper Layout view.
- In the Paper Layout view, note the two spaces that now appear just above the F_SumSUM_SALPerJOB and F_SumSUM_SALPerYEAR fields.
- Click the Line tool in the tool palette.
- Click and drag a line in the space above F_SumSUM_SALPerJOB.
- Repeat steps 7 and 8 to create a line above F_SumSUM_SALPerYEAR.
Figure 27-4 Layout model with lines above column summaries
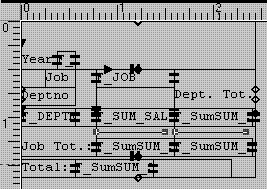
Text description of the illustration matgrp_lm.gif
27.4 Add space between groups
Note that the output has no space between the groups.
To add more space:
- In the Paper Layout view, click the Confine Off and Flex On buttons in the toolbar to set Confine mode off and Flex mode on.
- Click the Year label to select it, then Shift-click the F_YEAR field to the right to select it, too.
- Click and drag the F_YEAR field down about 0.25 inches.
- Click the Paper Design button in the toolbar to preview your report output in the Paper Design view.
Figure 27-5 Matrix group above report output with added space
Text description of the illustration matgrp_fin.gif
27.5 Create a Web layout
Now that you have created a paper layout, suppose that you decide you would also like to have a Web layout for this report. You can quickly create a Web layout in the Report Wizard without changing your paper layout.
- Choose Tools > Report Wizard.
- Select Create Web Layout only.
- Click Finish.
- Click the Web Source view button in the toolbar and review the Web source for your Web layout.
- Choose Program > Run Web Layout to preview your Web layout.
Note:
If Netscape 7.0 is your default browser, the browser may not display. You can work around this bug by making a copy of the Netscape 7.0 executable, naming it netscape.exe; with this name, the browser will display as expected.
|
27.6 Summary
Congratulations! You have successfully created a matrix group above report. You now know how to:
- create a matrix group above report with a single-query data model.
- add labels and line for summaries.
- add some white space between the master records.
- create a Web layout without changing the paper layout.
For more information on any of the wizards, views, or properties used in this example, refer to the Reports Builder Online Help, which you can access in two ways:
