19
Building a Report that Renumbers Pages by Repeating Frame
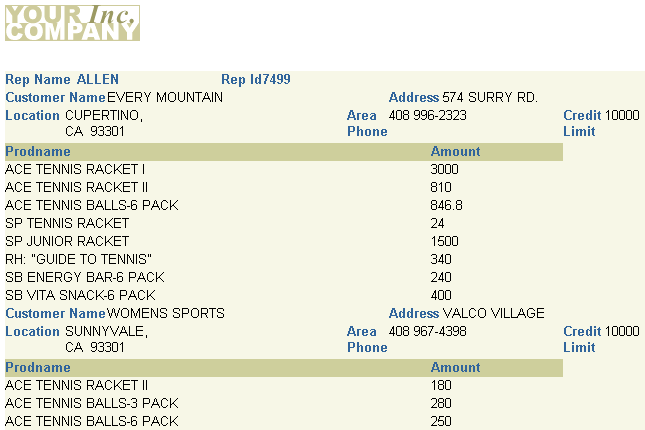
Figure 19-1 Pages renumbered by repeating frame report output
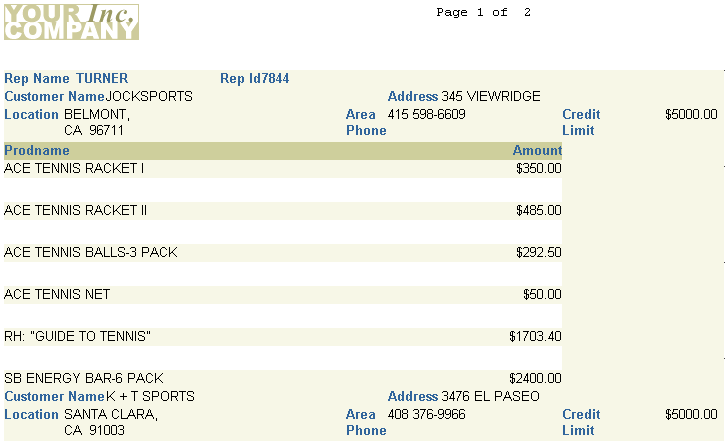
Text description of the illustration pagenum_wiz6.gif
This report numbers pages using the format "Page X of Y Pages". The first number (X) corresponds to the current page for each parent record (i.e., each sales representative). This page number is reset to "1" for each sales representative, thus tracking the statistics of each representative separately.
The second number (Y) is the total pages required to display the customer information for each sales representative. This field is also reset with each new parent record.
Important Note: The steps described here explain how to produce the "Page X of Y Pages" for the paper layout and have no effect on the Web source, because the Web source does not have pagination.
Concepts
- The Page Numbering dialog box enables you to specify that the page number either reset at a particular repeating frame or increment over the entire report.
- However, if you decide to use a page total that repeats on several pages, as with the second number in the example report, you need to be aware of certain rules that apply when formatting a field that contains a count of other objects. To be able to display such a value, called a page-dependent reference, on the first page--or any page prior to the final page--of the report, Reports Builder must format the field that will contain the value before it knows the value. As a result, any field displaying a value of this type must be fixed, so that Reports Builder knows how much space to reserve for it when formatting the report. Even if you set the Horizontal Elasticity property or Vertical Elasticity property to Expand, Contract, or Variable for such a field, Reports Builder considers it fixed. When you create such a field, you must ensure that it is large enough to contain the value.
- An alternative is to hide the field and reference it from a boilerplate object. When using this method, the field can be variable, but the boilerplate remains fixed, so be sure to create a boilerplate object of sufficient size to hold the field.
- Some values that are treated in this fashion by Reports Builder are &TOTAL LOGICAL PAGES, &TOTAL PANELS, and &TOTAL PHYSICAL PAGES, and any summaries or formulas that reference them. Summaries with either a Compute At property or Reset At property setting of Page and formulas that reference them are also considered page-dependent references. For a complete list of such values and a comprehensive discussion of Reports Builder's treatment of them, see the topics "Vertical Elasticity property" or "Horizontal Elasticity property" in the Reports Builder online help.
Data Relationships
- As illustrated in the screenshot at the beginning of this chapter, this report contains both a master/detail relationship and a break. This results in two levels of data differentiation. The top level (the break) will determine when page numbers reset.
Layout
- This report uses the master/detail layout style, with modifications. In addition, you'll create two hidden fields for the page numbers, then reference them in a boilerplate object. This will ensure that the field displaying the total number of pages is the proper size. Then you'll check the Maximum Records Per Page property setting for the break group's repeating frame to ensure that your pages are numbered correctly.
Example Scenario
Suppose that you want to create a page number in the margin of a report in the format "Page X of Y Pages". The page number X is incremented for each page produced by customer sales for one sales representative at a time. Y represents the total number of pages for the sales representative of that sales grouping and is reset for the next sales representative.
To see a sample report that renumbers pages by repeating frame, open the examples folder named pagenum, then open the Oracle Reports example called pagenum.rdf. For details on how to open it, see "Accessing the example reports" in the Preface.
Table 19-1 Features demonstrated in this example
19.1 Prerequisites for this example
19.2 Create a data model and a group above layout
When you are creating a single-query report, such as this one, you can use the Report Wizard to create the data model and layout simultaneously.
To create a data model and group above layout:
- Launch Reports Builder (or, if already open, choose File > New > Report).
- In the Welcome or New Report dialog box, select Use the Report Wizard, then click OK.
- If the Welcome page displays, click Next.
- On the Report Type page, select Create both Web and Paper Layout, then click Next.
- On the Style page, type a Title for your report, select Group Above, then click Next.
- On the Data Source page, click SQL Query, then click Next.
- On the Data page, enter the following SELECT statement in the Data Source definition field:
SELECT ENAME, REPID, CUSTID, NAME, ADDRESS, TRIM(CITY)||',

'||STATE||'  '||ZIP LOCATION,  AREA||' '||PHONE, CREDITLIMIT

FROM EMP, CUSTOMER

WHERE EMPNO = REPID

ORDER BY REPID
Note:
You can enter this query in any of the following ways:
- Copy and paste the code from the provided text file called
pagenum_code.txt into the Data Source definition field.
- Click Query Builder to build the query without entering any code manually.
- Type the code in the Data Source definition field.
|
- Click Next.
Note:
If you are not already connected to a database, you will be prompted to connect to the database when you click Next. Ensure that you connect to a database that has the appropriate schema for this example. Section 19.1, "Prerequisites for this example" describes the sample schema requirements for this example.
|
- On the Groups page, click ENAME and REPID in the Available Fields list and click the right arrow (>) to move these fields to the Group Fields list, then click Next.
Figure 19-2 Selecting group fields in the Report Wizard
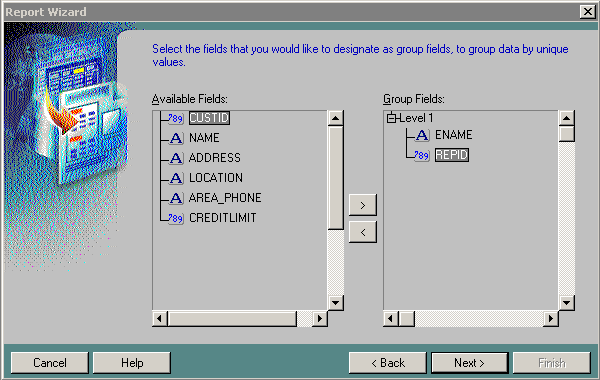
Text description of the illustration pagenum_wiz1.gif
- On the Fields page, click the double right arrows (>>) to move all of the fields to the Displayed Fields list, then click CUSTID and click the left arrow (<) to move it back to the Available Fields list, then click Next.
- On the Totals page, click Next.
- On the Labels page, change the labels and field widths as follows, then click Next:
Figure 19-3 Specifying labels and widths in the Report Wizard
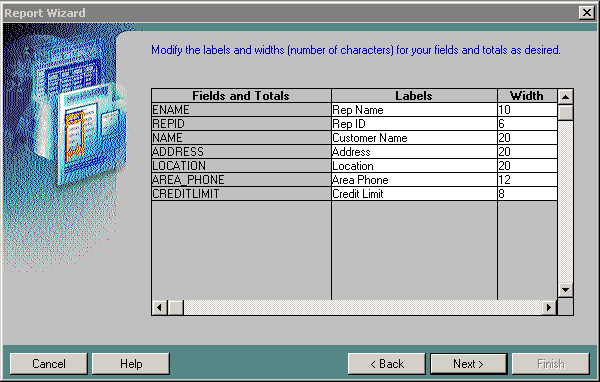
Text description of the illustration pagenum_wiz2.gif
- On the Template page, click Finish to display your report output in the Paper Design view.
19.3 Add a second query
In the Paper Design view, the data is grouped by the Sales Representative with customer data listed below each Sales Representative.
Figure 19-4 Report layout in the Paper Design view
Text description of the illustration pagenum_wiz3.gif
All the data will display on one page and the individual sales transactions for each customer is not yet available. You will need an additional query in the Data Model to accomplish this.
To add a new query to the report:
- Click the Data Model button in the toolbar.
- In the Data Model view, click the SQL Query tool in the tool palette, then click in the main area (canvas region) of the window to the right of query Q_1.
- In the SQL Query Statement dialog box, type the SELECT statement for the query:
SELECT CUSTID,PRODNAME,AMOUNT

FROM SALES

ORDER BY CUSTID
- Click OK to display the new query in the Data Model view.
- In the Data Model view, click the Data Link tool in the tool palette.
- Using the cross hairs of the cursor, click CUSTID in the G_NAME group and drag the cursor to custid1 in the G_custid1 group, then release the mouse button to link the CUSTID and custid1 fields between the two groups.
- Position the Report Editor window to display it alongside the Object Navigator so that you can view both windows simultaneously.
- In the Object Navigator, under the Data Model node, expand the Groups node. Then, under the Paper Layout node, expand the Main Section node. Compare these two structures and note that even though additional data is made available in the Data Model by adding query Q_2, the Paper Layout will not use this additional data unless modified to do so. We will do this next.
19.4 Redefault the layout
To redefault the layout to use the additional query data:
- In the Object Navigator, click the report name.
- Choose Tools > Report Wizard to re-enter the wizard.
- In the Report Wizard, on the Groups page, click G_custid1 in the Available Groups list and click Down specify the Print Direction and move this group to the Displayed Groups list.
- On the Fields page, click prodname and amount in the Available Fields list and click the right arrow (>) to move these fields to the Displayed Fields list.
- On the Labels page, change the labels and field widths as follows:
- On the Template page, click Finish to display your report output in the Paper Design view. It should look something like this:
Figure 19-5 Revised report layout in Paper Design view
Text description of the illustration pagenum_wiz4.gif
Note that the data is still grouped by the Sales Representative with customer data listed below each Sales Representative. But now, the individual products sold to the customers are listed below each customer. The report now has multiple pages.
19.5 Set properties and format fields
To set properties and format the fields of your report:
- In the Object Navigator, click the Paper Layout node and click the Expand All button in the toolbar.
- Double-click the repeating frame icon next to the R_G_ENAME node to display the Property Inspector, and set properties:
- Under Repeating Frame, set the Maximum Records per Page property to 1.
- In the Object Navigator, double-click the repeating frame icon next to the R_G_CUSTID1 node to display the Property Inspector, and set properties:
- Under Repeating Frame, set the Vert. Space Between Frames property to 0.25 to specify 1/4 inch of vertical space between instances of the repeating frame; that is, between each customer record.
- Under General Layout, set the Page Protect property to Yes to specify that the first instance of the repeating frame (that is, the first customer record) must all fit on the same logical page.
- In the Object Navigator, click the F_CREDITLIMIT node, then Ctrl-click F_AMOUNT to select both nodes.
- Click the Paper Design button in the toolbar to make the Paper Design view the active window, with the F_CREDITLIMIT and F_AMOUNT fields selected, and make the format changes (you can also click the corresponding buttons in the toolbar):
- choose Format > Number > Currency
- choose Format > Number > Add Decimal Place
- choose Format > Number > Add Decimal Place (again, for two decimal places)
- choose Format > Justify > Right
- In the Paper Design view, click the Amount label (column heading), and choose Format > Justify > Right.
19.6 Create new fields
To create new fields for the page numbers of the report:
- Click the Paper Layout button in the toolbar to display the Paper Layout view.
- In the Paper Layout view, click the Edit Margin button in the toolbar to display the margin areas of your report. You will be creating two page number fields in the top margin, as shown here:
Figure 19-6 Page number source fields in top margin of report
Text description of the illustration pagenum_plview.gif
- Click the Field tool in the tool palette and draw a field about two characters long in the center of your margin.
- Double-click the new field object (F_1) to display the Property Inspector, and set properties:
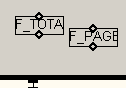
- Under General Information, set the Name property to F_TOTAL_PAGENO.
- Under Field, set the Source property to Total Pages, and set the Visible property to No.
- Under General Layout, set the Horizontal Elasticity property to Variable.
Hiding both this field and the field you'll create below ensures that they'll appear only where you reference them. Changing the horizontal sizing to Variable ensures that the fields can expand to accommodate large page ranges.
- Under Field, click the Page Numbering property field to display the Page Numbering dialog box:
in the Reset at list, click R_G_ENAME, and verify that the Start at and Increment by values are both 1.
- Close the Property Inspector.
- In the Paper Layout view, click the F_TOTAL_PAGENO field.
- Choose Edit > Copy, then choose Edit > Paste to create a new field with the same dimensions as F_TOTAL_PAGENO next to F_TOTAL_PAGENO.
- Drag the new field object (F_TOTAL_PAGENO1) to an open area of the margin.
- Double-click the new field object (F_TOTAL_PAGENO1) to display its Property Inspector, and make the following changes:
- Under General Information, set the Name property to F_PAGENO.
- Under Field, set the Source property to Page Number.
Because it is a duplicate of F_TOTAL_PAGENO, the Horizontal Elasticity and Visible properties are already set as desired.
- Under Field, click the Page Numbering property field to display the Page Numbering dialog box.
In the Reset at list, click R_G_ENAME, and verify that the Start at and Increment by values are both 1.
- Close the Property Inspector.
Next, you will reference these fields in a text box to display page numbers in the format "Page X of Y Pages".
19.7 Reference fields
To reference the page number fields:
- In the Paper Layout view, click the Line Color tool in the tool palette.
- In the color palette, click No Line.
- Click the Text tool in the tool palette.
- Position the cursor in the top margin where you would like the page number to appear, and click to create a boilerplate object.
- In the new boilerplate object, type
Page &F_PAGENO of &F_TOTAL_PAGENO.
Figure 19-7 Page number source and reference fields in top margin of report
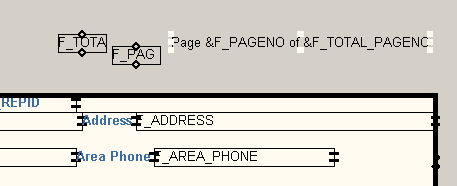
Text description of the illustration pagenum_wiz5.gif
In the report output, the current page number will appear where you reference the field F_PAGENO, while the total number of pages for each master will appear where you reference the field F_TOTAL_PAGENO. If you wish, you can resize the page number boilerplate text object to lengthen it to ensure that no values for F_TOTAL_PAGENO get truncated.
- Save and run your report. Your final report output should look something like this:
Figure 19-8 Final pages renumbered by repeating frame report output
Text description of the illustration pagenum_wiz6.gif
19.8 Summary
Congratulations! You have successfully created a report that renumbers pages by repeating frame. You now know how to:
- create a data model with a group above layout.
- add a second query to create a multiquery report, and redefault the layout.
- set properties and format fields.
- create and reference a page number boilerplate object in your layout.
For more information on any of the wizards, views, or properties used in this example, refer to the Reports Builder online help, which you can access in two ways:
