10g (9.0.4)
Part Number B10321-01
Home |
Contents |
Index |
| Oracle Application Server Containers for J2EE Servlet Developer's Guide 10g (9.0.4) Part Number B10321-01 |
|
In an Oracle Application Server environment, configuration of Web modules is through Oracle Enterprise Manager. This chapter describes key features of Enterprise Manager for servlet and Web site configuration. It includes the following sections:
The direct use of global-web-application.xml, orion-web.xml, and default-web-site.xml elements and attributes described in Chapter 6, "Configuration File Descriptions" is for development and deployment in an OC4J standalone environment. In an Oracle Application Server environment, such as for production deployment, use Enterprise Manager for Web module configuration and deployment.
Oracle Enterprise Manager Application Server Control is the administration console for an Oracle Application Server instance. It enables you to monitor real-time performance, manage Oracle Application Server components and instances, and configure these components and instances. This includes any instances of OC4J. In particular, Application Server Control includes pages to configure servlets and Web sites. Application Server Control comes with your Oracle Application Server installation. Log in as the ias_admin user.
The discussion in this chapter covers relevant Application Server Control pages for managing and configuring Web modules in an OC4J instance within Oracle Application Server. Some of the pages allow you to alter global-web-application.xml, orion-web.xml, and default-web-site.xml settings. Other pages display web.xml settings, which you can override through orion-web.xml settings.
Each page description notes the corresponding elements and attributes in web.xml, orion-web.xml/global-web-application.xml, or default-web-site.xml. The elements and attributes for global-web-application.xml or orion-web.xml are documented in "Element Descriptions for global-web-application.xml and orion-web.xml". The default-web-site.xml elements and attributes are covered in "Element Descriptions for Web Site XML Files". For information about web.xml elements, refer to the Sun Microsystems Java Servlet Specification.
See the Oracle Application Server Containers for J2EE User's Guide for additional information about using Enterprise Manager with OC4J. For general information about using Enterprise Manager to manage your Oracle Application Server environment, see the Oracle Application Server 10g Administrator's Guide.
The following sections discuss key Application Server Control pages in Enterprise Manager for servlet and Web site configuration and deployment:
The Oracle Application Server Instance Home Page is the main page you reach when you first access an Oracle Application Server instance through Application Server Control in Enterprise Manager. Through this page, you can drill down to any of the running OC4J instances by selecting the name of the instance (home, for example) in the System Components table. Application Server Control will then display the OC4J Home Page for that instance.
Figure 7-1 shows portions of the OC4J Home Page for the home instance.
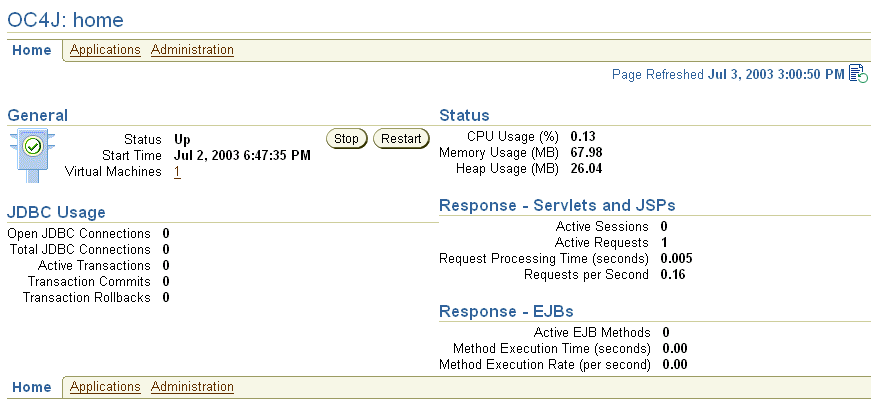
From the OC4J Home Page, you can do the following:
Figure 7-2 shows the OC4J Applications Page, which enables you to deploy applications. You can reach this page by clicking Applications from the OC4J Home Page.
In particular, relating to topics covered in this manual, note the following:
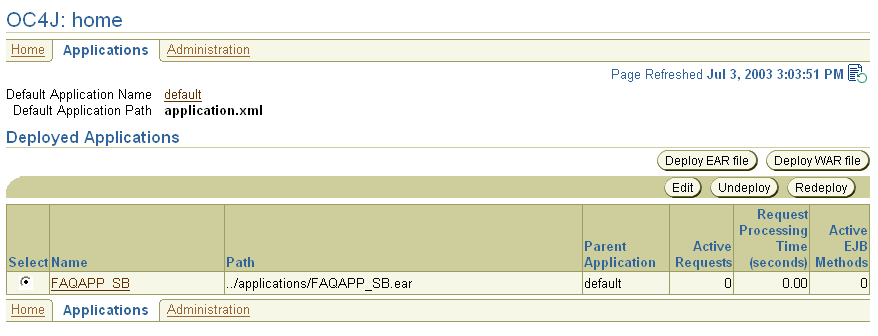
Figure 7-3 shows the key portion of the Application Server Control Deploy Application Page, which is the page for deploying an EAR file. Drill down to this page from the Applications Page of an OC4J instance by clicking the Deploy EAR file button.
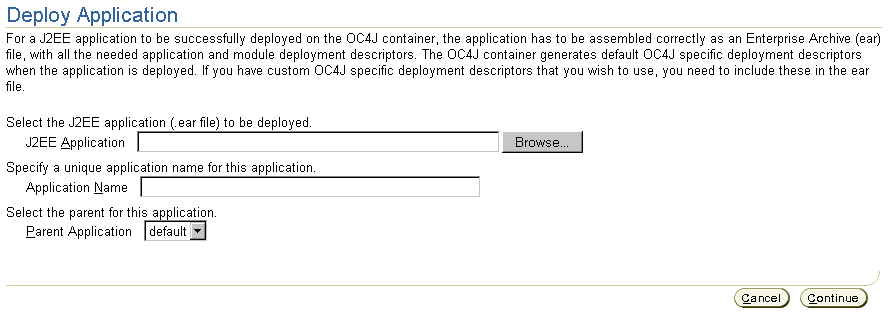
In the Deploy Application Page, click the Browse button to select an EAR file to deploy, then specify the desired J2EE application name, which is typically the same as the EAR file name without the .ear extension. You can also specify a parent application, but it is typical to use the OC4J default application as the parent.
Deployment results in a new <application> element being entered in the server.xml file.
When you click the Continue button, you will come to the Deploy Application: URL Mapping for Web Modules Page, which enables you to set a URL context path for the Web application that the J2EE application contains. Figure 7-4 shows this page, with the default context path for the Web application of a J2EE application named utility. Clicking the Next button enables you to review your entries and then deploy.
Specifying a URL context path results in an entry in the default-web-site.xml file to bind the Web application to the Web site. This is accomplished through a new <web-app> subelement of the <web-site> element. In addition, the mod_oc4j.conf configuration file for the Oracle HTTP Server mod_oc4j Apache mod is updated with appropriate mount points.
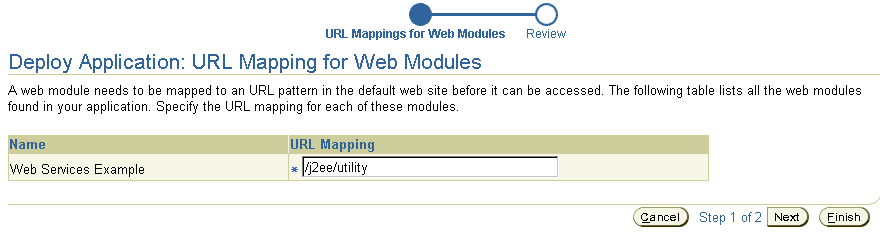
Figure 7-5 shows the key portion of the Application Server Control Deploy Web Application Page, which is the page for deploying an independent WAR file. Drill down to this page from the Applications Page of an OC4J instance by clicking the Deploy WAR file button.
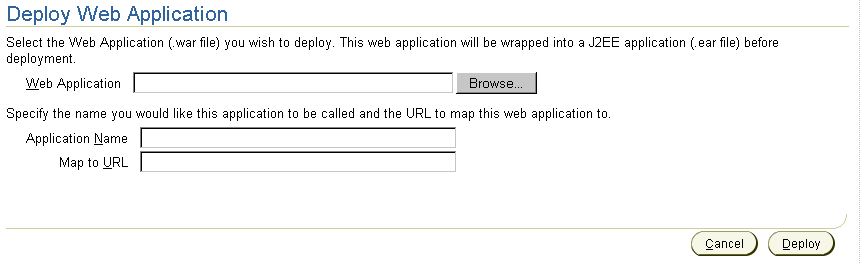
In the Deploy Web Application Page, click the Browse button to select a WAR file to deploy. Then specify a desired J2EE application name along with a URL context path to map to the Web application. Transparently, a J2EE application by the specified application name will be created to contain the Web application. In OC4J, any Web application must be contained in a J2EE application.
As with an EAR file, the deployment results in a new <application> element in the server.xml file, and in an entry in the default-web-site.xml file to bind the Web application to the Web site. The Web application binding is accomplished through a new <web-app> subelement of the <web-site> element. In addition, the mod_oc4j.conf configuration file for the Oracle HTTP Server mod_oc4j Apache mod is updated with appropriate mount points.
Figure 7-6 shows the OC4J Administration Page, which enables you to access OC4J instance properties. You can reach this page by clicking Administration from the OC4J Home Page.
Clicking Website Properties under Instance Properties provides access to the Website Properties Page, through which you can access a variety of pages to update Web module properties.
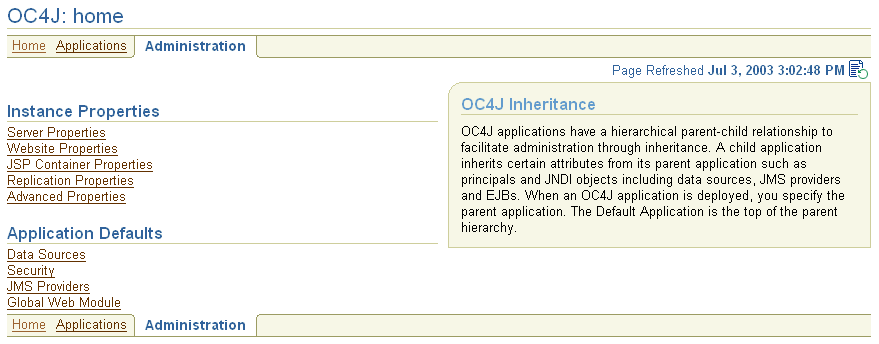
Figure 7-7 shows the key portion of the Application Server Control Website Properties Page for an OC4J instance. Drill down to this page by clicking Website Properties under Instance Properties in the OC4J Administration Page.

Among other things, this page enables you to specify whether each application should be loaded automatically when OC4J starts. (Otherwise, an application is not loaded until the first request for it.) This corresponds to the load-on-startup attribute of the appropriate <web-app> subelement of the <web-site> element in the default-web-site.xml file. (For general information about loading an application at OC4J startup, see "Servlet Preloading".)
From the Website Properties Page, drill down to the Web Module Page for any particular Web module. In the sample page above, for example, you can click webapp to drill down to the Web Module Page for that module.
Figure 7-8 shows the key portion of the Application Server Control Web Module Page for the module webapp. Drill down to the Web Module Page for a particular module by clicking the module name in the Website Properties Page.
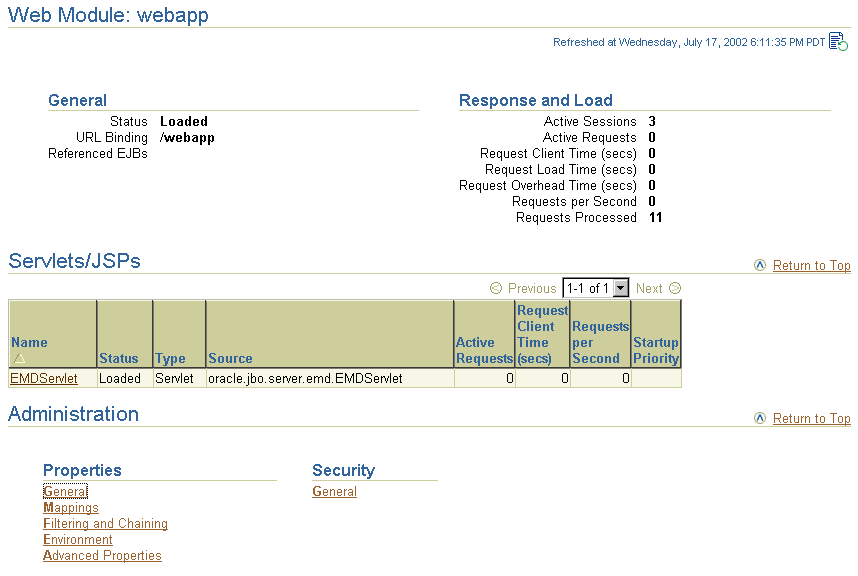
From the Web Module Page, you can access several categories of Web module properties through the following links under Properties in the Administration section of the page:
Figure 7-9 and Figure 7-10 show portions of the Application Server Control Web Module Properties Page for a particular module. Drill down to this page by clicking General under Properties in the Administration section of the Web Module Page.
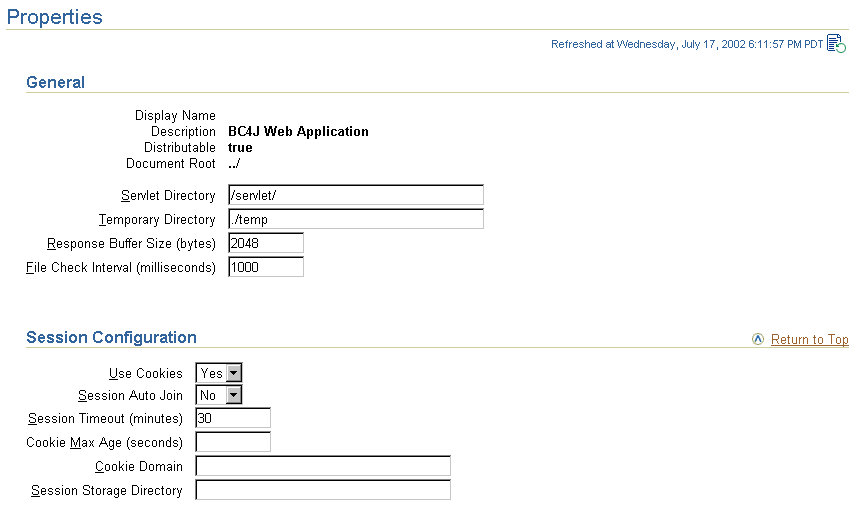
Correspondence of these settings to orion-web.xml elements is as follows.
In the General section:
servlet-webdir attribute of the <orion-web-app> element.
temporary-directory attribute of the <orion-web-app> element.
default-buffer-size attribute of the <orion-web-app> element.
file-modification-check-interval attribute of the <orion-web-app> element.
In the Session Configuration section:
cookies attribute of the <session-tracking> element, which is a subelement of the <orion-web-app> element.
autojoin-session attribute of the <session-tracking> element.
<session-timeout> subelement of the <session-config> subelement of the standard <web-app> element. You can use a <web-app> subelement under <orion-web-app> in orion-web.xml for deployment-specific overrides of <web-app> settings in the application web.xml file.
cookie-max-age attribute of the <session-tracking> element.
cookie-domain attribute of the <session-tracking> element.
persistence-path attribute of the <orion-web-app> element.
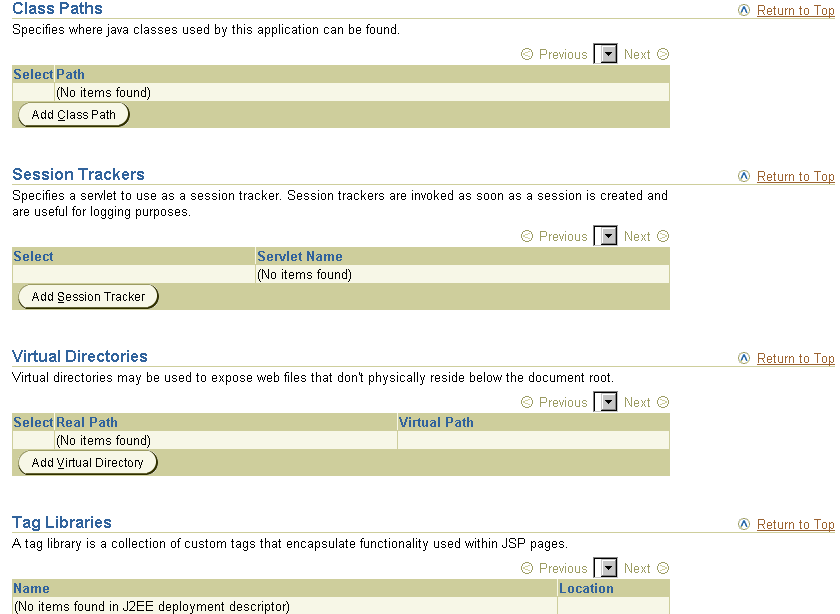
In the Class Paths section:
path attribute of a <classpath> subelement of the <orion-web-app> element.
In the Session Trackers section:
servlet-name attribute of a <session-tracker> element, which is a subelement of the <session-tracking> element.
In the Virtual Directories section:
real-path and virtual-path attributes of a <virtual-directory> subelement of the <orion-web-app> element.
In the Tag Libraries section:
Figure 7-11 and Figure 7-12 show portions of the Application Server Control Web Module Mappings Page for a particular module. Drill down to this page by clicking Mappings under Properties in the Administration section of the Web Module Page.


The following settings all correspond to subelements of the <web-app> element in the web.xml file. You can use a <web-app> subelement under <orion-web-app> in orion-web.xml for deployment-specific overrides of these settings. You can use the Advanced Properties Page for this purpose--see "Application Server Control Web Module Advanced Properties Page".
In the Servlet Mappings section:
<servlet-name> and <url-pattern> subelements of a <servlet-mapping> subelement of the <web-app> element.
In the MIME Mappings section:
<mime-type> and <extension> subelements of a <mime-mapping> subelement of the <web-app> element.
In the Welcome Files section:
<welcome-file> subelement of the <welcome-file-list> subelement of the <web-app> element.
In the Error Pages section:
<error-code> and <location> subelements of an <error-page> subelement of the <web-app> element.
<exception-type> and <location> subelements of an <error-page> subelement of the <web-app> element.
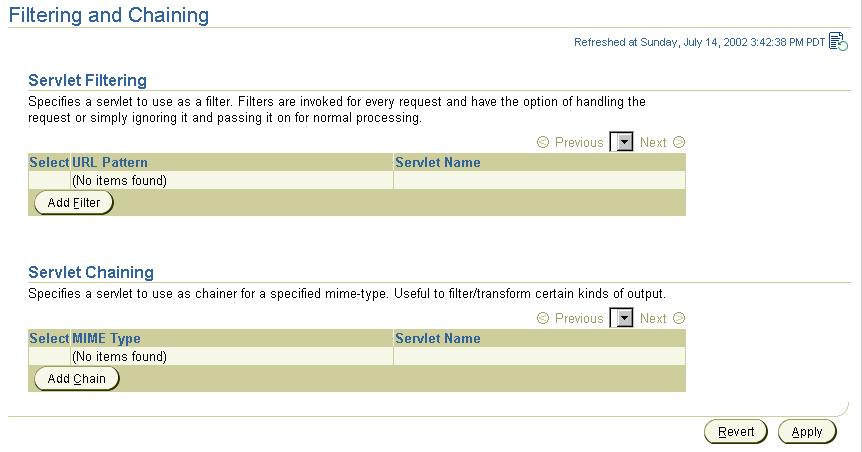
Figure 7-13 shows the key portion of the Application Server Control Web Module Filtering and Chaining Page for a particular module. Drill down to this page by clicking Filtering and Chaining under Properties in the Administration section of the Web Module Page.
Correspondence of these settings to orion-web.xml elements is as follows.
In the Servlet Filtering section:
servlet-name and url-pattern attributes of a <servlet-filter> subelement of the <orion-web-app> element. The servlet name you specify is tied to a servlet class through its standard configuration in the web.xml file.
In the Servlet Chaining section:
servlet-name and mime-type attributes of a <servlet-chaining> subelement of the <orion-web-app> element. The servlet name you specify is tied to a servlet class through its standard configuration in the web.xml file.
|
Note: Servlet chaining is an older mechanism with essentially the same functionality as standard servlet filtering, which was introduced in the servlet 2.3 specification. It is advisable to use servlet filtering instead. See "Servlet Filters". |
Figure 7-14 shows the key portion of the Application Server Control Web Module Environment Page for a particular module. Drill down to this page by clicking Environment under Properties in the Administration section of the Web Module Page.
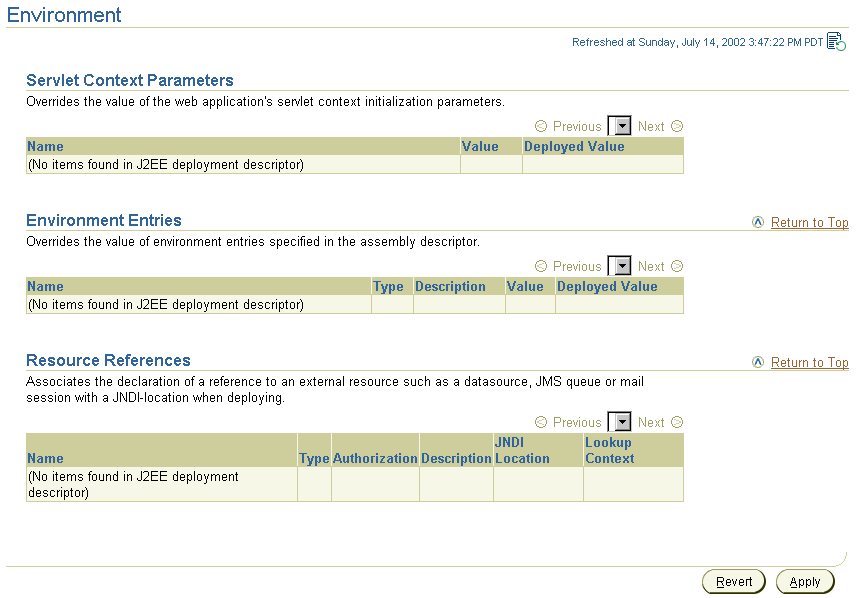
This page shows settings for servlet context parameter overrides, environment entry overrides, and resource references. The overrides indicate settings in the orion-web.xml file that override corresponding web.xml settings.
Correspondence of these settings to web.xml and orion-web.xml elements is as follows.
In the Servlet Context Parameters section:
web.xml <context-param> elements that can be overridden for this deployment, along with any Deployed Value overrides that have already been specified. Enter a new value in the Deployed Value column to specify a new override. Doing so creates a <context-param-mapping> entry in orion-web.xml.
In the Environment Entries section:
web.xml <env-entry> elements that can be overridden for this deployment, along with any Deployed Value overrides that have already been specified. Enter a new value in the Deployed Value column to specify a new override. Doing so creates an <env-entry-mapping> entry in orion-web.xml.
In the Resource References section:
web.xml and orion-web.xml settings. The name and type of a resource reference correspond to <res-ref-name> and <res-type> subelements under a <resource-ref> subelement of the <web-app> element in the web.xml file. The JNDI location and lookup context correspond to settings under a <resource-ref-mapping> element and its <lookup-context> subelement, under the <orion-web-app> element in the orion-web.xml file.
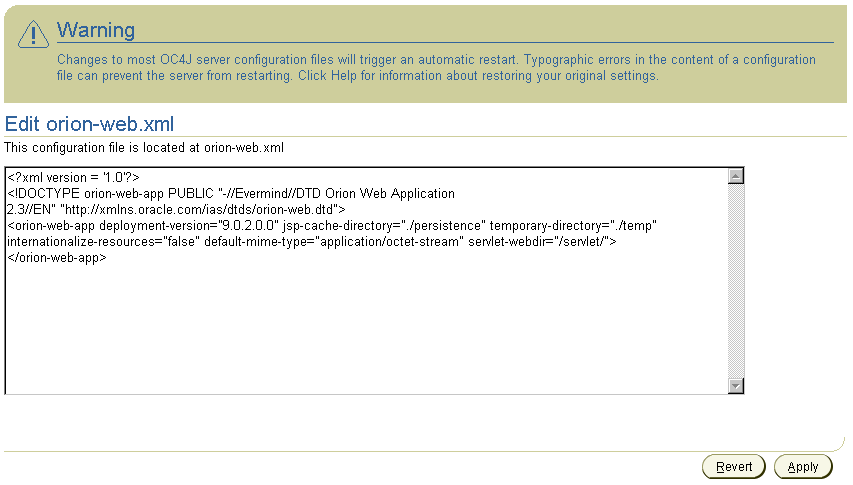
Figure 7-15 shows the key portion of the Application Server Control Web Module Advanced Properties Page for a particular module. Drill down to this page by clicking Advanced Properties under Properties in the Administration section of the Web Module Page.
You can use the Web Module Advanced Properties Page to edit orion-web.xml or global-web-application.xml for any settings not covered by the previously discussed Application Server Control Web module pages. In fact, you can make any orion-web.xml or global-web-application.xml entries through the Advanced Properties Page; however, it is advisable to use the previously described pages whenever possible because of their error handling and reporting features.
|
|
 Copyright © 2002, 2003 Oracle Corporation. All Rights Reserved. |
|