| Oracle® Collaboration Suite Migration and Coexistence Guide 10g Release 1 (10.1.1) Part Number B14486-02 |
|
|
View PDF |
| Oracle® Collaboration Suite Migration and Coexistence Guide 10g Release 1 (10.1.1) Part Number B14486-02 |
|
|
View PDF |
This chapter provides information about performing the e-mail migration using Oracle Collaboration Suite Email Migration Tool. The chapter contains the following sections:
To start Oracle Collaboration Suite Email Migration Tool on UNIX, run the migrate.sh script located in the migration tool bin directory by entering the following command at the command prompt:
<prompt> $ORACLE_HOME/oes/migration/bin/migrate.sh
To start the migration tool on Windows, double-click the migrate.cmd file located in the bin directory of the tool, or enter the following command at the command prompt:
<prompt> %ORACLE_HOME%/oes/migration/bin/migrate.cmd
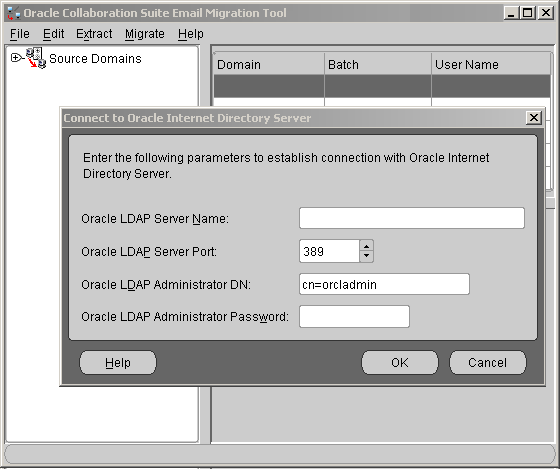
The Connect to Oracle Internet Directory Server screen is displayed as shown in Figure 3-1.
Figure 3-1 Connecting to Oracle Internet Directory
To connect to the Oracle Internet Directory server:
Specify the following Oracle Internet Directory information:
Oracle LDAP Server Name: Enter the host name of the computer where the Oracle Internet Directory server is running.
Oracle LDAP Server Port: Enter the port number on which the Oracle Internet Directory server is listening. The default port number for LDAP is 389. Update the port number if the port number is different.
Oracle LDAP Administrator DN: Enter the directory manager distinguished name.
Oracle LDAP Administrator Password: Enter the directory manager password.
Click OK.
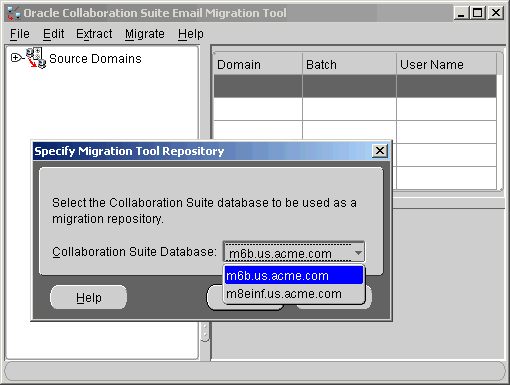
Oracle Collaboration Suite Email Migration Tool lists the available databases, and you can select any of them. The selected database is used to maintain the migration parameters. If only one database is available, Oracle Collaboration Suite Email Migration Tool automatically connects to the database without prompting the user to select a database.
You need to select a database from Oracle Collaboration Suite Database list, as shown in Figure 3-2.
Figure 3-2 Selecting the Oracle Collaboration Suite Database
Oracle Collaboration Suite Email Migration Tool creates a repository in the es_mail user schema on the chosen database. If a migration tool repository exists, Oracle Collaboration Suite Email Migration Tool reuses the repository.
Note:
If Oracle Collaboration Suite Email Migration Tool is run for the first time, a dialog is displayed that prompts you to create a repository instance. Click OK to launch the migration setup wizard.The migration setup wizard collects details about the source and target domains, information for setting specific migration options, and notification of successful migration.
You need to perform the following steps by using the migration setup wizard:
Note:
The number of required steps is determined by choices made in Step 1: Specifying Mail System Objects.On the Welcome screen of the migration setup wizard, click Next as shown in Figure 3-3.
Figure 3-3 The Welcome Screen of the Migration Setup Wizard

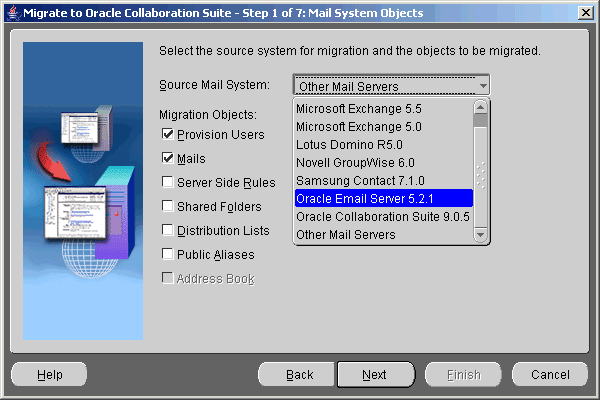
The Mail System Objects screen is displayed as shown in Figure 3-4.
Figure 3-4 Specifying Mail System Objects
To specify mail system objects:
Select the source e-mail system from the Source Mail System list. The supported source e-mail systems are:
Oracle Email Server 5.2.1
Microsoft Exchange 2000 and 2003
Microsoft Exchange 5.5
Microsoft Exchange 5.0
Lotus Domino release 5.0
Novell GroupWise 6.0
Samsung Contact 7.1.0
Oracle Collaboration Suite 9.0.5
Other Mail Servers that support the IMAP protocol or can generate standard MBOX files
Select the supported objects to migrate.
If you want to create accounts, select Provision Users. To migrate e-mail, select Mails.
Click Next. The Source System Information screen specific to the selection you made from the Source Mail System is displayed.
This section discusses how to specify source system information for different legacy e-mail systems.
This section contains the following:
See Also:
"Preparing for Migration" for source system prerequisites
Table 2-1 for a list of migration tasks supported by each source system
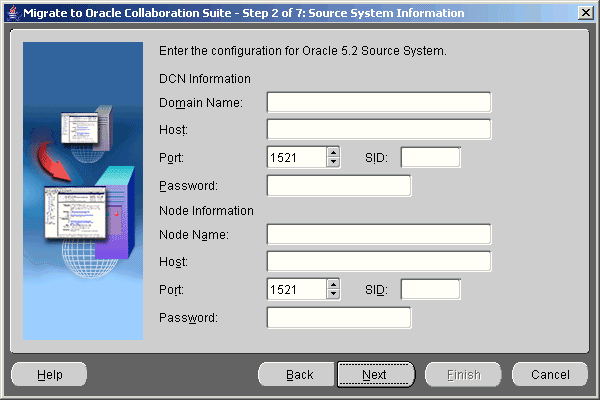
Figure 3-5 displays the Source System Information screen for Oracle 5.2.
Figure 3-5 Specifying Oracle Email Server System Information
To specify the information for Oracle 5.2 source system:
In the DCN Information section, provide the following information:
Domain Name: Enter the domain for the Domain Configuration Node (DCN) of the Oracle Mail server.
Host: Enter the host name of the Oracle Mail server DCN.
Port: Select the port number of the Oracle Mail server DCN. This is the SQLNet port number of the listener that is running on the DCN.
SID: Enter the system identifier of the Oracle Mail server DCN.
Password: Enter the account password for the DCN. This should be the password of the OO schema.
In the Node Information section, specify the following information:
Node Name: Enter the Oracle Mail server node name from which you want to migrate.
Host: Enter the host name of the node.
Port: Select the port number on which the node listens. This is the SQLNet port number of the listener that is running on the DCN.
SID: Enter the system identifier of the node.
Password: Enter the password for the node. This should be the password of the OO schema.
Click Next.
Note:
You need to provide information for the node that is to be migrated, even if the node is the DCN.Figure 3-6 displays the Source System Information screen for Microsoft Exchange.
Figure 3-6 Specifying Microsoft Exchange Source System Information
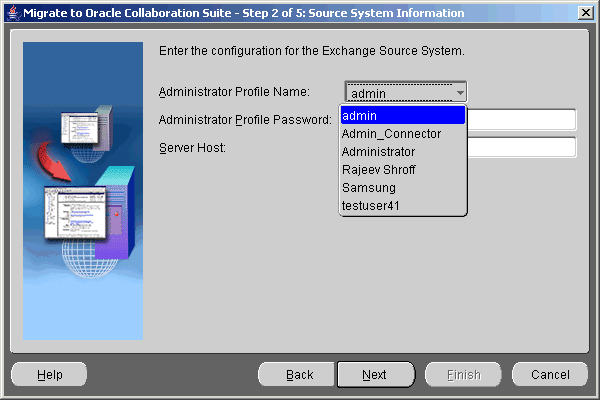
To specify the information for the Microsoft Exchange source system:
Enter the following information in the Source System Information screen:
Administrator Profile Name: Select the administrator profile name from the list.
Administrator Profile Password: Enter the administrator profile password.
Server Host: Enter the Microsoft Exchange directory host name.
Click Next.
Note:
The input screen is the same irrespective of the different Exchange versions, such as 5.5, 2000, or 2003.Figure 3-7 displays the Source System Information screen for Lotus Notes.
Figure 3-7 Specifying Lotus Notes Source System Information
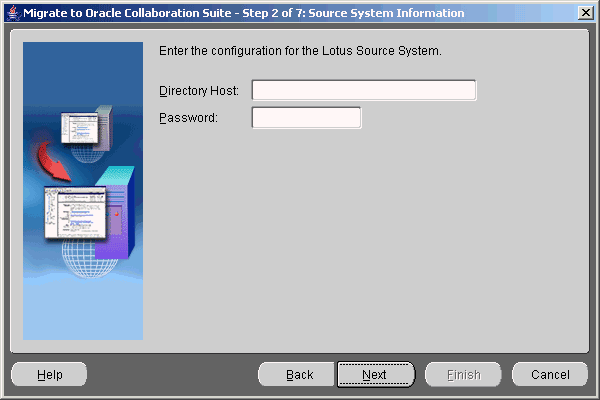
To specify the information for the Lotus Notes source system:
Enter the following information in the Source System Information screen:
Directory Host: Enter the host name of the computer on which the Lotus Notes directory is running.
Password: Enter the password of the Lotus Notes administrator's key file (user.id).
Click Next.
Figure 3-8 displays the Source System Information screen for Novell GroupWise.
Figure 3-8 Specifying Novell GroupWise Source System Information
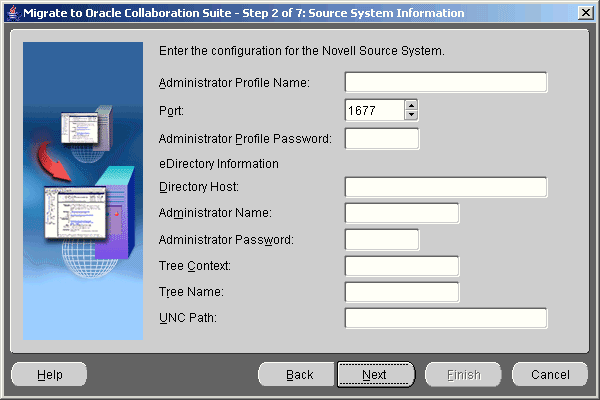
To specify the information for the Novell GroupWise source system:
Enter the following information in the Source System Information screen:
Administrator Profile Name: Enter the administrator profile name.
Port: Select the post office agent port.
Administrator Profile Password: Enter the administrator profile password.
Enter the following information in the eDirectory Information section:
Directory Host: Enter the host name of the GroupWise directory.
Administrator Name: Enter the Novell eDirectory administrator name.
Administrator Password: Enter the Novell eDirectory administrator password.
Tree Context: Enter the GroupWise eDirectory tree context, such as ACME.
Tree Name: Enter the name of the Novell eDirectory tree, such as GRPWISETREE.
UNC Path: Enter the path to the shared location of wpdomain.db on the GroupWise server, such as f:\\software\\domain\\grpdomain.
Click Next.
Figure 3-9 displays the Source System Information screen for Samsung Contact server.
Figure 3-9 Specifying Samsung Contact Source System Information
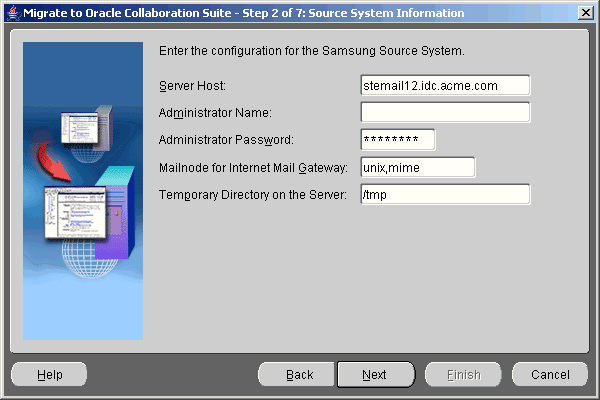
To specify the information for the Samsung Contact source system:
Enter the following information in the Source System Information screen:
Server Host: Enter the host name of the Samsung Contact server.
Administrator Name: Enter the administrator name in the Personal Name form in the Samsung Contact system directory. For example,
John A. Smith/california,idc,dev,imteam
Administrator Password: Enter the administrator password.
Mailnode for Internet Mail Gateway: Enter the name of the mailnode for the Internet mail gateway. For example,
unix,mime
Temporary Directory on the Server: Enter the path to a temporary directory on the Samsung Contact server with read and write privileges. This directory location will be used by the migration tool during migration.
Click Next.
Specify the user provisioning options as shown in Figure 3-10.
Figure 3-10 Specifying User Provisioning Options
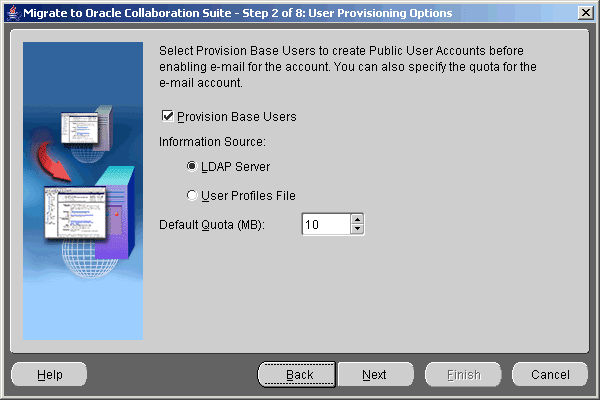
To specify these options:
Select Provision Base Users to create public user accounts before enabling e-mail for the account.
Note:
If Oracle Collaboration Suite is already installed and populated with users, deselect Provision Base Users.In the Information Source section, select LDAP Server if the source system user attributes are maintained on an LDAP server, else select User Profiles File.
Note:
The Information Source section is activated only if Provision Base Users is selected.Enter a value for Default Quota (MB) for the users who are to be provisioned. A value of 0 indicates infinite quota.
Note:
The user quota is applied system wide.Click Next.
Figure 3-11 displays the Source LDAP Service screen.
Figure 3-11 Specifying Source LDAP Service Parameters
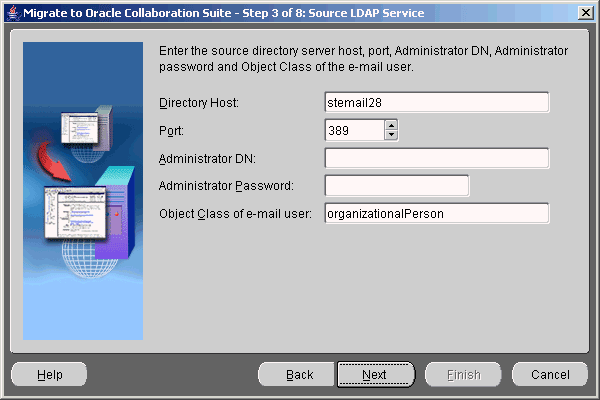
To specify the source LDAP service information:
Enter the following information in the Source LDAP Service screen:
Directory Host: Enter the host name of the computer on which the source directory server is running.
Port: Select the port number on which the source directory server is listening. The default port number for LDAP is 389. Update the port number if your port number is different.
Administrator DN: Enter the distinguished name of the directory manager. For all Exchange versions, administrator DN can be of the following format:
cn=administrator,dc=acme,dc=com
Administrator Password: Enter the directory manager password. Leave the Admin DN and Admin Password fields empty if the source LDAP server supports anonymous login.
Object Class of E-mail User: Enter the object class that identifies the schema of an e-mail user on the source LDAP server.
Click Next.
In Oracle Collaboration Suite, the orclperson object class describes an e-mail user. This object class has the following mandatory attributes that must be mapped to source directory attributes:
cn: Common Name
sn: Last Name or Surname
Figure 3-12 displays how to change the default attribute mapping on the LDAP Entry Translation screen.
Figure 3-12 Specifying LDAP Entry Translation Options
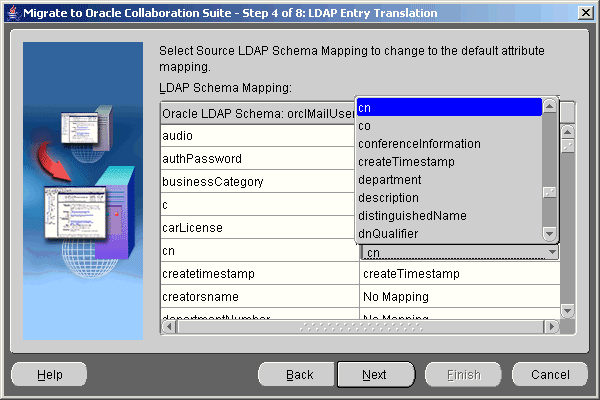
To change the default attributes:
Click the source attribute in the Source LDAP Schema column to display a list of mapping choices and select the appropriate mapping.
The non-mandatory attributes displayed on the target Oracle Internet Directory will have the No Mapping option displayed in the Source LDAP Schema column if the mapping is not found. Click the list to display a list of mappable attributes.
Note:
You need only map these attributes once, because the Oracle Collaboration Suite Email Migration Tool saves the values for the subsequent batches.Click Next.
Create the user accounts on the target Oracle Collaboration Suite system as shown in Figure 3-13.
Select one of the following options in the User Name Generation screen:
Retain Old Usernames: Specifies that the target user names remain the same as the source user names.
Construct New Usernames: Specifies that the Oracle Collaboration Suite Email Migration Tool generates the target user names.
To construct new user names, select the following options:
Retain First Name: You can choose to retain the first, middle, or last names, or any combination of the three. Select the appropriate option to retain any of the three names. You may retain the first n characters of a name by selecting the first n characters you want to retain from Retain First check box.
Name Separator: Choose a separator character from the Name Separator list.
If the first name or middle name is not mapped to any of the attributes of the source LDAP server, the corresponding check boxes will be disabled.
The values for first name, middle name, and last name are picked up from the source LDAP attributes that map to the given name, middle name, and surname of orclperson attributes.
If the target user names are specified in the user list (users.xml), these names will be used in all cases.
Click Next.
Specify the mail migration options on the Mail Migration Options screen as shown in Figure 3-14.
Figure 3-14 Specifying Mail Migration Options
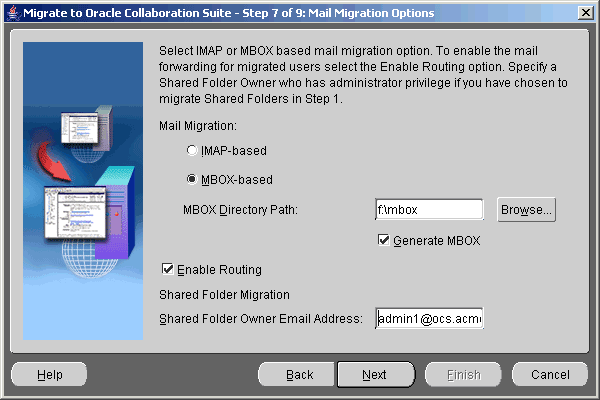
To specify:
Select one of the following options in the Mail Migration section:
IMAP-based: If the source e-mail system is IMAP4 rev1 compliant, Oracle Collaboration Suite Email Migration Tool can extract e-mail from the source system using IMAP.
MBOX-based: Select this option if you want to perform an MBOX-based migration. Select Generate MBOX and click Browse to specify the MBOX directory path where the MBOX files will be created.
Do not select Generate MBOX if you are running Oracle Collaboration Suite Email Migration Tool again after an initial run. The files will already exist and need not be generated again.
If Generate MBOX is not selected, Oracle Collaboration Suite Email Migration Tool assumes that the files have been generated externally and have been placed in the location specified in the MBOX Directory Path field.
No extraction of files will occur if Generate MBOX is not selected.
Note:
There must be sufficient space on the target disk to store all the e-mail messages being migrated.Note:
The Oracle Mail server plug-in packaged with this release of Oracle Collaboration Suite does not generate MBOX files.Select Enable Routing to forward e-mail from source system to the new user accounts on the target system, during and after migration.
Note:
If the source e-mail system is Microsoft Exchange, Lotus, or Samsung, and if Enable Routing is selected, a copy of the message is forwarded to Oracle Collaboration Suite.In the Shared Folder Migration section, enter the e-mail address of an e-mail user existing in the target system in the Shared Folder Owner Name field. This user is the default owner for shared folders without an owner association.
Click Next.
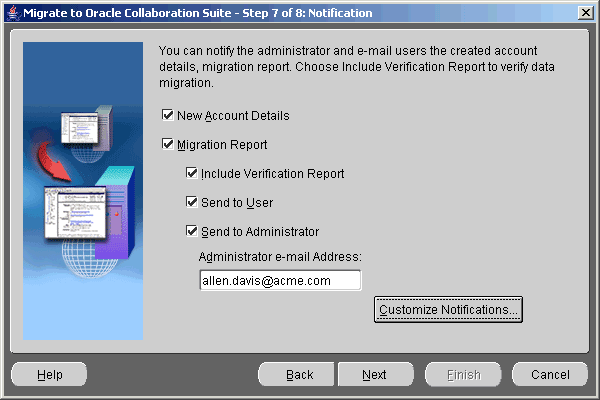
Notifications are e-mail messages that inform users about migration events. Specify notifications options on the Notification screen as shown in Figure 3-15.
Figure 3-15 Specifying Migration Notifications
To specify:
Select New Account Details.
After the user account is created on the target e-mail server, a message is sent to the user's source e-mail account notifying the new user name, password, and IMAP and SMTP host names.
Select Migration Report.
When you select Migration Report, you can choose to send a message to either the user's target account, the administrator, or both, notifying them that the migration is complete and that the user can begin using the new account.
Select Include Verification Report to attach a verification report to the migration report at the end of every migration.
Note:
When this option is selected, the Oracle Collaboration Suite Email Migration Tool compares the SMTP message ID of every message that is present on the target account with that of the source account. The Oracle Collaboration Suite Email Migration Tool generates a report based on this comparison and sends it as a part of the migration report.Select Send to User to send a migration report to the user.
Select Send to Administrator to send a migration report to the administrator. Enter the e-mail ID of the administrator in the Administrator Email Address field.
Note:
Migration reports are not sent for premigration.Click Customize Notifications to add header and footer notes to the notifications.
Click Next.
Specify the source and target mail system information on the Mail Services screen as shown in Figure 3-16.
To specify:
Enter the following information in the Mail Services screen:
Note:
The columns are displayed based on the user provisioning and mail migration options selected earlier.Source Domain: Enter the domain name of the source e-mail system.
Target Domain: Select the target domain name from the list of domain names.
Source IMAP Host: Enter the source IMAP host name. This appears when the IMAP-based migration option is selected in the Mail Migration Options screen.
Target IMAP Host: Select the target IMAP host name from the list.
Source LDAP DN: Enter the LDAP DN for users on the source domain. If you have more than one domain, enter the LDAP DNs for all the domains. Oracle Collaboration Suite Email Migration Tool looks for source account entries under the DN of the LDAP. The source LDAP DN is specific to each supported source system. For example, in a Microsoft Exchange 2000 mail system for an Active Directory domain acme.com, it may be:
cn=Users,dc=acme,dc=com
Target LDAP DN: Select the LDAP DN from the list for the target Oracle Internet Directory on which all users of this domain are created.
Target SMTP Host: Select the SMTP host of the target domain from the list.
Click Next.
The Summary screen is displayed as displayed in Figure 3-17.
Clicking Finish returns you to the Oracle Collaboration Suite Email Migration Tool main window as shown in Figure 3-18.
Figure 3-18 Oracle Collaboration Suite Email Migration Tool Main Window
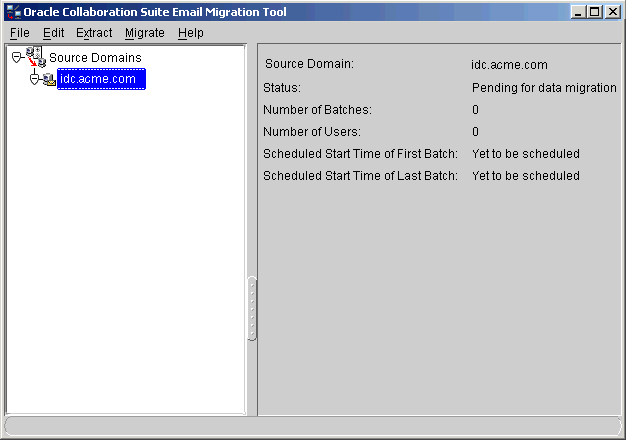
You need to configure the users who will be migrated. The user data is loaded from an XML file. The XML file can be created in either of the following ways:
Clicking Extract, and then Users: This invokes the source system-specific plug-in to generate the users.xml file.
Manually writing the users.xml file: This manually written users.xml needs to comply with Migration.dtd, which is shipped along with Oracle Collaboration Suite Email Migration Tool.
In this case, the users.xml file must be present in a directory that is determined by the users' source domain. If the source domain specified in Mail Services wizard page is acme.com, the users.xml file for that domain should be in the following path:
$ORACLE_HOME/oes/migration/files/com/acme/users.xml
Figure 3-19 displays the path of the users.xml file.
You can load the users.xml file by clicking File, and then Load Users. This loads all the users into the migration schema. You can also reload the same set of users after modifying the users.xml file. For example, you have selected the IMAP-based migration without specifying the sourceimappasswd attribute in the users.xml file. You can later edit the XML file to add sourceimappasswd to all users, and then reload the users by clicking File, and then Load Users.
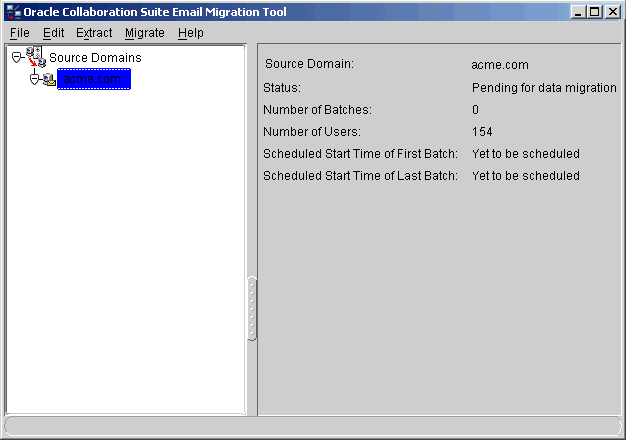
Figure 3-20 displays the number of users who have been successfully loaded.
Figure 3-20 Oracle Collaboration Suite Email Migration Tool Main Window: Pending for Data Migration
To provision users from the source directory server to Oracle Collaboration Suite, perform the following steps:
If you selected User Profiles File from the User Provisioning Options screen, click Extract and then User Profiles to generate the user_profiles.ldif file.
Note:
If you want to extract users from multiple domains, select each domain and perform Step 1.See Also:
Appendix A, "Plug-In Generated File Formats" for more information about user profile file formatsClick Migrate, and then Provision Users from the Oracle Collaboration Suite Email Migration Tool menu bar to create user accounts in the target Oracle Internet Directory.
Prior to migrating public aliases, ensure that all user accounts have been provisioned.
To migrate public aliases, do the following:
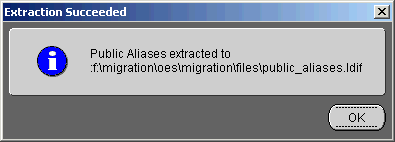
If you chose to migrate public aliases, click Extract and then Public Aliases from the Oracle Collaboration Suite Email Migration Tool menu bar to generate the public_aliases.ldif file in the files directory. Figure 3-21 displays the path of the public_aliases.ldif file.
Figure 3-21 Path of the public_aliases.ldif File
Click Migrate and then Public Aliases from the Oracle Collaboration Suite Email Migration Tool menu bar to create the public aliases on the target e-mail server.
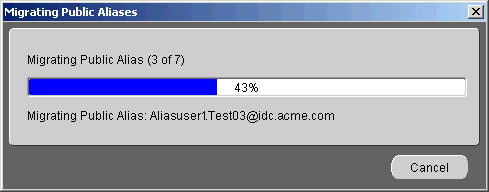
To cancel migration of public aliases, click Cancel on the status dialog that is displayed when you start to migrate the public aliases as shown in Figure 3-22.
Figure 3-22 The Migrating Public Aliases Status Dialog
Note:
If you cancel migration of public aliases, rollback does not occur and you can safely restart migration. The e-mail objects that were created before you canceled migration are not re-created when migration is re-commenced.There are two phases in the migration of distribution lists:
All distribution lists are created
The distribution lists are populated with users
The status bar is immediately displayed, and it shows a progress when distribution lists are being populated with users.
To migrate distribution lists, do the following:
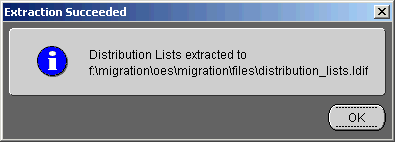
Click Extract and then Distribution Lists from the Oracle Collaboration Suite Email Migration Tool menu bar to generate the distribution_lists.ldif file in the files directory. Figure 3-23 displays the path of the distribution_lists.ldif file.
Figure 3-23 Path of the distribution_lists.ldif File
Click Migrate and then Distribution Lists from the Oracle Collaboration Suite Email Migration Tool menu bar to create the distribution lists on the target e-mail server.
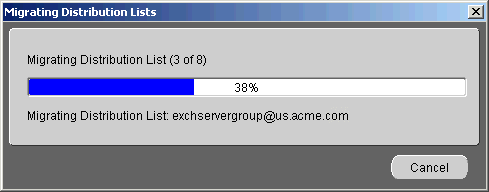
To cancel the migration of distribution lists, click Cancel on the status dialog that is displayed when you start to migrate the distribution lists as displayed in Figure 3-24.
Figure 3-24 The Migrating Distribution Lists Status Dialog
Note:
If you cancel migration of distribution lists, rollback does not occur and you can safely restart migration. The e-mail objects that were created before you canceled migration will not be re-created when the migration is recommenced.This section contains the following topics:
Prior to migrating data, you must create and schedule batches for migration.
Using Oracle Collaboration Suite Email Migration Tool, you can create a batch either by designating the number of users for each batch, or by creating a custom batch.
Batch creation is done on a domain basis. To create a batch by domain, do the following:
Click Source Domain on the directory tree on the left side of the Oracle Collaboration Suite Email Migration Tool screen.
Select the appropriate domain.
Click File and then Create Batch. The Create Batch dialog is displayed as shown in Figure 3-25.
Create batches using one of the following methods:
Select Full User List and enter or use the arrows to select the number of users in the Users per Batch field. For example, if you have 100 users and specify 5 users in each batch, 20 batches are created.
Select Custom User List to create a custom batch. Use this option to batch a subset of the loaded users.
Create a file containing the users formatted according to the following example:
<userlist>
           <user sourceimapuserid="test1" targetimapuserid="Test2" />
</userlist>
Enter the path to the custom batch file in the adjacent field or click Browse to locate the file.
When the batches are created, the status is displayed as shown in Figure 3-26.
To schedule batches for user e-mail migration, expand the domain node to view the batches.
To schedule a start time for batch migration:
Select a batch from the directory tree in the Oracle Collaboration Suite Email Migration Tool screen.
Click Schedule to display the Schedule Start Time dialog as shown in Figure 3-27.
Figure 3-27 Scheduling Batches for Migration
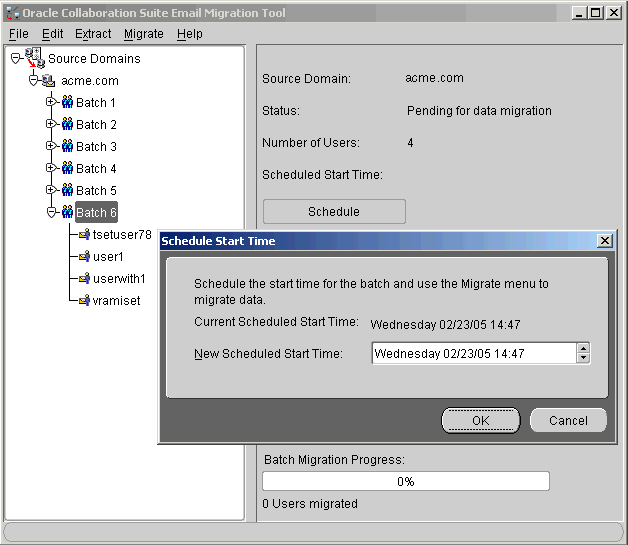
In the New Scheduled Start Time field, edit the day, date, and time by selecting one element in the string and clicking the Up and Down arrows to scroll through and select values.
Note:
You can schedule multiple batches to migrate in parallel by scheduling them to start at the same time.Click OK.
Note:
If a single user in a batch fails, the batch is marked as failed. To reschedule the batch for migration, select the failed batch from the Oracle Collaboration Suite Email Migration Tool screen, edit the Scheduled Start Time field, and click OK. Once a batch is rescheduled, the users that failed are picked up again for data migration when the scheduled migration time occurs. Users that have been successfully migrated are not re-migrated.After you complete scheduling batches for migration, you can start data migration. You can migrate data by clicking Migrate and then Migrate User Data from the Oracle Collaboration Suite Email Migration Tool menu bar. However, the migration of user accounts and messages involves transferring large amounts of data and therefore, takes a long time. Users must be transferred from the source system to the new one in the least possible amount of time to be able to cope if mail is operational while data is moving. Oracle Collaboration Suite Email Migration Tool provides a two-phase migration option that enables repeated iteration of moving data.
This section contains the following:
All users' messages from the source system are written into the target Oracle Collaboration Suite system. User accounts, however, are not actually populated with messages, nor are their folders created. In this phase all the message bodies are transferred into the Oracle Collaboration Suite system. This is typically done in the background over several days while users continue to use their old accounts.
To start pre-migration, do the following:
Ensure that user accounts have been created on the target Oracle Collaboration Suite system.
Note:
Message routing will not take effect during premigration.See Also:
"Step 7: Specifying Mail Migration Options" for more information about message routingClick Migrate and then Pre-Migrate User Data from the Oracle Collaboration Suite Email Migration Tool menu bar.
When the premigration of data is complete, the status is displayed as shown in Figure 3-28.
In the second phase, Oracle Collaboration Suite Email Migration Tool takes advantage of the message sharing capability of Oracle Collaboration Suite to quickly populate user folders with the messages that were transferred in the first phase.
The second phase, typically, involves only associating migrated e-mail folders with the user accounts, and can be done over a weekend. During the second phase, the following operations are performed:
Any new messages that users receive between the first and second phases are transferred to the target user accounts
Any messages that users delete in the interim do not appear in the target user accounts
Any new folders that users create in the interim are transferred to the target user accounts
Any folders that users have deleted in the interim do not appear in the target user accounts
Note:
For best results, the second phase should be performed as quickly as possible after the first phase is complete.
When you perform a two-phase migration, all batches are migrated during both phases. It is not possible to selectively migrate specific batches during a two-phase migration.
To start data migration, click Migrate and then Migrate User Data from the Oracle Collaboration Suite Email Migration Tool menu bar.
Migration begins at the time you selected while scheduling batches. If you start migration at a time later than that which you scheduled, migration begins instantly.
When migration complete, the status is displayed as shown in Figure 3-29.
To cancel migration, click Migrate and then Cancel Migration from the Oracle Collaboration Suite Email Migration Tool menu bar.
Prior to migrating shared folders, ensure that all user accounts have been provisioned.
To migrate shared folders:
Click Migrate and then Shared Folders from the Oracle Collaboration Suite Email Migration Tool menu bar to create the shared folders on the target e-mail server.
Click OK when 100% is displayed on the status screen, indicating the migration is complete.
To cancel migration of shared folders, click Cancel on the status dialog that displays when you start to migrate the shared folders as shown in Figure 3-30.
Note:
If you cancel migration of shared folders, rollback does not occur and you can safely restart migration. The e-mail objects that were created before you canceled migration are not re-created when migration is recommenced.Oracle Collaboration Suite Email Migration Tool can migrate the private address books created by users using their Oracle eMail Server 5.2.1 WebMail client. Migration of the Oracle WebMail address book of each user involves migrating both the private aliases and private distribution lists that users have.
Note:
Oracle WebMail Address Book migration is available only for Oracle eMail Server to Oracle Collaboration Suite migrations. This migration can only be run for users using the Oracle eMail Server 5.2.1 WebMail client.Prior to migrating address books, ensure that all user accounts have been migrated.
To migrate Oracle WebMail address books:
Click Migrate and then Address Book from the Oracle Collaboration Suite Email Migration Tool menu bar. The Address Book Migration Status screen is displayed.
Click OK when 100% is displayed on the status screen, indicating the migration is complete.
To cancel migration of address books, click Cancel on the status dialog that displays when you start to migrate the address books.
Note:
If you cancel migration of address books, rollback does not occur and you can safely restart migration. The address book objects that were created before you canceled migration are not re-created when migration is recommenced. Migration continues from the point where it was canceled.Any changes you make take effect after you cancel and restart the migration. You cannot modify migration parameters during the migration.
Note:
If two or more instances of the Oracle Collaboration Suite Email Migration Tool are running against the same repository, all instances except one must be shut down before modifications to the migration parameters can proceed.To modify migration parameters:
Click Edit and then Migration Parameters from the Oracle Collaboration Suite Email Migration Tool menu bar. The Modify Migration Parameters screen is displayed as shown in Figure 3-31.
Figure 3-31 Modifying Migration Parameters

Modify the parameters according to your selected source system.
Note:
Values for these parameters were originally entered in "Step 7: Specifying Mail Migration Options" and "Step 4: Specifying Source LDAP Service Parameters".Click OK.
On the completion of migration, the administrator must perform certain post-migration tasks. The tasks are:
In addition to the above-mentioned tasks, the administrator needs to enable the antispam check feature.
You must change the mail exchanger (MX) record to redirect e-mail to the new system.
Note:
Routing is not implemented for Novell GroupWise and you should immediately switch to using Oracle Collaboration Suite after the MX record changes.You can verify the migration of individual user data by using one of several methods of comparison. The administrator can verify the validity of the overall migration and can also provide support to users when users complain of discrepancies in their accounts.
Note:
The verifier can be used only for users who have successfully migrated.
The verifier is not available for an MBOX-based migration.
To search and select users to verify:
Click Tools, and then Verify New Accounts. The Verification dialog is displayed as shown in Figure 3-32.
Select the category of users from the Category list.
Specify the keyword in the Keyword field.
Click Search. The users are listed. You can select any or all users from the table.
Select a verification option from one of the following:
Message Count: Compares the message count in each folder
Message IDs: Compares the SMTP message IDs
Message Header: Compares the message headers
Entire Message: Compares the message bodies of every message
Note:
Each option verifies that all folders in an individual user's account have been migrated on the target e-mail system, and compares different message information between the source and target e-mail systems.Note:
If you choose either the Message Header or Entire Message verification option while migration is proceeding, the migration process slows down considerably.Enter the e-mail ID of the administrator to whom the verification report is to be sent in the Administrator Email ID field.
Click Verify Data Migration to start the verification process.
To cancel the verification process, click Cancel on the Verification dialog.
Oracle Collaboration Suite Email Migration Tool enables you to view users according to their migration status. To view the user status:
Click Migrate, and then View User Status. The View User Status dialog is displayed as shown in Figure 3-33.
Select a domain from the Domain list.
Select a status from the Status list.
Select a batch from the Batch list.
Click Show Users. This displays the list of users in the Results section.
Select a user from the list and click View Details.
The View User Details Screen is displayed as shown in Figure 3-34.