| Oracle® Voicemail & Fax Administrator's Guide 10g Release 1 (10.1.1) Part Number B14496-03 |
|
|
View PDF |
| Oracle® Voicemail & Fax Administrator's Guide 10g Release 1 (10.1.1) Part Number B14496-03 |
|
|
View PDF |
Before you can start using Oracle Voicemail & Fax, you must use Enterprise Manager Grid Control to set up your sites and groups and configure the PBX-Application Cluster.
In this section, you verify that you have the privileges required to use Enterprise Manager and use Enterprise Manager to verify that the Oracle Voicemail & Fax targets are visible and navigate through the hierarchy of targets.
When you installed Enterprise Manager, a default Super Administrator, SYSMAN, was automatically created with the password you specified. You may use this user name and password, or any other user name with administrator privileges, to log in to Enterprise Manager Grid Control.
See Also:
Oracle Enterprise Manager Grid Control Installation and Basic Configuration for more information.To verify that you can see the Oracle Voicemail & Fax hierarchy:
Open a Web browser and log in to Enterprise Manager Grid Control.
From the home page, select Voicemail & Fax in the Search field and click Go.
Note:
There are two targets with very similar names: Voicemail & Fax and Voicemail & Fax Application. Select Voicemail & Fax which refers to the Oracle Voicemail & Fax group. (Voicemail & Fax Application refers to the applications installed on your Applications tiers.)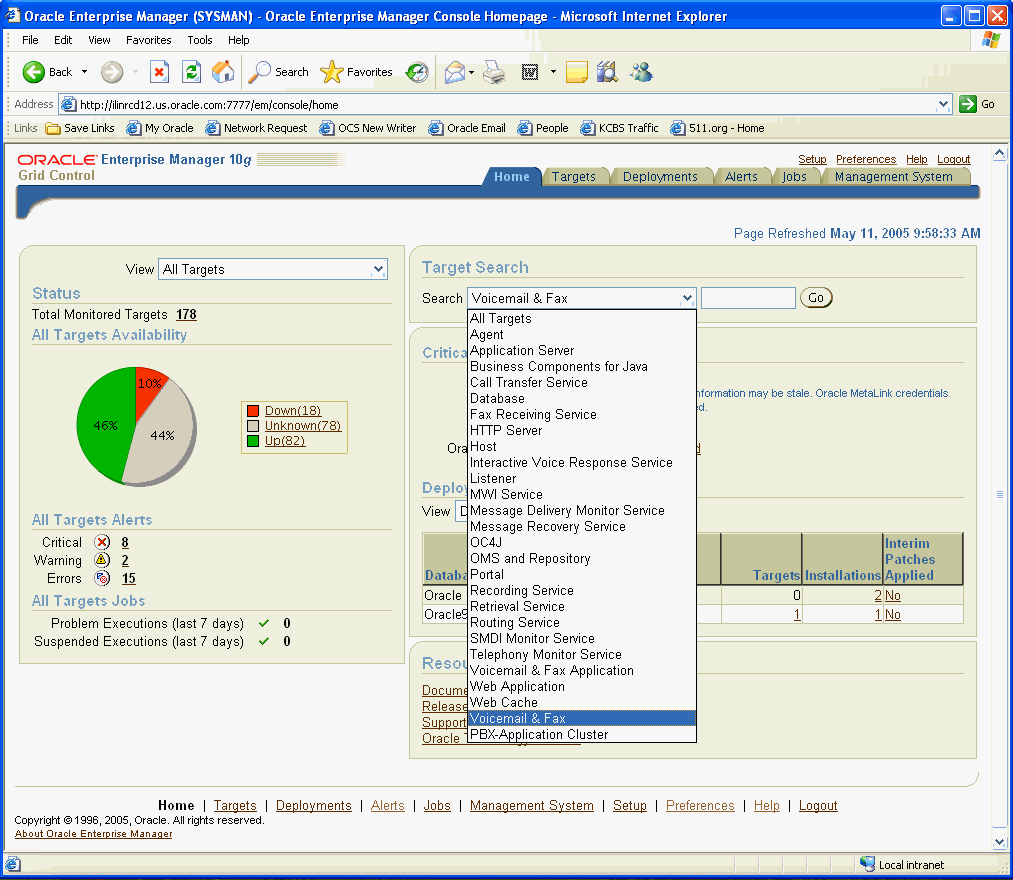
A list of all Voicemail & Fax group targets is displayed. In most environments, there will only be one Voicemail & Fax target.
If the Oracle Voicemail & Fax group does not appear in the list, you may have to manually create the target. Refer to "Registering Oracle Voicemail & Fax Targets" for more information.
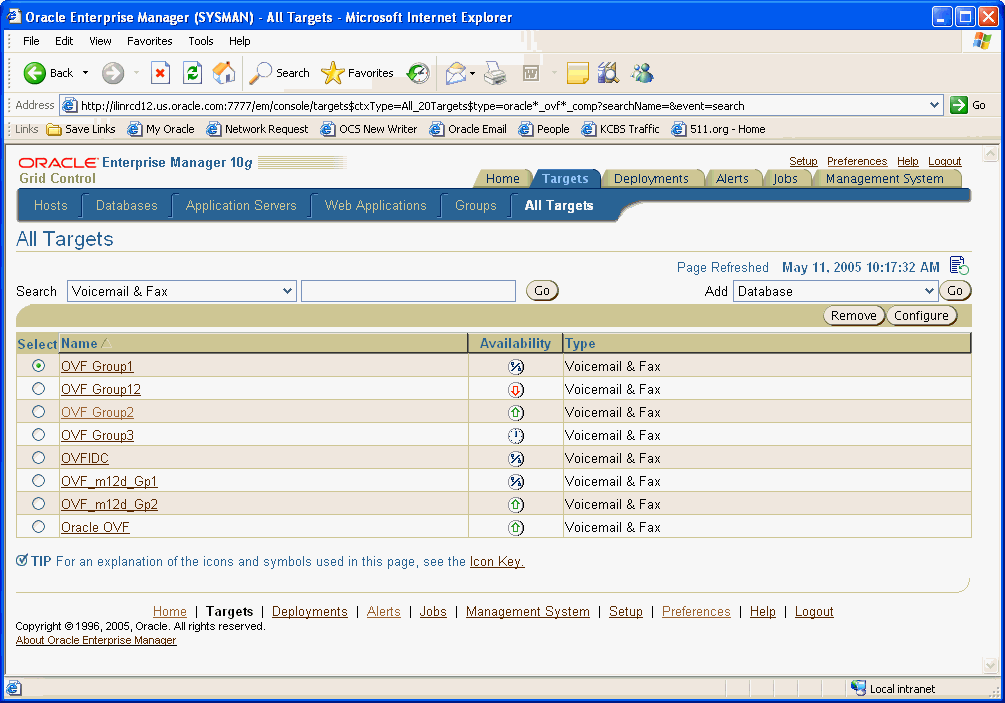
Click the desired target.
If you have not specified preferred credentials for the Voicemail & Fax target, you are prompted to log in. Enter the user name and password for the Oracle directory server and click Login. You can use the superuser orcladmin user name and password.
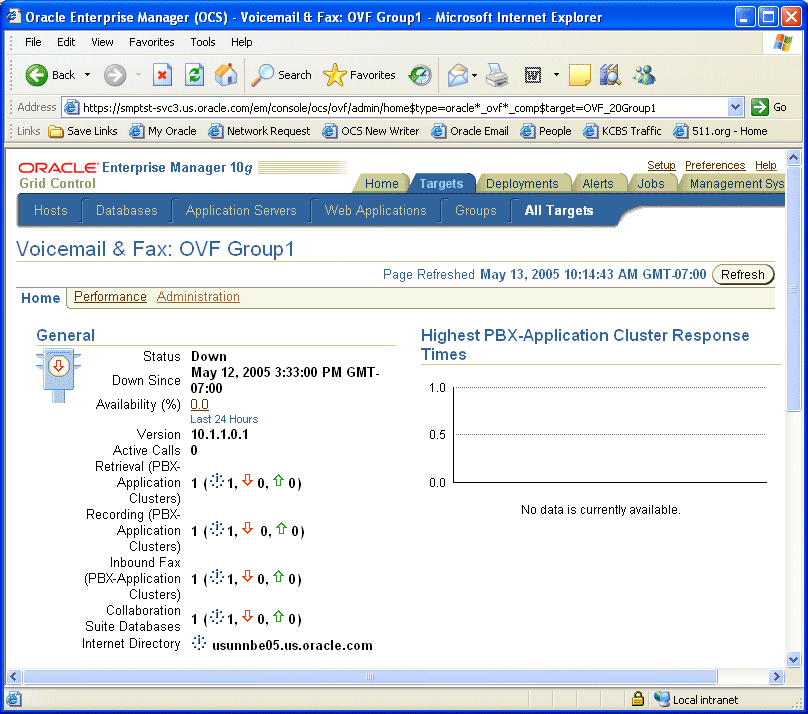
The home page for the Voicemail & Fax group is displayed.
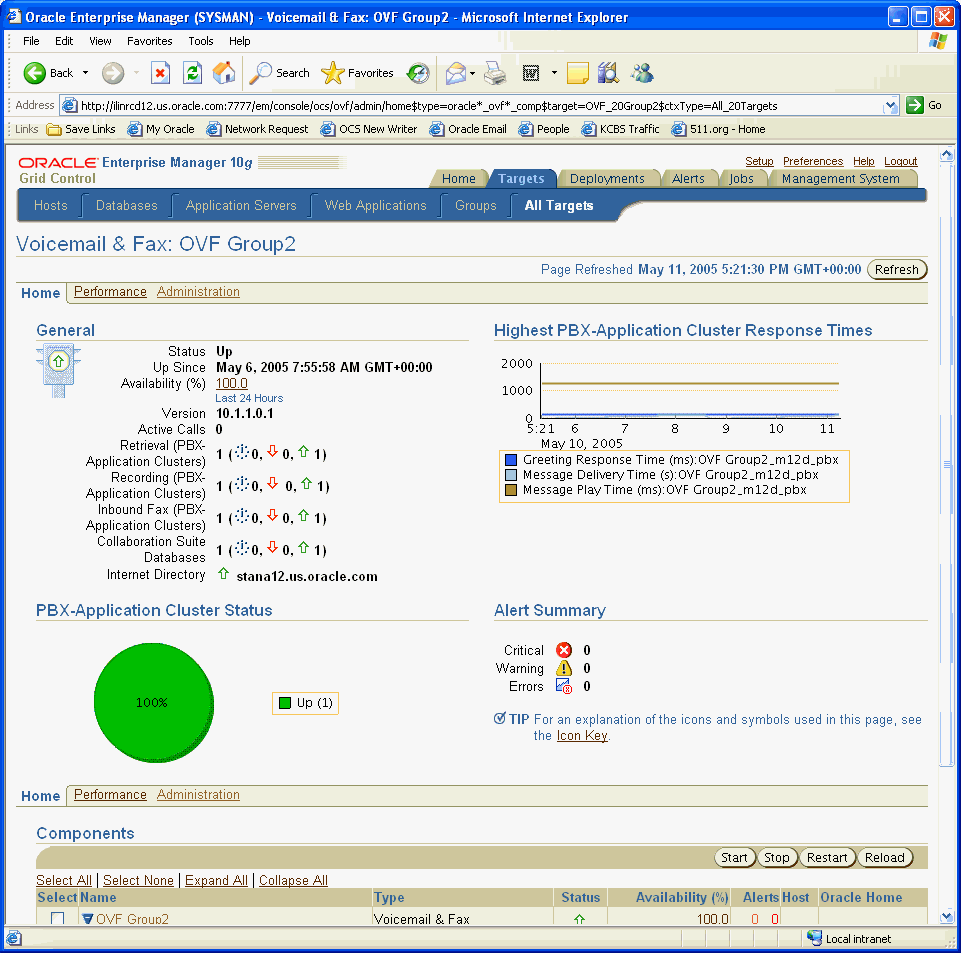
From the home page, scroll down to the Components table.
Click Expand All.
The Components table expands to reveal all the targets in its hierarchy.
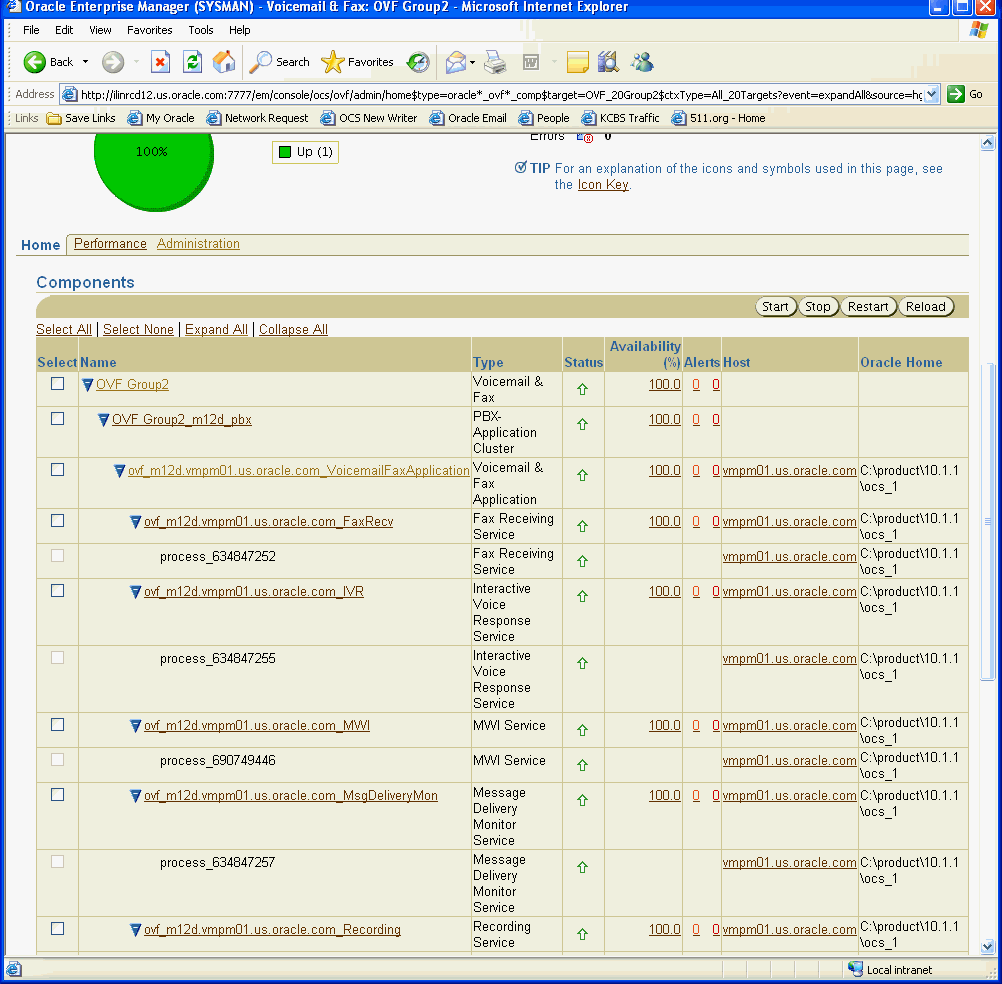
You should see the following targets for the Voicemail & Fax component:
Voicemail & Fax group
One or more PBX-Application Clusters
For each PBX-Application Cluster, one or more Voicemail & Fax Applications.
For each Voicemail & Fax Application, you should see the following services:
Call Transfer Service
Fax Receiving Service
IVR Service
Message Delivery Monitor Service
Message Recovery Service
Message Waiting Indicator Service
Recording Service
Retrieval Service
Routing Service
SMDI Monitor Service
Telephony Monitor Service
If you cannot see one or more of the services, use opmnctl to verify that the service is defined and is up. If the service is not defined, then there was a problem with the installation. Check the installation log files for any errors.
See Also:
Oracle Voicemail & Fax and Oracle Web Conferencing Conversion Servers Installation and Upgrade Guide for more information.Enterprise Manager Grid Control is the system management tool you will use to administer your Oracle Voicemail & Fax system. The components of Oracle Voicemail & Fax are organized in a hierarchy (Figure 2-1). At each level of the hierarchy, you can get status and performance information for that level of the hierarchy. In addition, you can set properties for each level in the hierarchy (with the exception of the service instances). Components inherit properties from their parents and pass properties on to child components. At each level, a subset of the inherited properties are exposed. The values for these exposed properties can be overridden and local values can be set. From any point in the hierarchy, you can drill down to all levels below it, or navigate back up the hierarchy.
Figure 2-1 Oracle Voicemail & Fax Hierarchy
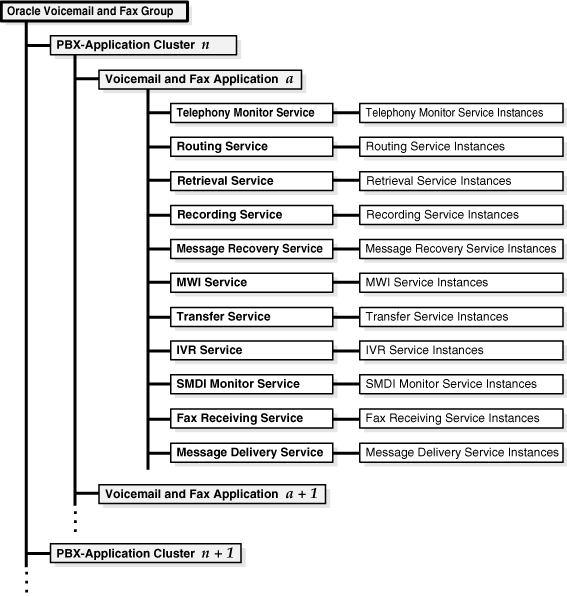
Voicemail & Fax Group — This is the highest level of the hierarchy. From this level, you have an overview of the Oracle Voicemail & Fax installation. You can get performance and status information on the component level below it, that is, the PBX-Application Cluster level. You can perform component-level tasks such as managing users, creating groups and sites, and set component-level and systemwide defaults. The properties set at this level are passed down to each level below it, to the Voicemail & Fax Application level and to the services.From this level, you can drill down to a particular PBX-Application Cluster or to any components of a particular cluster.
PBX-Application Cluster — A PBX-Application Cluster defines a relationship between one or more PBXes and one or more Voicemail & Fax Applications. The Voicemail & Fax Applications that support the PBX are called an application cluster. From the PBX-Application Cluster level, you can get a high-level overview of the Voicemail & Fax Applications associated with the PBX-Application Cluster. You set parameters in the PBX-Application Cluster for the specific Voicemail & Fax Applications that are servicing a specific PBX. From this level, you can drill down to a particular Voicemail & Fax Application or to one of the services associated with the application.
In many situations, you might deploy multiple Voicemail & Fax Applications to support a specific PBX. This ensures that if a specific Voicemail & Fax server is unavailable, there is another that can take its place. There is also a physical limit to the number of simultaneous phone calls that a Voicemail & Fax Application on one server can manage. If a PBX hands off more calls at one time than can be handled by one Voicemail & Fax server, the PBX will need to be deployed with multiple Voicemail & Fax servers.
There is one PBX-Application Cluster defined for each PBX. At a minimum, there is at least one Voicemail & Fax Application associated with the PBX-Application Cluster. In the multi-site boarded deployment example in Figure 2-2, there are three PBX-Application Clusters, HQ_Nortel, New_York_Avaya, and London_Avaya. The HQ_Nortel PBX-Application Cluster has two Voicemail & Fax Applications associated with it, and the New_York_Avaya and London_Avaya PBX-Application Clusters each have one Voicemail & Fax Application associated with it. All four Voicemail & Fax Applications are installed against the same Oracle Internet Directory and are part of the same Oracle Voicemail & Fax installation.
Voicemail & Fax Applications — A Voicemail & Fax Application is a set of services running on a voicemail host. At this level, you get an overview of the Voicemail & Fax Application and the Telephony Sever, and you set properties for the Voicemail & Fax Application. The parameter values are inherited from the values set at the Voicemail & Fax component level. For the parameters that are inherited and exposed at this level, the values can be overridden for this application. From this level, you can drill down to any of the services associated with this Voicemail & Fax Application.
Voicemail & Fax Services — There are eleven services that comprise the Voicemail & Fax Application. These services are: Routing, Retrieval, Recording, Call Transfer, Message Delivery Monitor, Message Recovery, Telephony Monitor, SMDI (Simplified Message Desk Interface) Monitor, MWI (Message Waiting Indicator), IVR (Interactive Voice Response), and Fax Receiving. You can view the status of each of the services and set parameters for the services. The parameter values are inherited from the Voicemail & Fax Application. For the parameters that are inherited and exposed at this level, the values can be overridden at the service level.
Oracle Voicemail & Fax is managed using the Enterprise Manager framework. Enterprise Manager allows you to create and manage multiple Voicemail & Fax groups. Each instance of the Oracle Voicemail & Fax configuration is managed in a separate Oracle Internet Directory. In a typical production deployment, you would only have one Oracle Voicemail & Fax group being managed by your Enterprise Manager. One reason to have multiple Oracle Voicemail & Fax groups is to support a separate deployment for testing purposes.
Follow the procedure below to navigate through the different levels of the Oracle Voicemail & Fax hierarchy.
To navigate the Oracle Voicemail & Fax hierarchy:
Log in to Enterprise Manager Grid Control.
Navigate to the Oracle Voicemail & Fax home page.
From the Oracle Voicemail & Fax group home page, scroll down to the Components table.
The Components table displays the targets in the Oracle Voicemail & Fax hierarchy. The first target in the table is the Oracle Voicemail & Fax group. This target has the name that was assigned during the Oracle Voicemail & Fax configuration.
The next level in the hierarchy is the PBX-Application Cluster. The name of the PBX-Application Cluster is the name that was assigned to it during the Oracle Voicemail & Fax configuration.
Click the Show icon next to the PBX-Application Cluster to reveal the next level in the hierarchy.
You can continue to click the Show icon at each level to reveal the level below it. Alternatively, you can click the Expand All link to expose all the targets in the hierarchy.
Click the PBX-Application Cluster link in the Components table.
This takes you to the home page for the PBX-Application Cluster target. You can click any target in the Components table to navigate to the home page for that target.
From the Components table, navigate between targets.
Navigate between the home page, performance page, and administration page by clicking the tabs at the top of the page.
Before you start configuring your Oracle Voicemail & Fax system, be sure you have completed the following tasks.
Follow the instructions in Oracle Voicemail & Fax and Oracle Web Conferencing Conversion Servers Installation and Upgrade Guide and install Oracle Voicemail & Fax.
Follow the instructions in "Verifying the Voicemail & Fax Installation" in Oracle Collaboration Suite Administrator's Guide and verify that the installation was successful.
Connect the phone lines from the PBX to the Voicemail & Fax Server.
Create a hunt group and set up the PBX to communicate with the Voicemail & Fax Server.
Set up a test user's phone to roll over to the hunt group after the call is not answered.
Once you have verified that these steps have been successfully completed, you are ready to continue with the post-installation steps.
The following is an overview of the steps to configuring the Oracle Voicemail & Fax system and testing the system.
Create and configure a site.
Configure the PBX-Application Cluster for your site.
Add a test user.
Test the Oracle Voicemail & Fax system.
This chapter makes the following assumptions about this Oracle Voicemail & Fax installation:
This is a boarded PBX, that is, there is one PBX that is directly connected to one Voicemail & Fax Server.
The Voicemail & Fax Server is using a Digital D82 card to communicate with the PBX. One port must be reserved for call detail information and this port has been set.
In the procedures that follow, we use an example PBX which has the following characteristics:
The PBX serves one physical site, the headquarters office for the ACME Company.
The PBX supports phone numbers that match the patterns 1650203???? and 1650307????.
The PBX uses five-digit extensions to dial internal phone numbers and for its message waiting indicator.
The PBX passes ten-digit extensions to Oracle Voicemail & Fax.
Users can enter five-digit extensions to identify their Oracle Voicemail & Fax accounts.
The hunt group number is 1 650 203-0000.
Note:
In the procedures that follow, we will refer to the values specified for this example PBX. You will have to replace these example values with the correct values for your PBX and for your site.The first step is to create a group for your location. This group is called a site. We are assuming that the ACME Company is installing Oracle Voicemail & Fax at their headquarters.
To create and configure a site:
From Enterprise Manager Grid Control, navigate to the Voicemail & Fax home page and click the Administration tab.
Click the Go To Task icon of the Manage Groups and Sites task.
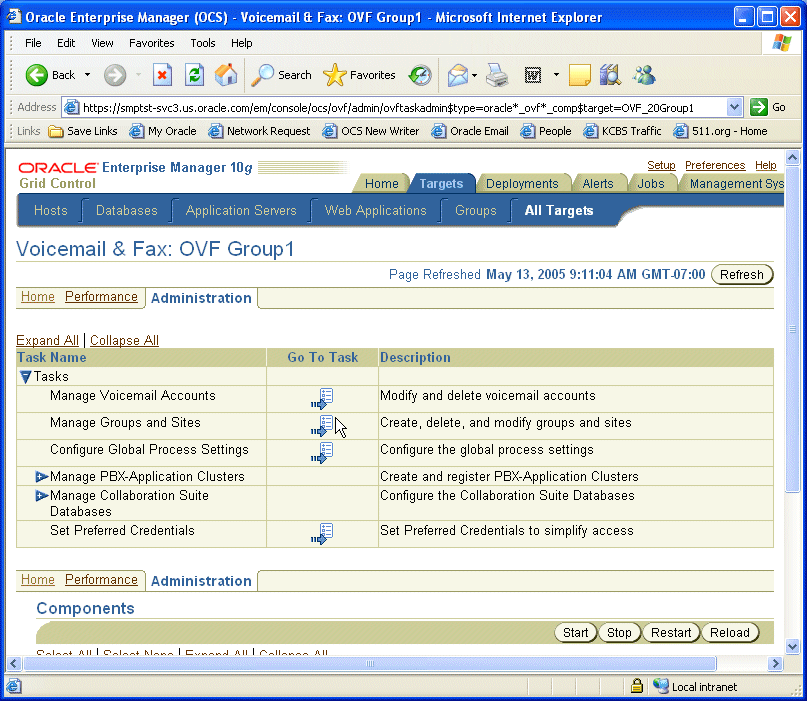
When you install Oracle Voicemail & Fax, the root, orclguest, and com groups are automatically created by default. The orclguest and com groups are children of the root group. First, you will change the default domain name of the root group.
In the Manage Groups and Sites page, click the root group.
On the Edit Group or Site page, change the Default Domain Name from oracle.com to the domain name for your company. In this example, we will use the domain name acme.com.
Click OK.
In this example, we will be creating the hq.acme.com group. To create this group, you have to create each level in the hierarchy. The com group is already created. So you will create the acme.com group first, then you will create the hq.acme.com group.
Click Create.
In the Name field, enter acme.
Select Group from the Category list.
Select com from the Parent list.
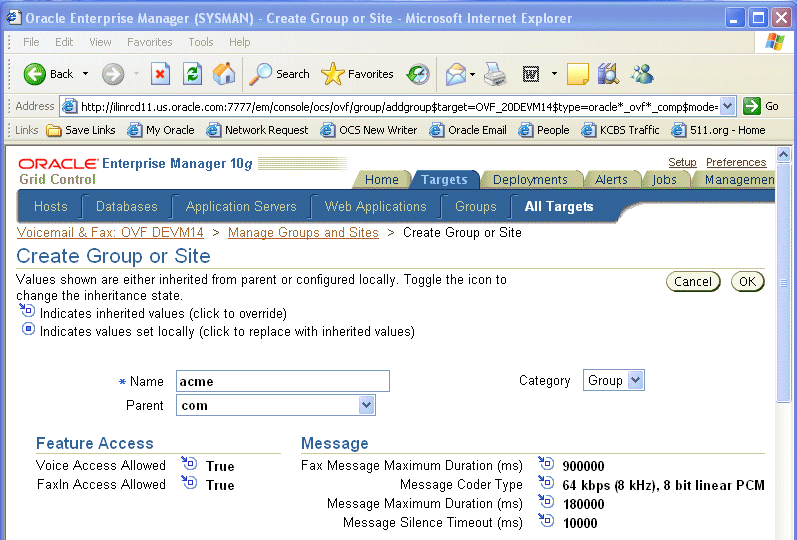
The values you see for the parameters are inherited from the group specified in the Parent list, in this instance, the com group.
Click OK.
Click Create again.
In the Name field, enter hq.
This time, select Site from the Category list because we want hq.acme.com to be a site.
Select acme.com from the Parent list.
We will focus on those parameters which are required to create a site. For all other parameters, we will use the default values.
Scroll down to the Site section, and enter the Mailbox Extension Length. In this example, enter 5.
When your users log in to the voicemail system, they are prompted to enter their mailbox number. The mailbox number is their phone number. Rather than entering 11-digits (the number of digits in a U.S. phone number in international format), you can allow them to enter their extension. Typically, this is 4 or 5 digits depending on what phone numbers your PBX supports. If your PBX supports phone numbers that match one pattern such as 650 203-????, you can use a 4-digit extension to get a unique number. If your PBX also supports phone numbers that match the pattern 650 307-????, then you have to use a 5-digit extension to ensure a unique extension. In this example, the PBX supports both 650 203-???? and 650 307-????.
Enter the Length of Local Phone Number. In this example, enter 7.
When a caller is forwarded to a user's voicemail system and the user has not created a personalized greeting, the voicemail system uses the phone number to identify the mail box (for example, "You have reached 3072492"). You can specify the length of the phone number to use to identify the mailbox. In this example, we want to use the 7-digit local phone number, so we specify 7.
Enter the Telephone Number Translation Rules as shown below.
In Step15, you specified an extension that users could enter for their mailbox number. So when a user logs in to his or her voicemail account and is prompted to enter their mailbox number, the user enters, for example, 37869 instead of 16502037869. However, Oracle Voicemail & Fax needs the telephone number in international format in order to know what account the user is logging in to. Therefore, the Telephone Number Translation Rules specifies how to take a mailbox extension such as 37869 and convert it to an international phone number such as 16502037869.
You must create rules to cover all the phone numbers owned by this PBX. In this example, the two phone number patterns that users will be entering are 3???? and 7????.
Select the time zone for your site from the Timezone list. In this example, select US Pacific Time.
Skip the Phone Numbers table. This will be covered when you configure the PBX-Application Cluster.
Accept the defaults for the Interactive Voice Response (IVR) parameters.
Click OK.
Set the Attendant Extension for the root group. Select the root group and click Edit or simply click root to go to the Edit Group or Site page. Enter the five-digit extension for the attendant and click OK.
During a call, a caller has the option to press 0 to reach an attendant. Typically, this is the company operator. The Attendant Extension is the number to which calls are transferred when the caller presses 0. There is no default setting for the Attendant Extension, so you must provide this number. The format for this number is the format that users enter to specify their mailbox number. Oracle recommends that you set this for the root group. Any group created under root inherits this setting. This setting can always be overridden at the group level or user level.
During the Oracle Voicemail & Fax installation, you created a PBX-Application Cluster to associate with the Voicemail & Fax Application. Now you will specify how the Voicemail & Fax Application integrates with the PBX.
To configure the PBX-Application Cluster:
From Enterprise Manager Grid Control, scroll down to the Components table and select the PBX-Application Cluster that you created during installation.
On the home page for the PBX-Application Cluster, click the Administration tab.
In the PBX Integration section, select the Integration Type. For this example, select Telephony Server.
Leave the default setting for Message Truncation Time unchanged.
Complete the Phone Numbers table for your PBX and site.
The Phone Numbers table is a mapping of a PBX and its phone numbers to a specific site. For this example:
Select hq.acme.com from the Site list. hq.acme.com is the site you created earlier in "Creating and Configuring a Site".
Enter the phone number pattern in the International Phone Number Pattern column.
Enter as many entries as you need to cover all the phone numbers that are assigned to your site.
Your entries should look like the figure below.
Note:
This table is a different view of the Phone Numbers table on the Create Group or Site page. Alternatively, you could fill in this information on the Create Group or Site page, if you wish.In the Internal Dialing Rules section, enter the dialing rules for phone numbers owned by the PBX.
The internal dialing rules are used to convert phone numbers that are in Oracle Voicemail & Fax format (that is, in international format) into a form that the PBX recognizes. In this example, the PBX uses five-digit extensions to dial internal phone numbers.
For this example, the Internal Dialing Rules table should look like the figure below.
Note:
When a phone number is passed to the application, the application checks the phone number against the phone number patterns. If the phone number does not match any of the specified patterns, the DEFAULT pattern is used. By default, the rule is to pass the phone number, as is, with no changes. Another use of the DEFAULT rule is if all phone numbers can be handled with one rule. If this is the case, you can use the DEFAULT pattern to define this rule.Therefore, if the phone number is 16503072492, the first six digits are removed, leaving 72492, no digits are prepended. The number that gets passed to the PBX is 72492 which is the five-digit format it uses to dial internal phone numbers.
In the External Dialing Rules section, enter the dialing rules for phone numbers that are not owned by this PBX.
The external dialing rules are used to convert phone numbers that are in Oracle Voicemail & Fax format (that is, in international format) into a form that the PBX recognizes. For this example, the entries should look like the figure below.
The first rule is used to dial phone numbers with the local area code 650 that do not belong to this PBX. To dial phone numbers with area code 650, the PBX prepends a 9 to the local number. For example, to call 16504518422, the PBX would dial 94518422. To get from 16504518422 to 94518422, the first four digits are removed and a 9 is prepended to the result.
The second rule covers all U.S. phone numbers that are outside of the local 650 area code. Note that you could also use 1, followed by ten question marks (1??????????) to specify this pattern. In this instance, you remove no digits and prepend a 9 to the beginning of the number. Therefore, 14158439245 would be dialed as 914158439245.
The last rule covers international phone numbers. In this instance, no digits are removed, and 9011 is appended to the beginning of the number. Because international numbers can be of varying lengths, use the asterisk rather than a series of question marks.
If a phone number should match more than one pattern, the most restrictive pattern is used. For example, the phone number 16504518422 matches all three of the specified patterns, *, 1*, and 1650???????. However, it matches more characters in the last pattern, so the 1650??????? rule is applied to the number.
In the Telephone Number Translation Rules, enter the rules for converting phone numbers that the PBX passes to Oracle Voicemail & Fax into international phone number format.
This PBX passes ten-digit phone numbers to Oracle Voicemail & Fax. These ten-digit numbers must be converted into a valid Oracle Voicemail & Fax account number. That is, they must be converted into international phone number format. You must specify rules to cover all phone numbers owned by this PBX.
In the MWI Phone Number Conversion table, enter the rules for converting Oracle Voicemail & Fax account numbers into a format that the PBX can dial.
For this particular PBX, these rules are identical to the Internal Dialing Rules.
In the Interactive Voice Response table, enter a phone number in the International Phone Number column. This phone number should always forward a call to the hunt group phone number.
Click Apply.
Note:
"Configuring PBX-Application Clusters" for more information on the PBX-Application Cluster parameters.Oracle Collaboration Suite users are provisioned for voice access through Oracle Internet Directory Self-Service Console.
To create a test user:
Log in to Oracle Internet Directory Self-Service Console.
You need to be logged in as an administrator with privileges to provision users. For example, you can use the orcladmin user name which has superuser privileges.
Create a user named John Doe.
Provision the user for voice access and assign the user the phone number 16502037882.
See Chapter 4, "Managing Oracle Collaboration Suite Users and Groups," in Oracle Collaboration Suite Administrator's Guide for more information on how to use the Self-Service Console to provision users.
Make sure you complete each step successfully, resolving any errors, before you proceed to the next step.
To test the Oracle Voicemail & Fax system:
Dial the hunt group number (1 650 203-0000) and allow the phone call to roll over into the voicemail system.
You should hear the following message: "Please enter the mailbox number or press start to record a message for another user."
You may hear the following message instead: "To record a message, press 1; to retrieve messages, press 2; to speak to an operator, press 0; to hang up, press the star key." If you hear this message prompting you to record a message or retrieve your messages, then this means that the Oracle Voicemail & Fax system cannot differentiate between a direct call and a forwarded call. Should this occur, check to see that the correct port has been specified on the Voicemail & Fax Server to receive call detail information.
Log in using the account you created. In this example, the account number is 37882. (Remember, you are using the mailbox extension length you set up on the Create Group or Site page.)
Enter the numeric password you set up for this user.
Follow the voice prompts and change the user's password and record the user's name (John Doe).
From the main menu, select 5, (Set Greetings or Change Personal Options), and do the following:
Record a greeting for the user. (optional)
Activate one of the greetings you create.
Hang up the phone.
Dial the user's phone number (1 650 203-7882) and let the call roll over into the voicemail system.
If you get the message: "An error occurred during the processing of your request. Please try your call again," check the Routing Service log to see what phone number the PBX is passing to Oracle Voicemail & Fax. Is it passing 6502037882 or is it passing some other number? In this example, you would look for the following entry: "Storing call details: from 650xxxxxxx; to 6502037882; type B." Look for a similar entry for your specific situation. Check the Telephone Number Translation Rules on the PBX-Application Cluster administration page and verify that it includes a rule that can convert this phone number into international phone number format.
If you do not hear a greeting, then do the following:
Log in to the user's voicemail account and from the main menu, select 5 (Set Greetings or Change Personal Options), and follow the prompts to re-activate your greeting or record and activate the greeting again.
Verify that Oracle Internet Directory is up and running. Go to the Voicemail & Fax home page and check the status of Oracle Internet Directory in the General section of the page.
Dial the hunt group number (1 650 203-0000), log in to the user's account (37882) and from the main menu, select 4 to record a new message. After you record the message, press 4 to send the message to the user. (For the purpose of this test, you are logging in to John Doe's account, recording a message, and sending the message to John Doe's account.)
If you hear the message: "Your message could not be sent and has been queued," then do the following:
Verify that the Oracle Collaboration Suite Database is up and running. Go to the Voicemail & Fax home page and check the status of Collaboration Suite Database in the General section of the page.
Check to see that the Oracle Collaboration Suite Database is available for the Voicemail & Fax Application. See "Setting the Available Oracle Collaboration Suite Databases" (UNKNOWN STEP NUMBER) for more information.
Check to see that the Oracle Collaboration Suite Database is listed in the sc_vsto.cfg file. The sc_vsto.cfg file is a NetMerge configuration file that picks up information from Oracle directory server. This file can be found in the C:\Documents and Settings\All Users\Dialogic\CT Media\Container directory. Check to see that the database you are trying to connect to is listed.
Dial in to the hunt group number and log in to John Doe's account (37882). You should hear the following message: "You have one new voicemail message, no saved voicemail messages, no new e-mail messages, and no new fax messages."
If the voicemail prompt indicates you have no new messages instead of indicating you have one new message, then verify that the Oracle Mail IMAP Server and the SMTP process are up and running. See the Oracle Mail Administrator's Guide for information on checking the Oracle Mail IMAP Server and the SMTP process.
Congratulations! You have successfully configured the Oracle Voicemail & Fax system, created a test user, verified that you can log in to the Oracle Voicemail & Fax system, set the user's personal settings (password and greeting), verified that the system is correctly translating PBX phone numbers into Oracle Voicemail & Fax account numbers, verified that you can send and retrieve messages.
You can now add the other users to your system. Follow the instructions in Chapter 5, "Managing Oracle Voicemail & Fax Accounts." In particular, you may want to refer to "Adding Users with Bulk Provisioning" on bulk provisioning users.