| Oracle® Calendar Administrator's Guide Release 2 (9.0.4) Part Number B10892-02 |
|


|
View PDF |
| Oracle® Calendar Administrator's Guide Release 2 (9.0.4) Part Number B10892-02 |
|
|
View PDF |
This chapter describes the various tasks involved in creating and managing resources. The administrative controls and functionality of resource management are similar to those of user management, with some important differences in an LDAP context.
The following topics are dealt with in this chapter:
A resource is an inanimate object, such as a conference room or a piece of equipment, that has its own account on the calendar server. When creating an event in their agenda, users can reserve resources by inviting them in the same way that they invite other users. Resources can be managed by local users who act as designates. Resources can be set up to permit reservations on a first come first served basis to prevent double-bookings, to permit more than one reservation at a time, or to require approval by a resource manager.
Resource accounts can also be used to create calendars for tracking related enterprise-wide information, such as company holidays or employees' travel schedules. For example, to create a Travel Planner for an organization, add a resource to the node and name it "Travel Planner". Whenever an employee is scheduled to travel, he/she will create an event in his/her personal agenda and invite the resource. The result is a calendar for the resource Travel Planner containing all entries related to employees' travel.
You can add resources to a node using the Calendar Administrator. Click the Calendar Management tab and then on Resources at the top left. Click Add Resource on the far right. Enter the resource information and then click Apply.
Use uniuser -add -resource to add a single resource. A password for the resource must be supplied. For full information on use and syntax, see Appendix E, "Utilities" of the Oracle Calendar Reference Manual.
% uniuser -add "R=conference room/N=4/PSW=abcd123" -resource -n 786 -p syspsw
uniuser: added "conference room"
uniuser documentation in Appendix E, "Utilities" of the Oracle Calendar Reference Manual.
A R=conference room/N=104/CA=24/S=Alexander/G=James/PSW=abc1
A R=projector/N=2/S=Addison/G=Thomas/PHONE=123-4567/PSW=def2
% uniuser -ex res1 -resource -n 444
Enter SysOp password:
uniuser: added "conference room"
uniuser: added "projector"
uniuser: added "lab"
In a standalone installation of the calendar server, using an third-party LDAP directory server, you may specify a Resource Relative DN for your installation using the server parameter [LDAP] resourcerelativedn. If you do, all resources will be stored by default in that location in the LDAP tree. Alternatively, you may specify a full DN for resources as you create them. For more details on the resourcerelativedn parameter, see Appendix C, "Server Parameters" of the Oracle Calendar Reference Manual.
While users are typically in the directory server before they are added to a calendar server node, resources are added directly to the calendar server and directory server in a single operation.
You can add resources to a calendar server node easily using the Calendar Administrator. Click the Calendar Management tab and then on Resources at the top left. Click Create Resource on the far right. Enter the resource attributes and then click Apply.
Use uniuser -add to add a single resource. For full information on use and syntax, see Appendix E, "Utilities" of the Oracle Calendar Reference Manual. This example specifies a full DN for the new resource.
%  uniuser -resource -add "R=Res1/PSW=test1" -n 134
Enter SysOp password:
uniuser: added "cn=Room614,o=Acme,c=US"
This example specifies only a resource name, leaving the resource's location in the LDAP directory to be determined by the Resource Relative DN and the calendar server base DN.
%  uniuser -resource -add "R=Room614" -n 134
Enter SysOp password:
uniuser: added "R=Room614"
uniuser documentation in Appendix E, "Utilities" of the Oracle Calendar Reference Manual. This example specifies full DNs for the new resources.
A DID=cn=Room24, o=Acme, c=US
A DID=cn=projector3, o=Acme, c=US
A DID=cn=lab5, o=Acme, c=US
% uniuser -resource -ex res1 -n 444
Enter SysOp password:
uniuser: added "cn=Room24, o=Acme, c=US"
uniuser: added "cn=projector3, o=Acme, c=US"
uniuser: added "cn=lab5, o=Acme, c=US"
The resource now exists in the directory server and on the calendar server node.
You can manage resources easily using the Calendar Administrator. Click the Calendar Management tab and then Resources at the top left. Search for the resource you want to modify. You can click Go to list all resources or select a filter and enter a value in the Search edit box to limit the search. When the resource is listed, click the pencil icon in the Actions column to modify the resource's attributes or click the key icon to change the password.
List resources using the uniuser utility with the -ls and the -resource options. List resource attributes using the -info and the -resource options. To modify resources, use uniuser -mod -resource. For full information on use and syntax, see Appendix E, "Utilities" of the Oracle Calendar Reference Manual. For example:
% uniuser -resource -ls "R=HPLaser*" -format "%r% Contact: %g% %s%" -n 12
 -p mypasswd
% uniuser -resource -mod "R=oakroom" -m "N=301/PSW=abc123" -n 23
When a resource is deleted from a node, the resource's directory entry and records are removed from the local node. The resource will no longer appear as invited in user's agendas, nor will it appear in any directory listings.
Calendar entries owned by the resource can be transferred to another resource before deleting the resource, using uniuser with the -transfer option.
Another option is to take a copy of the resource's agenda using the unicpoutr utility, and subsequently copy it back to any calendar server node using the unicpinr utility. For full information on use and syntax of these utilities, see Appendix E, "Utilities" of the Oracle Calendar Reference Manual.
You can delete resources easily using the Calendar Administrator. Click the Calendar Management tab and then on Resources at the top left. Search for the resources you want to delete using the search edit box or select Advanced Search. Select the resources you want to delete from the list using the checkboxes in the Select column and click Delete on the top right.
Remove the resource(s) from the calendar server node using the uniuser -del -resource (single deletion) or uniuser -ex (multiple deletions) commands. For full information on use and syntax, see Appendix E, "Utilities" of the Oracle Calendar Reference Manual.
You may define a default resource profile to apply as you add resources to the database. This profile can also be applied to existing resources.
$ORACLE_HOME/ocal/misc/resource.ini file. Edit this file using a text editor supplied with your operating system.$ORACLE_HOME/ocal/misc/resource.ini file.uniuser utility or the Calendar Administrator).[GEN] in the $ORACLE_HOME/ocal/misc/resource.ini file. Multiple profiles can be created from this template and appended to the file under different section heading names. These profiles can then be specified during resource creation or modification using the uniuser command. For full information on use and syntax, see Appendix E, "Utilities" of the Oracle Calendar Reference Manual.uniuser -resource -ex command.An administrator can grant a user the right to access the agenda of a resource. These rights include event viewing rights, task viewing rights, scheduling rights and designate rights.
When a designate user is assigned to a resource, he can open the resource's agenda to add, delete or modify entries. Designate and other access rights are set according to the default resource profile file (resource.ini) at the time the resource is added to the node.
If a resource grants scheduling rights to a user, it means the user has the right to book the resource. If the default access rights for all users is set such that no one has the right to book a resource, the resource is said to be restricted.
You can set access rights using the Calendar Administrator or the uniaccessrights utility.
Use the Calendar Administrator to grant access rights from a resource to a user. Click the Calendar Management tab and then on Resources on the top left. Search for the resource and then click the Update (pencil) icon in the Actions column. Click Access Rights on the left side. Click Grant Rights on the top right. Search the user or users who will be granted the access rights (grantees). Select the users using the checkmark boxes in the Select column then click Grant Rights on the right.
Use the uniaccessrights utility with the -mod option to grant access rights from a resource to a user or from a resource to many users. For example:
% uniaccessrights -mod -grantee "S=OBrian" -grantor "R=ConfRoom1" -host gravel
-p sysop1 -eventview "NORMAL=ALL"
For full information on the use and syntax of uniaccessrights, see Appendix E, "Utilities" in the Oracle Calendar Reference Manual.
Resource reservation settings are controlled at the level of individual resources. By default, a resource is set to be reserved on a first come first served basis. The first user to reserve the resource will get the accepted reply automatically. Any subsequent request to reserve the resource for the same time slot will be refused.
A resource can also be set to allow double-booking. When a resource is allowed to be booked by more than one user for the same time slot, the resource designate can choose which user gets the resource by accepting one of the requests and declining the others.
Some resources may be set up such that anyone requesting a resource will need approval by a resource manager before the resource can be booked. This mechanism includes sending an e-mail to the approver, explaining that a resource has been requested. The e-mail message will include a link to the calendar Web client where the approver can either approve or refuse the request. This e-mail will be sent in the language set for the resource.
When a resource is restricted, no one can reserve the resource. To allow a few users to reserve a restricted resource, the right to book the resource must be granted from this resource to each of these specific users.
You can set resource scheduling attributes easily using the Calendar Administrator or the uniaccessrights utility. For more information on the use and syntax of uniuser, see Appendix E, "Utilities" of the Oracle Calendar Reference Manual.
Setting the ALLOW-CONFLICT attribute to YES will allow the resource to be booked by more than one user for the same time slot. Set the ALLOW-CONFLICT attribute back to NO to let the resource be booked on a first come first served basis. Use DEFAULT to resort to the default set by the server parameter (unison.ini) [ENG] allowresourceconflict. For more information on this server parameter, see Appendix C, "Server Parameters" of the Oracle Calendar Reference Manual.
A resource can be set to allow double-booking using the Calendar Administrator. Click the Calendar Management tab and then click Resources at the top left. Search for the resource you want to modify by selecting a Search filter and entering a value in the search edit box. Click Go to list the resources. When the resources are listed, click the pencil icon in the Actions column. Scroll down to the Scheduling Options section. Select "Yes -- Requires Approval" in the Allow Double-booking pull-down list.
To allow double-booking for a resource, set the resource ALLOW-CONFLICT attribute to YES using the uniuser utility with the -mod option. Example:
% uniuser -n 1 -resource -mod "R=Pool Table" -m ALLOW-CONFLICT=YES
The Approval mechanism for resources can be set up using the Calendar Administrator or using the uniuser utility.
To set resource approval using the Calendar Administrator, sign-in and click the Calendar Management tab and then Resources at the top left. Search for the resource you want to modify and then click the pencil icon in the Actions column. Scroll down to the Scheduling Options section. Select "Yes -- Requires Approval" in the Allow Double-booking pull-down list. For the approval mechanism to work, you must checkmark the "Notify Approver by E-mail" box and enter the e-mail address of the approver in the box labeled "Approver E-mail". Change the language that will be used for sending the e-mail using the pull down list.
To set resource approval using the uniuser utility, use the -mod option. Three attributes must be set, ALLOW-CONFLICT must be set to YES, NOTIFY-APPROVER must be set to TRUE and APPROVER-EMAIL must be set to the approver's e-mail address; for example:
% uniuser -n 1 -resource -mod "R=Projector" -m
"ALLOW-CONFLICT=YES/NOTIFY-APPROVER=TRUE/APPROVER-EMAIL=resmanager@test.com"
In order to grant approval, the approver must have full designate rights for the resource.
Restricting a resource is done using the resource's CanBookMe attribute. Setting it to FALSE will make the resource restricted. To allow a user to reserve a restricted resource, the CanBookMe access right for the resource must be granted to the user.
You can restrict a resource easily using the Calendar Administrator. Click the Calendar Management tab and then on Resources at the top left. Search for the resource you want to modify and then click the pencil icon in the Actions column. Click Access Rights on the left menu. Click the Modify Default Access Rights button on the top right. In the Scheduling section, un-check the "Can Invite Me" option. This will be reflected in the Scheduling Options section of the Resource Information Web page for this resource where it will say "Restricted resource".
To grant booking rights to specific users, from the same Resources page, search for the resource then click the pencil icon in the Actions column. Click Access Rights on the left menu, then click Grant Rights on the top right. Find a user or all the users using the search box. When the user or the list of users is displayed, checkmark the user or users to whom you want to grant access rights in the Select column, then click Grant Rights at the top right of the list. Go down to the Scheduling section and select "Can Invite Me". Click Apply.
Use the uniuser utility with the -s option to set a resource to be restricted. This option lets you specify a section of the configuration file $ORACLE_HOME/ocal/misc/resource.ini to use for determining the default values to be used for editing the attributes of a resource.
For full information on the use and syntax of uniuser -s, see Appendix E, "Utilities" in the Oracle Calendar Reference Manual. For example:
[RESTRICT_RESOURCE] in the resource.ini file with the CanBookMe parameter set to FALSE. Simply add these two lines at the end of the file:
[RESTRICT_RESOURCE]
CanBookMe=FALSE
You can list the values in any section of the resource.ini file:
% uniuser -resource -defaultls -s "RESTRICT_RESOURCE" -n 23 -p sysop1
CanBookMe = FALSE
% uniuser -resource -mod "R=OakRoom" -s "RESTRICT_RESOURCE" -n 23 -p sysop1
uniuser: "R=OakRoom/N=100/UID=oakroom/ID=308/NODE-ID=23" has been modified.
uniaccessrights utility with the -mod option to grant access rights from the resource to a user; for example:
% uniaccessrights -mod -grantee "S=OBrian" -grantor "R=OakRoom" -p sysop1
-scheduling "canbookme=true" -n 23
% uniaccessrights -mod -grantee "OU1=Engineering" -grantor "R=OakRoom" -p
sysop1 -scheduling "canbookme=true" -n 23
For full information on the use and syntax of uniaccessrights, see Appendix E, "Utilities" in the Oracle Calendar Reference Manual.
The calendar server facilitates the task of searching for resources through the use of resource categories and resource capacity for calendar clients that support it. When a new resource such as a conference room or a vehicle is added, a capacity value can be entered. The capacity can be used by the calendar users to select resources. The Calendar Administrator interface and the Oracle Connector For Outlook both allow users to filter resources based on the capacity.
When a user searches for resources using any calendar client, he can narrow his search by first selecting the country, then the facility and finally the type of resource (rooms, equipment, etc.). Figure 9-1 shows how a user can search for a resource from a calendar client by selecting entries from three pull down lists. Resource categories are used to store this information in the calendar server database.
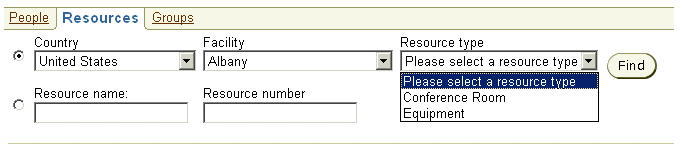
Text description of the illustration rsearch.gif
In order to provide this feature for end users, the list of resource categories must be defined in the category configuration file $ORACLE_HOME/ocal/misc/category.ini. A second category configuration file $ORACLE_HOME/ocal/misc/categorytype.ini exists in the same directory and should not be modified. The list of available countries, facilities and resource types will be displayed in the calendar clients according to the category.ini file. The administrator must edit this file and enter the data manually. These two files are needed to allow searching for resources using resource categories.
The categories must be organized in a tree structure which specifies the countries, the facilities in each country, and the types of resources available at each facility.
Figure 9-2 shows an example of resources in an organization with offices in 2 countries, in 4 different cities, and with different types of resources.
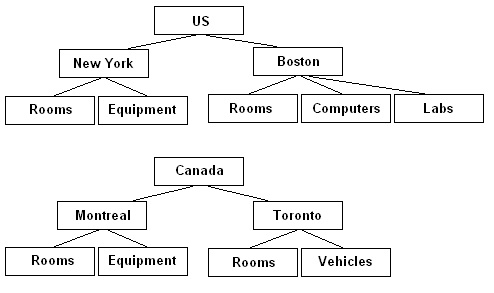
Text description of the illustration rorg.gif
The file category.ini contains information describing each node of the resource tree and defines the names of the categories that will appear in the pull-down lists in the user interface (for example, the country "United-States", the facility "New-York", the resource type "Computer"). Each category name can be defined in different languages allowing localized calendar clients to display the list of categories in the proper language.
These files must be encoded in the UTF-8 format. To convert a string to UTF-8, use the unistrconv utility or use a UTF-8 editor. For full information on use and syntax of this utility, see Appendix E, "Utilities" of the Oracle Calendar Reference Manual.
Once you have defined the way to structure the resources in your organization, edit the category.ini file to enter the information. You may want to keep a copy of the sample category.ini file before changing it.
In order for the categories to apply to all resources in a node network, the category.ini file must be copied on all hosts in the network.
The category.ini file contains the list of all countries, the list of all facilities for each country and the list of all types of resources available at each facility. Every entry in the three lists must have a corresponding section in the file. Each section is identified by a section name enclosed in square brackets, (ex. [RL_NEWYORK]). Section names must not exceed 32 characters.
Each section contains a list of labels to be displayed in the different languages available to end users. Each of these label strings must be encoded in UTF-8 format. The typeid parameter in each section specifies whether the entry is part of the list of countries, of facilities or of resource types. All section names must be different.
Enter sections for each country. For example, if your organization has offices in three countries, USA, England and Canada, then you should enter three sections, one for each country: [RL_USA], [RL_ENGLAND] and [RL_CANADA]. Within these sections, the typeid parameter should be set to "RL_COUNTRY"and parentid to "RL_ROOT". For example:
[RL_USA]
typeid = "RL_COUNTRY"
parentid = "RL_ROOT"
description.en = "USA"
Use the description.xx parameters to enter the country's label in more than one language. The translated labels will be used for calendar clients of different languages. For example, description.fr defines the French label, description.de defines the German label, etc. Each of these label strings must be encoded in UTF-8 format.
For example:
[RL_ENGLAND]
typeid = "RL_COUNTRY"
parentid = "RL_ROOT"
description.en = "England"
description.fr = "Angleterre"
description.es = "Inglaterra"
The language codes are the following:
en (English)
fr (French)
it (Italian)
es (Spanish)
de (German)
pt (Portuguese)
ja (Japanese)
ko (Korean)
zh-cn (Traditional Chinese)
zh-tw (Simplified Chinese)
pt-br (Brazilian Portuguese)
Enter sections for each facility. For example, if your organization has two offices in the USA, then you should enter two sections with the typeid parameter set to "RL_FACILITY" and parentid to "RL_USA". The section name should identify the facility. The name of the city it is located in or the name of the department that occupies it can be used. For example:
[RL_NEW_YORK]
typeid = "RL_FACILITY"
parentid = "RL_USA"
description.en = "New York Office"
[RL_SANFRANCISCO]
typeid = "RL_FACILITY"
parentid = "RL_USA"
description.en = "San Francisco Laboratory"
Enter sections for each type of resource available at a facility. For example, if your office in New York has three types of resources (Conference rooms, Equipment, Vehicles), then you should enter three sections with the typeid parameter set to "RL_RESOURCETYPE" and parentid set to "RL_NEW_YORK". The section name should identify the resource type and the facility and should be unique. For example:
[RL_NY_VEHICLES]
typeid = "RL_RESOURCETYPE"
parentid = "RL_NEW_YORK"
description.en = "Vehicle"
description.es = "vehículo"
[RL_NY_CONFROOM]
typeid = "RL_RESOURCETYPE"
parentid = "RL_NEW_YORK"
description.en = "Conference room"
description.es = "Salón de Conferencias"
[RL_NY_EQUIPMENT]
typeid = "RL_RESOURCETYPE"
parentid = "RL_NEW_YORK"
description.en = "Equipment"
description.es = "Equipos"
For each facility, in all countries, resource types must be entered this way with a section name reflecting the resource type and the facility, and the parentid parameter set to the facility's section name.
Once all resource types have been entered in the category.ini file, each resource entered in the database can then be associated with a resource type category. Associating a category to a resource will ensure that this resource is found when the user selects the right category type from the pull-down list.
To associate a resource to the proper categories, the uniuser utility can be used with the -mod option. For example:
% uniuser -resource -n 1 -mod "R=ConfRoom202" -m "CATEGORY=RL_NY_CONFROOM"
Once categories have been assigned to all resources, you can list the resources based on categories using uniuser -resource -ls. For example:
% uniuser -resource -n 1 -ls "CATEGORY=RL_NY_CONFROOM"
For full information on use and syntax on this utility, see Appendix E, "Utilities" of the Oracle Calendar Reference Manual.
You can set categories for a resource easily using the Calendar Administrator. Click the Calendar Management tab and then on Resources at the top left. Find the resource or resources you wish to edit by using the Search box. Once the resource is listed, click the pencil icon to edit the resource's attributes. Select Categories on the left hand side. The Available Categories will be listed. Click a category name to see the sub-categories. Click the check boxes to select categories to associate to the resource. Click View All to view all categories available.
|
 Copyright © 1993, 2003 Oracle Corporation All Rights Reserved. |
|

