| Oracle® Enterprise Manager Administrator's Guide for Software and Server Provisioning and Patching 10g Release 5 (10.2.0.5.0) Part Number E14500-04 |
|
|
PDF · Mobi · ePub |
| Oracle® Enterprise Manager Administrator's Guide for Software and Server Provisioning and Patching 10g Release 5 (10.2.0.5.0) Part Number E14500-04 |
|
|
PDF · Mobi · ePub |
This chapter explains how you can extend and scale up an existing Oracle RAC stack (Oracle Clusterware, Oracle ASM, Oracle RAC database), in a single click. In particular, this chapter covers the following:
This section helps you get started with this chapter by providing an overview of the steps involved in extending an existing Oracle RAC stack. Consider this section to be a documentation map to understand the sequence of actions you must perform to successfully extend an existing Oracle RAC. Click the reference links provided against the steps to reach the relevant sections that provide more information.
Table 6-1 Getting Started with Extending Oracle RAC
| Step | Description | Reference Links |
|---|---|---|
 |
Understanding the Deployment Procedure Understand the Deployment Procedure that is offered by Enterprise Manager Grid Control for extending Oracle RAC. Know how the Deployment Procedure functions, what use cases it covers, and so on. |
To learn about the Deployment Procedure, see Deployment Procedure. |
 |
Knowing About The Supported Releases Know what releases of Oracle RAC can be extended by the Deployment Procedure. |
To learn about the releases supported by the Deployment Procedure, see Supported Releases. |
 |
Understanding the Deployment Phases The Deployment Procedure consists of a series of interview screens that take you through the different deployment phases and capture the required information. Understand the different phases involved and know what information is captured in each phase. |
To learn about the deployment phases involved in extending Oracle RAC, see Deployment Phases. |
 |
Meeting the Prerequisites Before you run any Deployment Procedure, you must meet the prerequisites, such as setting up of the provisioning environment, applying mandatory patches, setting up of Oracle Software Library. |
To learn about the prerequisites for extending Oracle RAC, see Prerequisites. |
 |
Running the Deployment Procedure Run the Deployment Procedure to successfully extend an existing Oracle RAC. |
To extend Oracle RAC, follow the steps explained in Procedure. |
Enterprise Manager Grid Control offers the following Deployment Procedure for extending Oracle RAC:
One Click Extend Cluster Database
Using this Deployment Procedure, you can extend the following releases of Oracle RAC:
Oracle Database 10g Release 2 (10.2.x.x)
Oracle Database 11g Release 1 (11.1.x.x)
This section describes how you can extend an existing Oracle RAC to include as many additional nodes as you need, in just one click.
This section covers the following:
The following describes the different phases involved in this Deployment Procedure:
Table 6-2 Deployment Phases Involved in Extending Oracle RAC
| Phase | Description |
|---|---|
 |
Extend RAC Allows you to select an existing Oracle RAC you want to extend, add new nodes you want to include to it, specify credentials, and schedule the Deployment Procedure to run immediately or later. Also allows you to run prerequisite checks and fix-ups on the selected nodes. |
 |
Review Allows you to review the details you have provided for extending the Oracle RAC instance. |
Before running the Deployment Procedure, meet the following prerequisites:
Ensure that you meet the prerequisites described in the following sections:
Ensure that oinstall and dba groups are available.
Ensure that operating system users such as oracle and crsuser are available on all nodes of the cluster. These users must be a part of the relevant operating system groups such as dba and oinstall.
Ensure that the credentials being used to run this operation along with the group ID are the same on all nodes of the selected cluster.
Ensure that you do NOT use an NIS-based operating system user.
Ensure that you use an operating system user that has the privileges to run the Deployment Procedure and its commands on the target hosts. If you do not have the privileges to do so, that is, if you are using a locked account, then request your administrator (a designer) to either customize the Deployment Procedure to run it as another user or ignore the steps that require special privileges. For information about customization, see Chapter 23, "Customizing Steps to Run as Another User".
Ensure that the shared storage used for existing cluster nodes are accessible to the nodes you want to add.
Ensure that the umask value on the target host is 022.
To extend an existing Oracle RAC, follow these steps:
In Grid Control, click the Deployments tab.
On the Deployments page, in the Deployment Procedure Manager section, click RAC Provisioning Procedures.
On the Deployment Procedure Manager page, in the Procedures subtab, from the table, select One Click Extend Cluster Database. Then click Schedule Deployment.
Enterprise Manager Grid Control displays the Extend Real Application Clusters page.
On the Extend Real Application Clusters page, do the following:
In the Select Real Application Clusters (RAC) section, select the Oracle RAC you want to extend. The associated clusterware and Automatic Storage Management (ASM) also get extended if they are not already existing.

You can use the Search section to search for a particular Oracle RAC. From the Search list, select the target type based on which you want to search, and click Go. You can use wildcards such as % and *.
Note:
If the cluster database you want to extend does not appear on this page, then:Specify the clusterware home location for the cluster target in Enterprise Manager Grid Control. In Grid Control, click the Targets tab, and then click the All Targets subtab. On the All Targets page, from the Search list, select Cluster and click Go. From the results table, select the cluster for which you want to specify the clusterware home location. On the Cluster Home page, in the Related Links section, click Monitoring Configuration. On the Configure Target page, specify the clusterware home location and click Update.
Configure Enterprise Manager Grid Control settings to display them. In Grid Control, click the Deployments tab, and on the Deployments page, in the Configuration section, click Refresh Host Configuration. On the following page, from the Available Hosts pane, select the hosts and add them to the Selected Hosts pane. Then, click Refresh Hosts and wait for the job to succeed. Return to this Deployment Procedure page and run the search query again to view the hosts in the search results.
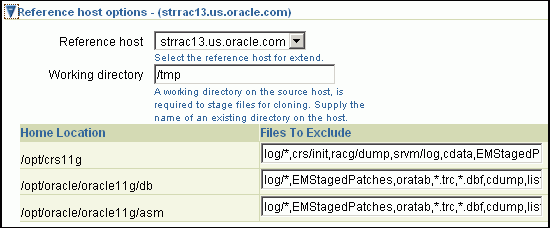
In the Reference Host Options section, from the Reference Host list, select a host that you want to use as the primary host for performing this operation. Reference Host is the host that is selected for creation of clone archives and then transferred to the new target nodes being added.

For Working directory, specify the full path to an existing directory on the selected host that can be used for staging files for cloning. If the directories you specify do not exist on the target hosts, then they will be created by the Deployment Procedure. Ensure that the working directory is NOT shared on the nodes.
For Files To Exclude, for each Oracle home, specify the files you want to exclude while performing this operation. Note that any file or folder corresponding to the regular expressions provided here will be excluded.
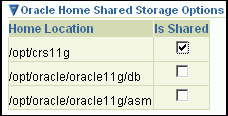
In the Oracle Home Shared Storage Options section, select the Oracle home locations that are on shared storage.

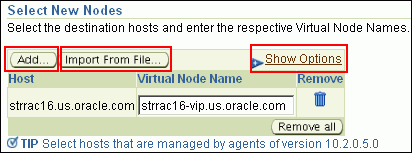
In the Select New Nodes section, click Add to add new nodes that you want to include to the selected Oracle RAC. After adding the node, specify the virtual node name for each new node and verify the values displayed by default.

Note:
Ensure that you select nodes that are monitored by Oracle Management Agents 10g Release 5 (10.2.0.5) or higher.Optionally, you can click Show Options to specify Private Node Name, Private IP, Virtual IP, and Working Directory. Private Node Name and Private IP are required only if you want to set up a private network as part of the procedure.Virtual Node Name and Virtual IP are required only if they are fixed and not DHCP-based. If the node is already part of the Oracle Real Application Clusters (RAC) system, it will be ignored. If the node is part of the Oracle Clusterware, the private network and virtual host information will be ignored. For Working Directory, ensure that the location you specify is NOT shared on the nodes.
If you already have these details stored in cluster configuration file, then click Import From File to select that cluster configuration file. This file typically contains information about the new nodes to be added. It may also include information about the private node name, private IP address, virtual host name, and virtual IP address to which the Oracle RAC should be extended.
In the User Credentials (Override Preferred Credentials) section, retain the default selection, that is, Use Preferred Credentials.
Note:
You can optionally override these preferred credentials. The credentials you specify here are used by the Deployment Procedure to run the provisioning operation. If this environment is secure and has locked accounts, then make sure that:The credentials you specify here have the necessary privileges to switch to the locked account for performing the provisioning operation.
The Deployment Procedures has been customized to support locked environments.
For more information, see Chapter 23, "Customizing Steps to Run as Another User".
From the Host Credentials list, select Different for each Oracle Home if you want to use different operating system credentials for each Oracle home, or Same for all Oracle Homes if you want to use the same set of credentials for all Oracle homes. Depending on the selection you make, specify the credentials. Ensure that the users belong to the same group (dba/oinstall).
Note:
If you are using vendor clusterware, then ensure thatroot and the operating system users, such as oracle and crsuser, owning the clusterware and various Oracle homes are a part of the operating system groups required by the vendor clusterware.
For example, if your system uses High Availability Cluster Multiprocessing (HACMP) clusterware, then create or check for the existence of the group hagsuser. Ensure that the relevant operating system users and root user are members of this group.
For more information, refer to the Oracle Clusterware and Oracle Real Application Clusters Installation and Configuration Guide.
In the Schedule section, schedule the Deployment Procedure to run either immediately or later.

In the Prerequisites (Run Prerequisites and Fix-Ups) section, by default, Skip prerequisites and fix-ups is not selected and therefore, the deployment procedure runs the prerequisite checks and fix-ups on the selected nodes.

The prerequisite checks are required to ensure that the nodes meet all the requirements of this operation and are ready to be added to the cluster. The option is not selected assuming that you have not already run the prerequisite checks on the selected nodes beforehand.
If you have already run the prerequisite checks on the selected nodes and want the deployment procedure to skip running them all over again, then select Skip prerequisites and fix-ups.
If you have never run prerequisite checks on the selected nodes and if you want the deployment procedure to run them, then deselect Skip prerequisites and fix-ups. The deployment procedure runs the prerequisite checks, fixes issues if there are any, and then proceeds with the extend cluster operation.
If you want to check the prerequisites only but not proceed with the operation at this point, then click Run Prerequisites Only.
Click Review.
On the Review page, review the details you have provided for extending Oracle RAC, and click Submit.
Note:
When you run the Deployment Procedure on Linux Itanium x64, if the CVU Run to verify shared locations step fails, then manually fix it before proceeding to the next step. No automated fix-ups are available for this platform.