| Oracle® Application Server Administrator's Guide 10g Release 3 (10.1.3) B25209-03 |
|
 Previous |
 Next |
| Oracle® Application Server Administrator's Guide 10g Release 3 (10.1.3) B25209-03 |
|
 Previous |
 Next |
When you installed Oracle Application Server, you chose an installation type and the components you wanted to configure. After installation, you may want to cluster Oracle Application Server instances, to add or delete OC4J instances, to use OracleAS Web Cache as a reverse proxy, or to use Identity Management with your middle-tier installation. This chapter describes how to make these types of changes.
It contains the following topics:
Configuring Oracle Application Server 10.1.2 with Oracle Application Server 10.1.3
Configuring Instances to Use 10.1.2 and 9.0.4 Oracle Identity Management
If you have disabled anonymous binds in Oracle Internet Directory, you must enable them before you make configuration changes. See Section 6.6, "Disabling and Enabling Anonymous Binds" for more information.
A cluster topology is defined as two or more loosely connected Oracle Application Server nodes.
Some reasons for creating a cluster topology include:
Using a single instance of the Application Server Control (the Administration OC4J instance) to manage all the instances in the cluster.
Enabling Oracle HTTP Server to route requests to the J2EE container, and the J2EE container to dynamically notify Oracle HTTP Server of new application bindings when an application is deployed. This scenario is described in Section 6.1.1.
Providing high availability of J2EE servers by installing multiple J2EE instances on multiple hosts. This scenario is described in Section 6.1.2.
Perform some common administrative tasks automatically across multiple OC4J instances, by the use of groups. A group is a loosely synchronized set of like-named OC4J instances that belong to the same cluster topology. See Section 2.3.6 for more information.
With this release, you can create the following types of cluster topologies:
Dynamic node discovery: The cluster topology map for each node is automatically updated as nodes are added or removed, enabling the cluster to be self-managing.
Static hubs as discovery servers: Specific nodes within a cluster are configured to serve as discovery servers, which maintain the topology map for the cluster; the remaining nodes then connect with one another through this server. Hubs in one topology can be connected to those in another.
Connection of isolated topologies through gateways: This configuration is used to connect topologies that are separated by firewalls or on different subnets using specified "gateway" nodes.
Manual node configuration: The host address and port for each node in the cluster are manually specified in the configuration. This is the same clustering mechanism supported in Oracle Application Server Release 2 (10.1.2) and is supported primarily to provide backward compatibility.
You can configure a cluster topology in the following ways:
During installation, by checking the Configure this OC4J instance to be part of an Oracle Application Server cluster topology option in the Cluster Topology Configuration page. This method creates a dynamic node discovery cluster topology.
See the Oracle Application Server Installation Guide for more information.
After installation, by using one of the following Oracle Process Manager and Notification Server (OPMN) commands:
opmnassociate: This utility provides a one-step solution for adding an OC4J instance to a cluster. The syntax is:
opmnassociate *multicastAddress:multicastPort -restart
Note that the opmnassociate command adds only the default home OC4J instance to a cluster; to add other OC4J instances, use the opmnctl config topology command.
opmnctl: This utility includes commands for updating opmn.xml with the multicast port:address and Web site configuration data needed to add an instance to a cluster. The syntax is:
opmnctl config topology update discover=*multicastAddress:multicastPort
|
See Also: The chapter, "Configuring and Managing Clusters" in the Oracle Containers for J2EE Configuration and Administration Guide for detailed information about configuring cluster topologies |
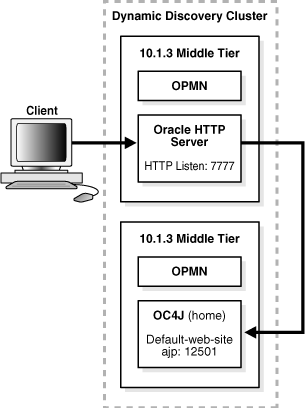
In this example, you install a Web server, Oracle HTTP Server, on one host, and install Oracle Containers for J2EE (OC4J) on another host. Then, you cluster the instances using dynamic node discovery. This will enable Oracle HTTP Server to route requests to the OC4J, and OC4J to dynamically notify Oracle HTTP Server of new application bindings when an application is deployed.
Figure 6-1 shows the environment.
Figure 6-1 Web Server MIddle Tier and OC4J MIddle Tier on Separate Hosts in a Cluster
For this scenario, install the following Oracle Application Server middle-tier instances on separate hosts:
Web Server and Process Management
J2EE and Process Management
Note the following points:
During installation you can choose to configure the default OC4J instance as an Administration OC4J instance, by selecting Configure this as an Administration OC4J Instance in the Administration Instance Settings page.
If you did not choose this option, you can configure it later, as described in Section 6.1.2.
When you select an OC4J instance to be the Administration OC4J instance, the Application Server Control Console that is hosted within that instance administers the local OC4J instance and any other instances in the cluster that are not designated as Administration OC4J instances.
For those instances that are not specified as the Administration OC4J instance, Application Server Control Console is deployed in the instance, but not started.
Oracle recommends that only one OC4J instance in the cluster be configured as the Administration OC4J instance.
After you install the middle-tier instances, configure the instances for dynamic node discovery, by taking the following steps:
Set the OPMN discovery address for the Web Server and Process Management instance using the opmnassociate command. The command is located in the bin directory of the Oracle home. It adds the Web Server and Process Management instance to a cluster using multicast discovery.
For example, to associate the Web Server instance on Windows to the multicast address 225.0.0.33, use the following command:
Oracle_home\bin\opmnassociate *225.0.0.33:8001 -restart
Set the OPMN discovery address for the J2EE and Process Management instance using the opmnassociate command, as shown in the following example:
Oracle_home\bin\opmnassociate *225.0.0.33:8001 -restart
Now, both instances are part of the same cluster topology. The OC4J instance uses Apache JServ Protocol (AJP) to receive and respond to requests from Oracle HTTP Server.
Verify the configuration in one of the following ways:
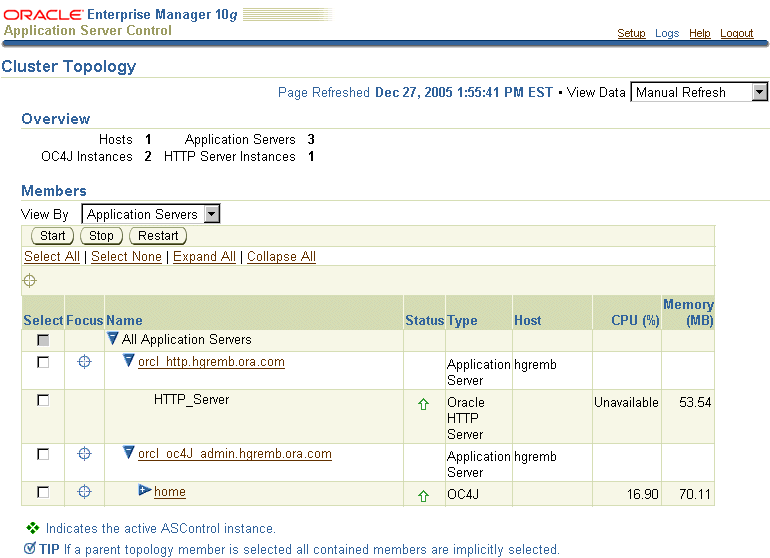
Using Application Server Control Console: Navigate to the Cluster Topology page. The page displays both instances, as shown in Figure 6-2:
Figure 6-2 Verifying the Cluster Topology
Using the opmnctl command with the @cluster option. The following example shows the output:
Oracle_home\opmn\bin\opmnctl @cluster status
Processes in Instance: orcl_http.hgremb.ora.com
-------------------+--------------------+---------+---------
ias-component      | process-type       |     pid | status
-------------------+--------------------+---------+---------
HTTP_Server        | HTTP_Server        |    1172 | Alive
Processes in Instance: orcl_oc4J_admin.hgremb.ora.com
-------------------+--------------------+---------+---------
ias-component      | process-type       |     pid | status
-------------------+--------------------+---------+---------
OC4J               | home               |    1436 | Alive
ASG                | ASG                |     N/A | Down
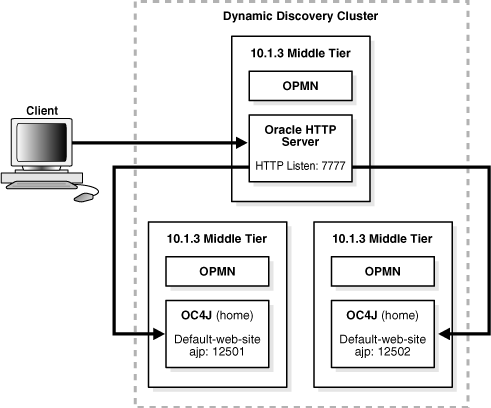
The example in this section builds upon the example in the previous section, Section 6.1.1. It adds an additional OC4J middle tier to the cluster topology, to support a highly available environment for testing or production purposes.
Figure 6-3 shows this environment.
Figure 6-3 Multiple OC4J Middle Tiers and a Web Server Middle Tier in a Cluster
For this scenario:
Install and configure instances as described in Section 6.1.1.
Install an additional J2EE and Process Management instance.
During installation, you can choose to configure the default OC4J instance as an Administration OC4J instance, by selecting Configure this as an Administration OC4J Instance in the Administration Instance Settings page. For this scenario, do not select this option.
In addition, if you want the OC4J instances to be part of the same group, specify the same name for the second OC4J instance name as for the first OC4J instance on the Administration Settings page during installation. A group makes it easy to deploy applications to more than one OC4J instance at time. You can simultaneously execute specific configuration operations on all OC4J instances in a group.
Then, configure the additional J2EE and Process Management instance for dynamic node discovery and remote management, by taking the following steps:
Add the instance to the cluster by using the same multicast address as used by the other instances. For example, on Windows:
Oracle_home\bin\opmnassociate *225.0.0.33:8001 -restart
If you specified during installation that this OC4J instance is an Administrative OC4J instance, and you want another OC4J instance to be the Administrative instance, you can change it now. This configuration allows administrators to manage it from another instance in a cluster. Otherwise, an Application Server Control user with the ascontrol_admin role must enable remote management for other administrators who do not have those privileges.
For example, if you want the first OC4J instance to be the Administration OC4J instance, take the steps described in Section 2.3.5.2, "Enabling Remote Management by Setting Administrator Credentials" to enable remote management for the second instance.
Now, this instance is part of the cluster topology. Both OC4J instances use Apache JServ Protocol (AJP) to receive and respond to requests from Oracle HTTP Server. If you named the default OC4J instance in this second J2EE and Process Management installation the same as the default OC4J instance in the first J2EE and Process Management installation, the instances will be part of the same group.
Verify the configuration in one of the following ways:
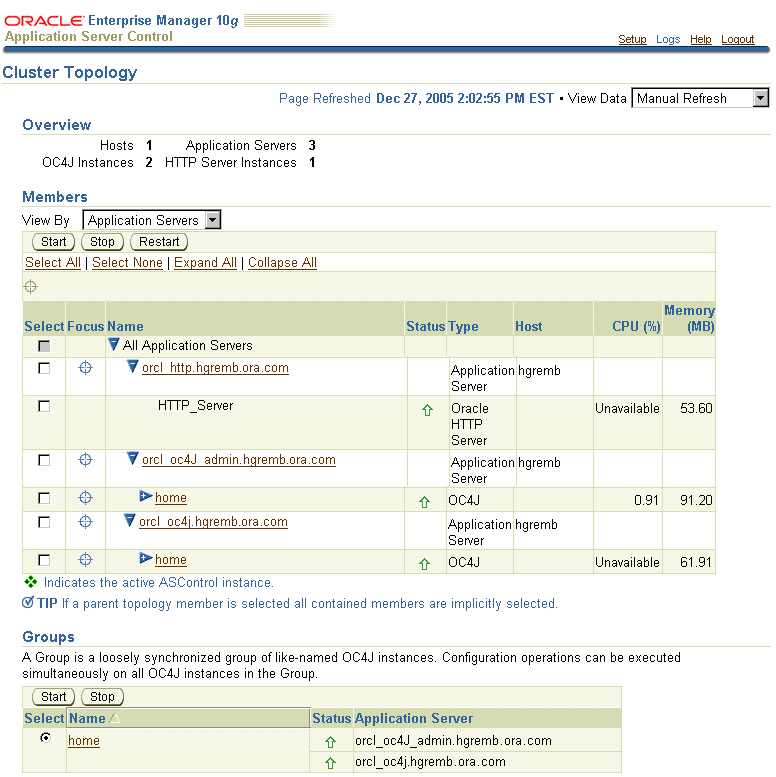
Using Application Server Control Console: Navigate to the Cluster Topology page. The page displays both instances in the Members section and in the Groups section, as shown in Figure 6-4.
Figure 6-4 Verifying the Cluster Topology and Group
Using the opmnctl command with the @cluster option. The following example shows the output:
Oracle_home\opmn\bin\opmnctl @cluster status
Processes in Instance: orcl_http.hgremb.ora.com
-------------------+--------------------+---------+---------
ias-component      | process-type       |     pid | status
-------------------+--------------------+---------+---------
HTTP_Server        | HTTP_Server        |    1172 | Alive

Processes in Instance: orcl_oc4J_admin.hgremb.ora.com
-------------------+--------------------+---------+---------
ias-component      | process-type       |     pid | status
-------------------+--------------------+---------+---------
OC4J               | home               |    1436 | Alive
ASG                | ASG                |     N/A | Down

Processes in Instance: orcl_oc4j.hgremb.ora.com
-------------------+--------------------+---------+---------
ias-component      | process-type       |     pid | status
-------------------+--------------------+---------+---------
OC4J               | home               |    2424 | Alive
ASG                | ASG                |     N/A | Down
You can add or delete OC4J instances in an existing Oracle home, as described in the following sections:
You can add OC4J instances in an existing Oracle home using the createinstance utility. This utility is located in the bin directory of Oracle home.
For example, you can add an additional OC4J instance to a J2EE and Process Management installation that is part of a cluster. In Figure 6-5, a second OC4J instance named crm is added to an existing cluster.
Figure 6-5 Multiple OC4J MIddle Tiers, Additional OC4J Instance, and a Web Server Middle Tier in a Cluster
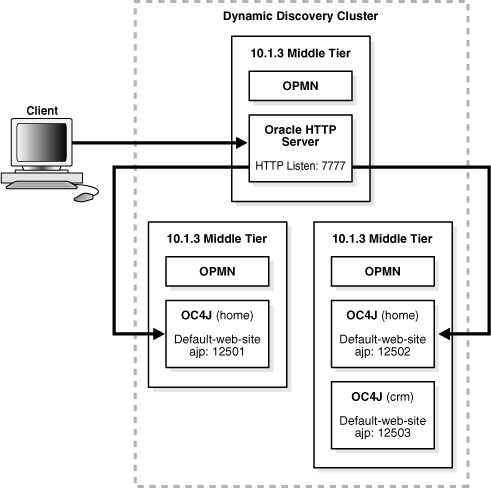
To add an OC4J instance, take the following steps:
Create the instance:
createinstance -instanceName OC4J_instanceName [-port httpPort]
Note that the -port option is necessary only if you want the instance to run in HTTP mode, which means that it will not be accessed by Oracle HTTP Server. In this case, the OC4J instance is configured to listen for HTTP requests by default.
If you want the instance to be accessed by Oracle HTTP Server, omit the -port option. In this case, the instance will use Apache JServ Protocol (AJP). The OC4J instance will receive and respond to requests from Oracle HTTP Server. Omit the option if the OC4J instance is part of a cluster.
As part of the creation process, you are asked to enter a password. This password will be tied to the oc4jadmin user for this instance. For consistency, you may want to enter the same password used to access the home instance with the oc4jadmin user.
If OPMN is running, you must reload opmn.xml to load the new instance configuration, then restart OPMN to start the new instance. For example, on Windows:
ORACLE_HOME\opmn\bin\opmnctl reload
ORACLE_HOME\opmn\bin\opmnctl startall
Figure 6-6 shows part of the Cluster Topology page, which displays the additional OC4J instance added to the cluster.
Figure 6-6 OC4J Instance Added to Cluster
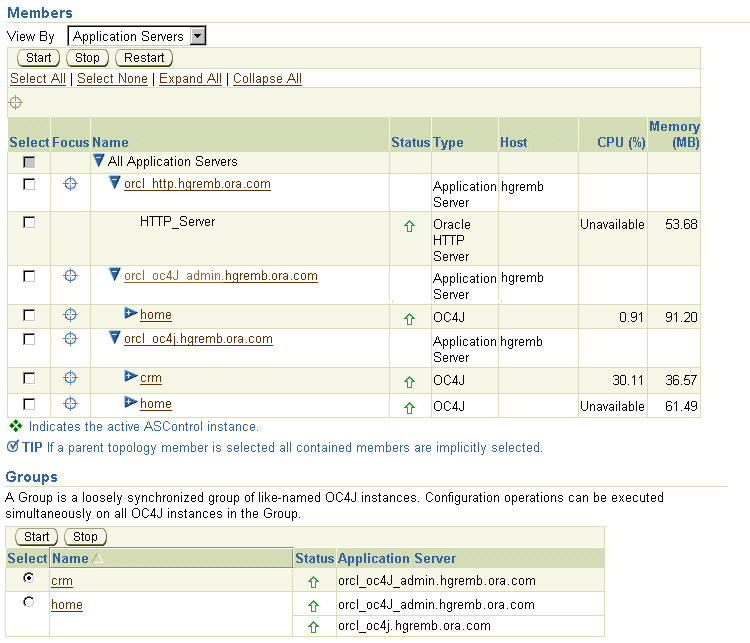
You can also verify that the instance was added by using the opmnctl command with the @cluster option:
Oracle_home\opmn\bin\opmnctl @cluster status
Processes in Instance: orcl_http.hgremb.ora.com
-------------------+--------------------+---------+---------
ias-component      | process-type       |     pid | status
-------------------+--------------------+---------+---------
HTTP_Server        | HTTP_Server        |    1172 | Alive

Processes in Instance: orcl_oc4J_admin.hgremb.ora.com
-------------------+--------------------+---------+---------
ias-component      | process-type       |     pid | status
-------------------+--------------------+---------+---------
OC4J               | home               |    1436 | Alive
ASG                | ASG                |     N/A | Down

Processes in Instance: orcl_oc4j.hgremb.ora.com
-------------------+--------------------+---------+---------
ias-component      | process-type       |     pid | status
-------------------+--------------------+---------+---------
OC4J               | crm                |    1152 | Alive
OC4J               | home               |    2424 | Alive
ASG                | ASG                |     N/A | Down
|
Note: If you have configured Remote Management Interface (RMI) to use Secure Socket Layer (SSL), you must add the appropriate <ssl-config> element to thermi.xml file for each OC4J instance you create. Otherwise, management connections to the OC4J instance from the Application Server Control will either fail or use the non-secure RMI protocol, depending upon the value of the connection protocol property in the opmn.xml file for the administration OC4J instance. See Section A.3, "Configuring Security for the Application Server Control Console" for more information. |
|
See Also: The chapter, "Creating and Managing Additional OC4J Instances" in the Oracle Containers for J2EE Configuration and Administration Guide |
To remove an OC4J instance, use the removeinstance utility. This utility deletes the directory created for the instance from the j2ee directory structure and removes configuration data for the instance from opmn.xml. This utility is located in the bin directory of Oracle home.
For example, to remove an instance, take the following steps:
Stop the instance:
ORACLE_HOME/opmn/bin/opmnctl stopproc process-type=oc4J_instanceName
Remove the instance:
removeinstance -instanceName oc4J_instanceName
Note the following guidelines for deleting OC4J instances:
You can use Release 2 (10.1.2) OracleAS Web Cache as a reverse proxy for your 10g Release 3 (10.1.3) middle-tier instance. As a reverse proxy server, OracleAS Web Cache acts a gateway to the middle-tier servers.
The following topics describe how to configure OracleAS Web Cache Release 2 (10.1.2) as a reverse proxy for your 10g Release 3 (10.1.3) middle-tier instance:
Configuring an OracleAS Web Cache Instance as a Reverse Proxy
Configuring an OracleAS Web Cache Cluster as a Reverse Proxy
|
See Also: For complete information about using OracleAS Web Cache as a reverse proxy, and about OracleAS Web Cache clusters, see the Release 2 (10.1.2) Oracle Application Server Web Cache Administrator's Guide. |
You can use Release 2 (10.1.2) OracleAS Web Cache as a reverse proxy for your middle-tier instance. The procedure in this section makes the following assumptions:
You have installed a Release 2 (10.1.2) OracleAS Web Cache standalone kit. The kit is part of the Oracle Application Server Companion CD, which is available on OTN.
You have configured OracleAS Web Cache, as described in the Oracle Application Server Web Cache Administrator's Guide.
You have installed a 10g Release 3 (10.1.3) middle tier instance.
Figure 6-7 depicts the scenario described in this section.
Figure 6-7 OracleAS Web Cache as Reverse Proxy
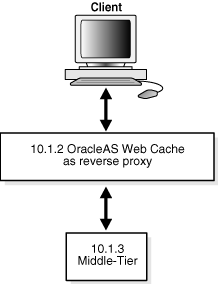
From the Release 2 (10.1.2) standalone OracleAS Web Cache instance, take the following steps:
Log into OracleAS Web Cache Manager, using the OracleAS Web Cache username and password. By default, the username is ias_admin and the password is the one you specified during installation. Use the following URL, where port is the OracleAS Web Cache administration port:
http://hostname:port/webcacheadmin
By default, the port is 9400. The administration port number for a OracleAS Web Cache standalone installation is listed in the Oracle_home/webcache/webcache.xml file. To find the port number for OracleAS Web Cache that is part of an Oracle Application Server installation, click the Ports link in Application Server Control Console.
In the navigator frame, select Origin Servers, Sites, and Load Balancing > Origin Servers.
In the Origin Servers page, click Add in the Application Web Servers section.
In the Add Application Web Server dialog box, enter the following information:
In the Hostname field, enter the host name of the origin server (Oracle HTTP Server) in the 10g Release 3 (10.1.3) middle-tier instance.
In the Port field, enter the listening port from which the origin server will receive OracleAS Web Cache requests.
In the Routing field, select ENABLED to permit OracleAS Web Cache to route requests to the origin server.
For information about other fields in the dialog box, refer to the online Help or the Oracle Application Server Web Cache Administrator's Guide.
Click Submit.
Optionally, you can add a new site to map to the origin server or you can use an existing site. To add a new site, in the navigator frame, select Origin Servers, Sites, and Load Balancing > Site Definitions.
For more information about adding a site, refer to the online Help or the Oracle Application Server Web Cache Administrator's Guide.
In the navigator frame, select Origin Servers, Sites, and Load Balancing > Site-to-Server Mapping to map the site to the origin server in the 10g Release 3 (10.1.3) middle-tier instance.
In the Site-to-Server Mapping page, select a mapping and click Insert Above or Insert Below.
In the Edit/Add Site-to-Server Mapping dialog box:
Select Select from Site definitions to select the site definition you want to use.
In the Select Application Web Servers field, select the application Web server from 10g Release 3 (10.1.3) middle-tier instance.
You can use a cluster of Release 2 (10.1.2) OracleAS Web Cache instances as a reverse proxy for your 10g Release 3 (10.1.3) middle-tier instance.
The procedure in this section makes the following assumptions:
You have installed more than one instance of Release 2 (10.1.2) OracleAS Web Cache standalone kit. The kit is part of the Oracle Application Server Companion CD, which is available on OTN.
You have configured OracleAS Web Cache, as described in the Oracle Application Server Web Cache Administrator's Guide.
You have installed a 10g Release 3 (10.1.3) middle-tier instance.
Figure 6-8 depicts the scenario described in this section.
Figure 6-8 OracleAS Web Cache Cluster as Reverse Proxy
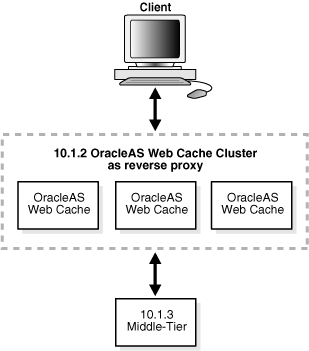
To configure an OracleAS Web Cache cluster as a reverse proxy, take the following steps:
Set up one OracleAS Web Cache instance as a reverse proxy, as described in Section 6.3.1.
Log into OracleAS Web Cache Manager for that instance, using the OracleAS Web Cache username and password. By default, the username is ias_admin and the password is the one you specified during installation. Use the following URL, where port is the OracleAS Web Cache administration port:
http://hostname:port/webcacheadmin
Configure the properties of the cache cluster, by taking the following steps:
In the OracleAS Web Cache Manager navigator frame, select Properties > Clustering.
In the General Cluster Information section of the Clustering page, click Edit.
Follow the directions in the online Help or Chapter 10 of the Oracle Application Server Web Cache Administrator's Guide.
Add other caches to the cluster, by taking the following steps for each instance you want to place in the cluster:
In the OracleAS Web Cache Manager navigator frame, select Properties > Clustering.
In the Cluster Members section of the Clustering page, click Add.
Follow the directions in the online Help or Chapter 10 of the Oracle Application Server Web Cache Administrator's Guide.
After you have added all the caches to the cluster, propagate the cluster configuration to the cluster members by taking the following steps:
In the OracleAS Web Cache Manager navigator frame, select Operations > Cache Operations.
Select All Caches, and click Propagate.
Restart all caches by selecting All Caches and clicking Restart.
To use the latest J2EE features of Oracle Application Server, 10g Release 3 (10.1.3), with existing Oracle Application Server, Release 2 (10.1.2), components and applications, you can use your Oracle HTTP Server, Release 2 (10.1.2), from an Oracle Application Server, Release 2 (10.1.2), middle tier as the front-end for your Oracle Application Server, 10g Release 3 (10.1.3), middle tier. This section provides instructions on installing and configuring Oracle Application Server, 10g Release 3 (10.1.3), and Oracle HTTP Server, Release 2 (10.1.2), for interoperability.
On your farm or cluster, either install or locate the following:
Server 1—An Oracle Application Server, Release 2 (10.1.2), J2EE and Web Cache type middle tier or other Oracle Application Server, Release 2 (10.1.2), middle tier with Oracle HTTP Server.
Server 2—An Oracle Application Server, 10g Release 3 (10.1.3), J2EE and Process Management middle tier. For instructions on installing an Oracle Application Server, 10g Release 3 (10.1.3), J2EE and Process Management middle tier, refer to the 10g Release 3 (10.1.3), Oracle Application Server Installation Guide for your platform. This instance must use AJP protocol. If you are using HTTP protocol, run the following commands to change to AJP protocol:
ORACLE_HOME_SERVER2/opmn/bin/opmnctl port update ias-component=OC4J process-type=<instance name> portid=default-web-site protocol=ajp

ORACLE_HOME_SERVER2/opmn/bin/opmnctl reload

ORACLE_HOME_SERVER2/opmn/bin/opmnctl restartproc ias-component=OC4J process-type=<instance name>
For Release 2 (10.1.2) middle tiers other than a J2EE and Web Cache type middle tier, start with step 3 in the following procedure because the ons.conf file on the Release 2 (10.1.2) middle tier is not updated in this configuration. For this configuration, the Oracle Application Server, 10g Release 3 (10.1.3), initiates the connections between the two instances.
Configuration Procedure
Perform the following steps to configure the two servers:
On Server 1, add Server 2 using DCM:
ORACLE_HOME/dcm/bin/dcmctl addOPMNLink server2 ip:server2 ons remote port
Verify that Server 2 is added by inspecting the contents of ons.conf in the ORACLE_HOME/opmn/conf directory. The file should contain a list of comma-separated <hostname/ip:ons remote port> entries. The remote port is the port on Server 2 that OPMN on Server 1 uses to communicate with Server 2. An example of an entry in the list would be:
127.2.148.142:6200
On Server 2, add Server 1 to the cluster using static discovery by editing the topology section in ORACLE_HOME/opmn/conf/opmn.xml:
<notification-server>
...
   <topology>
      <nodes list="<ip:server1 remote port>,<ip:server2 remote port>"/>
   </topology>
</notification-server>
In the example, ip:server1 and remote port are the IP address of the server and the port number through which other servers can communicate with the server, for example:
127.2.148.142:6200
To configure ONS in opmn.xml, all RAC instance nodes must be listed, not only the master. For a RAC with host1, host2, host3, host4, the list would be:
list="host1:ONSRemotePort,host2:ONSRemotePort,host3:ONSRemotePort,host4:ONSRem
otePort"
The SSL setting must be the same on all nodes: enabled or disabled.
On Server 2, reload OPMN:
ORACLE_HOME_SERVER2/opmn/bin/opmnctl reload
Verify that both servers can communicate with each other by running the following commands:
Server 1:
ORACLE_HOME_SERVER1/opmn/bin/opmnctl @farm status
Server 2:
ORACLE_HOME_SERVER2/opmn/bin/opmnctl @cluster status
These commands produce a list of servers that are part of the farm or cluster.
On Server 1, set the OC4J mount directive in the ORACLE_HOME/Apache/Apache/conf/mod_oc4j.conf file:
Oc4jMount /MyApp instance://server2_instance_name:oc4j_instance_name
Oc4jMount /MyApp/* instance://server2_instance_name:oc4j_instance_name
A mount point must be added for each J2EE application deployed on 10g Release 3 (10.1.3). As new applications are added, a mount point must be added.
Restart Oracle HTTP Server on Server 1:
ORACLE_HOME_SERVER1/opmn/bin/opmnctl restartproc ias-component=HTTP_Server
A browser pointing to appserverInstance on Server 1 can now access an OC4J application in appserverInstance on Server 2.
|
Caution: For Release 2 (10.1.2) middle tier installations other than a J2EE and Web Cache type middle tier, start the Oracle Application Server, Release 2 (10.1.2), middle tier before starting the Oracle Application Server, 10g Release 3 (10.1.3), middle tier, or a delay of up to two minutes can occur. |
In this configuration, the application stop functionality in the J2EE 10g Release 3 (10.1.3) instance should not be used because errors can occur when the Oracle HTTP Server Release 2 (10.1.2) routes to the J2EE 10g Release 3 (10.1.3) instance with the stopped application.
You can configure 10.1.3 middle-tier instances to use Release 2 (10.1.2) and Release 9.0.4 Oracle Identity Management, as described in the following sections:
Configuring Instances to Use 10.1.2 Oracle Identity Management
Configuring Instances to Use 9.0.4 Oracle Identity Management
See the Oracle Application Server Upgrade and Compatibility Guide for information about the specific versions of Oracle Identity Management that are supported with 10g Release 3 (10.1.3).
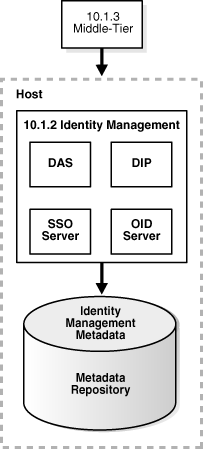
This section describes how to configure a 10.1.3 middle-tier instance to use Oracle Identity Management, Release 2 (10.1.2), as shown in Figure 6-9.
Figure 6-9 Middle Tier Using 10.1.2 Identity Management
Before you start, make sure that:
The Oracle Identity Management instance is started (status is Up).
You know the Oracle Internet Directory host and port numbers.
You know the password for cn=orcladmin, or another user who is a member of the iASAdmins group.
Task 1: Enable SSO Authentication (Optional)
If you want to enable SSO authentication for deployed applications, you must take the following steps before you use the Identity Management wizard described in "Task 2: Configure the Middle-Tier Instance for Identity Management":
On the Identity Management host, set the environment variables ORACLE_HOME and ORACLE_SID.
On the Identity Management host, run the ssoreg script, using the -remote_midtier option. The file is located at:
(UNIX) ORACLE_HOME/sso/bin/ssoreg.sh
(Windows)ORACLE_HOME\sso\bin\ssoreg.bat
For example, on LINUX:
$ORACLE_HOME/sso/bin/ssoreg.sh -oracle_home_path $ORACLE_HOME
 -config_mod_osso TRUE
 -site_name myhost.com:7778
 -remote_midtier
-config_file $ORACLE_HOME/Apache/Apache/conf/osso/myosso.conf
-mod_osso_url http://myhost.com:7778
The resulting configuration file (mysso.conf in the example) is an obfuscated osso configuration file.
Copy the obfuscated osso configuration file to the 10g Release 3 (10.1.3) middle-tier instance.
On the middle-tier host, run the following script to complete the registration:
(UNIX) ORACLE_HOME/Apache/Apache/bin/osso1013 config_file
(Windows) perl ORACLE_HOME\Apache\Apache\bin\osso1013 config_file
Task 2: Configure the Middle-Tier Instance for Identity Management
To configure the middle-tier instance to use Identity Management, take the following steps:
Using the Application Server Control Console, navigate to the OC4J Home page for the middle-tier instance.
Click Administration.
In the Task Name column of the table, expand Security if it is not already expanded. Then, in the Identity Management row, click the Go to Task icon.
On the Identity Management page, click Configure.
On the Configure Identity Management: Connect Information page:
Oracle Internet Directory Host: Enter the fully-qualified name of the Oracle Internet Directory host.
Oracle Internet Directory User: Enter the distinguished name of a user, such as cn=orcladmin, in the iASAdmins group.
Password: Enter the password for the user.
This password will be used as the default password for the oc4jadmin user created in Oracle Internet Directory.
Use only SSL connections to the Internet Directory: Select this option if you want middle-tier components to connect to Oracle Internet Directory using only SSL.
Then, in the Oracle Internet Directory SSL Port field, enter the Oracle Internet Directory SSL port number.
Use non-SSL connections to the Internet Directory: Select this option if you want middle-tier components to connect to Oracle Internet Directory using non-SSL connections.
Then, in the Oracle Internet Directory Port field, enter the Oracle Internet Directory non-SSL port number.
Click Next.
On the Configure Identity Management: Application Server Control page, you can specify if you want to configure the Application Server Control to use Identity Management as its security provider, for authentication and authorization of administrative users. If you do, select Use Oracle Identity Management Security Provider.
Note the following:
Any Application Server Control administrator users created for the current security provider will not be able to access the Application Server Control after you make this change. Only users and groups defined in Oracle Internet Directory will be able to access the Application Server Control Console.
You can change the Application Server Control security provider later by clicking Setup, then Security Provider.
On the Configure Identity Management: Deployed Applications page, you can specify security options for applications deployed in this OC4J instance. For each application:
Use OID Security Provider: Select this option to configure applications to use Identity Management as its security provider for authentication and authorization.
Note that you cannot change the security provider for the default application.
Enable SSO Authentication: If you selected Use OID Security Provider, you can select this option to use Single Sign-On authentication. Note, however, that you must have first registered your instance of Oracle Application Server with the OracleAS Single Sign-On server. See "Task 1: Enable SSO Authentication (Optional)" for more information.
Click Configure.
When the operation is finished, you need to restart the OC4J instance. Do not click Restart on the Confirmation page. Instead, navigate to the Cluster Topology page, select the OC4J instance, and click Restart.
Your middle tier is now configured to use Oracle Identity Management services.
This section describes how to configure a 10.1.3 middle-tier instance to use Oracle Identity Management, Release 9.0.4.3.
Before you start, make sure that:
The Oracle Identity Management instance is started (status is Up).
You know the Oracle Internet Directory host and port numbers.
You know the password for cn=orcladmin, or another user who is a member of the iASAdmins group.
See the Oracle Application Server Upgrade and Compatibility Guide for information about the specific versions of Oracle Identity Management that are supported with 10g Release 3 (10.1.3).
Task 1: Enable SSO Authentication (Optional)
If you want to enable SSO authentication for deployed applications, you must take the following steps before you use the Identity Management wizard described in "Task 2: Configure the Middle-Tier Instance for Identity Management":
On the Identity Management host, set the environment variables ORACLE_HOME and ORACLE_SID.
On the Identity Management host, run the ssoreg script. The file is located at:
(UNIX) ORACLE_HOME/sso/bin/ssoreg.sh
(Windows)ORACLE_HOME\sso\bin\ssoreg.bat
You use the -remote_midtier option and following option, depending on the platform:
On UNIX: Use -u ROOT
Windows: Use -u SYSTEM
For example, on LINUX:
$ORACLE_HOME/sso/bin/ssoreg.sh -oracle_home_path $ORACLE_HOME
 -config_mod_osso TRUE
 -site_name myhost.com:7778
-remote_midtier
-config_file $ORACLE_HOME/Apache/Apache/conf/osso/myosso.conf
-mod_osso_url http://myhost.com:7778
-u root
The resulting configuration file (mysso.conf in the example) is an obfuscated osso configuration file.
Copy the obfuscated osso configuration file to the 10g Release 3 (10.1.3) middle-tier instance.
On the middle-tier host, run the following script to complete the registration:
(UNIX) ORACLE_HOME/Apache/Apache/bin/osso1013 config_file
(Windows)perl ORACLE_HOME\Apache\Apache\bin\osso1013 config_file
Task 2: Configure the Middle-Tier Instance for Identity Management
To configure the middle-tier instance to use Identity Management, take the following steps:
Using the Application Server Control Console, navigate to the OC4J Home page for the middle-tier instance.
Click Administration.
In the Task Name column of the table, expand Security if it is not already expanded. Then, in the Identity Management row, click the Go to Task icon.
On the Identity Management page, click Configure.
On the Configure Identity Management: Connect Information page:
Oracle Internet Directory Host: Enter the fully-qualified name of the Oracle Internet Directory host.
Oracle Internet Directory User: Enter the distinguished name of a user, such as cn=orcladmin, in the iASAdmins group.
Password: Enter the password for the user.
This password will be used as the default password for the oc4jadmin user created in Oracle Internet Directory.
Use only SSL connections to the Internet Directory: Select this option if you want middle-tier components to connect to Oracle Internet Directory using only SSL.
Then, in the Oracle Internet Directory SSL Port field, enter the Oracle Internet Directory SSL port number.
Use non-SSL connections to the Internet Directory: Select this option if you want middle-tier components to connect to Oracle Internet Directory using non-SSL connections.
Then, in the Oracle Internet Directory Port field, enter the Oracle Internet Directory non-SSL port number.
Click Next.
On the Configure Identity Management: Application Server Control page, you can specify if you want to configure the Application Server Control to use Identity Management as its security provider for authentication and authorization. If you do, select Use Oracle Identity Management Security Provider.
Note the following:
Any Application Server Control administrator users created for the current security provider will not be able to access the Application Server Control after you make this change. Only users and groups defined in Oracle Internet Directory will be able to access the Application Server Control Console.
You can change the Application Server Control security provider later by clicking Setup, then Security Provider.
On the Configure Identity Management: Deployed Applications page, you can specify security options for applications deployed in this OC4J instance. For each application:
Use OID Security Provider: Select this option to configure applications to use Identity Management as its security provider for authentication and authorization.
Note that you cannot change the security provider for the default application.
Enable SSO Authentication: If you selected Use OID Security Provider, you can select this option to use Single Sign-On authentication. Note, however, that you must have first registered your instance of Oracle Application Server with the OracleAS Single Sign-On server. See "Task 1: Enable SSO Authentication (Optional)" for more information.
Click Configure.
When the operation is finished, you need to restart the OC4J instance. Do not click Restart on the Confirmation page. Instead, navigate to the Cluster Topology page, select the OC4J instance, and click Restart.
Your middle tier is now configured to use Oracle Identity Management services.
Beginning with Release 2 (10.1.2.0.2), you can enable and disable anonymous binds (anonymous authentication) in Oracle Internet Directory. By default, anonymous binds are enabled.
Although disabling anonymous binds is useful in many runtime environments, most configuration changes, such as the following, require that anonymous binds are enabled:
Installing new components with Oracle Universal Installer
Configuring components with Application Server Control Console
Changing the host name, domain name, or IP address of a host on which you have installed Oracle Application Server
To disable anonymous binds, take the following steps:
Shut down all middle tiers that are connected to the OracleAS Infrastructure, as described in Section 3.2.1, "Starting a Middle-Tier Instance".
Shut down OracleAS Infrastructure, in all Infrastructure Oracle homes:
(UNIX) ORACLE_HOME/opmn/bin/opmnctl stopall
(Windows) ORACLE_HOME\opmn\bin\opmnctl stopall
Start Oracle Internet Directory, because it must be started while you perform the procedure:
(UNIX) ORACLE_HOME/bin/oidmon connect=db_connect_string start
(Windows) ORACLE_HOME\bin\oidmon connect=db_connect_string start
Edit the ias.properties file for each middle tier connected to the OracleAS Infrastructure and for the Infrastructure Oracle home that contains OracleAS Single Sign-On and Oracle Delegated Administration Services. The ias.properties file is located in the following directory:
(UNIX) ORACLE_HOME/config
(Windows) ORACLE_HOME\config
In the ias.properties file, add the OIDAnonymousDisabled property to the file and set it to true:
OIDAnonymousDisabled=true
Edit the dads.conf file for each middle tier connected to the OracleAS Infrastructure and for the Infrastructure Oracle home that contains OracleAS Single Sign-On and Oracle Delegated Administration Services. The dads.conf file is located in the following directory:
(UNIX) ORACLE_HOME/Apache/modplsql/conf
(Windows) ORACLE_HOME\Apache\modplsql\conf
By default, the PlsqlDatabaseConnectString parameter contains a value that uses the LDAP name resolution format, for example:
PlsqlDatabaseConnectString cn=orcl, cn=oraclecontext NetServiceNameFormat
Comment out this line. (Do not delete it because you will need to revert to it if you want to enable anonymous binds in the future.)
Add the following line, which changes the value of the PlsqlDatabaseConnectString parameter to use the host:port:service format instead of LDAP name resolution:
PlsqlDatabaseConnectString db_host:db_hostdb_listener_port:db_service_name
In the example, db_host is the name of the host on which the OracleAS Metadata Repository for OracleAS Single Sign-On is installed, db_listener_port is the listener port for that OracleAS Metadata Repository, and db_service_name is the service name for the OracleAS Metadata Repository.
Use the ldapmodify command to disable anonymous binds. Use the command on the Oracle home that contains Oracle Internet Directory.
Take the following steps:
Create a text file with the following lines:
dn:
changetype: modify
replace: orclanonymousbindsflag
orclanonymousbindsflag: 0
Use the ldapmodify command, calling the text file created in the previous step as input. In the following example, the text file is named anon_off.ldif:
(Unix) ORACLE_HOME/bin/ldapmodify -h host -p port -D cn=orcladmin -w password -v -f anon_off.ldif
(Windows) ORACLE_HOME\bin\ldapmodify -h host -p port -D cn=orcladmin -w password -v -f anon_off.ldif
Stop Oracle Internet Directory:
(UNIX) ORACLE_HOME/bin/oidmon connect=db_connect_string stop
(Windows) ORACLE_HOME\bin\oidmon connect=db_connect_string stop
Start OracleAS Infrastructure, including Oracle Internet Directory, in the Oracle Internet Directory Oracle home, then in any other OracleAS Infrastructure Oracle homes:
(UNIX) ORACLE_HOME/opmn/bin/opmnctl startall
(Windows) ORACLE_HOME\opmn\bin\opmnctl startall
Start all middle tiers that are connected to the Infrastructure, as described in Section 3.2.1, "Starting a Middle-Tier Instance".
If you have disabled anonymous binds, you must take the following steps to enable anonymous binds before you can make configuration changes to Oracle Application Server middle tiers or OracleAS Infrastructure:
Shut down all middle tiers that are connected to the OracleAS Infrastructure, as described in Section 3.2.2, "Stopping a Middle-Tier Instance".
Shut down OracleAS Infrastructure, in all Infrastructure Oracle homes:
(UNIX) ORACLE_HOME/opmn/bin/opmnctl stopall
(Windows) ORACLE_HOME\opmn\bin\opmnctl stopall
Start Oracle Internet Directory, because it must be started while you perform the procedure:
(UNIX) ORACLE_HOME/bin/oidmon connect=db_connect_string start
(Windows) ORACLE_HOME\bin\oidmon connect=db_connect_string start
Edit the ias.properties file for each middle tier connected to the OracleAS Infrastructure and for the Infrastructure Oracle home that contains OracleAS Single Sign-On and Oracle Delegated Administration Services. The ias.properties file is located in the following directory:
(UNIX) ORACLE_HOME/config
(Windows) ORACLE_HOME\config
In the ias.properties file, set the OIDAnonymousDisabled property to false:
OIDAnonymousDisabled=false
If the property does not exist in the file, or if it is set to false, anonymous binds are enabled.
Edit the dads.conf file for each middle tier connected to the OracleAS Infrastructure and for the Infrastructure Oracle home that contains OracleAS Single Sign-On and Oracle Delegated Administration Services. The dads.conf file is located in the following directory:
(UNIX) ORACLE_HOME/Apache/modplsql/conf
(Windows) ORACLE_HOME\Apache\modplsql\conf
If you previously commented out the line that contains the PlsqlDatabaseConnectString parameter with a value that uses the LDAP name resolution format, uncomment out that line. If you deleted the line, add a line using the following format:
PlsqlDatabaseConnectString cn=orcl, cn=oraclecontext NetServiceNameFormat
If you previously added a line similar to the following, which contains the PlsqlDatabaseConnectString parameter with a value that use host:port:service format, comment out the line:
PlsqlDatabaseConnectString db_host:db_hostdb_listener_port:db_service_name
Use the ldapmodify command to enable anonymous binds. Use the command on the Oracle home that contains Oracle Internet Directory.
Take the following steps:
Create a text file with the following lines:
dn:
changetype: modify
replace: orclanonymousbindsflag
orclanonymousbindsflag: 1
Use the ldapmodify command, calling the text file created in the previous step as input. In the following example, the text file is named anon_on.ldif:
(Unix) ORACLE_HOME/bin/ldapmodify -h host -p port -D cn=orcladmin -w password -v -f anon_on.ldif
(Windows) ORACLE_HOME\bin\ldapmodify -h host -p port -D cn=orcladmin -w password -v -f anon_on.ldif
Stop Oracle Internet Directory:
(UNIX) ORACLE_HOME/bin/oidmon connect=db_connect_string stop
(Windows) ORACLE_HOME\bin\oidmon connect=db_connect_string stop
Start OracleAS Infrastructure, including Oracle Internet Directory, in the Oracle Internet Directory Oracle home, then in any other OracleAS Infrastructure Oracle homes:
(UNIX) ORACLE_HOME/opmn/bin/opmnctl startall
(Windows) ORACLE_HOME\opmn\bin\opmnctl startall
Start all middle tiers that are connected to the Infrastructure, using the following command:
(UNIX) ORACLE_HOME/opmn/bin/opmnctl startall
(Windows) ORACLE_HOME\opmn\bin\opmnctl startall