|
Oracle TopLink Developer's Guide
10g Release 3 (10.1.3) B13593-01 |
|
 Previous |
 Next |
|
Oracle TopLink Developer's Guide
10g Release 3 (10.1.3) B13593-01 |
|
 Previous |
 Next |
The TopLink project uses a classpath–a set of directories, JAR files, and ZIP files–when importing Java classes and defining object types.
Table 22-4 summarizes which projects support project classpath configuration.
Table 22-4 Project Support for Project Classpath
| Descriptor | Using TopLink Workbench
|
Using Java |
|---|---|---|
|
Relational Projects |
|

|
|
EIS Projects |
|

|
|
XML Projects |
|

|
Do not include JDBC drivers or other elements required to access the data source in the project classpath. Use the setenv file to specify these application-level settings (see "Configuring the TopLink Workbench Environment").
After you configure the project classpath, you can use TopLink Workbench to import classes into your project (see "Importing and Updating Classes").
To specify the project classpath information, use this procedure:
Select the project object in the Navigator.
Click the General tab in the Editor. The General tab appears.
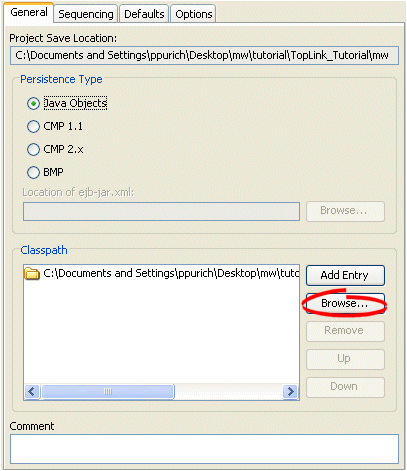
Figure 22-2 General Tab, Classpath Options

To add a new classpath entry, click Add Entry or Browse and select the directory, .jar file, or .zip file for this project. To create a relative classpath, select an entry and edit the path, as necessary. The path will be relative to the Project Save Location.
To remove a classpath entry, select the entry and click Remove.
To change the order of the entries, select the entry and click Up or Down.