|
Oracle TopLink Developer's Guide
10g Release 3 (10.1.3) B13593-01 |
|
 Previous |
 Next |
|
Oracle TopLink Developer's Guide
10g Release 3 (10.1.3) B13593-01 |
|
 Previous |
 Next |
Using TopLink Workbench, you can create Java classes and packages. This section includes information on the following:
Oracle recommends that you develop your Java classes using an IDE such as Oracle JDeveloper and import these existing classes into TopLink Workbench (see "Importing and Updating Classes")
However, it is sometimes convenient to create and configure classes in TopLink Workbench: for example, when generating an object model from a database schema.
This section includes information on using TopLink Workbench to create Java classes.
For more information on using TopLink Workbench to edit classes, see "Creating Classes".
To create new classes and packages from within TopLink Workbench, use this procedure:

Select the project in the Navigator and click Create New Class.
You can also right-click the project in the Navigator and choose Create New Class from the context menu or choose Selected > Create New Class from the menu.
Use the following information to enter data in each field on the Add New Class dialog box:
| Field | Description |
|---|---|
| Package Name | Choose an existing package or enter a new package name. If blank, TopLink Workbench uses the default package name. |
| New Class Name | Enter a class name. The New Class Name must be unique within the package. |
For more information on using TopLink Workbench to edit classes, see "Configuring Classes".
Oracle recommends that you develop your Java classes using an IDE such as Oracle JDeveloper and import these existing classes into TopLink Workbench (see "Importing and Updating Classes")
However, it is sometimes convenient to create (see "Creating Classes") and configure classes in TopLink Workbench: for example, when generating an object model from a database schema.
This section describes using TopLink Workbench to edit classes, including the following:
This section includes information on Using TopLink Workbench to configure class information.
To configure class and superclass information, use this procedure:
Select a class in the Navigator. Its properties appear in the Editor.
Click the Class Info tab in the Editor.
Figure 5-35 Class Tab, Class Information Fields
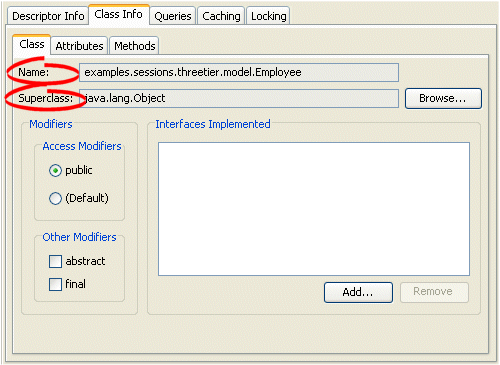
Use the following information to enter data in each field on the tab:
| Field | Description |
|---|---|
| Name | The name of the class. This field is for display only. |
| Superclass | Click Browse and select a class and package that contains the class (that is, the superclass). |
This section includes information on Using TopLink Workbench to configure class modifiers.
To configure class modifiers, use this procedure:
Select a class in the Navigator. Its properties appear in the Editor.
Click the Class Info tab in the Editor.
Figure 5-36 Class Tab, Class Modifier Fields
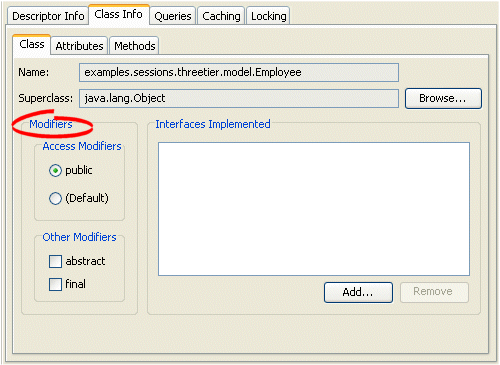
Use the following information to enter data in each field on the tab:
| Field | Description |
|---|---|
| Access Modifiers | Use to specify whether the class is accessible publicly or not.
Only public classes are visible to the Oracle TopLink Workbench. |
| Other Modifiers | Specify if the class is Final or Abstract, or both. Final classes are not included in the superclass selection lists for other classes to extend. |
This section includes information on Using TopLink Workbench to specify the interfaces implemented by a class. You can choose any interface in the TopLink Workbench classpath (see "Configuring Project Classpath").
Although you may add interfaces to a project directly (see "Importing and Updating Classes"), you do not need to do so in order to configure a class to implement an interface.
To implement interfaces, use this procedure:
Select a class in the Navigator. Its properties appear in the Editor.
Click the Class Info tab in the Editor.
Figure 5-37 Class Tab, Interfaces Implemented Fields
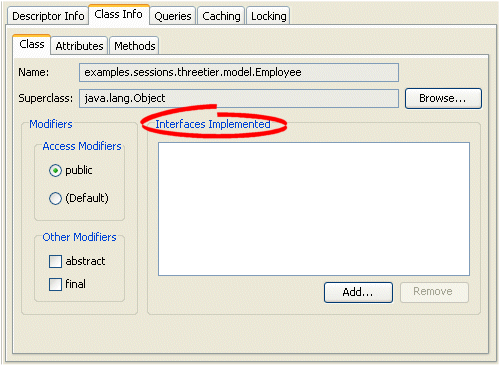
Use the following information to enter data in each field on the Interfaces Implemented tab:
| Field | Description |
|---|---|
| Interfaces Implemented | To add an interface, click Add and select the interface and package.
To remove an interface, select the interface and click Remove |
This section includes information on Using TopLink Workbench to add an attribute to a class.
This section includes information on Using TopLink Workbench to configure attribute modifiers.
To specify access modifiers, use this procedure:
Select a class in the Navigator. Its properties appear in the Editor.
Click the Class Info tab in the Editor.
Click the Attributes tab. The Attributes tab contains two sub-tabs.
Click the General tab.
Figure 5-38 Attributes Tab, Modifiers Fields
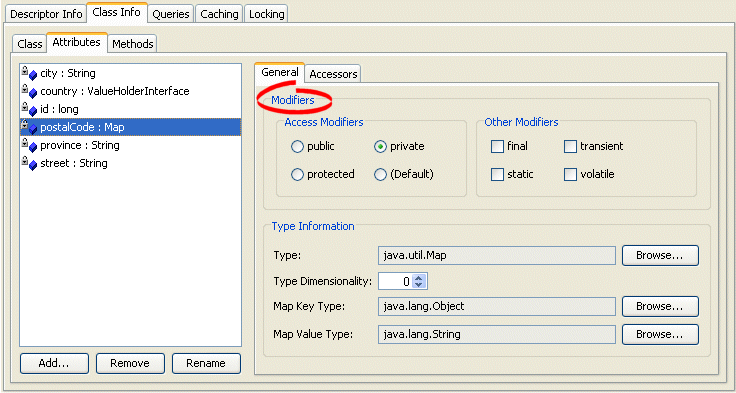
Use the following information to enter data in each field on the tab:
This section includes information on Using TopLink Workbench to configure attribute type information.
To specify attribute type information, use this procedure:
Select a class in the Navigator. Its properties appear in the Editor.
Click the Class Info tab in the Editor.
Click the Attributes tab. The Attributes tab contains two sub-tabs.
Click the General tab.
Figure 5-39 Attributes Tab, Type Information Fields
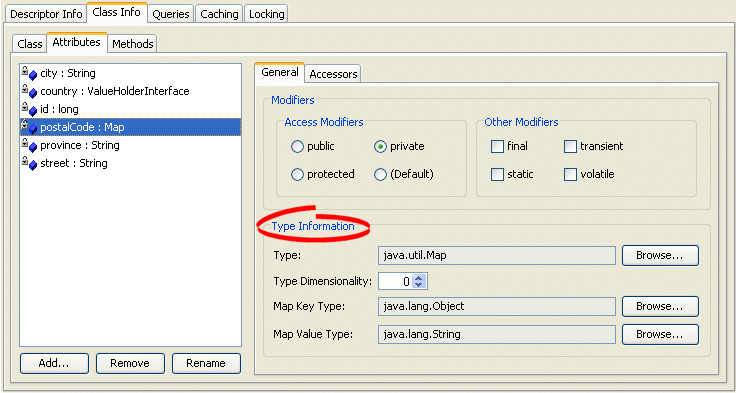
Use the following information to enter data in each field on the tab:
| Field | Description |
|---|---|
| Type | Click Browse and select a class and package for the attribute. |
| Type Dimensionality | Specify the length of an array. This field applies only if Type is an array. |
| Value Type | Click Browse and select a class and package for the attribute.
This field applies for |
| Map Key Type | Click Browse and select a class and package for the attribute.
This field applies for |
| Map Value Type | Click Browse and select a class and package for the attribute.
This field applies for |
| Element Type | Click Browse and select a class and package for the attribute.
This field applies for |
This section includes information on Using TopLink Workbench to configure attribute accessing methods. If you change an attribute and regenerate the accessing methods, TopLink does not remove any previously generated methods.
To specify attribute accessing methods, use this procedure:
Use the following information to complete the fields on the Accessors tab:
| Field | Description |
|---|---|
| Get Method | Choose the get method for the attribute.
This field applies for non- |
| Set Method | Choose the set method for the attribute.
This field applies for non- |
| Add Method | Choose the add method for the attribute.
This field applies for |
| Remove Method | Choose the remove method for the attribute.
This field applies for |
| Value Holder Get Method | Choose the method used to return the ValueHolderInterface type.
This field applies for |
| Value Holder Set Method | Choose the method used to set the ValueHolderInterface type.
This field applies for |
| Value Get Method | Choose the method used to return the actual value.
This field applies for |
| Value Set Method | Choose the method used to set the actual value.
This field applies for |
This section includes information on Using TopLink Workbench to add a method to a class.
To add or remove methods, use this procedure:
Select a class in the Navigator. Its properties appear in the Editor.
Click the Class Info tab in the Editor.
Click the Methods tab.
To add a new method to the descriptor, click Add.
To delete an existing method, select the method and click Remove.
To rename an existing method, select the method and click Rename.
This section includes information on Using TopLink Workbench to configure method modifiers.
To specify access modifiers, use this procedure:
Select a class in the Navigator. Its properties appear in the Editor.
Click the Class Info tab in the Editor.
Click the Methods tab.
Figure 5-41 Methods Tab, Modifiers Fields
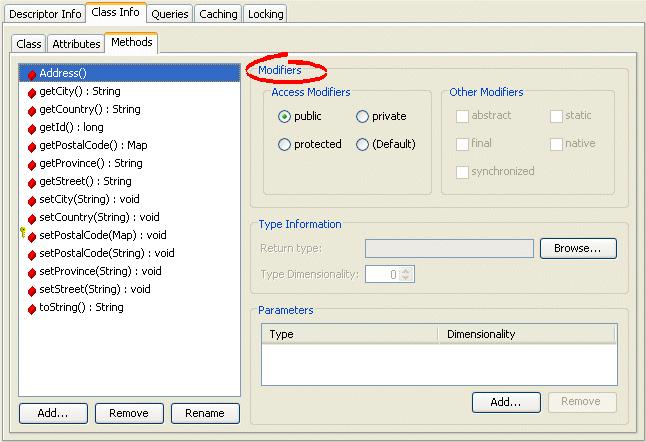
Use the following information to enter data in each field on the tab:
This section includes information on Using TopLink Workbench to configure method type information.
To specify method type information, use this procedure:
Select a class in the Navigator. Its properties appear in the Editor.
Click the Class Info tab in the Editor.
Click the Methods tab.
Figure 5-42 Methods Tab, Type Information Fields
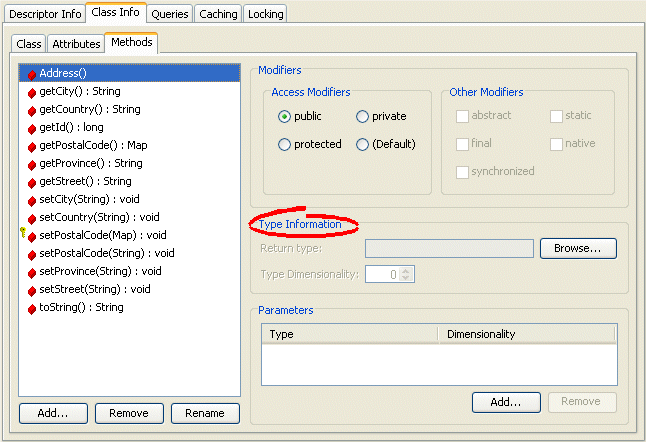
Use the following information to enter data in each field on the tab:
| Field | Description |
|---|---|
|
Return Type |
Click Browse and select a class and package for the method. |
|
Type Dimensionality |
Specify the length of an array. This field applies only if Type is an array. |
This section includes information on Using TopLink Workbench to configure method parameters.
To specify additional method parameters, use this procedure:
Select a class in the Navigator. Its properties appear in the Editor.
Click the Class Info tab in the Editor.
Click the Methods tab.
Figure 5-43 Attributes Tab, Class Modifier Fields
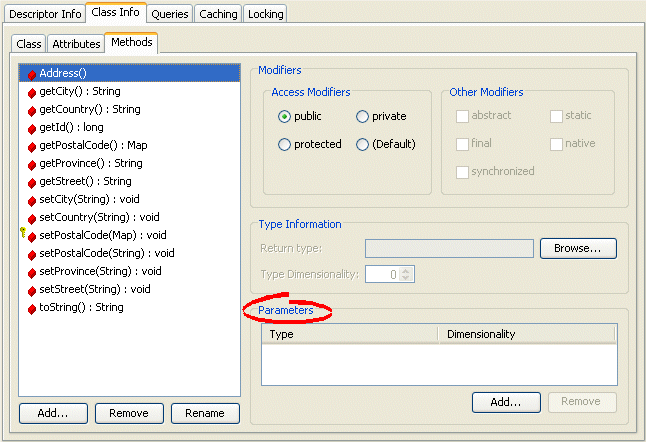
Use the following information to enter data in each field on the tab:
| Field | Description |
|---|---|
| Type | Click Browse and select a class and package for the method. |
| Dimensionality | Specify the length of an array. This field applies only if Type is an array. |
This section includes information on Using TopLink Workbench to import and update Java classes.
You can import Java classes and interfaces created in any IDE.
You can import any class on the system classpath or project classpath.
If a class exists on both the system classpath and the project classpath, TopLink Workbench will update the class from the system classpath. To update or refresh from the project classpath, remove the class from the system classpath and restart TopLink Workbench.
For more information, see "Configuring Project Classpath".
Use this procedure to update or refresh the classes in the TopLink Workbench project.
Define the available classes and packages for the project on the General tab. See "Configuring Project Classpath" for information on classes and packages.

Click Add or Refresh Class. The Select Classes dialog box appears.
You can also update the classes by choosing Selected > Add or Refresh Classes from the menu.
Select the packages or classes (or both) to import into the project and click OK. TopLink Workbench adds the new classes to your project in the Navigator.
By default, TopLink Workbench creates the following descriptor types for each package and class (depending on your project type):
Relational projects–Relational class descriptors (see "Relational Class Descriptors")
EIS projects–EIS composite descriptors (see "EIS Composite Descriptors")
XML projects–XML descriptors (see "XML Descriptors")
See Chapter 27, "Creating a Descriptor" for more information.
|
Note: If the class exists on both the system classpath and the project classpath, TopLink Workbench will update the class from the system classpath. To update or refresh from the project classpath, remove the class from the system classpath and restart TopLink Workbench. |
To Remove a Class from a Project:

Select the descriptor and click Remove, or choose Selected > Remove from the menu.
Some of the mappings in your TopLink project may reference classes that do not have TopLink descriptors or are not included in the project.
To add, remove, or refresh Java classes that do not have TopLink descriptors, use this procedure:
From the menu, select Workbench > Manage Non-Descriptor Classes. The Manage Non-Descriptor Classes dialog box appears.
You can access the dialog box by right-clicking the TopLink project icon in the Navigator and selecting Manage Non-Descriptor Classes from the context menu.
Figure 5-45 Manage Non-Descriptor Classes Dialog Box
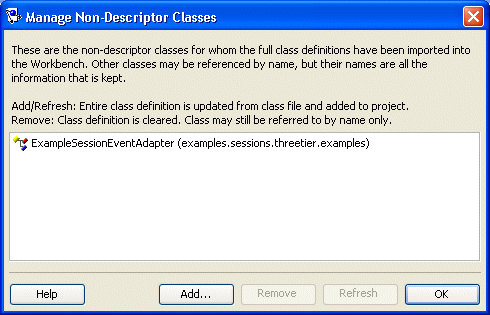
Select one of the following options:
To add new classes, click Add. The Select Classes dialog box appears.
To add new classes, click Add. The Select Classes dialog box appears (see Figure 5-44.
Only classes that have been added to the project's class path can be added as nondescriptor classes. See "Configuring Project Classpath" for more information.
To delete an existing class, select the class and click Remove.
To refresh the classes (for example, if you edited the classes in an IDE), click Refresh.
When you add classes to a project, TopLink Workbench shows the classes contained in the package to which they belong (see "Using the Navigator").
You can use TopLink Workbench to change the package statements in all the Java classes of a selected package (to move the all the classes contained by the selected package to a new package). This is useful if you are refactoring an existing TopLink Workbench project.
|
Note: The TopLink Workbench package rename feature is not intended for migrating projects from older versions of TopLink: for this, you must still use the TopLink Package Renamer. The Package Renamer updates import statements for TopLink classes: it does not change the package statements in user application classes.For information on the TopLink Package Renamer, refer to Oracle TopLink Release Notes and Oracle TopLink Getting Started Guide for more information. |
For more information on using TopLink Workbench to edit classes, see "Configuring Classes".
To change the package of an existing class in TopLink Workbench, use this procedure:
Enter the package name and click OK. TopLink Workbench changes the name of the package in the Navigator window.
For more information on using TopLink Workbench to edit classes, see "Configuring Classes".