|
Oracle TopLink Developer's Guide
10g Release 3 (10.1.3) B13593-01 |
|
 Previous |
 Next |
|
Oracle TopLink Developer's Guide
10g Release 3 (10.1.3) B13593-01 |
|
 Previous |
 Next |
Using TopLink Workbench, you can perform the following project functions:
See Chapter 22, "Configuring a Project" for additional information on working with TopLink Workbench projects.
Use this procedure to open an existing project:

Click Open Project on the toolbar. The Choose a File dialog box appears. You can also open a project by choosing File > Open from the menu.
|
Note: The File menu option contains a list of recently opened projects. You can select one of these projects to open. See "General Preferences" for information on customizing this list. |
Select the TopLink Workbench project file ( .mwp) to open, and click Open. TopLink Workbench displays the project information.
If you open a TopLink Workbench version 3.n project that contains EJB information, the Potential EJB Descriptors dialog box appears.
Select which of the descriptors should be imported as EJB descriptors, the project persistence type, and click OK.
You can also specify whether or not TopLink Workbench generates methods and attributes that comply with the EJB specification, if they are not found within the current class descriptor(s).
If you open a TopLink Workbench version 9.0.3 (or later) project, the Create New TopLink Workbench Project from Previous Version dialog box appears.
Figure 21-4 Create New TopLink Workbench Project From Previous Version Dialog Box

To convert the old project to the current format and view the project immediately, click Save Later.
To convert the old project to the current format and save it to a new location and then view the project, click Save Now.
TopLink Workbench does not automatically save your project. Be sure to save your project often to avoid losing data.
To save your project(s), use this procedure:


Click Save or Save All to save your project(s).
You can also save a project by choosing File > Save or File > Save All from the menu.
If you close TopLink Workbench while there are currently unsaved changes, the Save Project dialog box appears.
Select the project(s) to save and click OK.
Click Select All to select all the available projects.
To save your project with a different name or location, use this procedure:

Choose File > Save As. The Save As dialog box appears.
Select a name and location, then click Save.
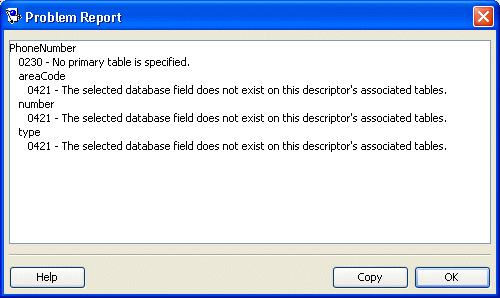
Use the project status report to display a list of all warnings and errors in the TopLink Workbench project. This report is similar to the Problems window (see "Working With TopLink Workbench"), but lets you easily copy and paste the errors into documents or messages. To generate the project status report, use this procedure:

Right-click the Problems label above the Problems window and select Problem Report. The Project Status Report dialog box appears, displaying the status of each TopLink Workbench project.
You can also generate the project status report by selecting Tools > Problem Report from the menu.
Figure 21-7 Project Status Report Dialog Box

See Chapter 14, "TopLink Workbench Error Reference" for information on each reported error.
To copy the report to another application, click Copy.