|
Oracle TopLink Developer's Guide
10g Release 3 (10.1.3) B13593-01 |
|
 Previous |
 Next |
|
Oracle TopLink Developer's Guide
10g Release 3 (10.1.3) B13593-01 |
|
 Previous |
 Next |
In this step, you will create a relational TopLink project mapped to a relational database. In addition to relational projects, TopLink can create other kinds of nonrelational projects mapped to EIS data sources or XML Schema-based XML documents.
To create a new TopLink Workbench project, use this procedure:
Start TopLink Workbench by executing the workbench script in <TOPLINK_HOME>\bin. For windows, select the workbench.cmd file. For UNIX, select the workbench.sh file.

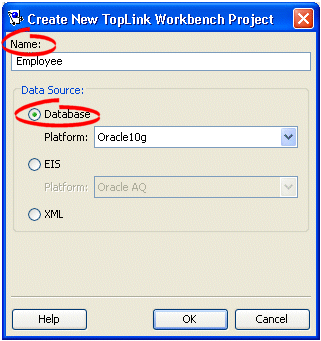
Click New on the toolbar and select Project. The Create New TopLink Workbench Project dialog box appears.
You can also create a new project by choosing File > New > Project from the menu.
Figure 17-1 Create New TopLink Workbench Project Dialog Box

In the Name field, type Employee.
Select Database as the Data Source, then use the Platform field to select your specific database platform.
Click OK. TopLink Workbench creates the new project.
The tutorial project uses Java Objects as the persistence type. TopLink Workbench places an asterisk ( * ) beside the project name in the Navigator, indicating that you have not yet saved the project.

Click Save on the toolbar. TopLink Workbench prompts for a directory location.
Select the <TUTORIAL_HOME>\mw directory, and click OK.
When you create a new TopLink Workbench project, always save it in an empty directory.
After creating the empty Employee project, you must add the compiled Java classes to the project's classpath.
Select the Employee project in the Navigator. Its properties appear in the Editor.
Click the General tab. The General tab appears.
In the Classpath area, click Browse. The Add Entries dialog box appears.
Select the <TUTORIAL_HOME>\servletjsp.jar that contains the compiled classes for this tutorial and click OK. TopLink Workbench adds the JAR file to the project's classpath.
For information on these classes, See "Source Files".

Click Add or Refresh Classes to add the classes to the project. The Select Classes dialog box appears.

Select the examples.servletjsp.model package and click Add Selected Classes To List. The package moves to the Selected Classes area.
The other classes are used by the application at run time.
Click OK. TopLink Workbench adds the package to the project and creates TopLink descriptors for each Java class.
Descriptors are TopLink representations of Java classes. Descriptors own the mappings that relate persistent attributes to database fields.
Notice that TopLink Workbench alerts you that there are errors and unmapped attributes in the project. You will correct these errors as you map the tutorial project.

Click Save on the toolbar to save the project.