|
Oracle TopLink Developer's Guide
10g Release 3 (10.1.3) B13593-01 |
|
 Previous |
 Next |
|
Oracle TopLink Developer's Guide
10g Release 3 (10.1.3) B13593-01 |
|
 Previous |
 Next |
Each TopLink project requires a data source. For the tutorial project, you will use a relational database. In this tutorial, you will create a development login on the project to allow TopLink Workbench to access the database during development. Later, you will create a deployment login that your application will use when you deploy it to the application server (see "Creating a Database Deployment Login").
To create a database login for TopLink Workbench to use during development, use this procedure:
Expand the Employee project icon in the Navigator and select the Database icon. Its properties appear in the Editor.
Verify that the Database Platform is correct. Click Change to select a different platform, if necessary.
In the Defined Logins area, click Add. The Add New Login dialog box appears.
Type the name for your login (for example, myLogin) and click OK. TopLink Workbench adds the newly created login to the Defined Logins area.
Use the following information to complete the remaining login information:
| Field | Description |
|---|---|
| Driver Class | Select the JDBC driver TopLink uses to communicate with your database (such as oracle.jdbc.OracleDriver).
|
| URL | Specify the full location of your data source (such as jdbc:oracle:thin:@myserver:port:sid.
|
| Username | Specify your username, required to log in to the database. |
| Password | Specify your password, required to log in to the database. |
| Save Password | Specify if TopLink if to save the password.
When using JDK 1.4.1 (or later), the password is automatically encrypted with Java Cryptography Extension (JCE). For JDK versions prior to 1.4.1, refer to Oracle TopLink Getting Started Guide for information on using encrypted passwords. |
| Development Login | Select the login that you created (from the Defined Logins area). |
| Deployment Login | Ignore this field for now. You will specify a deployment login from the TopLink sessions configuration, later in this tutorial. |

Click Login on the tool bar to log in to the database.

Notice that the database icon in the Navigator changes to let you know that you are currently logged in.

Click Save to save the project.
To import the database tables (including their attributes and constraints) into the TopLink Workbench project, use this procedure:
Select the logged-in Database icon in the Navigator. Its properties appear in the Editor.

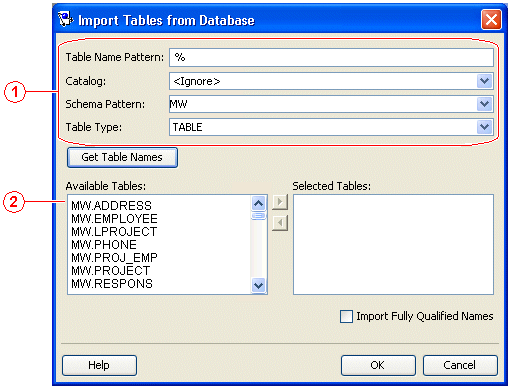
Click Add or Update Existing Tables from Database. The Import Tables from Database dialog appears.
Figure 17-7 numbered callouts identify the following groups of user interface elements on this dialog box:
Filters: this area is made up of attributes Table Name Pattern, Catalog, Schema Pattern, and Table Type
Available and selected items: the tables that match the filter attributes are listed in the left hand panel and the tables that you have selected are listed in the right hand panel.
Figure 17-7 Import Tables from Database Dialog Box

Use the following information to complete the filter information in the Import Tables from Database dialog box:
| Field | Description |
|---|---|
| Table Name Pattern | Use the percent symbol ( % ) as wildcard search to display all the database tables. |
| Catalog | The database creation scripts do not specify a catalog or schema. Consult your DBA for the correct information for your specific database and login. |
| Schema Pattern | |
| Table Type | Select TABLE as the database table type. TopLink also supports other database table types such as views and synonyms. |
Click Get Table Names. TopLink Workbench displays the database tables in the Available Tables area.
Select the following tables (see "Data Model") and click Add Selected Items.
ADDRESS
EMPLOYEE
LPROJECT
PHONE
PROJ_EMP
PROJECT
RESPONS
SALARY
SEQUENCE
Click OK. TopLink Workbench adds the tables to the project.

Click Save to save the project.
Use this procedure to apply a sequence table to the project. The tutorial project uses custom sequencing for the Employee and Address classes. Later you will assign specific sequencing information for both classes.
Select the Employee project in the Navigator. Its properties appear in the Editor.
Click the Sequencing tab. The Sequencing tab appears.
Use the following information to complete each field on the Sequencing tab:
| Field | Description |
|---|---|
| Custom Sequence Table | Specify that the project uses a custom sequence table. |
| Name | Select the SEQUENCE database table. |
| Sequence Name Field | Select the SEQ_NAME database field. |
| Sequence Counter Field | Select the SEQ_COUNT database field. |

Click Save to save the project.
Later, you will specify descriptor-level sequencing to track employees and their addresses.