|
Oracle TopLink Developer's Guide
10g Release 3 (10.1.3) B13593-01 |
|
 Previous |
 Next |
|
Oracle TopLink Developer's Guide
10g Release 3 (10.1.3) B13593-01 |
|
 Previous |
 Next |
A TopLink sessions configuration (the sessions.xml file) is the primary means by which the application performs all persistence operations with the database that contains its persistent objects at run time.
To create the sessions configuration for the Employee project, use this procedure:

Click New on the toolbar and select Sessions Configuration. TopLink Workbench creates a new sessions configuration (sessions.xml) file.

Click Save on the toolbar. TopLink Workbench prompts for a directory location.
Select the <TUTORIAL_HOME>\config directory in which to save the sessions_config.xml file, and click OK.
Server sessions provide session management to a single data source (including shared object cache and connection pools) for multiple clients in a three-tier architecture using database or EIS platforms. This is the most flexible, scalable, and commonly used session.
The Employee project uses a single server session to manage this data. TopLink supports multiple server sessions and also session brokers which allow a single session to connect to multiple databases.
To create a new server session to include in the sessions configuration file, use this procedure:
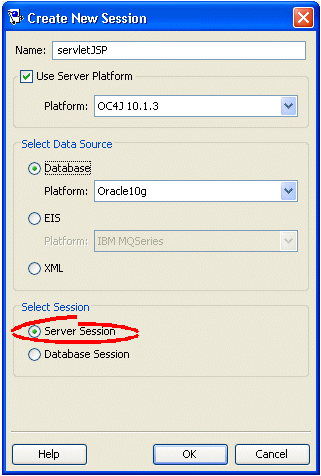
Right-click the sessions configuration object in the Navigator and select New > Session from the context menu. The Create New Session dialog box appears.

You can also create a new session by clicking New Session, or clicking Add Session in the Editor.
Figure 18-4 Create New Session Dialog Box

Use the following information to complete each field in the Create New Session dialog box, and then click OK:
| Field | Description |
|---|---|
| Name | Enter servletJSP as the name for this session. |
| Use Server Platform | Select User Server Platform and select the platform of your application server (such as OC4J 10g). |
| Select Data Source | Click Database and select the Platform of your database. This should be identical to the platform of the database you created when building the Employee project. |
| Select Session | Select Server Session. Server sessions provide session management to a single data source (including shared object cache and connection pools) for multiple clients in a three-tier architecture. This is the most flexible, scalable, and commonly used session. |
TopLink Workbench adds the session to the sessions configuration.

Click Save to save the project.
Now that the base session has been created, you can add the deployment XML information from the Employee tutorial project to the session.
Expand the sessions configuration object in the Navigator and select the servletJSP session object. Its properties appear in the Editor.
Click the Project subtab on the General tab. The Project tab appears.
To add the deployment XML you generated from the Employee project, click Edit. The Edit Project dialog box appears.
Select XML, then click Browse. The file chooser dialog box appears.
Select the XML file you generated in "Step 1: Generating Deployment Information" and click Open.
Click OK on the Edit Project dialog box.

Click Save to save the project.
When building the Employee project, you defined a development login to access the database tables while developing the mapping project (see "Creating a Database Development Login").
Because this is a servlet/JSP tutorial that is deployed to a J2EE application server, you must now configure a deployment login, using this procedure:
Using a text editor, open the <TUTORIAL_HOME>\config\data-sources.xml file (see Example 18-1).
|
Note: This sampledata-sources.xml file was compatible with OC4J 10.1.3 at time of publication. You may whish to compare this sample file with the data-sources.xml file in your OC4J <OC4J_HOME>/j2ee/home/config directory to verify the XML version and DTD.
|
Example 18-1 Tutorial data-sources.xml File for OC4J
<?xml version="1.0" standalone='yes'?>
<!--<!DOCTYPE data-sources PUBLIC "Orion data-sources" "http://xmlns.oracle.com/ias/dtds/data-sources.dtd">-->

<data-sources
    xmlns:xsi="http://www.w3.org/2001/XMLSchema-instance"
    xsi:noNamespaceSchemaLocation="http://xmlns.oracle.com/oracleas/schema/data-sources-10_1.xsd"
    schema-major-version="10"
    schema-minor-version="1">

        <connection-pool name="TopLink Examples Connection Pool">
            <connection-factory factory-class="oracle.jdbc.pool.OracleDataSource"
                                user="USERNAME"
                                password="PASSWORD"
                                url="URL">
            </connection-factory>
        </connection-pool>

        <managed-data-source connection-pool-name="TopLink Examples Connection Pool"
                             jndi-name="jdbc/TopLinkDS"
                             name="TopLinkDS"
                             tx-level="local"/>
</data-sources>
Configure the user, password, and url attributes to match the development login you created in "Creating a Database Development Login".
Save and close the data-sources.xml file.
Now you will configure a session login for deployment that will access the database at run time by way of the J2EE data source you defined (see "Updating the data-sources.xml File"), using this procedure:
Using TopLink Workbench, select the session object in the Navigator. Its properties appear in the Editor.
Click the Login tab. The Login tab appears. It contains three subtabs.
Click the Connection tab. The Connection tab appears.
Use the following information to complete each field on this tab:
| Field | Description |
|---|---|
| Database Platform | Verify that the platform is correct. |
| Database Driver | Select J2EE Datasource. |
| Data Source Name | Enter the name (jdbc/TopLinkDS) of the J2EE data source configured in the tutorial data-sources.xml file (see "Updating the data-sources.xml File").
|

Click Save to save the project.
The TopLink logging framework records TopLink behavior to a log file or session console. All log messages include a date stamp plus connection and server information, when applicable. In this tutorial project, you will log the login/logout per server session. After acquiring the session, detailed session information will be logged.
Select the session object in the Navigator. Its properties appear in the Editor.
Click the Logging tab. The Logging tab appears.
Use the following information to complete each field on this tab:
| Field | Description |
|---|---|
| Standard | Select the TopLink standard logging mechanism. |
| Logging Level | Select Fine. This logging level will show you the SQL that TopLink creates.
The different logging levels lets you customize the type and amount of information recorded in the log. |
| Console | Select to display the logging information to the standard console. |

Click Save to save the project.