|
Oracle TopLink Developer's Guide
10g Release 3 (10.1.3) B13593-01 |
|
 Previous |
 Next |
|
Oracle TopLink Developer's Guide
10g Release 3 (10.1.3) B13593-01 |
|
 Previous |
 Next |
To associate a descriptor with a database table, use this procedure:
Expand the Employee project icon and the examples.servletjsp.modelpackage in the Navigator.
Select the Address descriptor in the Navigator. Its properties appear in the Editor.
Select the Descriptor Info tab. The Descriptor Info tab appears.
In the Associated Table field, select the ADDRESS table. Notice that TopLink Workbench also correctly identifies the primary key for the table (if supported by your database driver).
If your database driver does not allow TopLink Workbench to identify the primary key, click Add to add the primary key, as indicated in the tables in "Data Model".
Use the following information to associate the remaining descriptors with database tables:
| Associate This Descriptor... | With This Database Table... |
|---|---|
| Employee | EMPLOYEE |
| LargeProject | LPROJECT |
| PhoneNumber | PHONE
Notice that the PHONE table has a compound primary key: EMP_ID and TYPE. |
| Project | PROJECT |
| SmallProject | PROJECT |

Click Save to save the project.
Notice that the EmploymentPeriod descriptor is not associated with any database tables. This class will acquire its characteristics through aggregation, later in this tutorial.
In this project, the Employee class is stored in multiple tables; although most information is in the EMPLOYEE table, salary information is stored in the SALARY table.
To spread classes across two or more tables, use this procedure:
Right-click the Employee descriptor in the Navigator and select Select Advanced Properties from the context menu. The Select Advanced Properties dialog box appears.
Select Multitable Info and click OK. TopLink Workbench adds the Multitable Info tab to the Editor.
Click the Multitable Info tab. The Multitable Info tab appears. The Primary Table (EMPLOYEE) has already been selected.
Click Add to add an additional table. The Select Associated Table dialog box appears.
Select the SALARY table, and click OK.
On the Multitable tab, select the Primary Keys Have the Same Name option.

Click Save to save the project.
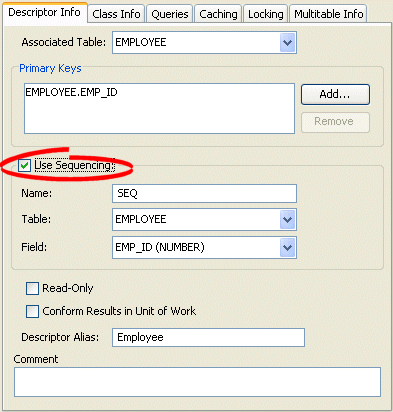
To specify custom (nonnative) sequencing for the Employee class, use this procedure:
Select the Employee descriptor in the Navigator. Its properties appear in the Editor.
Click the Descriptor Info tab. The Descriptor Info tab appears.
Figure 17-12 Descriptor Info Tab, Sequencing Options

Use the following information to complete the Sequencing options on the Descriptor Info tab:
| Field | Description |
|---|---|
| Use Sequencing | Specify that the Employee descriptor uses custom sequencing. |
| Name | Type EMP_SEQ as the name of this sequence.
|
| Table | Select the EMPLOYEE database table. |
| Field | Select the EMP_ID database field. |

Click Save to save the project.
Repeat these steps to use descriptor-level sequencing for the Address descriptor. Use the following information to complete the Sequencing information for the Address descriptor:
| Field | Description |
|---|---|
| Use Sequencing | Specify that the Address descriptor uses custom sequencing. |
| Name | Type ADDRESS_SEQ as the name of this sequence.
|
| Table | Select the ADDRESS database table. |
| Field | Select the ADDRESS_ID database field. |