|
Oracle TopLink Developer's Guide
10g Release 3 (10.1.3) B13593-01 |
|
 Previous |
 Next |
|
Oracle TopLink Developer's Guide
10g Release 3 (10.1.3) B13593-01 |
|
 Previous |
 Next |
In this step, you will create several direct and relationship mappings from the Java objects to the database tables. Review Table 16-10 for information on these mappings.
In the tutorial model, each attribute of the Address descriptor (such as city) maps directly to a column in a database table. TopLink represents this relationship as a direct-to-field mapping.
Use this procedure to create the direct-to-field mapping of the city attribibute of the Address class:
Expand the Address descriptor in the Navigator to display its attributes.

Select the city attribute and click Direct to Field Mapping. TopLink Workbench creates the direct-to-field mapping. Its properties appear in the Editor.
You can also create the mapping by right-clicking the city attribute and selecting Map As > Direct to Field from the context menu.
Notice that TopLink Workbench has added a warning icon to the city attribute, indicating that the mapping is incomplete.
Figure 17-13 General Tab of Direct-to-Field Mapping
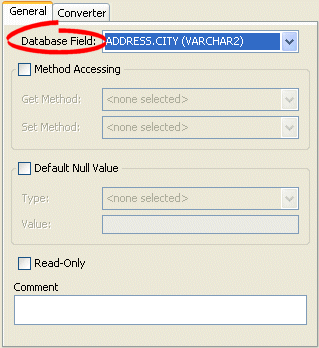
On the General tab, use the Database Field field to select the ADDRESS.CITY database field.
Instead of mapping Java attributes manually, TopLink Workbench can attempt to automatically map attributes and database fields with similar names.
To automatically map each attribute of the Address class as a direct-to-field mapping, use this procedure:
Expand the Address descriptor in the Navigator to display its attributes.
Right-click the Address descriptor and select Automap from the context menu. TopLink Workbench automatically maps the unmapped descriptors and displays the Automap Status dialog box.
Click OK. TopLink Workbench mapped each attribute as a direct to field mapping.
Individually, select each attribute of the Address descriptor and confirm they are mapped to the following database fields:
| Attribute | Database Field |
|---|---|
| country | COUNTRY |
| id | ADDRESS_ID |
| postalCode | P_CODE |
| province | PROVINCE |
| street | STREET |
|
Note: It is not necessary to confirm the city attribute; the Automap function will not change attributes that are already mapped. |

Click Save to save the project.
The Automap function relies on a logically named and ordered database structure. You should always review mappings created by the Automap function.
Follow the procedure from "Direct-to-Field Mappings" to map the following attributes as direct-to-field mappings:
| Descriptor | Attribute | Database Field |
|---|---|---|
| Employee | firstName | F_NAME |
| id | EMP_ID (from EMPLOYEE table) | |
| lastName | L_NAME | |
| salary | SALARY (from SALARY table) | |
| LargeProject | budget | BUDGET |
| milestoneVersion | MILESTONE | |
| PhoneNumber | areaCode | AREA_CODE |
| number | P_NUMBER | |
| type | TYPE | |
| Project | description | DESCRIP |
| id | PROJ_ID | |
| name | PROJ_NAME |
Leave all other attributes unmapped.
In the tutorial model, each employee has a single address. TopLink represents this relationship as a one-to-one mapping.
To create a one-to-one mapping of the address attribute of the Employee class, use this procedure:
Expand the Employee descriptor in the Navigator to display its attributes.

Select the address attribute and click One to One Mapping. TopLink Workbench creates the one-to-one mapping. Its properties appear in the Editor.
You can also create the mapping by right-clicking the address attribute and selecting Map As > One to One from the context menu.
Notice that TopLink Workbench has added a warning icon to the address attribute, indicating that the mapping is incomplete.
Figure 17-14 General Tab of One-to-One Mapping
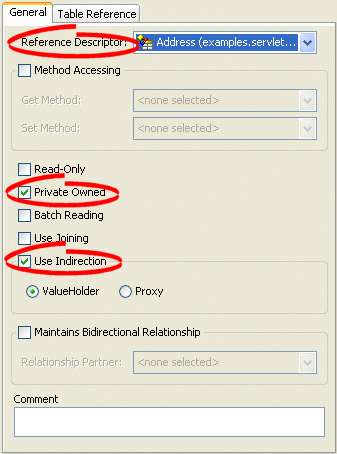
Click the General tab. Use the following information to complete the fields on the General tab:
| Field | Description |
|---|---|
| Reference Descriptor | Select Address. The address attribute (of the Employee descriptor) references the Address descriptor. |
| Private Owned | Select this option to automatically create, update, or delete the Address object, whenever its owner (Employee) is changed. |
| Use Indirection | Select ValueHolder to allow TopLink to use a value holder when retrieving and storing information from the database. This reduces database accesses and improves performance. See "Configuring Indirection" for more information. |
Leave the other fields empty.
Click the Table Reference tab. The Table Reference tab appears.
Figure 17-15 Table Reference Tab of One-to-One Mapping
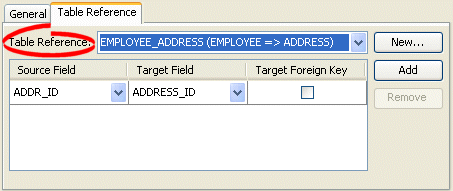
In the Table Reference field, select EMPLOYEE_ADDRESS. TopLink assigns the Source (ADDR_ID) and Target (ADDRESS_ID) fields, based on the database foreign key constraints imported when you imported the database tables (see "Importing Database Tables").
|
Note: For more information on creating constraints using TopLink Workbench, see "Configuring Table and Field References (Foreign and Target Foreign Keys)". |

Click Save to save the project.
Follow the procedure from "One-to-One Mappings" to map the following attributes as one-to-one mappings:
| Descriptor | Attribute | Reference Descriptor | Table Reference |
|---|---|---|---|
| Employee | manager | EMPLOYEE | EMPLOYEE_EMPLOYEE |
| Project | teamLeader | EMPLOYEE | PROJECT_EMPLOYEE |
Leave all other attributes unmapped.
In the tutorial model, each employee may have multiple telephone numbers. TopLink represents this relationship as a one-to-many mapping.
To create a one-to-many mapping of the attributes of the Employee class, use this procedure:
Expand the Employee descriptor in the Navigator to display its attributes.

Select the phoneNumbers attribute and click One to Many Mapping. TopLink Workbench creates the one-to-many mapping. Its properties appear in the Editor.
You can also create the mapping by right-clicking the phoneNumbers attribute and selecting Map As > One to Many from the context menu.
Notice that TopLink Workbench has added a warning icon to the phoneNumbers attribute, indicating that the mapping is incomplete.
Figure 17-16 General Tab of One-to-Many Mapping
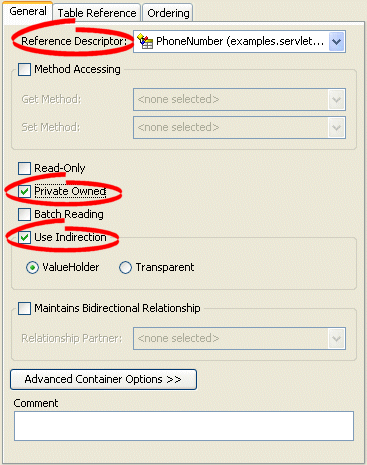
Click the General tab. Use the following information to complete the fields on the General tab:
| Field | Description |
|---|---|
| Reference Descriptor | Select PhoneNumber. The phoneNumbers attribute (of the Employee descriptor) references the PhoneNumber descriptor. |
| Private Owned | Select this option to automatically create, update, or delete the PhoneNumber object, whenever its owner (Employee) is changed. |
| Use Indirection | Select ValueHolder to allow TopLink to use a value holder when retrieving and storing information from the database. This reduces database accesses and improves performance. See "Configuring Indirection" for more information. |
Leave the other fields empty.
Click the Table Reference tab. The Table Reference tab appears.
Figure 17-17 Table Reference Tab of One-to-Many Mapping
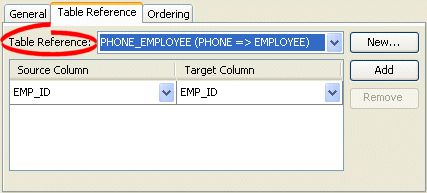
In the Table Reference field, select PHONE_EMPLOYEE. TopLink assigns the Source (EMP_ID) and Target (EMP_ID) fields, based on the database foreign key constraints.
To complete this one-to-many mapping, you must create a one-to-one mapping back from the referenced class. Follow the procedure from "One-to-One Mappings" to create a one-to-one mapping from the PhoneNumber descriptor's owner attribute to the Employee descriptor:
| Descriptor | Attribute | Reference Descriptor | Table Reference |
|---|---|---|---|
| PhoneNumber | owner | Employee | PHONE_EMPLOYEE |

Click Save to save the project.
Follow the procedure from "One-to-Many Mappings" to map the following attributes as one-to-many mappings:
| Descriptor | Attribute | Reference Descriptor | Table Reference |
|---|---|---|---|
| Employee | managedEmployees | EMPLOYEE | EMPLOYEE_EMPLOYEE |
This is an example of a one-to-many self-reference. The tutorial object model requires the Employee class to reference another instance of the same class. You have already created the one-to-one back-mapping from the Employee descriptor's manager attribute back to the Employee descriptor.
Leave all other attributes unmapped.
In the tutorial model, each employee's gender is stored as a single letter in the database (M or F), but the object value is the full word (Male or Female). TopLink represents this relationship as an object type mapping.
Expand the Employee descriptor in the Navigator to display its attributes.
Right-click the gender attribute and select Map As > Object Type from the context menu. TopLink Workbench creates the object type mapping. Its properties appear in the Editor.
Click the General tab. The General tab appears.
On the General tab, use the Database Field field to select the EMPLOYEE.GENDER database field.
Click the Converter tab. The Converter tab appears. Ensure the Object Type converter is selected.
Figure 17-18 Converter Tab, Object Type Mapping
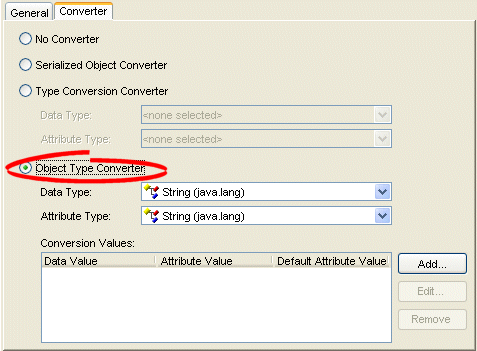
Use the following information to complete the fields on the Converter tab:
| Field | Description |
|---|---|
| Data Type | Select Character. In the database, the GENDER column type is a single character. |
| Attribute Type | Select String. In the object, the gender attribute is a text string. |
In Conversion Values area of the Converter tab, click Add. The Enter Conversion Value Pair dialog box appears.
In the Data Value field, type M. In the Attribute Value field, type Male. Click OK.
Repeat steps 7 and 8 to create a conversion from F to Female.

Click Save to save the project.
In TopLink, two objects–a source (parent or owning) object and a target (child or owned) object–are related by aggregation if there is a strict one-to-one relationship between them, and all the attributes of the target object can be retrieved from the same data source representation as the source object. This means that if the source object exists, then the target object must also exist, and if the source object is destroyed, then the target object is also destroyed.
In the tutorial object model, the Employee descriptor's period attribute uses an aggregate mapping to the EmploymentPeriod descriptor (which is associated with the START and END date fields of the EMPLOYEE database table).
Before creating the mapping, you must create the aggregate descriptor by doing the following:
Select the EmploymentPeriod descriptor in the Navigator.

Click Aggregate Descriptor in the toolbar. TopLink Workbench changes the descriptor to an aggregate descriptor.
Notice that the Descriptor Info and Queries tabs have been removed in the Editor.
Expand the EmploymentPeriod descriptor and map each attribute (StartDate and EndDate) as direct-to-field mappings.
Notice that the Database Field field is not available on each mapping's General tab.
Next, you create the aggregate mappings.
Now you will create an aggregate mapping for the period attribute, using the following procedure:
Expand the Employee descriptor in the Navigator to display its attributes.
Right-click the period attribute and select Map As > Aggregate from the context menu. TopLink Workbench creates the aggregate mapping. Its properties appear in the Editor.
On the General tab, use the Reference Descriptor field to select the EmploymentPeriod descriptor.
Notice that the field lists only the aggregate descriptor.
Click the Fields tab. The Fields tab appears.
Figure 17-20 Fields Tab of Aggregate Mapping

The Field Description column is populated automatically, based on the mapped attributes of the EmploymentPeriod aggregate descriptor.
Use the following information to select the database for each attribute:
| Fields | Database Field |
|---|---|
| EmploymentPeriod.endDate direct field | END_DATE |
| EmploymentPeriod.startDate direct field | START_DATE |

Click Save to save the project.
In the tutorial model, each employee has a list of responsibilities. TopLink represents this collection of objects relationship as a direct collection mapping.
Expand the Employee descriptor in the Navigator to display its attributes.
Right-click the responsibilitiesList attribute and select Map As > Direct Collection from the context menu. TopLink Workbench creates the mapping. Its properties appear in the Editor.
Click the General tab. The General tab appears.
Figure 17-21 General Tab of Direct Collection Mapping
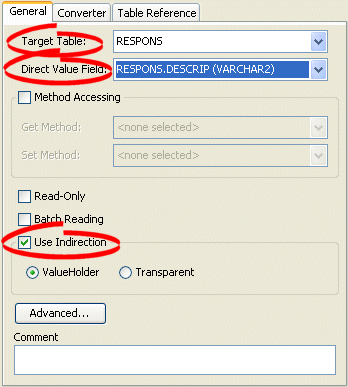
Use the following information to complete the fields on this tab:
| Field | Description |
|---|---|
| Target Table | Select the RESPONS table as the table in which to store the string value. |
| Direct Value Field | Select the RESPONS.DESCRIP table. |
| Use Indirection | Select ValueHolder indirection to allow TopLink to use a value holder when retrieving and storing information from the database. This reduces database accesses and improves performance. See "Configuring Indirection" for more information. |
Click the Table Reference tab. The Table Reference tab appears.
In the Table Reference field, select RESPONS_EMPLOYEE. TopLink assigns the Source (EMP_ID) and Target (EMP_ID) fields, based on the database foreign key constraints.

Click Save to save the project.
In the tutorial model, many employees may have many projects. TopLink represents this relationship between collections as a many-to-many mapping.
To create a many-to-may mapping, use the following procedure:
Expand the Employee descriptor in the Navigator to display its attributes.
Right-click the projects attribute and select Map As > Many to Many from the context menu. TopLink Workbench creates the mapping. Its properties appear in the Editor.
Click the General tab. The General tab appears.
Figure 17-22 General Tab of Many-to-Many Mapping
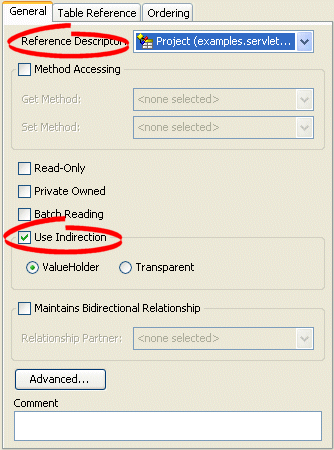
Use the following information to complete the fields on this tab:
| Field | Description |
|---|---|
| Reference Descriptor | Select the Project descriptor. |
| Use Indirection | Select ValueHolder indirection to allow TopLink to use a value holder when retrieving and storing information from the database. This reduces database accesses and improves performance. See "Configuring Indirection" for more information. |
Click the Table Reference tab. The Table Reference tab appears.
Figure 17-23 Table Reference Tab of Many-to-Many Mapping
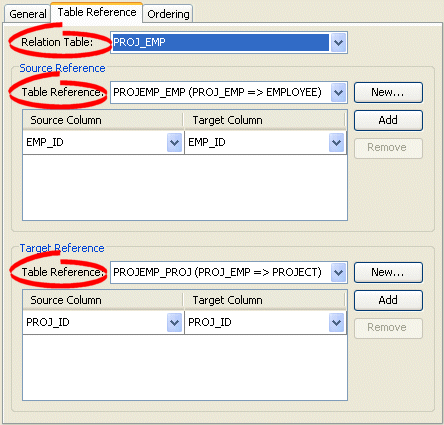
Use the following information to complete the fields on this tab:
| Field | Description |
|---|---|
| Relation Table | Select the PROJ_EMP table. |
| Source Reference |
|
| Table Reference | Select the PROJEMP_EMP table.
Select the EMP_ID field (from the PROJ_EMP table) as the Source Field, and the EMP_ID field (from the EMPLOYEE table) as the Target Field. |
| Target Reference |
|
| Table Reference | Select the PROJEMP_PROJ table.
Select the PROJ_ID field (from the PROJ_EMP table) as the Source Field, and the PROJ_ID field (from the PROJECT table) as the Target Field. |

Click Save to save the project.
Typically, a TopLink mapping maps a single Java attribute to a single database field.
In the tutorial model, the Employee descriptor has a single attribute (normalHours) that extracts the values from two database columns (START_TIME and END_TIME).
You can use a TopLink transformation mapping for these situations when an existing TopLink mapping cannot address your application requirements.
A transformation mapping is made up of an attribute transformer for field-to-attribute transformation at read (unmarshall) time (see "Configuring Attribute Transformer") and one or more field transformers for attribute-to-field transformation at write (marshall) time (see "Configuring Field Transformer Associations").
To create a transformation mapping, use the following procedure:
Expand the Employee descriptor in the Navigator to display its attributes.
Right-click the normalHours attribute and select Map As > Transformation from the context menu. TopLink Workbench creates the transformation mapping. Its properties appear in the Editor.
Notice that TopLink Workbench has added a warning icon to the transformation attribute, indicating that the mapping is incomplete.
In the Attribute Transformer field, click Edit. The Specify Transformer dialog box appears.
Figure 17-25 The Specify Transformer Dialog Box
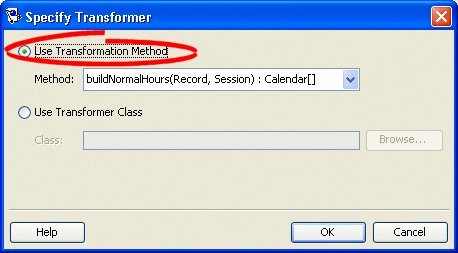
Select Use Transformation Method and select the buildNormalHours method. Click OK.
You can specify the attribute transformer as a method of this domain object class (as done here) or as a separate class.
In the Field Transformer Associations area, click Add. The Specify Field-Transformer Association dialog box appears.
Figure 17-26 The Specify Field-Transformer Association Dialog Box
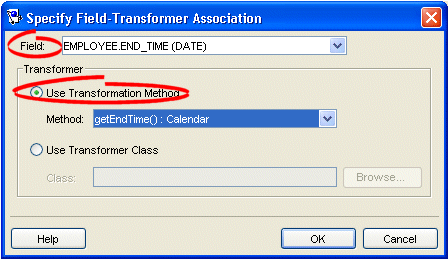
Use the following information to complete the fields on the Specify Field-Transformer Association dialog box and click OK:
| Field | Description |
|---|---|
| Field | Select the END_TIME field from the EMPLOYEE table.
|
| Use Transformation Method | Select the getEndTime() method.
|
Click OK.
Repeat steps 5 and 6 to add the START_TIME transformation method.

Click Save to save the project.