|
Oracle TopLink Developer's Guide
10g Release 3 (10.1.3) B13593-01 |
|
 Previous |
 Next |
|
Oracle TopLink Developer's Guide
10g Release 3 (10.1.3) B13593-01 |
|
 Previous |
 Next |
In the Employee tutorial project, you will explore several of the TopLink advanced descriptor properties. This step includes exercises on using:
In reviewing the tutorial object model (see Figure 16-1), notice that the Project class is extended by two subclasses: SmallProject and LargeProject. These subclasses inherit characteristics from the parent class.
To specify inheritance in TopLink Workbench, first configure inheritance attributes of the parent class and then configure the inheritance attributes of each of its derived child class.
Use this procedure to specify that Project is the root parent descriptor in the hierarchy.
Right-click the Project descriptor in the Navigator and select Select Advanced Properties from the context menu. The Select Advanced Properties dialog box appears.
Select Inheritance and click OK. TopLink Workbench adds the Inheritance tab.
Click the Inheritance tab. The Inheritance properties appear.
Figure 17-27 Inheritance Tab, Parent Class
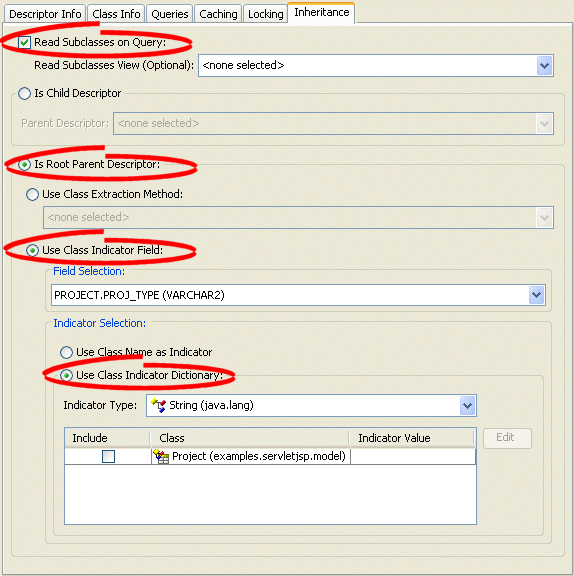
Use the following information to complete each field on this tab:
| Field | Description |
|---|---|
| Read Subclasses on Query | Select to allow TopLink to access the subclasses (LargeProject and SmallProject) in queries.
|
| Is Root Parent Descriptor | Select to specify the Project descriptor as the root of the inheritance. |
| Use Class Indicator Field | Select PROJ_TYPE. This field contains the indicator value for each subclass. |
| Use Class Indicator Dictionary | Select Use Class Indicator Dictionary and select String as the Indicator Type. The class indicator field in the database table (PROJ_TYPE) is a string value. |
Leave the other fields blank.
Now you will identify each child class in the inheritance hierarchy (LargeProject and SmallProject subclasses) using this procedure:
Right-click the LargeProject descriptor in Navigator and select Select Advanced Properties from the context menu. The Select Advanced Properties dialog box appears.
Select Inheritance and click OK. TopLink Workbench adds the Inheritance tab.
Click the Inheritance tab. The Inheritance properties appear.
Figure 17-28 Inheritance Tab, Child Class
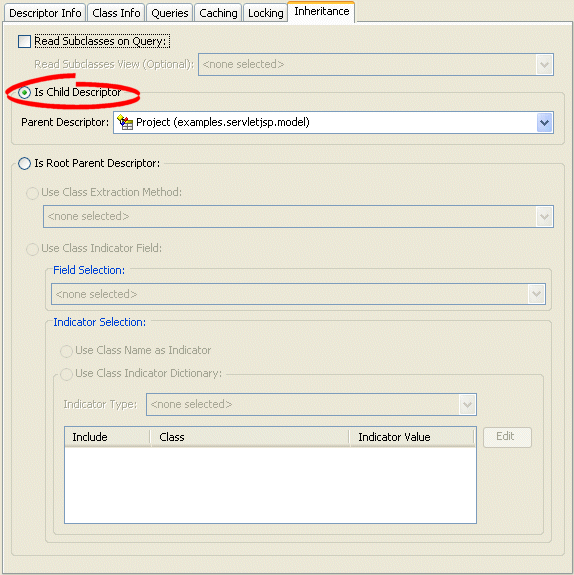
Use the following information to complete each field on this tab:
| Field | Description |
|---|---|
| Is Child Descriptor | Specify that the LargeProject descriptor is a child descriptor and not the parent. |
| Parent Descriptor | Select the Project descriptor. |
Leave the other fields blank.
Repeat this procedure for the SmallProject descriptor.
To complete the inheritance, you must select which children to include in the inheritance hierarchy, using this procedure:
Select the Project descriptor in the Navigator. Its properties appear in the Editor.
Click the Inheritance tab. The Inheritance properties appear.
Figure 17-29 Inheritance Tab, Indicator Values
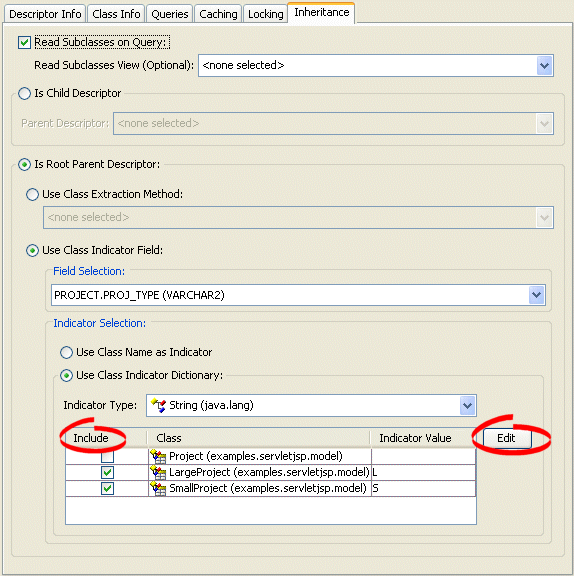
Select to Include the LargeProject descriptor and click Edit. The Enter an Indicator Value dialog box appears.
In the Indicator Value field, type L and click OK.
Repeat steps 3 – 4 to include the SmallProject descriptor. Use S as the indicator value.
Uncheck the Include column for the Project descriptor: because it is an abstract class, it does not require an indicator value.

Click Save to save the project.
In this tutorial project, each employee's project information (the Project class) uses optimistic locking based on version locking. To specify this locking policy, use this procedure:
Select the Project descriptor in the Navigator.
Click the Locking tab. The Locking tab appears.
Use the following information to complete each field on this tab:
| Field | Description |
|---|---|
| Optimistic Locking | Specify that this descriptor uses optimistic locking (instead of pessimistic locking). |
| By Version | Specify that this descriptor is locked by version (instead of by fields). |
| Database Field | Select the VERSION database field. TopLink will lock the descriptor based on the version of this database field. |
| Version Locking | Specify that this locked by version number (instead of time stamp). |
| Store Version in Cache | Specify that TopLink should store the version locking information in the cache. |
Repeat this procedure to implement locking for the Employee descriptor.
Click Save to save the project.
To create a simple query to find all employees whose telephone number includes a specific area code, use this procedure:
Select the PhoneNumber descriptor in the Navigator. Its properties appear in the Editor.
Click the Queries tab. The Queries tab appears, containing three subtabs.
Click the Named Queries subtab.
Click Add to create a new named query. In the Add Named Query dialog box, leave the Type as ReadObject, type localNumbers in the Name field, and click OK. TopLink Workbench adds the query.
Select the newly created localNumbers query. In the Parameters area of the General tab of the Named Queries tab, click Add. The Add Query Parameter dialog box appears.
Figure 17-31 General Tab on Named Queries Subtab of the Queries Tab
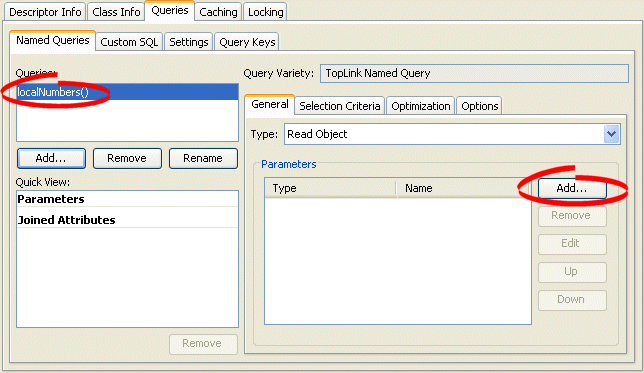
In the Name field of the Add Query Parameter dialog box, type ID. To configure the Type, click Browse. The Choose Class dialog box appears.
In the Choose a class field of the Choose Class dialog box, type String. In the Package area, select java.lang and click OK. TopLink Workbench adds the parameter.
Click the Selection Criteria subtab on the Names Queries subtab of the Queries tab. The Selection Criteria subtab appears.
Figure 17-34 Selection Criteria Tab on Queries Tab
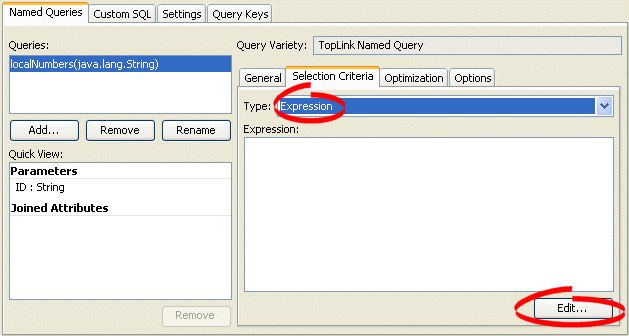
Select Expression as the Type to create a TopLink expression for this query, and click Edit. The Expression Builder dialog box appears.
Click Add to create a new expression. TopLink Workbench adds the expression node.
Figure 17-35 Expression Builder Dialog Box
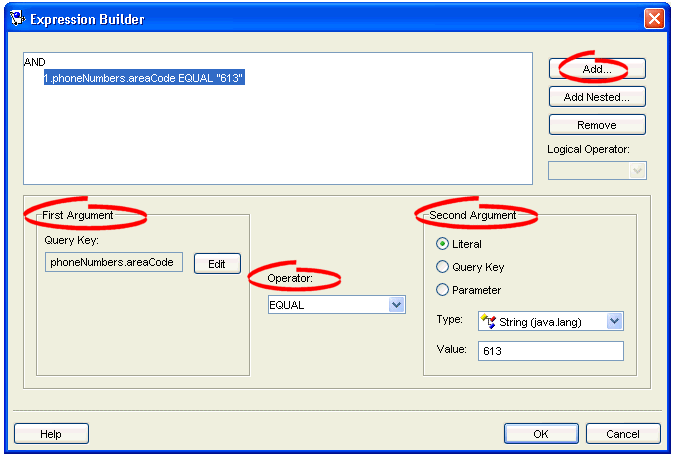
Use the following information to enter data in each field on this dialog box:
| Field | Description |
|---|---|
| First Argument | Click Edit and select the areaCode attribute. |
| Operator | Select EQUAL. |
| Second Argument | Select Literal. Select String as the Type, type 613 as the Value. |
This expression will find all employees whose telephone number has a 613 area code.
On the Expression Builder dialog box, click OK. The Selection Criteria subtab of the Named Queries subtab now includes the expression.

Click Save to save the project.