|
Oracle® Business Rules User's Guide
10g Release 3 (10.1.3) B15986-01 |
|
 Previous |
 Next |
|
Oracle® Business Rules User's Guide
10g Release 3 (10.1.3) B15986-01 |
|
 Previous |
 Next |
This chapter describes how to use some of the more advanced features of Oracle Business Rules Rule Author. The following topics are covered:
In this section you use Rule Author to add a variable that replaces a portion of the message that you print out in the Java Car Rental How-To you built in Chapter 2. Using Oracle Business Rules, a variable is similar to a public static variable in Java. You can specify that a variable is a constant or modifiable.
Perform the following steps to add a variable:
Click the Repository tab and load the CarRental dictionary.
Click the Definitions tab.
Click the Variable node in the navigation tree. The Variable Summary page shows that no variables are defined.
Click Create. This shows the Variable page.
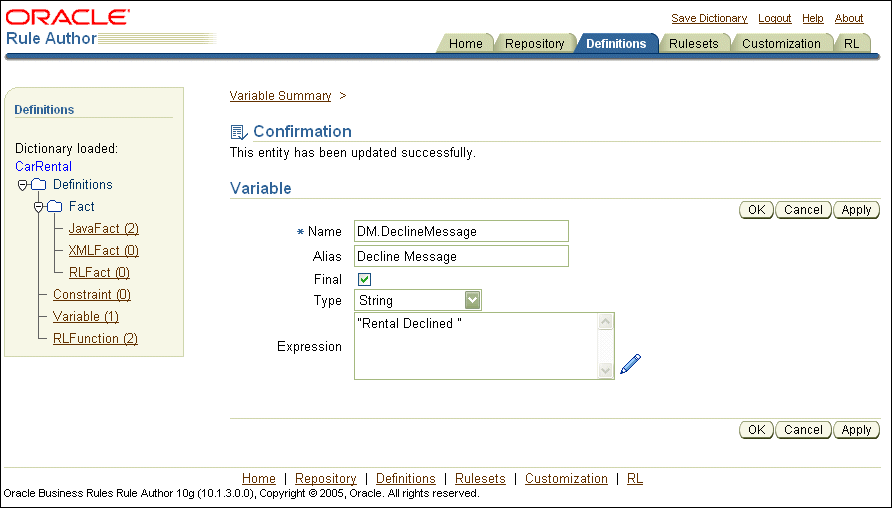
Enter DeclineMessage in the Name field.
|
Note: When Rule Author creates a variable, it adds a "DM." to the name you enter in the Name field (DM stands for Data Model).
|
Enter Decline Message in the Alias field.
Select the Final check box (by default this box is selected).
Select String in the Type box.
In the Expression box, enter "Rental declined ".
If you want to use the expression wizard to assist you with creating an expression, click the edit icon to bring up the expression builder.
Click Apply (see Figure 3-1).
Figure 3-1 Rule Author Variable Definition Page
Notes for creating Rule Author variables:
When you deselect the Final check box, this specifies that the variable is modifiable, for instance, in an Assign action.
You can only use variables specified as final variables in the test for a rule (non-finals are not allowed).
When you want to constrain the allowed values for a field to only a specific set of values in a customizable rule, for example if you want to specify a range of values, you can use a Rule Author constraint definition.
Rule Author supports three types of constraint definitions, as shown in Table 3-1.
Table 3-1 Rule Author Constraint Types
| Constraint Type | Description |
|---|---|
|
Range |
Specifies a numeric interval. |
|
Enumeration |
Specifies a list of possible values. |
|
Regular Expression |
Specifies a regular expression to which the string value conforms. The syntax for the regular expression in these constraints follows Java's regular expression definition. |
|
Note: The regular expression constraint requires quotation marks around strings. |
For the example in this section you define a constraint and then add the constraint to the UnderAge rule in the CarRental dictionary.
Perform the following steps to define a range constraint:
Click the Repository tab and load the CarRental dictionary.
Click the Definitions tab.
Click the Constraint node in the navigation tree. The Constraint Summary page shows no constraints are defined.
Click Create. This shows the Constraint page.
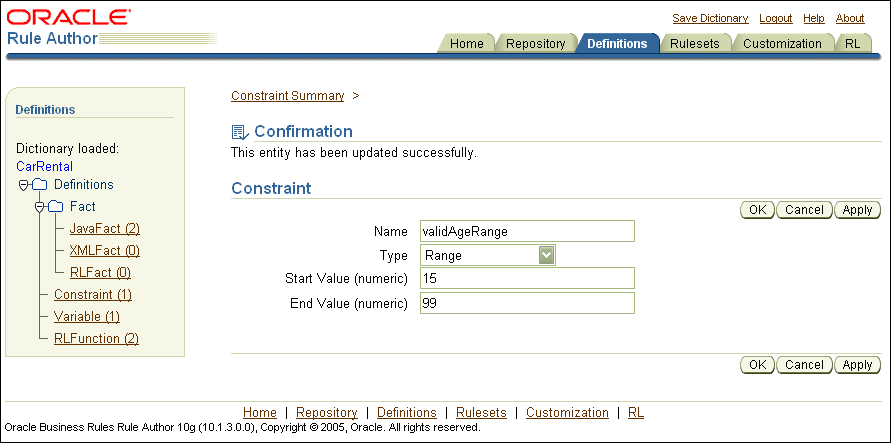
Enter validAgeRange in the Name field.
Select Range from the Type box. This shows a Constraint page with two new fields: Start Value and End Value.
Enter 15 in the Start Value field.
Enter 99 in the End Value field.
Click Apply. Rule Author shows a confirmation message (see Figure 3-2).
Figure 3-2 Rule Author Constraint Definition Page
Save the dictionary.
Next, add the validAgeRange constraint to the UnderAge rule. To use the constraint in the UnderAge rule, do the following:
Click the Repository tab and load the CarRental dictionary.
Using the CarRental dictionary, select the Rulesets tab.
Select the UnderAge link to show the UnderAge rule.
Select the edit icon in the If box. This displays the Pattern Definition page.
On the Pattern Definition Page, in the constraint field, select validAgeRange (this is the second box in the Value column).
Click OK. This closes the Pattern Definition Page.
Click OK on the Rule page.
Save the dictionary.
Use the Customization tab to verify that Rule Author lets you enter values from the specified range and rejects invalid entries.
|
See Also: "Defining Tests for Patterns with the Under Age Rule" for information on using the Allowed Values field to use constraints. |
|
Note: If you change a constraint that is used in a ruleset, you can still save the ruleset even though it may not adhere to all the constraints. |
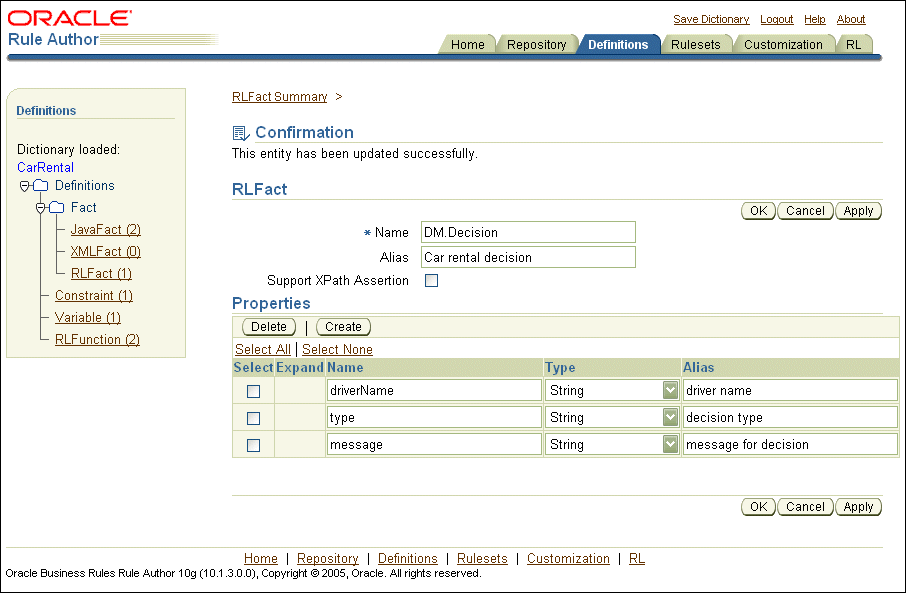
This example creates an RLFact named Decision that extends the CarRental rules. The RLFact has three members of String type: driverName, type, and message. Perform the following steps to create the Decision RLFact:
Click the Repository tab and load the CarRental dictionary.
Click the Definitions tab and click the RLFact node in the navigation tree under Facts. The RLFact Summary page shows that no RLFacts are defined.
Click Create. This shows the RLFact page.
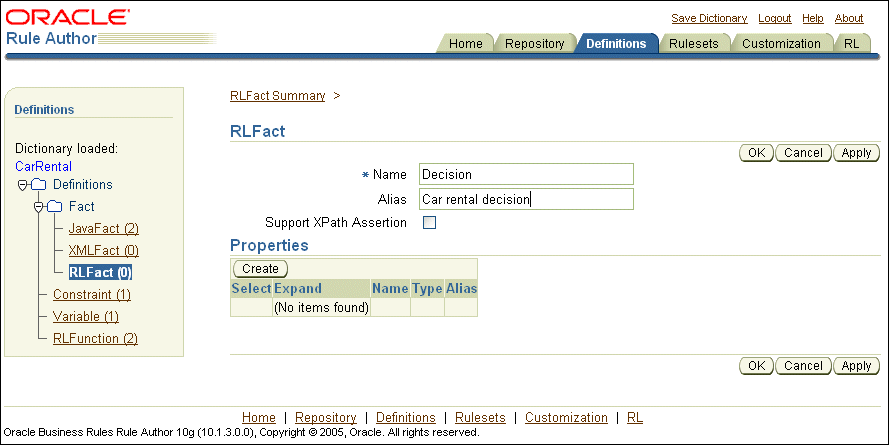
Enter Decision in the Name field.
Enter Car rental decision in the Alias field (see Figure 3-3).
Figure 3-3 Rule Author Definitions Tab with RLFact Page
In the properties table click Create. This shows a new row in the Properties table.
Enter driverName in the Name field.
Select String from the box in the Type field.
Enter driver name in the Alias field.
Click Create. This adds another new row to the Properties table.
Enter type in the Name field.
Select String from the box in the Type field.
Enter decision type in the Alias field.
Click Create. This adds another new row to the Properties table.
Enter message in the Name field.
Select String from the box in the Type field.
Enter message for decision in the Alias field.
Click Apply. This displays a confirmation message (see Figure 3-4).
Figure 3-4 Rule Author Definitions Tab with RLFact Properties
Click RLFact in the navigation tree. This displays the RLFact Summary page, and the new RLFact, DM.Decision.
|
Note: When Rule Author creates an RLFact, it adds a "DM." to the name you enter in the Name field (the DM stands for Data Model).
|
|
See Also: "Specifying Visibility and Object Chaining for Rule Author Drop Down Lists" for information on the Expand field shown in Figure 3-4. |
Oracle Business Rules lets you use built-in or user-defined functions in rule conditions and actions. In this section you use Rule Author to define a function named showDecision. You can use this function to print the results for the Java How-To.
|
Note 1: The example in this section uses the CarRental dictionary and the RLFact defined in Section 3.3. |
|
Note 2: For RL generated from the SDK (for example, Rule Author), global variables may not be referred to directly in an RL function. For more information, see Section D.2, "Global Variables may not be Used in RL Functions". |
Do the following to define the showDecision function:
Click the Repository tab and load the CarRental dictionary.
Using the CarRental dictionary, select the Definitions tab.
Select RLFunction in the navigation tree. This shows the RLFunction Summary page.
Click Create.
Enter showDecision in the Name field.
Enter Show Decision in the Alias field.
|
Note: If you are defining a function in Rule Author, you must specify a valid alias in the Alias field, even though the actual function name (not the alias) must be used in the function body. |
Select void in the box in the Return Type field (this is the default value).
Click Create in the Function Arguments table.
Enter decision in the Name field.
Enter Decision made for driver in the Alias field.
Select Car rental decision, the alias for the Decision RLFact, in the box in the Type field.
In the Function Body box, enter the following:
DM.println( "Rental decision is " + decision.type + " for driver " + decision.driverName + " for reason " + decision.message);
Click Apply. This shows a confirmation message.
Click the RL Function node in the left navigation pane. You should see the RL function DM.showDecision in the summary table.
Click Edit to view the function (see Figure 3-5).
After creating the new RLFact Decision as specified in Section 3.3 and the new RLFunction DM.showDecision, you can update the UnderAge rule to provide an action that creates a new Decision fact. To use the Decision fact with the showDecision function, you need to create a new rule that checks for Decision facts and provides an action, using the showDecision function, to show the results.
To view the objects in a data model, including any classes or packages that you import, do the following:
Click the Repository tab and load the appropriate dictionary. For example, load the CarRental dictionary.
Click the Definitions tab to view the Definitions page.
Expand the Facts folder and click the JavaFact node in the navigation tree to display the JavaFact Summary page.
For the car rental sample this shows a table that includes the imported class carrental.Driver.
Click the edit icon to view the Java Fact Properties and Methods.

Table 3-2 JavaFact Summary Fields
| Field | Description |
|---|---|
|
Name |
The name of the Java Object. |
|
Alias |
The specified alias name for the Java Object that is shown in Rule Author lists. |
|
Visible |
This box specifies if the Java Object is shown in Rule Author lists. |
|
Support XPath Assertion |
This box implies you can use the class in XPath expressions to assert XML data into a rule session. |
Table 3-3 JavaFact Properties and Methods Fields
| Field | Description |
|---|---|
|
Visible |
Specifies that the property or method shows up in Rule Author lists. |
|
Expand |
Specifies that the superclass for a property or method that has a superclass shows up in Rule Author lists. |
|
Member Variable Name |
This is shown for Properties. Specifies the property name. |
|
Type |
Specifies the type for a property |
|
Alias |
This is a text field that you can modify to specify the business vocabulary for the property or object. The specified name is used when the object is shown in Rule Author drop down lists. |
|
Method Name |
This is shown for methods. |
|
Argument Type |
This is shown for methods. |
|
Return Type |
This is shown for methods. |
|
Note: Importing a Java class causes its super class and classes associated through fields and methods to be imported into the data model. The JavaFact Summary page table shows you the super class and the associated classes for any classes that you import. |
You can specify that properties, classes, or methods are visible or not visible in Rule Author selection boxes (the selection boxes that contain classes, properties, and methods are shown when you create rules on the Rulesets Tab).
|
Note: For the Java Fact How-To, you do not need to change the object chaining. |
To remove the visibility of a Java object, do the following:
At the top of the Java Fact page, use the Visible box to specify whether an object is visible (by default, objects are visible).
Deselect the Visible box to remove the object from Rule Author selection boxes.
Click OK on the Java Fact page.
To remove visibility of a Java property or method, do the following:
Deselect the a property or method in the in the Properties area or the Methods area on the Java Fact page to remove the property or method from Rule Author selection boxes.
Click OK on the Java Fact page.
You can specify that Rule Author selection boxes show the methods or properties one level above a specified method or property, in superclass chain, by selecting the Expand box for the method or property on the Java Fact page. The Expand box is shown in the Expand field of the Properties and Methods area. The Expand box is only shown when a method or property includes a superclass (Rule Author does not show the Expand box for primitive types).
Using the RL tab, Rule Author lets you view the RL Language text that represents the data model and the rule sets associated with the dictionary data.
To generate and view RL Language text, do the following:
Click the Repository tab and load a dictionary. For example, load the CarRental dictionary.
Select the RL tab.
Select the rule set of interest in the navigation tree.
Click Generate RL. This shows you the RL Language text for the specified ruleset.
Click Check RL Syntax to validate the RL Language text.
Two properties can be configured globally for an entire dictionary in Rule Author:
Advanced Test Expression
Logging
To configure these properties, access the Dictionary Properties page:
Make sure you are connected to a repository and a dictionary is loaded.
Click the Repository tab.
Click the Properties secondary tab (see Figure 3-6).
Figure 3-6 Rule Author Dictionary Properties Page
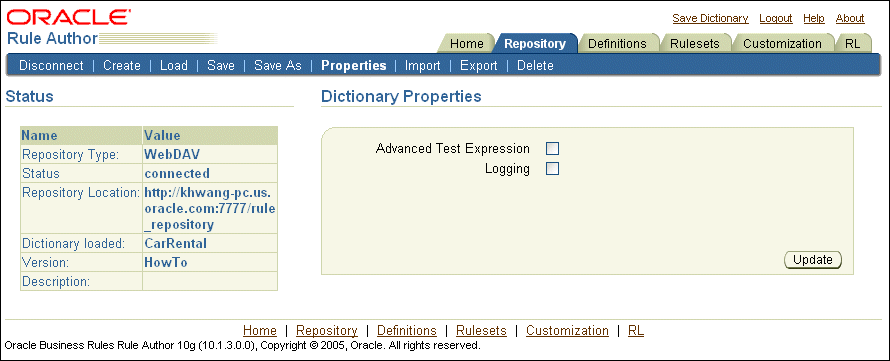
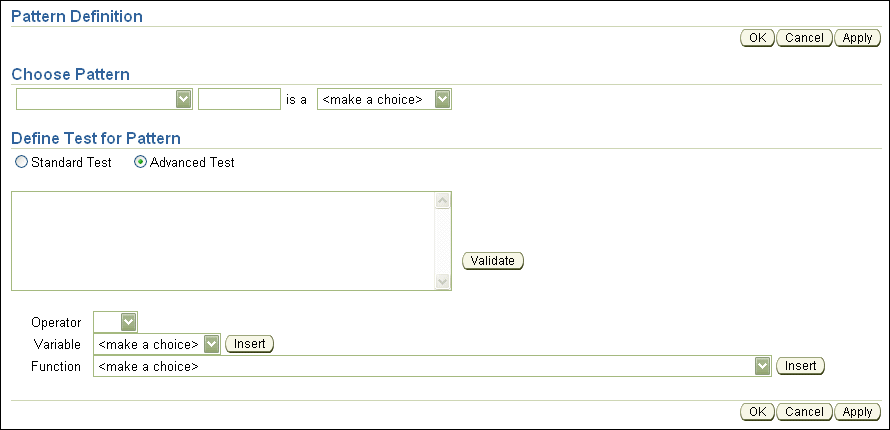
The Advanced Test Expression check box changes the Rule Author expression mode to advanced for test expressions displayed when you edit a pattern for a rule (see Figure 3-7). Tests in a rule's condition can involve mathematical operations and conjunctions. Rule Author includes the advanced expression mode to support defining such complex expressions.
When a pattern is first created, its test expression mode depends on the Advanced Test Expression property set on the Properties page. When you select the Advanced Test Expression check box, then the advanced test expression mode is applied to all new patterns. This setting persists when the dictionary is saved. In this case, when the dictionary is loaded, all patterns are created with Advanced mode. After a pattern is created, with or without a test, it is permanently associated with the test expression mode. Thus, the Test Expression mode of a pattern cannot be changed.
In a single rule, you can use both patterns created with basic expression mode and advanced expression mode.
Figure 3-7 Pattern Definition Advanced Test Expression Page
The Logging box specifies the logging options. This option is useful when you need to report a problem with Rule Author. To specify logging select the Logging check box and then select the following log file properties:
Log Level: Error is the lowest log level and generates the least amount of output, Status is the medium log level, and Trace is the highest log level, generating the most amount of output.
Use the Log Directory box to specify the directory for the log. Specifying the log directory in the Log Directory box is optional (if the directory is not set, the log is displayed on the console).
When the Log file name is specified, the log is saved in a file with the name <log_file_name>.<last_8_session_id>. For example, if you specified RALog as the name of your log file, and the last eight digits of your session ID are 11223344, the file RALog.11223344 would be created. If no log file is specified, the log is saved in a file named RuleAuthor.<last_8_session_id>.
Click Update when you are finished specifying your logging options.
This section shows you how to delete a version in a dictionary or delete an entire dictionary.
If you want to delete an individual dictionary version, do the following:
Click the Repository tab.
Click the Delete secondary tab.
If you want to delete a specific dictionary version, select a dictionary and version in the "Select dictionary version" section, then click Delete Version.
If you want to delete an entire dictionary (and all of its versions), select the dictionary in the "Select entire dictionary" section, then click Delete.
You can import a specific version of a dictionary or an entire dictionary into Rule Author. To do so:
Click the Repository tab.
Click the Import secondary tab.
If the dictionary you want to import resides locally, use the section in the first bullet to specify its location. You can manually enter the path to the dictionary or click the Browse button and select the dictionary.
If the dictionary you want to import resides on a different machine (where the Rule Author is running), you must specify the full path to the dictionary on that server.
Click Import.
To export an entire dictionary:
Click the Repository tab.
Click the Export secondary tab.
In the "Select entire dictionary" section:
In the Dictionary field, select the dictionary you want to export.
In the File Location field, specify the location and filename (absolute file path on the server) to which you want to export the dictionary.
Click Export.
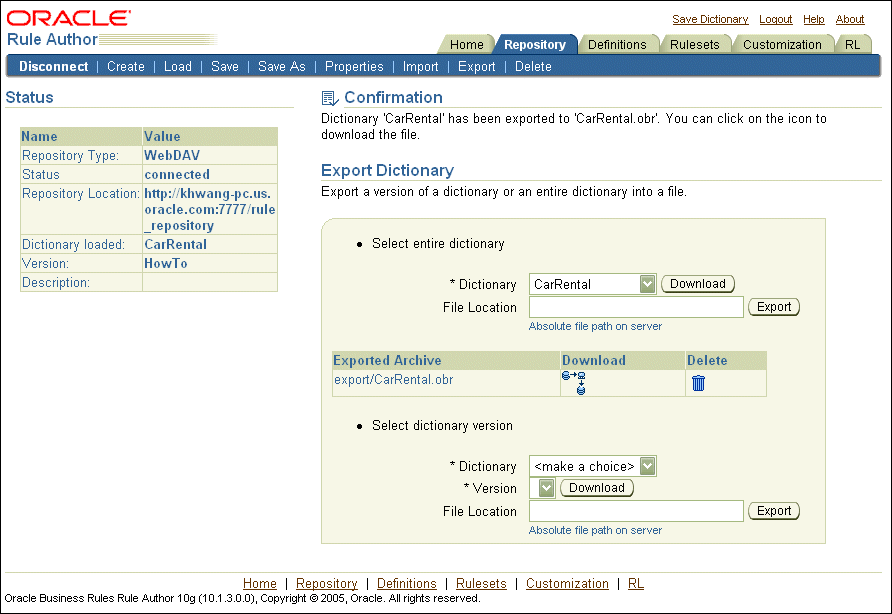
You can also select the dictionary and click Download, which creates a link to the exported archive on the Export Dictionary page. You can then click the link and use your browser to download the archive to a location of your choice (see Figure 3-8).
Figure 3-8 Rule Author Export Dictionary Page Showing the Download Option
To export a specific dictionary version:
Click the Repository tab.
Click the Export secondary tab.
In the "Select dictionary version" section:
In the Dictionary field, select the dictionary you want to export.
In the Version field, select the dictionary version you want to export.
In the File Location field, specify the location and filename (absolute file path on the server) to which you want to export the dictionary.
Click Export.
You can also select the dictionary and version and click Download, which creates a link to the exported archive on the Export Dictionary page. You can then click the link and use your browser to download the archive to a location of your choice (see Figure 3-8).
The Test Rulesets feature in the Rule Author is designed to allow you to write RL functions that test the rule sets created in Rule Author. The selected rule set and its associated data model are inserted into a Rule Session where a user-defined function is called which uses the rule set.
To use the Test Rulesets feature in Rule Author:
Create a rule set you want to test. If the data model includes any Java classes, the Java classes must be included in the OC4J classpath. The easiest way to do this is to put the JAR files in the following directory, then restart OC4J:
$ORACLE_HOME/j2ee/home/applications/ruleauthor/lib
You can also include the Java classes as a shared library. This allows Rule Author to share the classes with other applications. To do this, login to Enterprise Manager and perform the following:
Navigate to the OC4J:home page.
Click the Administration tab.
Find the Shared Libraries node under the Properties node and click the icon in the Go to Task column.
Click Create, enter the library name and version number, then click Next.
Click Add, navigate to the location of the JAR file, then click Continue.
Click Finish to return to the Shared Libraries page.
Find and click the link to the library you just created. Copy the absolute path to the archive.
Return to the OC4J:home page.
Click the Applications tab.
Click the link to the Rule Author application (this was defined when you first deployed the Rule Author application).
Click the ruleauthor module link.
Click the Administration tab.
Find the Configuration Properties node and click the Go to Task icon.
In the Classpath field, paste the absolute path to the archive which you copied in Step g, then click OK.
In the resulting confirmation message, click the Restart link to restart Rule Author.
Create a function that has some print statements to indicate the execution of the function. In this example, a function called DM.test is created:
Click the Definitions tab.
Click the RLFunctions node in the navigation tree.
Enter DM.test in the Name and Alias Fields.
Leave void as the return type.
Enter the following in the Function Body field:
java.text.SimpleDateFormat sdf =
   new java.text.SimpleDateFormat( "MM/dd/yyyy" );

assert (new carrental.Driver( "d111", "Dave", 50, "sports", "full",
                               sdf.parse ("10/1/1969"), 0, 1, true ));
assert (new carrental.Driver( "d222", "Abe", 15, "truck", "provisional",
                               sdf.parse ("8/1/2004"), 0, 0, true ));
assert (new carrental.Driver( "d333", "Lance", 44, "motorcycle", "full",
                               sdf.parse ("6/1/2004"), 0, 1, true ));

pushRuleset ("vehicleRent");
run();
This function asserts several facts, pushes the vehicleRent rule set onto the rule set stack, and calls run().
|
Note: All rule sets you want to have executed must be pushed onto the stack. They are not automatically pushed simply by selecting them. |
If you wanted to enable logging, you could call the watchFacts() and watchActivations() functions.
Click OK.
Save the dictionary.
Click the RL tab.
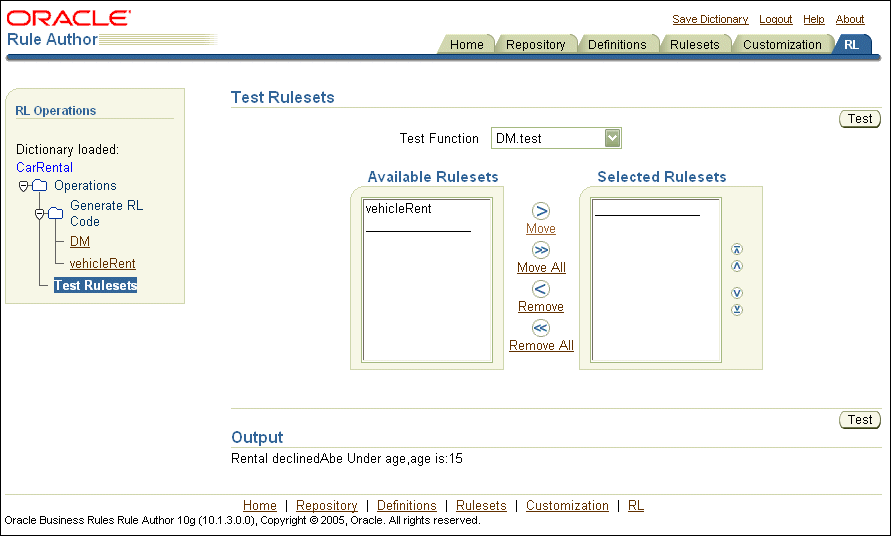
Click the Test Rulesets node in the navigation tree. This displays the Test Rulesets page.
Figure 3-9 Rule Author Test Rulesets Page
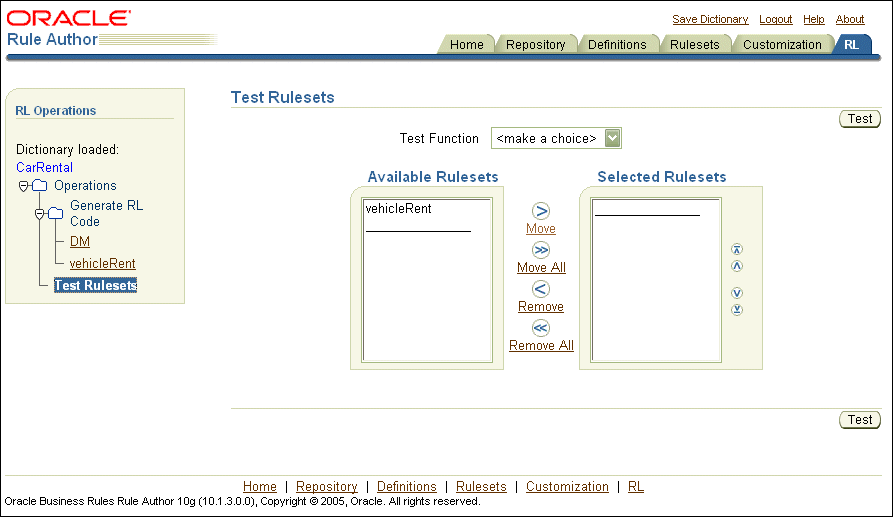
You can see the vehicleRent rule set is available. This rule set was created in Chapter 2.
Select the vehicleRent rule set and move it to the Selected Rulesets column.
Select the DM.test function from the Test Function list.
Click Test.
RL code is generated for the selected rule set(s), which is then inserted into a Rule Session. Then, the selected test function is called. Output from the function is printed on the screen (see Figure 3-10).
Figure 3-10 Rule Author Test Rulesets Page with Output
A rule enabled program usually invokes rules with the following steps:
Pass objects to the rule engine to be asserted as facts.
Run rules.
Obtain results produced from rules that fired.
This section describes the best practices for using an RL function to encapsulate invoking rules. This section covers three techniques for invoking rules; the techniques differ primarily in the details required to obtain results. This section uses a sample RL function named getSubscribers. Using this routine, each approach for invoking rules looks identical from the point of view of the rule enabled program that calls the getSubscribers.
This section covers the following:
The examples in this section show a highway incident notification system. These examples show the different approaches to access the results of rule engine evaluation. The examples use two Java classes: traffic.TrafficIncident and traffic.IncidentSubscription.
|
Note: Thetraffic.* sample classes are not included in the Oracle Business Rules distribution.
|
The TrafficIncident class represents information about an incident affecting traffic and contains the following properties:
Which highway
Which direction
Type of incident
Time incident occurred
Estimated delay in minutes
The IncidentSubscription class describes a subscription to notifications for incidents on a particular highway and contains the following properties:
Subscriber - the name of the subscriber
The highway
The direction
In the example using these classes, when an incident occurs that affects traffic on a highway, a TrafficIncident object is asserted and rule evaluation determines to whom notifications are sent.
In the examples, the sess object is a RuleSession and a number of incident subscriptions are asserted. As a simplification, it is assumed that the TrafficIncident objects are short lived. They represent an event that gets asserted and only those subscribers registered at that time are notified.
Using a global variable to accumulate results is a best practice, this approach yields simpler rule conditions than the following approaches.
Example 3-1 shows the getSubscribers function asserts a TrafficIncident, initializes a global variable with a Map, invokes the Rules Engine, and returns the result Map.
Example 3-1 Obtaining Results with a RLFunction that Accesses a Global Variable
Map alerts = null;

function getSubscribers(TrafficIncident ti) returns Map {
   try {
      alerts = new HashMap();
      assert(ti);
      run();
      return alerts;
   } finally {
      retract(ti);
      alerts = null;
   }
}
rule incidentAlert {
   if (fact TrafficIncident ti &&
      fact IncidentSubscription s &&
      s.highway == ti.highway &&
      s.direction == ti.direction) {
         alerts.put(s.subscriber, ti);
      }
   }
}
Example 3-2 shows Java code that invokes getSubscribers and prints out the results.
Example 3-2 Sample Showing Results with Global Variable
// An accident has happened
TrafficIncident ti = new TrafficIncident();
ti.setHighway("I5");
ti.setDirection("south");
ti.setIncident("accident");
ti.setWhen(new GregorianCalendar(2005, 1, 25, 5, 4));
ti.setDelay(45);

Map alerts = (Map)sess.callFunctionWithArgument("getSubscribers", ti);
Iterator iter = alerts.keySet().iterator();
while(iter.hasNext()) {
   String s = (String)iter.next();
   System.out.println("Alert " + s + " : " + alerts.get(s));
}
In this approach, one or more objects are asserted into working memory to act as a container for results. The RL code that asserts the objects keeps the references handy. As rules fire, they can add results to the containers. A container object could be one of the Java Collection classes or it could be some application specific container object. When rule evaluation is complete the container objects can be inspected to access the results.
Example 3-3 uses a java.util.Map and shows that the subscriber (key) and the incident (value) are added to the map. The getSubscribers function asserts the Map and a TrafficIncident, invokes the Rules Engine, and returns the result Map.
|
Note: TheMap is not reasserted even though it has been updated. In general, when an object that is being reasoned on is updated, it should be re-asserted. This use case represents an exception to that rule. The map, alerts, is just a container for results and its contents are not involved in the reasoning. Thus, it is okay not to re-assert it.
|
Example 3-3 Obtaining Results with a Container Object
function getSubscribers(TrafficIncident ti) returns Map {
   Map alerts = new HashMap();
   try {
      assert(alerts);
      assert(ti);
      run();
      return alerts;
   } finally {
      retract(alerts);
      retract(ti);
   }
}
rule incidentAlert {
   if (fact TrafficIncident ti &&
      fact IncidentSubscription s &&
      s.highway == ti.highway &&
      s.direction == ti.direction &&
      fact Map alerts) {
         alerts.put(s.subscriber, ti);
      }
   }
}
Example 3-2 shows Java code that invokes getSubscribers and prints out the results.
In this approach, one or more objects are asserted into the rules engine working memory and the object references are retained in RL (in the getSubscribers function). Rule evaluation updates one or more of these objects. These objects are inspected after rule evaluation to determine the results.
In Example 3-4 the TrafficIncident class is modified to keep a java.util.Set of subscribers that need to be notified. Since the TrafficIncident object is being reasoned on, it is re-asserted. To avoid an infinite loop of rule firings for the same subscription, you need to use the subscribed method to test for matched incidents; this method prevents looping. The subscribed method returns true if a subscriber has already been added to the matched TrafficIncident. This is a common idiom in rules programming; a rule action updates a fact that is being reasoned on and, to avoid unwanted additional firings, you add a test to the condition that checks for the absence of that update.
Example 3-4 shows getSubscribers function asserts a TrafficIncident, invokes the Rules Engine, and creates and returns the result Map.
Example 3-4 Obtaining Results with a Reasoned On Object
function getSubscribers(TrafficIncident ti) returns Map {
   try {
      assert(ti);
      run();
      Map alerts = new HashMap();
      for (Iterator iter = ti.subscribers(); iter.hasNext(); ) {
         alerts.put(iter.next(), ti);
      }
      return alerts;
   } finally {
      retract(ti);
   }
}
rule incidentAlert {
   if (fact TrafficIncident ti &&
      fact IncidentSubscription s &&
      s.highway == ti.highway &&
      s.direction == ti.direction &&
      !ti.subscribed(s.subscriber)) {
         ti.addSubscriber(s.subscriber);
         assert(ti);
      }
   }
}
Example 3-2 shows Java code that invokes getSubscribers and prints out the results.