|
Oracle® Business Rules User's Guide
10g Release 3 (10.1.3) B15986-01 |
|
 Previous |
 Next |
|
Oracle® Business Rules User's Guide
10g Release 3 (10.1.3) B15986-01 |
|
 Previous |
 Next |
This chapter provides a tutorial introducing Oracle Business Rules Rule Author (Rule Author). This chapter shows you how to start Rule Author, create a data model, and create and save rules. This chapter also shows you how to create a sample Java application that runs with the Rules Engine.
In this guide we use a car rental sample to illustrate how to work with Rule Author. In the car rental sample, driver data specifies driver information and the business rules determine if a rental company service representative should decline to rent a vehicle due to driver age restrictions. Using this example you create one rule, the UnderAge rule (the rule is specified according to rental company business rules).
This chapter covers the following:
If you are using Oracle Application Server, you must first create a user with appropriate privileges before you can start and use Rule Author. To do this:
|
Note: These instructions assume that the container is configured with the JAZN XML provider. If it is not, you should refer to the appropriate security documentation for information on creating users. |
Using Application Server Control, go to the OC4J instance where Rule Author was deployed.
Click the Administration tab.
In the "Task Name" column, find the "Security Providers" task and click the "Go to Task" icon in the corresponding row.
Click Instance Level Security.
Click the Realms tab.
In the table in the "Results" section, click the number in the "Roles" column to add a role.
Click the Create button.
In the "Name" field, enter rule-administrators, then click OK.
Click the Instance Level Security link near the top of the page (in the navigation trail) to return to the Instance Level Security page.
In the table in the "Results" section, click the number in the "Users" column to add a user.
Click the Create button.
In the "Name" field, enter the name you want to use to login to Rule Author (for example, ruleadmin). Enter and confirm the password for this user. In the "Assign Roles" section, double-click or use the arrows to assign the rule-administrators role to this user. When you are finished, click OK.
|
Note: In order to Rule Author authentication to work, the Rule Author user must belong to therule-administrators role.
|
Restart the Rule Author application.
Start Rule Author by entering the URL for the home page. The URL for the home page typically includes the name of the host computer and the port number assigned to the application server during the installation, plus the path of the Rule Author home page. For example:
http://myhost1.mycompany.com:7777/ruleauthor/
|
Note: The port number assigned to Oracle Application Server can be found in thereadme.txt file located in the $ORACLE_HOME/install directory.
|
Figure 2-1 shows the Rule Author login page. Specify the user name and password you supplied when you created the Rule Author user (Section 2.1, "Creating a Rule Author User").
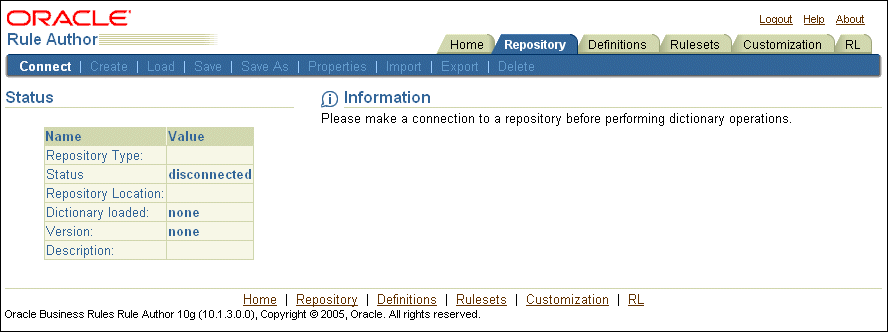
After logging in, you should see the Rule Author Repository Connect page (see Figure 2-2). You must connect to a repository before you can perform any operations. See Section 2.4.1, "Connecting to a Rule Author Repository" for more information.
Figure 2-2 Initial Rule Author Repository Connect Page
Click Logout to go to the Logout Confirmation page. On this page, click either Logout to log out of Rule Author, or Save and Logout to save your changes and log out of Rule Author. After doing so, you must log back in to Rule Author (Figure 2-1).
Click Help to access online help for the Rule Author.
Click About to view version and build information about the Rule Author (Figure 2-3). Click OK to dismiss this window.
Click the Home tab to access the Rule Author home page (Figure 2-4). The home page contains two panes: the top pane shows the tabs and the bottom pane contains content for the currently selected tab.
To work with Rule Author you need to start with a dictionary. Rule Author stores rules and their associated definitions in a dictionary. To create or save a dictionary, you must first connect to a repository that stores the dictionary. As shipped, Rule Author supports two types of repositories: WebDAV (Web Distributed Authoring and Versioning) repository and file repository. In this section you create and save a dictionary for the car rental How-To.
The example in this chapter saves the dictionary to a WebDAV repository.
|
Note: To create the dictionary shown in this chapter, you can either create a new dictionary, using either a WebDAV repository or a file repository, or you can load the completed dictionary from theCarRepository file repository in the /dict directory supplied with the car rental sample How-To.
See Section 2.4.2, "Creating a Rule Author Dictionary" for instructions on how to do this. |
Using Oracle Business Rules, a dictionary stores rules and the data model associated with the rules. You create and save dictionaries in a repository.
|
Note: Regardless of whether you choose to use a WebDAV or file repository, the repository must exist before you can connect to it. Rule Author does not create the repository for you.See Appendix B, "Using Rule Author and Rules SDK with Repositories" for more information. |
To connect to a repository, do the following:
Click the Repository tab.
Click the Connect secondary tab.
Select the WebDAV repository type in the Repository Type field.
Enter the URL to the WebDAV repository (see Figure 2-5). The URL must be in the form:
http://www.fully_qualified_host_name.com:7777/repository_name
|
Note: In order for authentication to work, you must use a fully qualified host name in the URL. |
Figure 2-5 Rule Author WebDAV Repository Connect Page
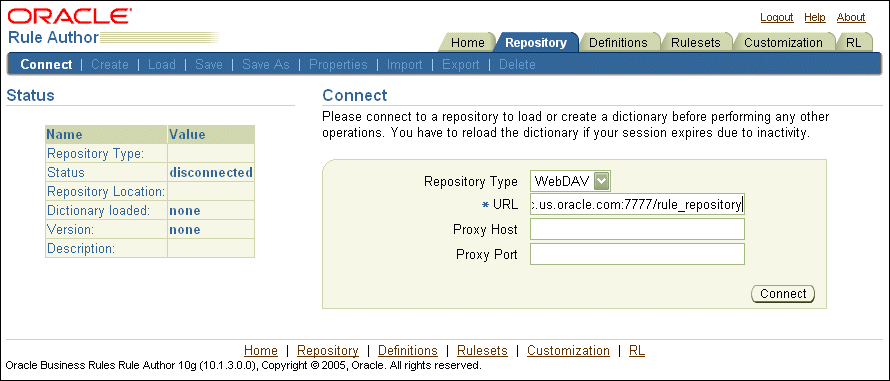
See Section B.1, "Working with a WebDAV Repository" for information on how to setup a WebDAV repository.
If you have a proxy server between the server on which Rule Author is running and the WebDAV server, specify the name and port number of the proxy server.
Click Connect.
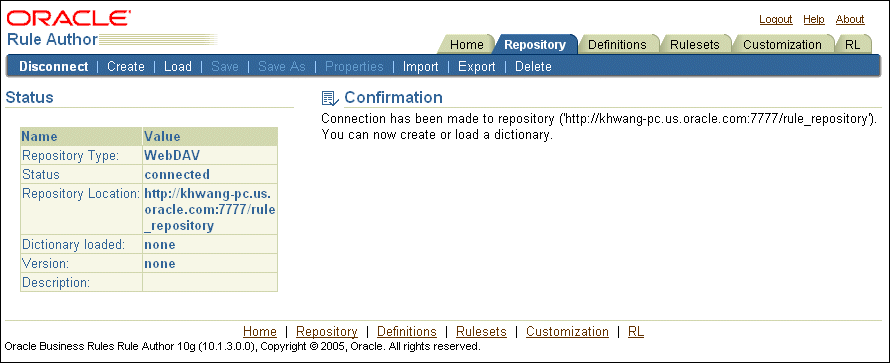
If you connect successfully, a confirmation message is displayed (see Figure 2-6).
|
Note: For file repositories, only one user may edit the repository at any given time, regardless of the number of dictionaries stored in the repository. For WebDAV repositories, a single user may edit multiple dictionaries simultaneously. |
Figure 2-6 Rule Author Repository Connect Page with Confirmation
A Rule Author dictionary is the top-level container and the starting point for working with Rule Author. A dictionary usually corresponds to the rules portion of an application.
|
Note: It is not safe for multiple users to edit the same dictionary. |
To create a dictionary, do the following:
Connect to a repository from the Repository tab.
Click Create.
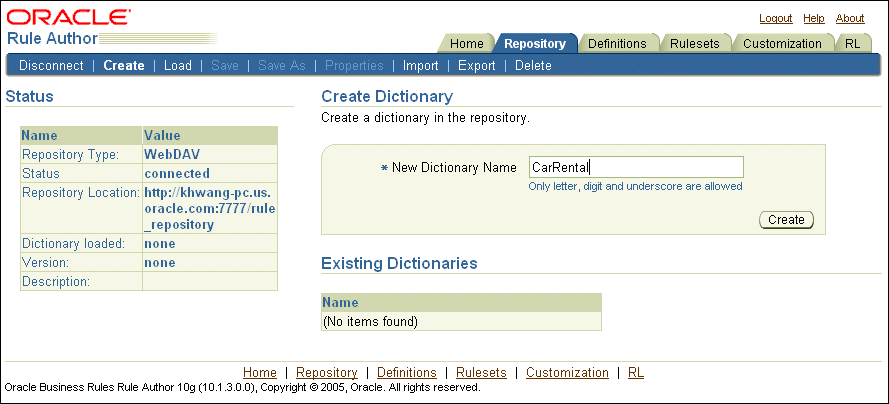
Enter the dictionary name in the New Dictionary Name field. For this example enter CarRental (see Figure 2-7).
Click Create. After you click Create, Rule Author shows a status message.
Figure 2-7 Rule Author Create Dictionary Page
|
Note: In addition to creating your own dictionary, you can also use the completed car rental dictionary that is supplied with the car rental sample How-To. This dictionary is located in theCarRepository file repository in the /dict directory:
|
If you want to save to a different dictionary name or specify a version for the current dictionary, use Save As as follows:
Click the Repository tab.
Click the Save As secondary tab.
Enter a dictionary name in the Dictionary field, for example CarRental.
To specify a version, enter a version in the Version field. For example HowTo (see Figure 2-8).
Click Save As. After clicking Save As, you should see a confirmation message.
|
Note: Rule Author does not allow you to use Save As to overwrite a dictionary with the same name and version. If you want to overwrite a dictionary with the same name and version, do one of the following:
BUG 4864714 |
To prevent data loss, you should periodically save the dictionary. To save a dictionary, do one of the following:
Click the Repository tab, then click the Save secondary tab.
Click the Save Dictionary link at the top of the page.
After performing either of the preceding actions, click Save on the Save Dictionary page. After clicking Save, you should see a confirmation message in the status area. For example:
Dictionary 'CarRental(HowTo)' has been saved
|
Note: You should save the dictionary periodically as you work since Rule Author sessions time out after a period of inactivity. |
Before working with rules you need to define a data model. A data model contains business data definitions for facts or data objects used in rules, including: Java class fact types, XML fact types, and RL Language fact types (to simplify the discussion in this section, we refer to Java fact types as Java facts). In this section you only work with Java facts.
This section covers the following topics:
The Java Car Rental How-To includes the car-objs.jar file in the $HowToDir/lib directory. This jar file includes the Driver class for the car rental sample. The Java source for the Driver object is available in the directory $HowToDir/src/carrental.
Before you can import Java facts into a data model you need to make the classes and packages that contain the Java facts available to Rule Author. To do this use Rule Author to specify the classpath that contains the Java classes. For example, to add the classpath for the Java class Driver, do the following:
Click the Repository tab.
On the Load dictionary page, select the CarRental dictionary and HowTo version, then and click Load (skip this step if you just created the dictionary).
Click the Definitions tab. The navigation tree shows the Definitions folder that contains the available definitions. Nothing is shown in the main pane.
|
Note: Using Rule Author, the bottom pane usually contains a navigation tree and a content area (the main pane). With the Definitions tab selected, the Definitions folder is shown at the top of the tree. |
The Definitions folder in the tree contains the Facts folder that includes the available fact types: JavaFact, XMLFact, and RLFact.
Click JavaFact to view the JavaFact Summary page (see Figure 2-9).
Figure 2-9 Rule Author Definitions Java Fact Summary Page
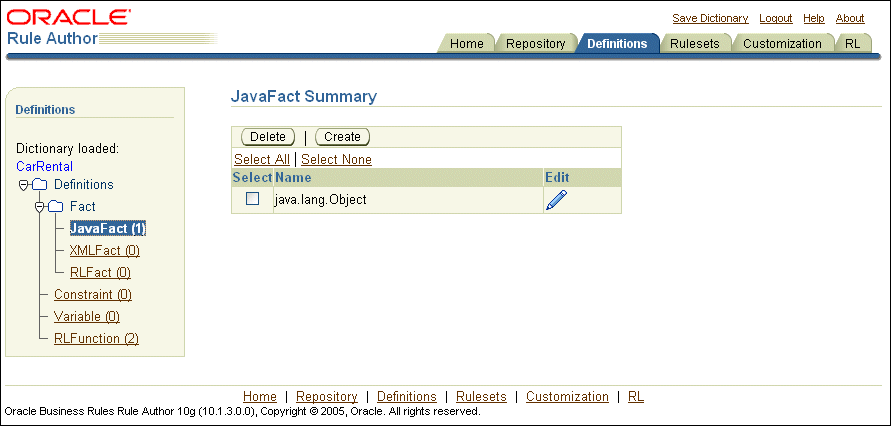
Click Create. This shows the Class Selector page.
On the Class Selector page, the User Classpath field lets you add a classpath. For example, for the car rental sample enter the following in the User Classpath field:
$HowToDir/lib/car-objs.jar
Where $HowToDir is the directory where you installed the Java Car Rental How-To.
Click Add. This updates the Current Classpaths field and adds the carrental package to the Classes box (see Figure 2-10).
Figure 2-10 Rule Author JavaFact Class Selector Page
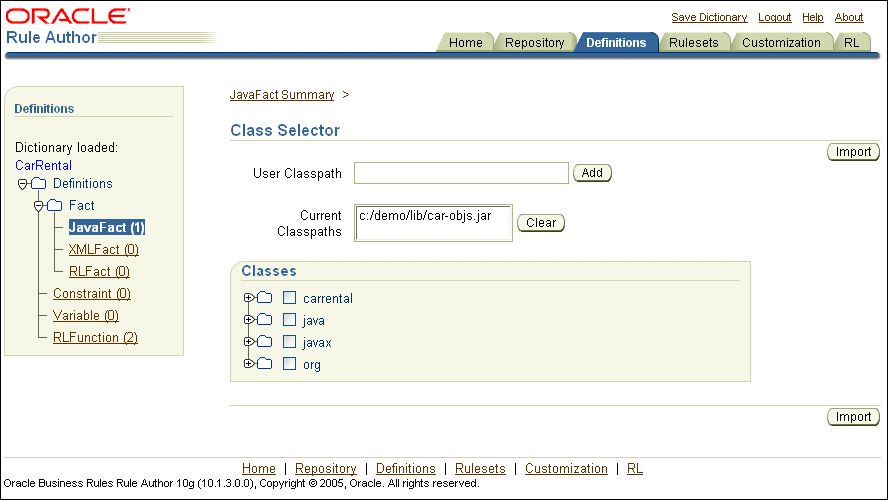
Next you need to select the desired Java classes to import into the data model from the Class Selector page. To add the Driver class to the data model, do the following:
Click the Definitions tab to view the Definitions page.
Click the JavaFact folder in the navigation tree.
Click Create on the JavaFact Summary page. This shows the Class Selector page.
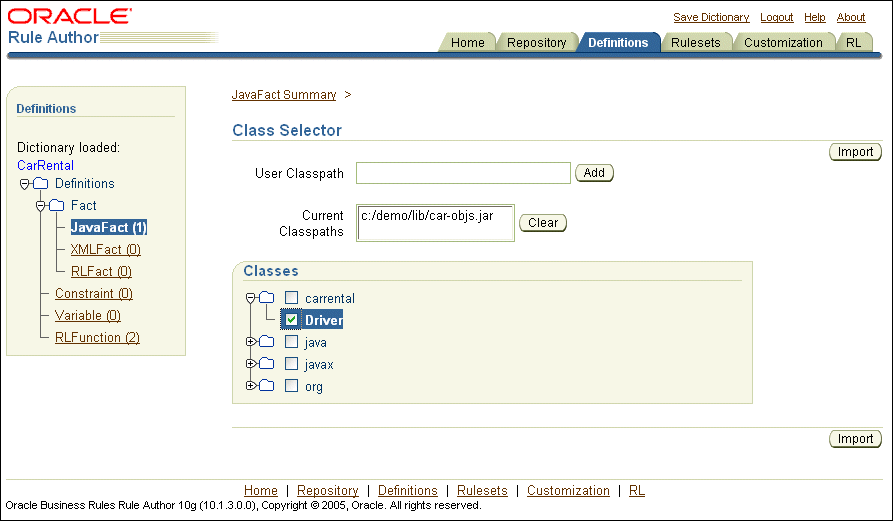
In the Classes box on the Class Selector page, expand the carrental node and select the Driver check box (see Figure 2-11).
Click Import.
Rule Author shows a confirmation message:
1 class or package has been imported.
|
Note: After a class is imported the class selector page shows the class in bold. |
Figure 2-11 Rule Author JavaFact Class Selector Page
Notes for specifying the user classpath and importing Java classes to Rule Author:
Using Rule Author, importing a Java Fact means the same thing as a Java import statement. That is, the classes and their methods become visible to Rule Author. Rule Author does not copy the Java code into the data model or into the dictionary.
The Class Selector page includes the Classes box that shows the Java classes available from the current classpaths.
The default Rule Author classpath includes three packages, java, javax, and org. These packages contain classes that Rule Author lets you import from the Java runtime library (rt.jar). Rule Author does not let you remove these classes from the Classes area (and the associated classpaths are not shown in the Current Classpaths field).
If you wish to assign or compare two objects that are not of the same type but are related by inheritance, you must import both classes to be compared and all classes between them in the inheritance hierarchy. For example, if you wish to assign an ArrayList to a variable of type Object, you must import ArrayList, AbstractList, and AbstractCollection into the data model. Otherwise, type-checking will not work correctly and expressions will not validate.
Classes and interfaces used in Rule Author must follow the following rules:
If you are using a class or interface and its super class, the super class must be declared first.
If you are using a class or interface, only its superclass or one of its implemented interfaces may be mentioned.
For more information, see Section D.6, "Preserving Class Order and Hierarchies in the Data Model".
The Classes box navigation tree is rendered on demand (to improve performance). Thus, a child node is rendered only if its parent node is expanded. It is a good practice to keep only the nodes of interest expanded.
On Windows systems, you can use a "\" to specify the User Classpath. Rule Author accepts either path separator. For example, you can use the following: $HowToDir\lib\car-objs.jar.
Where $HowToDir is the directory where you installed the How-To.
In the User Classpath you can specify a JAR file, a ZIP file, or a full path for a directory.
When you specify a directory name for the User Classpath, the directory specifies the classpath that ends with the directory that contains the "root" package (the first package in the full package name). Thus, if the User Classpath specifies a directory, Rule Author looks in that tree for directory names matching the package name structure.
For example, if you want to import a class cool.example.Test1, located in c:\myprj\cool\example\Test1.class to the data model, you should specify the User Classpath value, c:\myprj.
Do not use RL reserved words in Java package names. For more information, see Section D.8, "Using RL Reserved Words as Part of a Java Package Name".
While working on the data model from the Definitions tab and when you complete your work you should save the dictionary.
To save your definitions to the dictionary, do the following:
Click the Save Dictionary link.
Click Save on the Save Dictionary page.
Click the Definitions tab to return to the definitions page.
The business vocabulary allows business analysts, working with Rule Author to create rules using familiar names rather than using a Java package name, class name, method name, or member variable name. You use the Rule Author aliases feature to specify the business vocabulary. In this step you only need to define the business vocabulary for the business objects that you expect to use in rules. In addition, you can use the Rule Author Visible box to specify the properties and methods that show up in Rule Author lists when you create rules from the RuleSets tab.
This section covers the following topics:
To specify the business vocabulary for Java Fact definitions, do the following:
Click the Definitions tab to view the Definitions page.
Click the JavaFact node in the navigation tree to display the JavaFact Summary page. For the car rental sample this shows a table that includes the imported class carrental.Driver.
Click the edit icon to view the JavaFact Properties and Methods for carrental.Driver.
For the name, carrental.Driver, enter the alias, DriverData in the Alias field (this Alias field is at the top of the page, under the Name field).
For the age entry in the Properties table, specify the desired alias. For example, enter DriverAge in the Alias field.
For the name entry in the Properties table, specify the desired alias. For example, enter DriverName in the Alias field.
Click OK to save your changes and return to the JavaFact Summary page.
|
Note: Be sure to click either OK or Apply after making changes. If you do not, Rule Author does not save your changes. |
To specify the business vocabulary for an RL Language function, do the following:
Click the Definitions tab to view the Definitions page.
Click RLFunction in the Definitions folder in the navigation tree to display the RLFunction Summary page. For the car rental sample, this shows a table that includes the functions, DM.assertXPath and DM.println.
For the DM.println function, click the edit icon to view details.
In the Alias field, under the Name field, enter an alias. For example, enter PrintOutput in the Alias field.
|
Note: There is also an Alias field in the Function Arguments table. For this example, do not change the alias field in the function argument area. |
Click OK to save your changes and return to the RLFunction Summary page.
To specify whether properties or methods are visible in Rule Author lists, do the following:
Click the Definitions tab to view the Definitions page.
Click the JavaFact node in the navigation tree to display the JavaFact Summary page. For the car rental sample this shows a table that includes the imported class carrental.Driver.
Click the edit icon to view the JavaFact Properties and Methods for carrental.Driver.
For each entry in the Properties table, specify the desired visibility using the Visible checkbox. For this example, only the member variables age and name need to be visible.
Click OK to save your changes and return to the JavaFact Summary page.
|
Note: Modifying the visibility indicators for a particular property or method may cause dependent definitions or rules to display incorrectly. If this occurs, mark any non-visible properties or methods causing the problem as visible. |
In this section you define a rule for the car rental sample and see the basic steps for creating rules with Rule Author.
This section covers the following topics:
Before you can create a rule using Rule Author, you need to create a rule set. A rule set is a container for rules.
To create a rule set, do the following:
Click the Rulesets tab.
Click the RuleSet node in the navigation tree.
On the Ruleset Summary page, click Create. This displays the Ruleset page.
Enter text in the Name field. For example, enter vehicleRent in the Name field.
|
Note: Rule Author enforces a limitation for the name of a rule set; a rule set name can only contain letters (a-z and A-Z), numbers (0-9), and the underscore (_) character. |
Optionally enter a description for the rule set in the Description field (see Figure 2-12).
Click OK to create the vehicleRent rule set and exit the Ruleset page. After you click OK, the new rule set is visible in the navigation tree under RuleSet.
Save the dictionary.
After creating a rule set you can create rules within the rule set. In this section, you will create a rule called UnderAge. This rule will test for the following:
If the driver's age is younger than 21, then decline to rent
The UnderAge rule contains a single pattern for the Rules Engine to match, and a test that is applied to the pattern.
The following actions are associated with the UnderAge rule:
Print the text, "Rental declined", the name of the driver matched and the message, "Under Age, age is: " and the driver's age.
Retract the matched driver object.
To use Rule Author to add the UnderAge rule, do the following:
Click the Rulesets tab. The navigation pane displays the RuleSet folder that contains the vehicleRent rule set that you created in the section, "Creating a Rule Set for the Car Rental Sample".
Click the vehicleRent folder in the tree. This displays the Ruleset page, with a table listing rules (see Figure 2-13).
|
Note: If this is the first rule you create then the Rules table is empty. |
Figure 2-13 Rule Author Ruleset Page Showing the Table of Rules
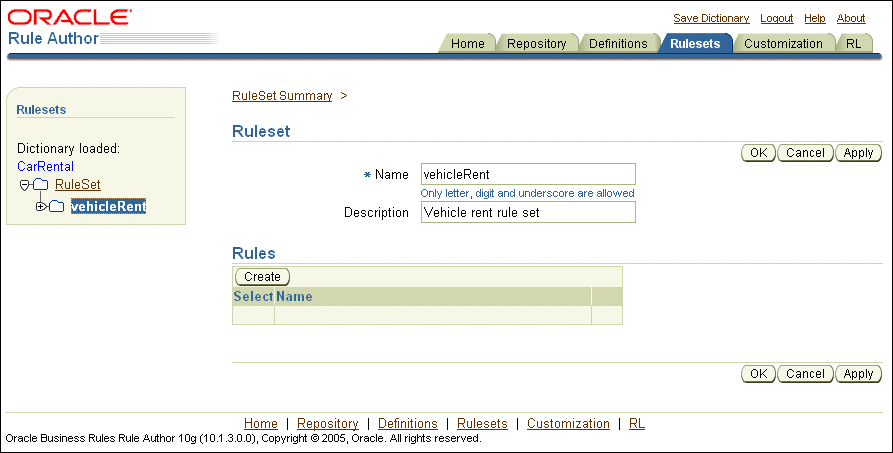
Click Create. This displays the Rule page.
Enter UnderAge in the Name field.
Do not change the default value, 0, in the Priority field.
|
Note: The Priority field determines the rule priority. Rule priority specifies which rule to act upon, and in what order, if more than one rule applies within a rule set. Often in applications that use rules, the rules in a rule set are applied in any order until a decision is reached, and setting the rule priority is not required. |
|
See Also: Oracle Business Rules Language Reference Guide for more information on working with rule priority. |
Enter Under age rule in the Description field (see Figure 2-14).
When the Rules Engine runs it checks the facts against rule patterns to find matching patterns. You need to add a pattern for the UnderAge rule. Do the following to add a pattern to a rule:
Click New Pattern in the If box on the Rule page. This brings up the Pattern Definition page which contains two areas: Choose Pattern and Define Test(s) for Pattern (see Figure 2-15).
|
Note: If the Pattern Definition page does not appear, you may have popup blocking enabled on your browser. Popup blocking must be disabled in order to use Rule Author. |
Figure 2-15 Rule Author Pattern Definition Page
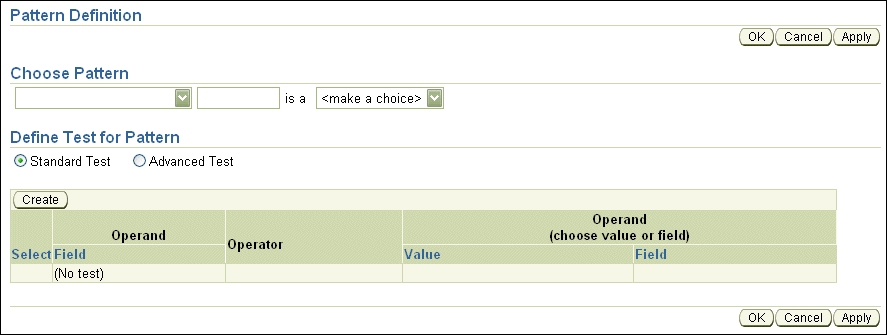
Under Choose Pattern, in the first box select the first choice (this shows no value in the selection box)
This box specifies that the rule should fire each time there is a match (for all matching drivers). One alternate value, There is at least one case, selects one firing of the rule if there is at least one match (one such driver). The value There is no case specifies the rule fires once if there are no such matches (no matching drivers).
The next text area under Choose Pattern lets you enter a temporary name for the matched fact. Enter driver in this field (this defines the "pattern bind variable name").
This value lets you test multiple instances of the same type in a single rule. For example, the pattern bind variable lets you compare a match for a driver with other drivers, using the specified name, in a comparison such as driver1.age > driver2.age.
The third box contains the text, <make a choice>. This box shows the available fact types from the data model. In this box select DriverData (if you did not define an alias for this in the data model, then this is carrental.Driver).
Click OK or to save the pattern definition and return to the Rule page.
Click OK on the Rule page to save the rule.
|
Note: Changes made to the pattern are not added to the rule until you click OK or Apply on the Rule page. If you navigate to a different rule set or select a different tab before you click OK or Apply, Rule Author discards the pattern definition. |
Save the dictionary.
Without any tests defined on the pattern, the action which you define would apply to all drivers. To define tests for patterns, continue on the Pattern Definition page, as shown in, Section 2.7.2.3.
To add a test for a pattern, do the following:
From the Rulesets tab, in the navigation pane click the rule that you want to add a test. For this example, click the UnderAge rule in the navigation pane.
In the If box, click the pencil icon to display the Pattern Definition page. The Pattern Definition page contains two areas: Choose Pattern and Define Test(s) for Pattern.

On the Pattern Definition page, select the Standard Test button, then click Create (see Figure 2-16).
Figure 2-16 Rule Author Rule Pattern Definition Page with Define Tests for Pattern Fields
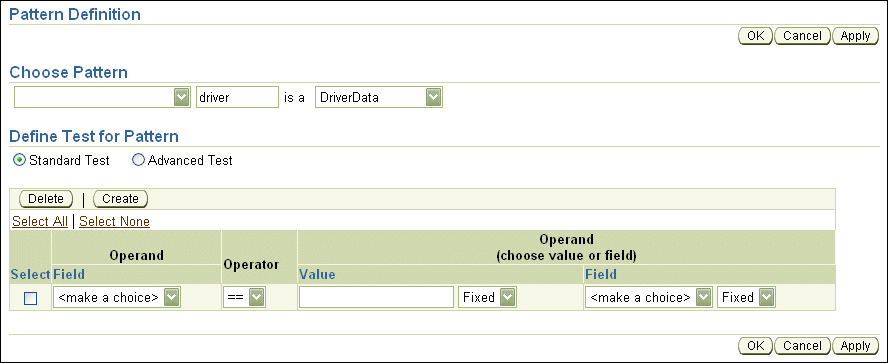
Standard pattern testing is only valid for AND expressions. Additionally, no grouping is allowed, and functions with parameters are not allowed. However, the use of constraints is allowed for customization. Advanced pattern testing does not have the restrictions of standard pattern testing, but the use of constraints is not allowed. Advanced expressions are not directly RL Language because aliases are used instead of variable names.
For more information, see Section 3.7.1, "Using the Advanced Test Expression Option".
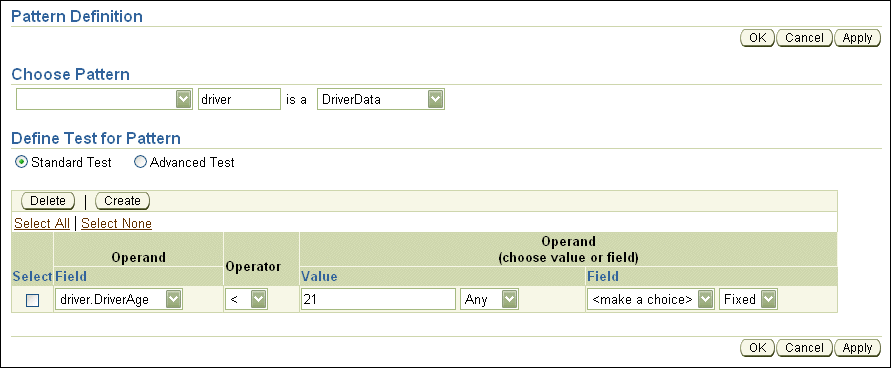
In the Operand column, from the Field box, select driver.DriverAge (if you did not define an alias for this member variable in the data model, then this is driver.age).
In the Operator column, select < (less than).
In the Operand column, in the Value box enter 21. Do not enter a value in the Field box.
Next to the Value and Field boxes is a drop-down list containing the fixed values Any and Fixed (see Figure 2-17).
These values are called constraints, and they are used to enable or disable customization for this field. Use the value Fixed to make the field read-only, which specifies that no customization is allowed for this field. Select the value Any to specify that Rule Author should allow changes to the value. Setting a value of Any allows for rule customization (which supports modifications by non-technical users). You can also define constraints that allow you to limit the allowed values.
Select Any as the constraint for the Value field.
Figure 2-17 Rule Author Pattern Definition Page With Values For Under Age Rule
Click OK or save your changes and return to the Rule page.
Click OK on the Rule page.
Save the dictionary.
|
Note: Changes made to the pattern are not added to the rule until you click OK or Apply on the Rule page. If you navigate to a rule set or select a different tab before you click OK or Apply, Rule Author discards the pattern definition. |
Actions are associated with pattern matches. When a rule's "If" portion matches, the Rules Engine activates the "Then" portion and prepares to run the rule's action.
In this section, you add two actions for the UnderAge rule. The first action prints the result. The second action retracts the driver fact from the Rules Engine. You might want to retract a fact for a number of reasons, including:
If you are done with the fact, and you want to remove it from the Rules Engine.
If the action associated with the rule changes the state, so that the fact needs to be retracted to represent the current state of the Rules Engine.
To add the action that prints the result for a match of the UnderAge rule, do the following:
Click the Rulesets tab.
In the tree, click the UnderAge node under the vehicleRent folder.
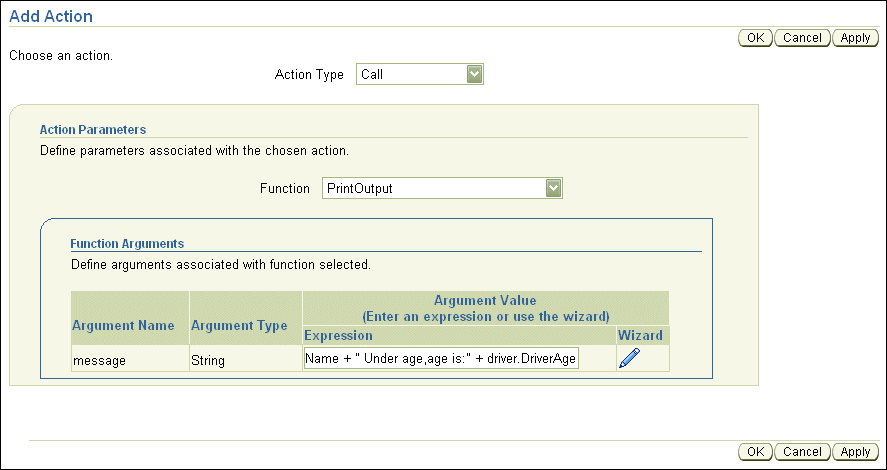
Click New Action on the Rule page in the Then box. This displays the Add Action page (see Figure 2-18).
Select the Call item from the Action Type box. This shows the Action Parameters box.
Choose PrintOutput from function box (if you did not define an alias for this function, then this is DM.println). This expands the Function Arguments box.
Enter a value in the Argument Value field under Expression (see Figure 2-19). For example:
"Rental declined" + driver.DriverName + " Under age,age is:" + driver.DriverAge
|
Note 1: Rule Author uses a Java like syntax for expressions. The RL Language defines the complete expression syntax. |
|
Note 2: If you do not know the variable names to use in the expression, use the edit icon in the Wizard field to bring up the expression wizard. This presents the wizard page which provides more space to write expressions. This also provides an easier and more accurate way to enter variables, since the expression builder presents a variable selection box. |
Figure 2-19 Rule Author Add Action Page for Under Age Rule
Click OK to save your changes and return to the Rule page.
Click OK on the Rule page.
Save the dictionary.
Next, add the retract action for the UnderAge rule. Perform the following steps to add this second action for the rule:
Click the Rulesets tab.
Click the UnderAge node under the vehicleRent folder.
On the Rule page, click New Action from the Then box. This brings up the Add Action page.
Select Retract from the Action Type box. This shows the Action Parameters box.
Select driver from the Fact Instance box. The pattern name driver, refers the single instance which was matched by the pattern.
Click OK to save your changes and return to the Rule page.
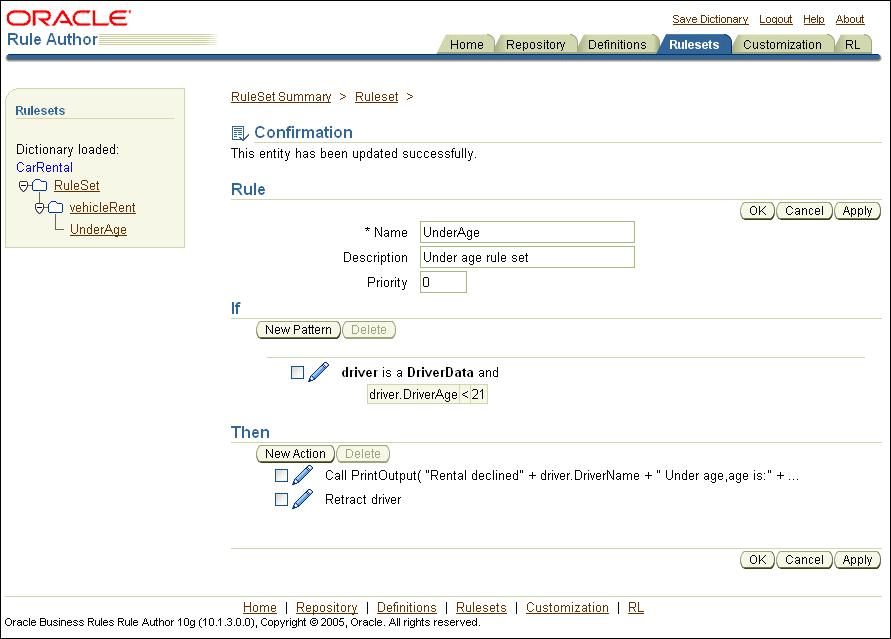
Click Apply on the Rule page to view the confirmation message (see Figure 2-20).
Save the dictionary.
Figure 2-20 Rule Author Under Age Rule With Pattern and Actions
|
Note: When you add actions to rules, you can only add new actions sequentially. If an action depends on the results of a previous action, then the order in which you add the actions is significant. |
|
See Also: Oracle Business Rules RL Language Reference Guide |
The Rule Author rule Customization tab is designed for business users. Rule developers use the Allowed Values field on the Pattern Definition page, which is available from the Rulesets tab, to specify if customization is allowed. When customization is allowed, you can specify a range of valid values for the customizable value. Then, business users may change values using the Customization tab.
In this example, the UnderAge rule can be modified on the Customization tab to change the age of an under age driver (for this sample we do not limit values, and specify that any value is valid).
To change the UnderAge rule, use the Customization tab as follows:
Click the Customization tab. The navigation pane displays the vehicleRent folder with the UnderAge node followed by a "*", which indicates that the rule is customizable.
Click the node for the UnderAge rule (see Figure 2-21).
Figure 2-21 Rule Author Rule Customization Page For Under Age Rule
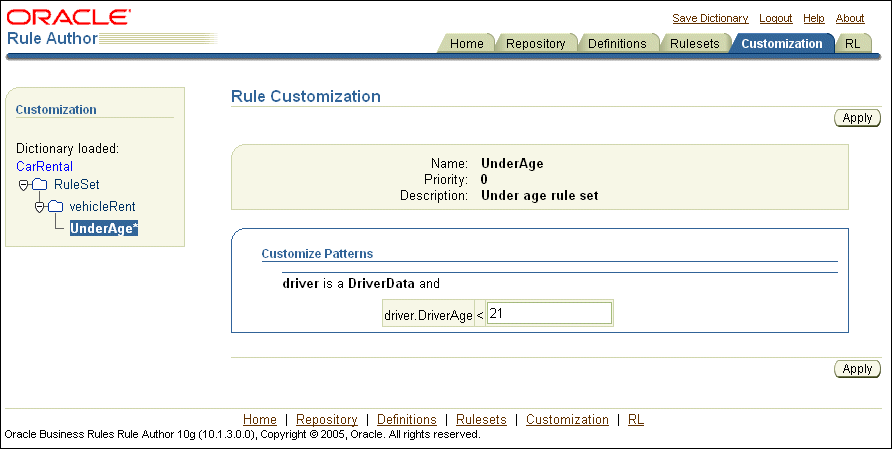
On the Rule Customization page the Customize Patterns box contains an editable text entry field for the test driver.DriverAge < 21.
In this field, change the value 21 and enter the value 19 in this field.
Click Apply.
Save the dictionary.
After you save the dictionary, you are done creating the data model and the rules for the Java Fact How-To.
|
See Also: "Defining Tests for Patterns with the Under Age Rule" for information on the Allowed Values field. |
After you create and save a dictionary that contains a data model and a rule set with rules, you can use the dictionary in a rule enabled Java application. This section shows you the steps for creating a rule enabled Java application.
|
Note: Make sure your Java calls are wrapped in a try/catch block. |
This section covers the following:
For the complete code for this sample application, see TestMain.java in the $HowToDir/src/carrental directory.
|
Note: The instructions in the preceding sections of this chapter enabled you to create and save a WebDAV repository and dictionary namedCarRental. The car rental example supplied in the How-To sample code uses a file repository with a dictionary also named CarRental. The dictionary contents in the WebDAV repository you created in this chapter and the file repository in the How-To sample are identical.
The How-To sample code contains code for both WebDAV and file repositories, but only the file repository is described in detail. The How-To sample uses a file repository for portability, but this sample can be modified to use the WebDAV repository you created in the proceeding sections. |
The first step when writing a rules enabled program is to import the required classes. Example 2-1 shows the imports from the TestMain.java application for the car rental sample.
Example 2-1 Required Imports for Car Rental Sample With Rules SDK
import java.util.Date;

import oracle.rules.sdk.ruleset.RuleSet;
import oracle.rules.sdk.repository.RuleRepository;
import oracle.rules.sdk.repository.RepositoryManager;
import oracle.rules.sdk.repository.RepositoryType;
import oracle.rules.sdk.repository.RepositoryContext;
import oracle.rules.sdk.dictionary.RuleDictionary;
import oracle.rules.sdk.exception.RepositoryException;

import oracle.rules.rl.RuleSession;

import carrental.Driver;
When building a rule enabled Java application, do the following to access a dictionary and specify a rule set (as shown in Example 2-2):
Create a String that contains the path to the repository.
Use a Rules SDK RuleType object to hold the repository that you obtain from the RepositoryManager.getRegisteredRepositoryType method. The jarstoreKey parameter specifies the repository type. Example 2-2 shows a file type repository.
Create a repository instance using the repository manager method createRuleRepositoryInstance.
Define a RepositoryContext and set appropriate properties. For a file repository, this step specified the path to the repository, as shown with the repoPath parameter in Example 2-2.
Use the init method in the RuleRepository object repo to initialize the repository instance.
Example 2-2 Loading A Dictionary With Rules SDK
String fs = "/";
String repoPath = "dict" + fs + "CarRepository";
final String jarstoreKey = "oracle.rules.sdk.store.jar";

	RepositoryType jarType =
     RepositoryManager.getRegisteredRepositoryType( jarstoreKey );

RuleRepository repo = RepositoryManager.createRuleRepositoryInstance( jarType );

//fill in initialization property values
RepositoryContext jarCtx = new RepositoryContext();
jarCtx.setProperty( oracle.rules.sdk.store.jar.Constants.I_PATH_BASE, repoPath );

//initialize the repository instance.
repo.init( jarCtx );
When building a rule enabled Java application you need to load a dictionary, with a specified version. Use a RuleDictionary object to load a dictionary, as shown in Example 2-3, which loads the CarRental dictionary, with the HowTo version, into the object named dict. The CarRental dictionary must be available in the repository (the CarRental dictionary with the version name HowTo was created earlier using Rule Author).
Example 2-3 Loading a Dictionary With Rules SDK
RuleDictionary dict = repo.loadDictionary( "CarRental", "HowTo" );
If you want to load a WebDAV repository instead of a file repository as shown in Example 2-3, you should use getWebDAVRepository. An example of this is shown in TestMain.java in the $HowToDir/src/carrental directory.
After loading a dictionary, you need to specify a rule set and use the Rules SDK to generate an RL Language program. This step is required since a dictionary stores a data model and rules using an intermediate XML format. The Rules SDK provides methods to access rule sets and rules the associated data model from a dictionary. The Rules SDK performs the mapping for the selected rule set from the intermediate XML format to produce the RL Language program that runs in the Rules Engine.
Using Rule Author, each rule set includes two components, a data model which is global and applies for all the rule sets in a dictionary, and the set of rules associated with a rule set. Example 2-4 shows the code that generates RL Language for these two components.
After you generate an RL Language program that includes rules and a data model, you are ready to work with a rule session. A rule session initializes the Rules Engine and maintains the state of the Rules Engine across a number of rule executions. A RuleSession object is the interface between the application and the Rules Engine.
Example 2-5 shows the code that creates a RuleSession object and executes the RL Language program.
The executeRuleset() executes an RL program passed as a String. This method tells the Rules Engine to interpret the specified RL Language program.
|
Note: The order of theexecuteRuleset() calls is important. You need to execute the data model RL Language program before the rule set RL Language program. The data model contains global information that is required when the associated rule set executes.
|
Example 2-5 Initializing and Executing a Rule Session With Rules SDK
RuleSession session = new RuleSession();
session.executeRuleset( dmrl );
session.executeRuleset( rsrl );

session.callFunction( "reset" );
session.callFunction( "clearRulesetStack" );
session.callFunctionWithArgument( "pushRuleset", rsname );
After the data model and the rule set are loaded and the rule session is ready to run the specified rule set against the facts that you assert for the rule session.
Before running a rule session you need to assert facts. When you execute a data model in a rule session, you prepare the rule session for new facts to be asserted. To assert facts, you use the session.callFunctionWithArgument() method and the assert function supplying a fact as an argument.
Example 2-6 shows sample code that prepares Driver objects for the car rental sample, and asserts three facts.
Example 2-6 Preparing Driver and Accident Records For Car Rental Sample
// Date Function
static public Date getDate(String dateStr ) {
  Date result = null;
  try {
    java.text.SimpleDateFormat sdf =
      new java.text.SimpleDateFormat( "MM/DD/YYYY" );
    result = sdf.parse( dateStr );
  }
  catch( Throwable t) { t.printStackTrace(); }
  return result;
}

// Driver d1 record
Date d1LicIssueDate = getDate( "10/1/1969" );
Driver d1 = new Driver( "d111", "Dave", 50, "sports", "full",
                        d1LicIssueDate, 0, 1, true );

// Driver d2 record
Date d2LicIssueDate = getDate( "8/1/2004" );
Driver d2 = new Driver( "d222", "Qun", 15, "truck", "provisional",
                        d2LicIssueDate, 0, 0, true );

//Driver d3 record
Date d3LicIssueDate = getDate( "6/1/2004" );
Driver d3 = new Driver( "d333", "Lance", 44, "motorcycle", "full",
                        d3LicIssueDate, 0, 1, true );

session.callFunctionWithArgument( "assert", d1 );
session.callFunctionWithArgument( "assert", d2 );
session.callFunctionWithArgument( "assert", d3 );
Example 2-7 shows the code that runs a rule session.
The $HowToDir/lib directory includes TestMain.jar, a ready-to-run Oracle Business Rules Java application that uses the CarRental dictionary. If you change the dictionary name then you need to modify TestMain.java (the source is available in the directory $HowToDir/src).
Example 2-8 shows output from running TestMain using the facts asserted within TestMain.
|
Note: TheReadme.txt file in the $HowToDir/src directory includes instructions for setting the environment variables required to run the test program.
|
Example 2-8 Sample Run Of Car Rental Program
java carrental.TestMain
Rental declined Qun Under age: age is: 15
Note that not all facts produce output or fire a rule. The example shows the output only for the asserted fact that matches the UnderAge rule.