| Oracle® Access Manager Access Administration Guide 10g (10.1.4.0.1) Part Number B25990-01 |
|
|
View PDF |
| Oracle® Access Manager Access Administration Guide 10g (10.1.4.0.1) Part Number B25990-01 |
|
|
View PDF |
The Access System's single sign-on capability enables users to access more than one protected URL or application with a single login. Before reading this chapter you should be acquainted with the terms and concepts covered in Chapter 4, "Protecting Resources with Policy Domains".
This chapter covers the following topics:
Before attempting to configure single sign-on, you need to have a working Identity and Access System. This includes installing and configuring your directory server, the Identity System, the Policy Manager and Access Server, and at least one WebGate or Access Gate. For complete details, see the Oracle Access Manager Installation Guide.
Single sign-on gives users the ability to access more than one protected resource (Web pages and applications) with one authentication. The Access System enables you to protect Web sites and applications by defining what resources you want to protect and providing rules for accessing the resource. The rules are for:
Authentication: Authentication is the process of proving that a user is who he or she claims to be. To authenticate a user, a WebGate presents the user's browser with a request for authentication credentials in the form of a challenge. The challenge is referred to as a challenge method or authentication method.
Authorization: Authorization is the process of determining if a user has a right to access a requested resource. A user may want to see data or run an application program protected by a policy. The requested resource may belong to a policy domain, or it may be covered within that domain by a specific policy that is different from the global one.
For more information on protecting access to a single resource, see Chapter 4, "Protecting Resources with Policy Domains".
Single sign-on can be implemented in a variety of ways:
Single domain: For example, you can set up single sign-on for a set of URLs within the domain mycompany.com.
Multi-domain: For example, you can set up single sign-on for a set of URLs that reside within the domains mycompany.com and yourcompany.com.
Applications and third-party products: For example, you can set up single sign-on between Oracle Access Manager and a IBM WebSphere Application Server.
The first two implementations use encrypted cookies, as explained in "Single Sign-On Cookies" . For these implementations to work, end users must enable their browsers to receive cookies. For single sign-on with third-party products, see the Oracle Access Manager Integration Guide.
The Access System implements single-domain and multi-domain single sign-on through an encrypted cookie called the ObSSOCookie. The WebGate sends the ObSSOCookie to the user's browser upon successful authentication. This cookie can then act as an authentication mechanism for other protected resources that require the same or a lower level of authentication.
When the user requests access to a browser or another resource, the request flows to the Access Server. The user is logged in, and the ObSSOCookie is set. The Access Server generates a session token with a URL that contains the ObSSOCookie. Single sign-on works when the cookie is used for subsequent authorizations in lieu of prompting the user to supply authorization credentials.
When the cookie is generated, part of the cookie is used as an encrypted session token. The encrypted session token contains the following information:
The distinguished name (DN) of the authenticated user.
The level of the authentication scheme that authenticated the user.
See "Authentication Schemes" for details.
The IP address of the client to which the cookie was issued.
The time the cookie was originally issued.
The time the cookie was last updated.
If the user has not been idle, the cookie is updated at a fixed interval to prevent the session from timing out. The update interval is one-fourth of the length of the idle session timeout parameter. See "Viewing AccessGates" for details.
Unencrypted ObSSOCookie data includes:
Cookie expiry time.
The domain in which the cookie is valid.
An optional flag that determines if the cookie can only be sent using SSL.
The ObSSOCookie is a secure mechanism for user authentication. When the Access System generates the cookie, an MD-5 hash is taken of the session token. When the ObSSOCookie is used to authenticate a user, the MD-5 hash is compared with the original cookie contents to be sure no one has tampered with the cookie. MD-5 is a one-way hash, so it cannot be unencrypted. The Access Server does the comparison by hashing the session token again and comparing the output with the hash of the token already present in the cookie. If the two hashes do not match, the cookie is corrupt. The system relies on the fact that if someone tampers with the session token, the hashes will not match.
The single sign-on cookie does not contain user credentials such as user name and password.
Configuring the ObSSOCookie is a one-time activity conducted by a Master Administrator or Master Access Administrator. The cookie is encrypted using a configurable encryption key known as a shared secret.
For shared secret keys used in installations of version 5.x, the RC4 encryption scheme was recommended.
For shared secret keys used in installations of version 6.x, the RC6 encryption scheme was recommended.
AES is a new encryption scheme introduced in version 7.0.
In version 7.0 and higher, shared secrets use this encryption scheme as the default.
Oracle Access Manager 10.1.4 does grandfather the ObSSOCookie only if the shared secret is regenerated and not for changes in the configuration of the cipher to be used. Oracle Access Manager always tries to use the newer shared secret when decrypting the ObSSOCookie. If this is not successful, it uses the older shared secret. If this fails, the Access System queries the Access Server to see if a new shared secret was generated. If none of the keys is successful, the user is prompted to re-authenticate.
The shared secret encryption algorithm is an Oracle Access Manager-wide setting. It affects all encrypted cookies, not just the ObSSOCookie.
For single sign-on to work with older WebGates that have not been upgraded to Version 6, you must continue to use the RC4 encryption algorithm until all of the WebGates are upgraded. Similarly, version 6 WebGates requires RC6 for the older WebGates to be compatible with the new WebGates, and for single sign-on to work. See the Oracle Access Manager Upgrade Guide for more information about ensuring backward compatibility between new Access Servers and older WebGates.
|
Note: Oracle recommends that administrators use AES as the encryption algorithm. It is a much stronger algorithm than RC4 or RC6. RC6 encryption is deprecated in Oracle Access Manager 10.1.4, and its support will be dropped in future releases. |
Generate a key to encrypt the ObSSOCookie from the Access System Console.
See "Creating a Shared Secret Key" for details.
Decide if you want the ObSSOCookie to be sent only using SSL.
See "Securing the ObSSOCookie in an Authentication Scheme" on page 5-17 for details.
The simplest form of single sign-on occurs within a single domain. For example, suppose within the domain mycompany.com you are hosting several restricted Web sites on several hosts. You can set up single sign-on so that users with the right privileges can access all or a subset of these restricted areas after just one authentication.
In order for single domain single sign-on to work, you need a fully functional Oracle Access Manager system, including at least two WebGates, as described in the following sections.
The rest of this section discusses the following topics:
In single domain single sign-on, the ObSSOCookie is associated with a particular domain, for instance, domain1.com. The user authenticates to a WebGate that protects a server, for example, foo1.domain1.com and the ObSSOCookie is set. Then the user requests a resource on another server in that domain—for example, foo2.domain1.com. For the second request, the same ObSSOCookie can be used and the user does not have to re-authenticate even though he or she has requested information on separate servers in that domain.
Single domain single sign-on works by passing the ObSSOCookie among the WebGates configured for the domain. For example, suppose a user requests index.html on Host1 through a Web browser protected by WebGate1. The process overview in Figure 7-1 illustrates the events as WebGate1 on Host1 asks the user for a user name and password. If the Access Server accepts the user's authentication, the Access Server gives WebGate1 permission to give the user access to index.html. Then WebGate1 gives the user access to index.html along with the ObSSOCookie.
If this user now wants to access Host2, the user's Web browser sends a request to WebGate2 for a page from Host2 along with the ObSSOCookie. If the two WebGates have the same cookie domain, WebGate2 can look at the ObSSOCookie and determine if the user is authenticated. The user does not have to re-authenticate.
In Figure 7-1, the process flow is as follows:
The user requests page1.html on host1.domain1.com.
The WebGate that protects this server presents an authentication challenge.
The user presents credentials that the WebGate passes to the Access Server.
The Access Server authenticates the user and passes the ObSSOCookie.
WebGate shows page1.html to the user.
The user requests page2.html on host2.domain1.com.
This sever is protected by another WebGate and single-domain single sign-on is configured between this WebGate and the first one. The ObSSOCookie is included in the request.
The WebGate passes the ObSSOCookie to the Access Server, which validates the cookie and serves page2.html.
The following is a summary of configuring a single domain for single sign-on.
Task overview: Enabling single domain single sign-on
Install a directory server and Web server according to the vendor's instructions.
Install and set up a working Oracle Access Manager system, as explained in the Oracle Access Manager Installation Guide.
Install and set up the Identity System.
Install and set up the Access System.
Set up a WebGate, as described in the procedure "To configure the WebGate" .
Configure access controls to a resource protected by this WebGate, as described in the "Task overview: Defining authentication and authorization schemes for single sign-on".
Set up a second WebGate, as described in the procedure "To configure a second WebGate for single sign-on".
Configure access controls to another resource protected by the second WebGate, again using the "Task overview: Defining authentication and authorization schemes for single sign-on".
Specify the same primary cookie domain for the two WebGates.
This discussion assumes that you have completed WebGate installation as part of your Access System installation and setup. For more information, see "Prerequisites".
From the Access System Console, click Access System Configuration, then click AccessGate Configuration.
Configure the WebGate as explained in "Adding an AccessGate", and be sure to:
Add a domain name for the Primary HTTP Cookie Domain.
For example:
host1.mycompany.com
|
Note: The more general the domain name, the more inclusive your single sign-on implementation will be. For example, if you specify b.com as your primary cookie domain, users will be able to perform single sign-on for resources on b.com and on a.b.com. However, if you specify a.b.com as your primary cookie domain, users will have to re-authenticate when they request resources on b.com. |
Set a value for user session timeout to define how long the ObSSOCookie lasts. Use the two Access Server parameters for setting this timeout:
Maximum User Session Time: Specifies the number of seconds that a user's connection to a resource can last before the user must re-authenticate.
Idle Session Time: Specifies the number of seconds that a cookie can remain valid without user activity. The shorter the session, the more frequently users must re-authenticate. Shorter sessions are more secure because they leave less time for an unauthorized user to access an unattended browser or an intercepted cookie to be re-used in a replay attack.
For more information about these parameters, see Chapter 3, "Configuring WebGates and Access Servers".
Configure multiple ways for a user to specify the fully qualified domain name, if desired.
For SSO to work, users must enter a fully qualified domain name. You can create alternative ways to specify the domain name, as described in "Using Host Identifiers and Host Contexts". If a preferred host is not specified, all known variations of IP addresses and URLs must be listed in the Host Identifier. This is the only way to prevent users from typing an IP address to bypass authentication and authorization.
Configure access controls to another resources protected by the second WebGate, as outlined in the following task overview.
Task overview: Defining authentication and authorization schemes for single sign-on
Create an authentication scheme for the domain and a level for the scheme, as described in "Creating an Authentication Scheme for Security Bridge".
If you use different authentication schemes on the two WebGates, users can go from a higher authentication scheme to a lower one, but not from a lower one to a higher one.
For example, if a user is granted access to a resource that has a Basic Over LDAP authentication scheme defined as having a level of 2, the user can access other resources that have schemes with the same or a lower level. However, if the user tries to access a resource with a more stringent authentication challenge, such as a scheme called Client Certificate with a level of 5, they must re-authenticate.
Create an authorization scheme, as described "Adding an Authorization Scheme".
Take stock of your authorization schemes and consider the following:
Users who use single sign-on may pass the authentication tests but may fail the authorization tests when attempting to access a second or third resource. Each resource in the domain may have a unique authorization scheme.
Configure a second WebGate for single sign-on, as described in the next procedure.
To configure a second WebGate for single sign-on
Configure a second WebGate for a set of resources in the same domain.
Give the second WebGate a domain configuration identical to the first WebGate, and be sure that it communicates with an Access Server in the same installation as the first WebGate. See "Configuring AccessGates" and "Associating AccessGates with Access Servers" for details.
For example, set up a WebGate for:
host2.mycompany.com
From the Access System Console, click Access System Configuration, then click AccessGate Configuration.
Click the link for the first WebGate.
Click Modify.
In the Primary HTTP Cookie Domain field, enter the domain using a .domain.domain format.
For example:
oracle.com
Click Save.
Click Back.
Select the second WebGate, click Modify, and enter the same domain.
|
Note: The primary HTTP cookie domains must be identical for the two WebGates. |
Save your work.
When two WebGates are set up, single sign-on should work between them. You must install a WebGate on each Web server that you want to protect.
If you are going to use a reverse proxy in a single sign-on configuration, be sure either to set the ipvalidation parameter to false or to add the proxy IP address to the IPValidationExceptions list in the AccessGate configuration. You need to do this because the reverse proxy hides the client's IP address. See "Configuring IP Address Validation for WebGates" for details.
In some situations the Apache Reverse Proxy does not pass the ObSSOCookie to BEA WebLogic after a successful authentication. To avoid this issue, use Form Based authentication instead of Basic Over LDAP when using Apache Reverse Proxy with BEA WebLogic.
By default, the WebGate logs a user out when it receives a URL containing "logout." (including the "."), with the exceptions of logout.gif and logout.jpg. For example, logout.html or logout.pl. When the WebGate receives a URL with this string, the value of the ObSSOCookie is set to "logout."
WebGate also treats any designated URL as a signal to log the user out of the single sign-on domain. The logout URL is configured in the AccessGate configuration page. See "AccessGate Configuration Parameters" for details. If the configuration is not specified, then the default behavior is used.
For example, you can configure the following logout URLs:
/access/oblix/lang/%lang%/logout.html
/logout.htm
In the first example URL, %lang% represents the directory for a specific language pack.
You can specify multiple logout URLs. See "AccessGate Configuration Parameters" for details. For each browser request, the list of configured logout URLs is scanned to determine whether the user will be logged out of the single sign-on domain. On Unix machines, the logout URLs are case sensitive.
The number of logout URLs affects the performance of the WebGate.
Multi-domain single sign-on allows a user authentication to be honored by all the hosts in two or more domains. The main objective in multi-domain single sign-on is to provide the user with an ObSSOCookie from each domain. Cookies cannot be sent across multiple domains. To achieve single sign-on across multiple domains, the Access System requires that you specify a primary domain for authentication. This primary domain acts as a central hub for all authentications. Regardless of what domain users try to authenticate to, each WebGate redirects them to the primary domain expressed as a single URL.
Multi-domain single sign-on is implemented, and works, in much the same way as single domain single sign-on. For more information, see "Single Domain Single Sign-On" and note the following differences:
For single domain single sign-on, you configure WebGates in one domain. However for multi-domain single sign-on, you configure WebGates on each authentication server in each domain and designate one of the authentication servers to be the primary authentication server.
For single domain single sign-on, the WebGate provides the user with an ObSSOCookie from one domain, and that cookie is valid for each protected resource in the domain. However, for multi-domain single sign-on, a series of redirects provides the user with a different ObSSOCookie from a designated WebGate in each domain.
For multi-domain single sign-on to work, WebGates in all domains must have access to the complete set of authentication schemes. This means that the Access Servers in your environment must use the same policy directory. If necessary, this directory can be replicated.
Multi-domain single sign-on works only with WebGates, not AccessGates. For example, the applications discussed in "Application Single Sign-On" have their own single sign-on methods. To integrate a scheme for AccessGate-based single sign-on with a scheme for WebGate-based multi-domain single sign on, you need to configure a proxy to act as a front end for these AccessGates.
Figure 7-2 illustrates the process of providing the user with an ObSSOCookie from more than one domain. An explanation of the diagram follows.
Process overview: Multi-domain single sign-on
The user initiates a request for a Web page from a browser.
For instance, the request could be for host1.domain1.com/page1.html.
WebGate1 on host1.domain1.com sends the authentication request back through the user's browser in search of the primary authentication server.
In this example, you have designated host2.domain2.com to be the primary authentication server.
The request for authentication is sent from the user's browser to the primary authentication server.
This request flows to the Access Server. The user logs in and the ObSSOCookie is set for domain2.com. The Access Server also generates a session token with a URL that contains the ObSSOCookie.
The session token and ObSSOCookie are returned to the user's browser.
The session token and ObSSOCookie are sent to host1.domain1.com.
The WebGate on host1.domain1.com sets the ObSSOCookie for its own domain (domain1.com) and satisfies the user's original request for the resource host1.domain1.com/page1.html.
If the user later sends a request to host3.domain3.com, a similar set of redirections takes place to set the cookie for that domain.
Since the ObSSOCookie for the primary domain has been set, the user would not have to log in to domain3.
As mentioned earlier, implementing multi-domain single sign-on is similar to implementing single domain single sign-on.
Task overview: Implementing multi-domain single sign-on
Use the "Task overview: Enabling single domain single sign-on" as a guide and be sure to implement the differences described in "Multi-Domain Single Sign-On".
Implement redirection as described in "Using Redirection to Enable Multi-Domain Single Sign-On".
Test your implementation, as described in "Testing Multi-Domain Single Sign-On".
Configure logout, as described in "Logout from a Multi-Domain Single Sign-On Session".
The rest of this section discusses the following topics:
For each WebGate in a multi-domain SSO configuration, you need to define an authentication scheme with redirection rules. For instance, suppose you have three authentication servers, each in a separate domain:
host1.domain1.com
host2.domain2.com—your primary authentication server
host3.domain3.com
Each WebGate can only set the ObSSOCookie for its own domain. As a result, you need to create redirection rules so that when a user logs in, they are redirected to the primary authentication server. In this example, the primary authentication server is host2.domain2.com.
|
Note: A redirection rule is needed even for the primary authentication server. |
For more information, see the next procedure.
From the Access Server Console, click Access Server Configuration, then click Authentication Management.
Click a link for an authentication scheme.
In the Challenge Redirect field, enter the primary authentication server for your multi-domain single sign-on scheme.
Repeat these steps for WebGates in each domain in your multi-domain SSO scheme, and for all authentication schemes that are protecting resources in these domains.
This procedure redirects the servers across domains to the primary authentication server.
Next, you need to be sure that the ObSSOCookie can be passed among WebGates within a particular domain.
Within each individual domain, ensure that each WebGate is configured to use the same primary HTTP cookie domain. See "Configuring the WebGates".
|
Note: If you do not specify a primary cookie domain within a single domain, the multi-domain ObSSOCookie will not be usable by other WebGates within an individual domain. |
Test your multi-domain single sign-on as described in "Multi-Domain Single Sign-On" .
To test a multi-domain single sign-on configuration, set your browser to notify you when you receive cookies. If single sign-on is working, you should receive notification of session cookies from each domain you have configured.
When you log out of an application, the Access System only removes the ObSSOCookie for the current domain. For example, if you are logged into domain1, domain2, and domain3, and you log out from domain1, only the ObSSOCookie for domain1 is removed.
The timeout of the cookie is always determined by the machine that performs the authentication. For example, suppose www.a.com sets a cookie expiration of one hour, and www.b.com sets a cookie expiration of 30 minutes. A user goes to www.b.com and is redirected to www.a.com for authentication. After 30 minutes the www.b.com cookie expires and the user is redirected to www.a.com. The cookie for www.a.com is still valid, so the user is not prompted to re-authenticate. The domain www.b.com sets a new cookie with a fresh timeout value. For details about idle session timeout and maximum user session timeout, see "AccessGate Configuration Parameters".
You can set the www.a.com timeout value to be less than that of any other domain. This guarantees that authentication happens any time one of the other domain's cookies expires. The drawback is that if you set www.a.com expiration to be too short, single sign-on may not happen because www.a.com's cookie can expire before the user's next attempt at single sign-on. You need to determine the balance between single sign-on functionality and expiration policy.
|
WARNING: If you configure multi-domain single sign-on for your users, be sure to tell them to close all browser windows or to explicitly log out of each domain to which they are still logged in. |
The Access System enables you to create a web of trust in which a user's credentials are verified once and are provided to each application the user runs. Using these credentials, the application does not need to re-authenticate the user with its own mechanism. Application single sign-on allows users who have been authenticated by the Access System to access applications without being re-authenticated.
There are two ways to send a user's credentials:
Using Cookies: A specific value is set on the browser's cookie that the application must extract to identify a user.
Using Header Variables: An attribute name-value pair is appended to the URL that calls the application.
With both forms of single sign-on, additional programming is required.
Header variables can be redirected only to Web servers known or protected by the Access System. Header variables passed as authentication actions are not persistent during a user session. See "Authentication Actions" for information about authentication actions.
For example, when a user authenticates, they may be redirected to a portal index page:
http://mycompany.com/authnsuccess.htm
For authentication failure, an authentication action may redirect the user to an error page or a self-registration script:
http://mycompany.com/authnfail.htm
The rest of this section discusses the following topics:
For more information on application single sign-on, see the following topics in the Oracle Access Manager Integration Guide:
Integration with Oracle Identity Federation: Enables federated authentication and authorization. The Oracle Access Manager Integration Guide discusses federated authorization. Federated authentication and authorization are discussed in Oracle Secure Federation Services Administration Guide.
Integration with OracleAS: Enables Oracle Access Manager single sign-on and identity management across applications that run on Oracle AS, such as Oracle eBusiness Suite.
Integration with RSA SecurID: SecurID is a two-factor authentication product from RSA Security. The Access System provides a plug-in and other components to provide native SecurID authentication.
Integration with mySAP: Enables Oracle Access Manager single sign-on for mySAP applications and other Oracle Access Manager-protected enterprise resources and applications. It also enables you to configure Oracle Access Manager authentication schemes for mySAP applications.
Integration with the Plumtree Corporate Portal: Provides companies with a Web enterprise solution for building customized, secure business portals with integrated, identity-based Web access management. In this solution, the Plumtree Corporate Portal acts as a gateway to an enterprise intranet or extranet, providing users centralized access to applications and content hosted by the enterprise.
Connector for WebSphere: Enables applications running on IBM WebSphere to be integrated with Oracle Access Manager access control and identity management features. The Connector for WebSphere enables J2EE resources and applications on WebSphere to use the Access System for authentication, authorization, auditing, and single sign-on. It also provides the Identity System for identity management features such as delegated administration, dynamic groups, and workflows.
Security Provider for WebLogic SSPI—This implements single sign-on across J2EE applications that are deployed in the BEA WebLogic platform. The Security Provider enables WebLogic administrators to use Oracle Access Manager to control access to business applications. The Security Provider provides authentication to BEA WebLogic Portal resources and supports single sign-on between Oracle Access Manager and the BEA WebLogic Portal Web applications. The Security Provider also offers user and group management functions.
The Access System sets the ObSSOCookie for each user or application that accesses a resource protected by the Access System. The ObSSOCookie enables users to access other resources protected by the Access System that have the same or a lower authentication level. If you have configured a logout form and a logout URL as described in "Configuring a Single Sign-On Logout URL" on page 2-6, calling the SSO Logout URL removes the ObSSOCookie. This requires the user to re-authenticate the next time they access a resource protected by the Access System.
See "Configuring a Single Sign-On Logout URL" on page 2-6 for details.
You can protect the Identity System with the Access System just as you would any other resource
When installing the Access System, you can indicate that you want to protect the Identity System applications with the Access System. This automatically creates two policy domains:
A policy domain protecting the Access System applications starting with /access
A policy domain protecting the Identity System applications starting with /identity
See the Oracle Access Manager Installation Guide for more information.
The rest of this section discusses the following topics:
The Access System installation provides the option to configure policy domains automatically to protect Identity System applications, you can manually configure these policy domains at any time using the following guidelines.
|
Note: These guidelines assume you are familiar with the process for creating policy domains. See Chapter 4, "Protecting Resources with Policy Domains" for more information. |
To create a policy domain that protects the Identity System applications
From the Policy Manager, create a new policy domain as described in Chapter 4, "Protecting Resources with Policy Domains".
From the Resources tab, enter http as the resource type and enter /identity as the URL prefix.
From the Default Rules tab, create an authentication rule that protects the Identity applications using the challenge method of choice.
The Oracle Access and Identity authentication scheme includes the ability not to allow deactivated users access to the Identity System.
From the Default Rules tab, create an authorization rule that controls user access.
Use the following as a guideline for configuring the authorization rule.
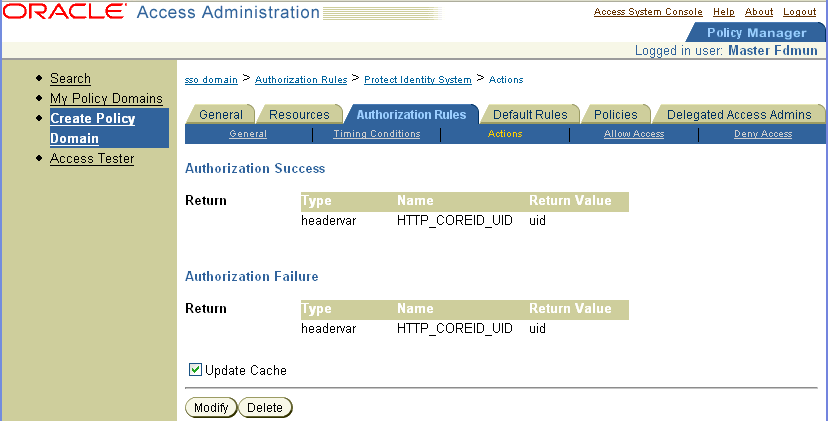
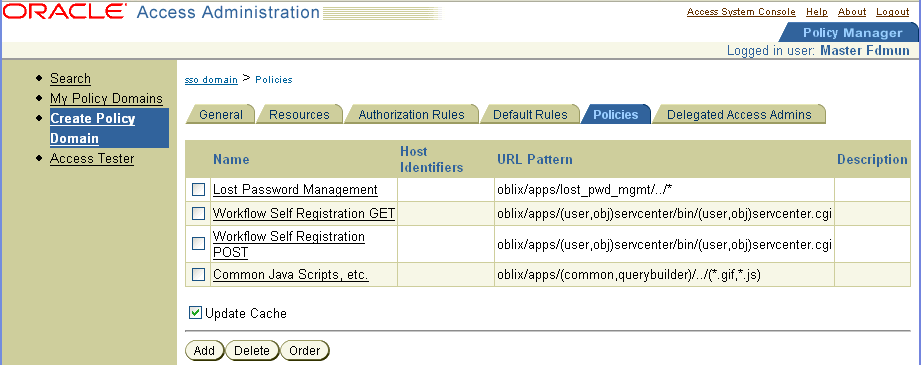
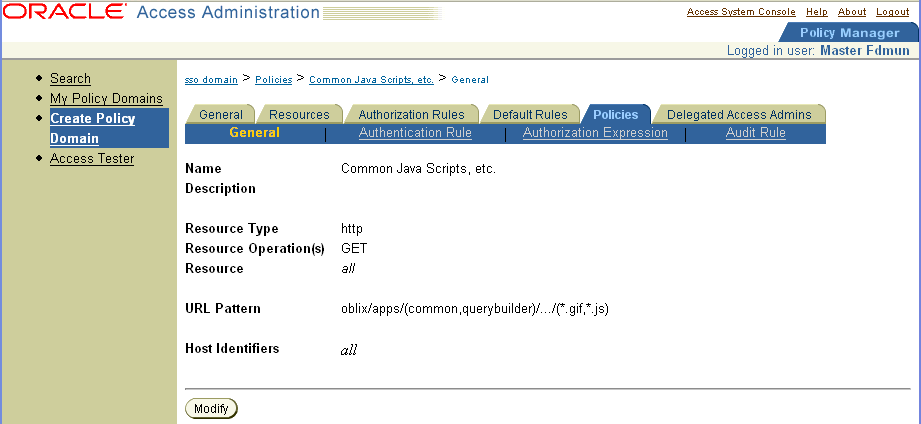
Next create the policies that allow access to key Identity System functionality such as Lost Password Management and Self Registration.
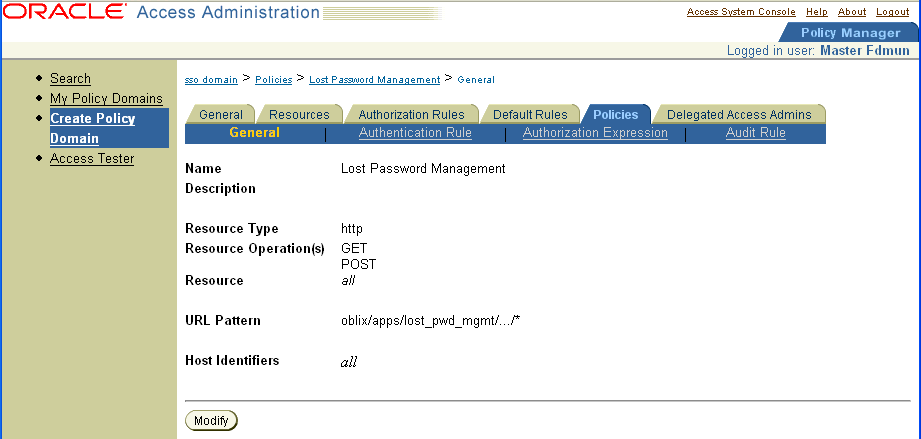
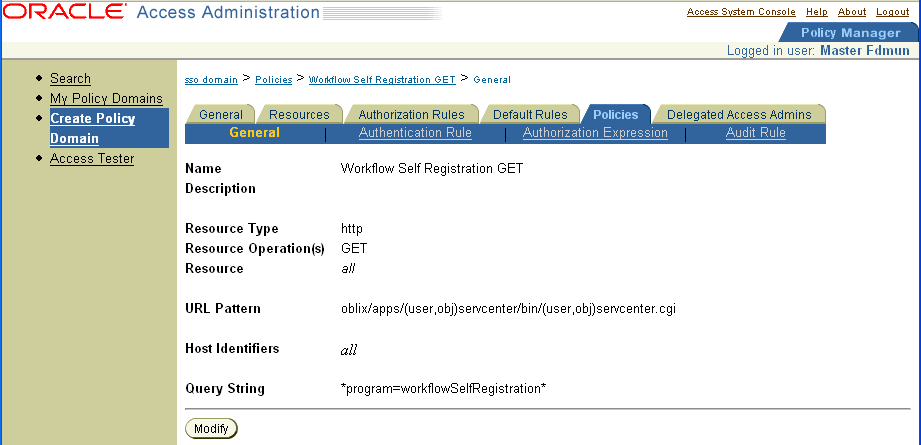
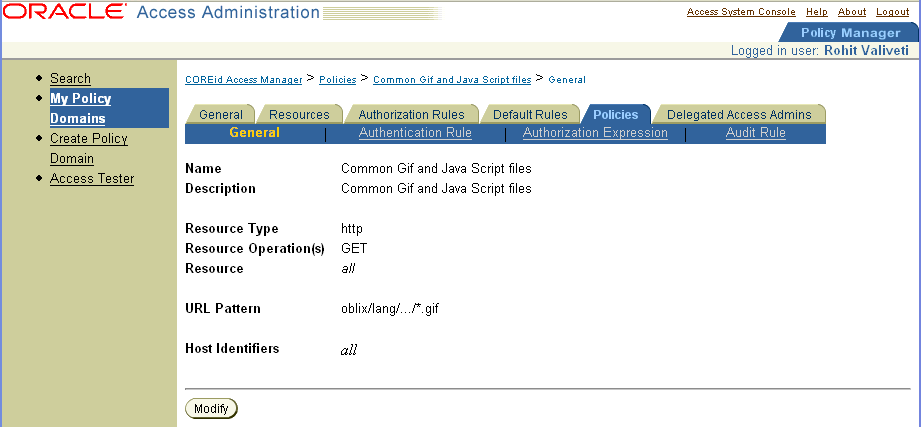
The following four screens show a summary of the policies.
|
Note: For each policy, configure the Anonymous Authentication scheme and configure users who are allowed or denied access. |
To create a policy domain that protects the Access System applications
From the Policy Manager, create a new Policy Domain.
From the Resources tab, enter http as the resource type and enter /access as the URL prefix.
From the Default Rules tab, create an authentication rule that protects the Access System applications using the Challenge Method of choice.
From the Default Rules tab, create an authorization rule that allows/denies access to the appropriate users.
Add the same action as shown in step 4 from the previous section, "To create a policy domain that protects the Identity System applications".
Create the policies that allow access to common Oracle Access Manager javascripts, gifs, and so on.
Configure the Anonymous authentication scheme and configure users who are allowed or denied access.
If single sign-on is enabled on the Identity System for connecting with another system (such as the Access System), you can use actions to define the user type in the header variables. The Access System picks up this user type and displays it if there is a correct corresponding value in the obnavigation.xml file. If no user type is set, the Access System uses the default defined in the obnavigation.xml file.
For information on troubleshooting, see Troubleshooting Oracle Access Manager on page E-1.
By setting the remote_user header to the name of the authorized user using standard actions, you can create Domino impersonation that is similar to Windows impersonation on IIS.
Domino uses its own user store. To provide single sign-on between the Access System and Domino, the Access System passes a header variable, remote_user, that contains the name of the user as it is contained in the Domino user store. The Access System looks up the user in the Domino user store, using both the long and short name stored there, and uses the preferred name defined by the Domino instance in the remote_user header.
|
Note: On Lotus Domino v6, be sure that the Anonymous authentication radio button on the server/ports/internet ports/web page tab is disabled. |
To configure single sign-on using a Lotus Domino Web server
Create an authorization rule, as described in Chapter 6, "Configuring User Authorization".
In the General screen displaying the authorization rule, click Actions.
The Actions page appears.
Click Add.
Under Authorization Success:
Type headervar in the first Type field.
Type remote_user in the Name field.
In the Return Value field, type the name of any attribute that identifies the user.
Click Save to save your changes (or click Cancel to exit the page without saving).
In a Windows environment, all processes and threads execute in a security context. Impersonation is the ability of a thread to execute in a security context that is different from that of the process that owns the thread.
When running in a client's security context, a service becomes the client to an extent. One of the service's threads uses an access token (a protected object that represents the client's credentials) to obtain access to objects for the client.
The primary purpose of impersonation is to trigger access checks against a client's identity. The Access System overrides impersonation enabled with IIS. For details about enabling impersonation, see Appendix B, "Enabling Impersonation with the Access System".
For information on troubleshooting, see Troubleshooting Oracle Access Manager on page E-1.