| Oracle® Access Manager Configuration Manager Installation and Administration Guide 10g (10.1.4.0.1) Part Number B32392-01 |
|
|
View PDF |
| Oracle® Access Manager Configuration Manager Installation and Administration Guide 10g (10.1.4.0.1) Part Number B32392-01 |
|
|
View PDF |
This chapter describes how to prepare for, deploy, and setup Oracle Access Manager Configuration Manager. The following topics are included in this chapter:
Assigning Configuration Manager Administrator and User Roles
Ensuring the Repository is Available to the Configuration Manager
The following discussions introduce deployment and planning considerations for Oracle Access Manager Configuration Manager:
About Planning the Number of Configuration Manager Instances Needed
Taking Inventory and Testing Operations in Existing Deployments
Oracle Access Manager Configuration Manager is a Java Application hosted on OC4J. A typical Oracle Access Manager Configuration Manager deployment includes the components and applications illustrated in Figure 2-1. A description follows the figure.
Note:
OC4J and Oracle Access Manager Configuration Manager must be installed together on a single platform.Figure 2-1 A Typical Oracle Access Manager Configuration Manager Installation
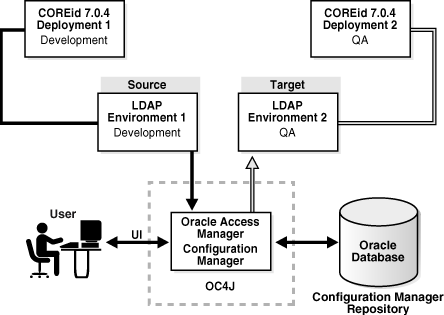
The sample Oracle Access Manager Configuration Manager deployment depicted in Figure 2-1 shows Oracle COREid Release 7.0.4 environments. However your deployment may include Oracle Access Manager 10g (10.1.4.0.1).
Administrators and users access Oracle Access Manager Configuration Manager through a Web browser. The Configuration Manager deployment includes:
Repository: One Oracle Database to use as the Configuration Manager repository
For more information, see "Installing and Setting up the Oracle Database Repository".
OC4J: One instance of the OC4J in either a standalone configuration, as depicted in Figure 2-1, or installed as a managed component of Oracle Application Server
For more information, see "Installing and Configuring OC4J".
The Configuration Manager: One or more instances of the Oracle Access Manager Configuration Manager deployed as an OC4J application
OC4J and the Configuration Manager are installed together on a single platform. For more information, see "About Planning the Number of Configuration Manager Instances Needed".
Environments: At least two Oracle Access Manager 10g (10.1.4.0.1), or Oracle COREid Release 7.0.4, deployments and environments (source and target LDAP directories) must be installed independently.
Installing and configuring Oracle Access Manager 10g (10.1.4.0.1), or Oracle COREid Release 7.0.4, deployments is outside the scope of this manual. For more information about these activities, see "Related Documents".
Oracle Access Manager Configuration Manager reads only from a single master or replica server and writes to only a single master LDAP directory. The installation of directory environments is outside the scope of this manual. For more information, see your vendor documentation.
Most enterprises need only one instance of the Oracle Access Manager Configuration Manager, as shown in Figure 2-1. If you encounter performance issues with multiple users, you may install additional Oracle Access Manager Configuration Manager instances.
Caution:
Multiple users migrating changes for the same logical object in the same target, could create an inconsistent state on the target. Oracle recommends that users coordinate before migrating data.One Oracle Database repository can serve multiple Configuration Manager instances. Multiple Configuration Manager instances may be connected to a single repository. There are no restrictions regarding the listening port of the repository when you have multiple Configuration Manager instances. Details in the repository may be viewed and managed from any Configuration Manager instance that is connected to that repository. For more information, see "Installing and Setting up the Oracle Database Repository".
Whether you have one, or more, Configuration Manager instances you need only one OC4J instance. For more information, see "Installing and Configuring OC4J".
The following guidelines apply to Oracle Access Manager Configuration Manager administrators:
Deploying the Configuration Manager requires OC4J administrator privileges. This role is created automatically during OC4J installation and setup.
Managing repository details within the Configuration Manager requires HMAdmin privileges. This role must be defined in OC4J and assigned to any individual who will manage details and test the repository connection within the Configuration Manager.
Configuration Manager functions, except managing the repository, require the HMUser role. The HMUser role must be defined in OC4J and assigned to individuals who will add environment details, create associations, make snapshots, migrate data, and manage transactions within the Configuration Manager.
Note:
A user with write privileges to an environment (directory) can perform all migration functions when they haveHMUser privileges. Those with HMAdmin privileges can perform only System Configuration functions in the Configuration Manager.Information about defining administrator privileges in OC4J is described in the Oracle Containers for J2EE Configuration and Administration Guide 10g Release (10.1.3) and in "Installing and Configuring OC4J".
To decide or confirm administrator rights
Adhere to your own corporate policies when designating administrators, choosing administrator log in IDs, choosing temporary or permanent passwords, collecting and disseminating information, and so on.
Communicate with your team as you decide and assign administrator rights as well as UserIDs and passwords for OC4J, Oracle Database, and Oracle Access Manager Configuration Manager login.
This discussion introduces the details that you need to collect and tests you need to create before starting any data migration activities in a live deployment. Before starting migration activities, Oracle recommends that you perform the activities here:
Take an inventory within Oracle Access Manager 10g (10.1.4.0.1), or Oracle COREid Release 7.0.4, deployments that will be involved in the migration.
Create and perform tests in the source deployment to ensure that data changes are producing the results you expect.
Taking Inventory: Table 2-1 identifies the details that you need to collect for each installed Oracle Access Manager 10g (10.1.4.0.1), or Oracle COREid Release 7.0.4, deployment and where to find the worksheets where you can record the information. You can find inventory details on installation or upgrade worksheets for each deployment or you can gather fresh details from the deployment itself.
Table 2-1 Details Needed for Each Existing 10g (10.1.4.0.1) or release 7.0.4 Deployment
| Component | For Specific Details Needed See |
|---|---|
|
Worksheet for Directory Instances Directory server type, version, patch level DNS hostname, port, Directory server security mode Root bind DN and password for Oracle Access Manager or Oracle COREid Searchbase (and Disjoint Searchbase, if applicable) Master/replica configuration details, if applicable Directory Server Profile names Type of data stored:User, Configuration, Policy data |
|
|
DIT and Object Definitions, Workflows, and Access Control Lists |
Worksheet for DIT and Object Definition Details |
|
Worksheet for Directory Server Profiles |
|
|
Worksheet for Database Instance Profiles |
|
|
Worksheet for Identity Servers |
|
|
Policy Manager Details (also known as the Access Manager in Oracle COREid Release 7.0.4) |
Worksheet for Policy Manager (release 7.0.4 Access Manager) Instances |
|
Identity Servers |
|
Creating Tests: Before migrating data to another deployment, be sure to create and perform tests to help you confirm that changes in the source are producing the desired result. In addition, you may need to "true up" the target to ensure that migrated changes operate as expected. For example if you are migrating workflow data, you want to ensure that all participants mentioned in the source environment are also present in the target. Otherwise, the workflow in the target deployment may not work properly. The Oracle Access Manager Configuration Manager does not inform you if participants are missing in the target environment.
To take inventory, test changes in the source deployment, and true up the target
Before migration, fill in a copy of the worksheets in Appendix A as you gather and record information about existing deployments and their directories.
Develop appropriate tests to validate functions in the source deployment that are impacted by configuration data changes to ensure that the changes produce the expected and desired result
Note:
After migrating data, you can use the same tests to validate migrated changes in the target deployment.You must perform all activities described in the following task overview to set up the host and prepare for Oracle Access Manager Configuration Manager installation.
Task overview: Setting up a host and preparing for Configuration Manager installation includes
This discussion provides an overview of installing and setting up the Oracle Database repository for use with the Configuration Manager.
You must install Oracle Database Server 10g Release 2 (10.2) as the Oracle Access Manager Configuration Manager repository. The following editions are supported:
Enterprise Edition
Standard Edition
Express Edition (XE)
The Configuration Manager communicates with the Oracle Database in the standard way, and does not use Oracle Call Interface (OCI). The Configuration Manager uses the repository to store details about environments, associations, transformation rules, snapshots, transaction records, audit information, and LDIF files.
Only one repository is needed even when you plan to install multiple instances of the Oracle Access Manager Configuration Manager. For more information, see "About Planning the Number of Configuration Manager Instances Needed".
To install Oracle Database Server 10g Release 2 (10.2)
Verify support certifications on MetaLink, as usual. For example:
Go to on https://metalink.oracle.com.
Log in to MetaLink as directed.
Click the Certify tab.
Click View Certifications by Product.
Select the Database/Server option and click Submit.
Choose Oracle Database - YourEdition and click Submit.
Refer to the appropriate Oracle Database Server Installation Guide for your specific platform for installation and setup details.
See the Oracle Database Concepts 10g Release 2 (10.2) for more information about Oracle Database administration and management.
Use the Oracle Database Administrator's Guide 10g Release 2 (10.2) for details about managing Oracle Database processes, tablespaces, datafiles, tempfiles, managing schema files, Oracle-managed files, and more.
After installing the repository, you are ready to complete activities in "Installing and Configuring OC4J". After installing OC4J, you can deploy the Configuration Manager then add details about the installed repository to the Configuration Manager.
This discussion introduces the Oracle Container for J2EE (OC4J) installation and setup.
Both OC4J and Oracle Access Manager Configuration Manager are installed together on a single platform. Before you can deploy Oracle Access Manager Configuration Manager, you must install OC4J 10g Release 3 (10.1.3).
OC4J provides a complete Java 2 Enterprise Edition (J2EE) 1.4-compliant environment. OC4J provides all the containers, APIs, and services mandated by the J2EE specification.
OC4J is distributed in two configurations, both of which are supported by Oracle Access Manager Configuration Manager:
Standalone Configuration: In this configuration, OC4J is installed as a single, standalone instance that is managed, started and stopped directly as a self-contained component. This OC4J configuration, also known as an unmanaged configuration, offers a robust J2EE-compliant container that is easy to administer. In this configuration, a single OC4J instance is installed into a single ORACLE_HOME (the root directory in which Oracle software is installed).
Web communication in an OC4J standalone configuration is provided through the built-in OC4J Web server, which supports HTTP and HTTPS communications natively without the use of the Oracle HTTP Server (OHS). The default Web site is defined in the default-web-site.xml file, which specifies the default HTTP listener on port 8888. Additional Web sites may be defined on different ports using variations of this file. See the Oracle Containers for J2EE Configuration and Administration Guide 10g Release (10.1.3) for instructions on creating and managing additional Web sites in OC4J.
For installation details, see "Installing and Configuring OC4J in a Standalone Configuration".
Managed Configuration: In this configuration, OC4J is installed as a component of Oracle Application Server, in a group of one or more OC4J instances within an Oracle Application Server cluster. Oracle Application Server provides support for HTTP session and stateful session Enterprise JavaBean replication and load balancing across a group of OC4J instances within a cluster topology.
For information, see "Installing OC4J as a Managed Component of Oracle Application Server".
The standalone OC4J configuration is comprised of the following components, and requires 80 MB of free space:
Oracle Containers for J2EE 10g Release 3 (10.1.3)
Oracle Enterprise Manager 10g Application Server Control Console
This Web-based administration application is installed by default with OC4J and is enabled immediately after installation. See details about the Oracle Enterprise Manager 10g Application Server Control Console in Oracle Containers for J2EE Configuration and Administration Guide 10g Release (10.1.3) for details on using this management interface.
The standalone OC4J distribution, which includes the Application Server Control Console, is provided as a ZIP archive. During installation you are asked to provide a port number where OC4J communicates. You may assign any port number; the default port is 8888.
Administrator Account and Role: During installation you are asked to provide a password for the oc4jadmin account. This account is assigned the oc4j-administrators role that is used to manage users and roles and to connect to the JMX MBean server. If you do not assign a password for this account when OC4J is installed, you are prompted to set it the first time you start OC4J. The password can later be changed through the Setup page in the Application Server Control Console. The following procedure includes details about setting the password for the oc4jadmin account. For more information, see details about installing standalone OC4J in the Oracle Containers for J2EE Configuration and Administration Guide 10g Release (10.1.3).
Starting and Stopping OC4J: You can start an OC4J server instance in a standalone environment using the default configuration with one of the OC4J command scripts, or with the executable oc4j.jar archive. You can stop a standalone OC4J server by invoking the -shutdown command in the admin_client.jar or admin.jar command-line utility or an oc4j.cmd or oc4j executable script. For more information, see the Oracle Containers for J2EE Configuration and Administration Guide 10g Release (10.1.3).
Default Web Site: Once installed the OC4J standalone distribution includes a default Web site where applications can be accessed, and a Web site that allows the Application Server Control Management interface to be used. In a standalone OC4J configuration, the default Web site is configured to receive HTTP requests directly on a specific port. The default port is 8888. Alternatively, the site can be configured to receive secure HTTPS requests. The default Web sites are provided so that you can start using OC4J immediately. For more information, see the Oracle Containers for J2EE Configuration and Administration Guide 10g Release (10.1.3).
The following procedure provides information you need to install the OC4J standalone configuration for use with Oracle Access Manager Configuration Manager. These steps are not intended to replace the OC4J installation details available in the Oracle Containers for J2EE Configuration and Administration Guide 10g Release (10.1.3).
To install the OC4J standalone server
Enter Metalink and ensure that your host computer is compatible with this Oracle Access Manager Configuration Manager release:
Go to on https://metalink.oracle.com.
Log in to MetaLink as directed.
Click the Certify tab.
Click View Certifications by Product.
Select the Application Server option and click Submit.
Choose Oracle Identity Manager and click Submit.
Click Oracle Identity Management Certification Information 10g (10.1.4.0.1) (html) to display the Oracle Identity Management page.
Click the link for Section 6, "Oracle Access Manager Certification" to display the certification matrix
Before installing a standalone OC4J server, ensure the prerequisites described in the Oracle Containers for J2EE Configuration and Administration Guide 10g Release (10.1.3) been met. For example:
On the OC4J host computer, download and install the Java 2 Platform, Standard Edition (J2SE) Development Kit (JDK) release 5.0 or higher.
After installing J2SE, ensure that the appropriate environment variables are set. For example, JAVA_HOME, ORACLE_HOME, and J2EE_HOME.
Locate and download the OC4J distribution ZIP archive from:
http://www.oracle.com/technology/software/products/ias/index.html

     For Development:
          Oracle Containers for J2EE (OC4J) 10g Release 3 (10.1.3.1.0)
Install the standalone OC4J distribution using instructions in the Oracle Containers for J2EE Configuration and Administration Guide 10g Release (10.1.3).
See instructions for extracting the oc4j_extended.zip file into the directory that will serve as the OC4J installed directory (also known as ORACLE_HOME) with the archive utility of your choice.
The installer automatically creates the required directory structure for you. You can start an OC4J server instance in a standalone environment using the default configuration with one of the oc4j command scripts or the executable oc4j.jar archive. For more information about starting and stopping OC4j, see the corresponding chapter in the Oracle Containers for J2EE Configuration and Administration Guide 10g Release (10.1.3).
Set a password for the OC4J Administrator account the first time OC4J is started (the user name for this account is set to oc4jadmin by default).
Note:
You can change the password for this account. For more information, see information on tools for administering OC4J in the Oracle Containers for J2EE Configuration and Administration Guide 10g Release (10.1.3).Ensure that the installation is a success by entering the URL to the OC4J home page then login as the oc4jadmin. For example:
http://hostname:port/em/console
where hostname refers to computer that hosts OC4j standalone configuration; port refers to the HTTP port number on which OC4j host listens; and em/console connects to the OC4j console.
Proceed as follows:
Installation Successful (perform activities described next):
Assigning Configuration Manager Administrator and User Roles ensures that users can log in to the Oracle Access Manager Configuration Manager after deployment
Deploying the Configuration Manager using the Enterprise Manager browser console
Installation Not Successful: See troubleshooting tips in the Oracle Containers for J2EE Configuration and Administration Guide 10g Release (10.1.3).
When installing OC4J as a managed component of Oracle Application Server you use advanced installation steps for the J2EE Server configuration. This configuration requires 570 M.B of free space.
In a J2EE Server configuration, the following components are installed:
Oracle Containers for J2EE (OC4J) 10g (10.1.3.1.0) in one or more instances in one or more groups
This component provides a complete Java 2 Enterprise Edition (J2EE) environment for developing Java applications.
Oracle Enterprise Manager 10g Application Server Control Console (used for Web-based management of Oracle Application Server)
Oracle HTTP Server 1.3, which provides front-end Web communication and load-balancing functionality is included with this installation
Oracle Process Manager and Notification Server (OPMN), which includes the Oracle Notification Server (ONS)
OPMN provides process control and monitoring for Oracle Application Server instances and their components. ONS is installed by default on every Oracle Application Server host. In a managed environment, you must use OPMN to start and stop all components, including OC4J and Oracle HTTP Server communications between components. See the discussion on starting OC4J in an Oracle Application Server environment in the Oracle Containers for J2EE Configuration and Administration Guide 10g Release (10.1.3) for details.
OC4J runtime options and system properties can be manually set in the OPMN configuration file, opmn.xml. See details on the OC4J runtime configuration in the Oracle Containers for J2EE Configuration and Administration Guide 10g Release (10.1.3) for details.
Oracle Application Server provides support for HTTP session and stateful session Enterprise JavaBean replication and load balancing across a group of OC4J instances within a cluster topology. For details about cluster technology and application clustering in OC4J, see the Oracle Containers for J2EE Configuration and Administration Guide 10g Release (10.1.3).
In an Oracle Application Server clustered environment, a single Application Server Control Console can be used to manage all OC4J instances in a cluster. For more information, see the discussion on Oracle Enterprise Manager 10g Application Server Control Console and tools for administering OC4J in the Oracle Containers for J2EE Configuration and Administration Guide 10g Release (10.1.3).
Installation of the various managed components is accomplished using the Oracle Universal Installer. OPMN must be installed in every ORACLE_HOME directory to enable monitoring of each installed component. The Oracle Universal Installer provides a number of installation options:
Integrated Web Server, J2EE Server, and Process Management
In this configuration, all components are installed into a single ORACLE_HOME directory, including OC4J, Oracle HTTP Server, and OPMN. Multiple OC4J instances can be created within this ORACLE_HOME directory. Multiple host computers, each hosting one or more OC4J instances, can be included in an Oracle Application Server cluster.
J2EE Server and Process Management
This installation includes OC4J and OPMN. It can be utilized as a standalone OPMN-managed OC4J instance for development or testing purposes, or can be included within an Oracle Application Server cluster.
Web Server and Process Management
This installation includes only Oracle HTTP Server and OPMN. It can be used as a standalone Oracle HTTP Server instance, typically serving as the front-end Web listener for an Oracle Application Server cluster.
The following procedure provides information you need to install the OC4J as a managed component for use with Oracle Access Manager Configuration Manager. These steps are not intended to replace the OC4J installation details available in the Oracle Application Server Installation Guide.
To install Oracle Application Server J2EE Server configuration
Enter Metalink and ensure that your host computer is compatible with this Oracle Access Manager Configuration Manager release:
Go to on https://metalink.oracle.com.
Log in to MetaLink as directed.
Click the Certify tab.
Click View Certifications by Product.
Select the Application Server option and click Submit.
Choose Oracle Identity Manager and click Submit.
Click Oracle Identity Management Certification Information 10g (10.1.4.0.1) (html) to display the Oracle Identity Management page.
Click the link for Section 6, "Oracle Access Manager Certification" to display the certification matrix
Perform activities as described for J2EE Server installation in the Oracle Application Server Installation Guide as follows:
Verify requirements.
Review the discussion about things you should know before starting the installation.
Review topics about advanced installation of the J2EE Server.
Access the Oracle Enterprise Manager 10g Application Server Control Console using the following URL:
http://hostname:port/em/console
where hostname refers to computer that hosts Oracle Enterprise Manager 10g Application Server Control Console; port refers to the HTTP port number on which host listens; and em/console connects to the console.
Proceed as follows:
Installation Successful (perform the following activities in the order specified):
Deploying the Configuration Manager using the Enterprise Manager browser console.
Assigning Configuration Manager Administrator and User Roles ensures that users can log in to the Oracle Access Manager Configuration Manager after deployment.
Installation Not Successful: See troubleshooting tips in the Oracle Application Server Installation Guide.
This discussion explains how to deploy Oracle Access Manager Configuration Manager as an OC4J application. Any Web server supported by OC4J is supported for the Configuration Manager. No Microsoft certification is available nor expected.
The Oracle Access Manager Configuration Manager application is distributed as a .war file that can be deployed using OC4J. The .war file requires 7.77 MB of free disk space.
The following procedure describes how to deploy and test the Configuration Manager. For details about starting and stopping OC4j, see the Oracle Containers for J2EE Configuration and Administration Guide 10g Release (10.1.3).
Check Table 2-2 to confirm that prerequisites have been completed before starting the following procedure.
Table 2-2 Deployment Prerequisites
| Confirm | Prerequisite Tasks | Look In |
|---|---|---|
|
Install the Oracle Database Repository |
Installing and Setting up the Oracle Database Repository |
|
|
Install OC4J |
Installing and Configuring OC4J |
To deploy the Configuration Manager using OC4J
Go to the OC4J home page, if you have not already done so, then login as the oc4jadmin. For example:
http://hostname:port/em/console
where hostname refers to computer that hosts OC4j standalone configuration; port refers to the HTTP port number on which OC4j host listens; and em/console connects to the OC4j console.
On the OC4J home page, click the Applications tab. For example:
Applications
On the Applications page, click the Deploy button:
Deploy
The Select Archive page appears.
Fill in the path to the Oracle Access Manager Configuration Manager .war file archive using the Browse button, then click the Next button as shown in Figure 2-2.
The Application Attributes page appears.
On the Application Attributes page, specify the values in Table 2-3 for the Configuration Manager Application Attributes, then click the Next button and compare your page with the one in Figure 2-3.
Table 2-3 Oracle Access Manager Configuration Manager Application Attribute Values
| Configuration Manager Application Attributes | Values |
|---|---|
|
Application Name |
OracleConfigurationManger |
|
Parent Application |
default |
|
Bind Web Module to Site |
Default-web-site |
|
Web Module Context Root |
OCM |
When you finish, the Application Attributes page should look something like the one in Figure 2-3.
When you click Next button, the Deployment Settings page appears.
On the Deployment Settings page, click the Deploy button as shown in Figure 2-4 to deploy Oracle Access Manager Configuration Manager.
View the confirmation message that appears, as shown in Figure 2-5.
On the Confirmation page, click the Return button in the lower-right corner (to return to the OC4J home page).
Test the deployment to ensure it is successful by entering the URL to the Configuration Manager home page in a browser window. For example:
https://hostname:port/ocm/faces/index.jsp
where hostname refers to computer that hosts the Configuration Manager; port refers to the HTTP port number on which the Configuration Manager host listens; /ocm refers to Web Module Context Root specified on the Application Attributes page while deploying the Oracle Access Manager Configuration Manager application; and faces/index.jsp connects to the Configuration Manager application's Login page.
The Configuration Manager Login page should appear, as shown here.

Proceed as follows:
Deployment Successful: Perform activities in the following order:
Logging In: Enter the login name and password that were defined for your use with the Configuration Manager, then click the Login button. For more information, see "Assigning Configuration Manager Administrator and User Roles".
Touring the Configuration Manager: Acquaint yourself with available functions and the user interface.
Adding Repository Details in the Configuration Manager: Define the repository to be used by the Configuration Manager if you have the HMAdmin role assigned.
Deployment Not Successful: If the Configuration Manager Login page does not appear, see troubleshooting tips related to deploying an application in the Oracle Containers for J2EE Configuration and Administration Guide.
The procedure in this discussion guides as you create then assign the administrator roles needed for Oracle Access Manager Configuration Manager.
Oracle Access Manager Configuration Manager requires only OC4J for security. Within OC4J, the Configuration Manager application requires two security roles that provide specific privileges for the Configuration Manager. Only users assigned with the following roles can perform tasks in Oracle Access Manager Configuration Manager:
HMAdmin: This role enables you to perform only System Configuration functions for the repository within Oracle Access Manager Configuration Manager. To perform all other Configuration Manager activities, individuals must be assigned the HMUser role.
HMUser: This role enables you to perform all Configuration Manager functions except System Configuration functions. A user with write privileges to an environment (directory) can perform all migration functions when they have HMUser privileges: add environment details, make associations and add transformation rules, take snapshots, migrate data, and manage transactions.
The HMAdmin and HMUser roles that you create in OC4J will not inherit any existing OC4J roles. Nor are RMI Login Permission or administration permission granted when you create the HMAdmin and HMUser role.
During Configuration Manager deployment using OC4J, you defined a specific application name for Oracle Access Manager Configuration Manager. In the following procedure, you will create the roles within OC4J that are required for administrators and users of Oracle Access Manager Configuration Manager, then assign those roles to specific users that you define within OC4J.
Check Table 2-4 to confirm that prerequisites have been completed before starting the following procedure.
Table 2-4 Assigning Configuration Manager Roles in OC4J Prerequisites
| Confirm | Prerequisite Tasks | Look In |
|---|---|---|
|
Deploy the Configuration Manager |
Deploying the Configuration Manager |
To create and assign HMAdmin and HMUser roles in OC4J
Go to the OC4J home page and login as the oc4jadmin. For example:
http://hostname:port/em/console
where hostname refers to computer that hosts OC4j standalone configuration; port refers to the HTTP port number on which OC4j host listens; and em/console connects to the OC4J console.
On the OC4J home page click the Applications tab, then locate and click the link you defined for Oracle Access Manager Configuration Manager as shown in Figure 2-6. For example:
Applications
OracleConfigurationManger
The Applications tab for Oracle Access Manager Configuration Manager opens.
Click the Administration tab to display the page for Oracle Access Manager Configuration Manager. For example:
Administration
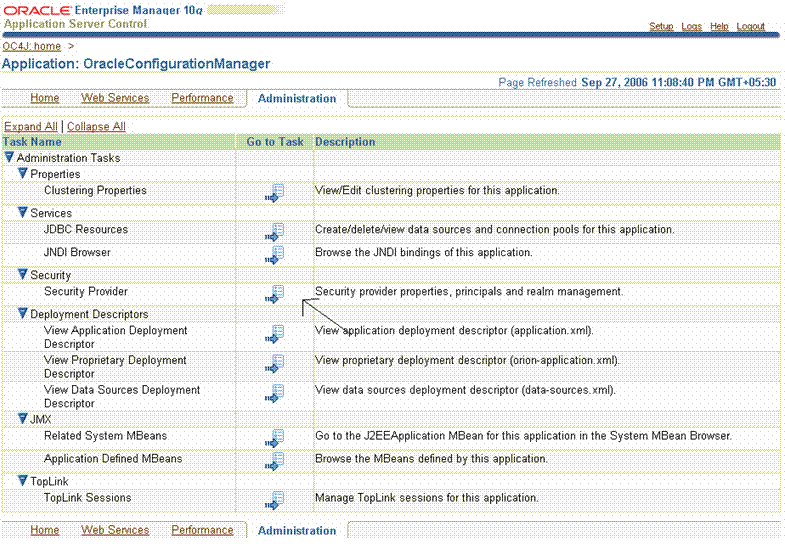
On the Administration tab, click the Security Provider icon in the Go To Task column, as shown in Figure 2-7.
Figure 2-7 Administration Tab for Oracle Access Manager Configuration Manager
The Security Provider page appears.
On the Security Provider page, click the Realms tab.
Perform the following steps to create the HMAdmin and HMUser roles for Oracle Access Manager Configuration Manager as follows:
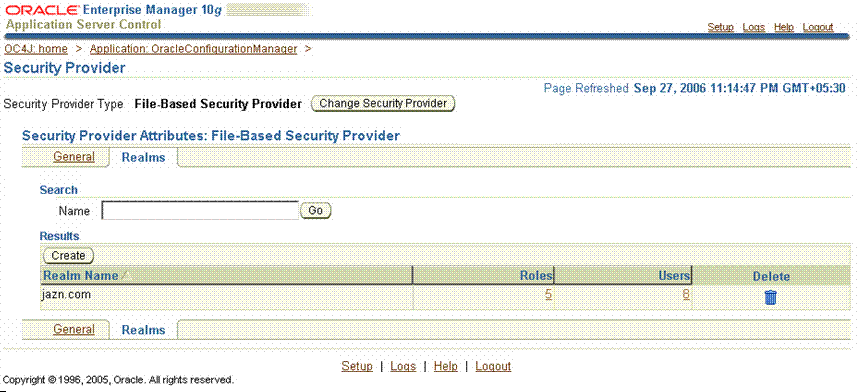
On the Realms subtab, locate and click the link (in the Roles column) that is associated with the Realm Name as shown in Figure 2-8.
Figure 2-8 Realms Subtab: Realm Name, Roles, and Users
The Roles page appears and includes a Create button.
On the Roles page, click the Create button to display the Add Role page.
The Add Role page appears as shown in Figure 2-9.
On the Add Role page, enter the following details for the HMAdmin role, then click OK:
Name: HMAdmin
Grant RMI Login Permission: Leave blank.
Grant Administration Permission: Leave blank.
Assign Roles: Ignore; there are no roles to be inherited by HMAdmin.
OK: Click the OK button when you finish to establish the HMAdmin role.
On the Add Role page, create the HMUser role using the following information as a guide:
Name: HMUser
Grant RMI Login Permission: Leave blank.
Grant Administration Permission: Leave blank.
Assign Roles: Ignore; there are no roles to be inherited by HMUser.
OK: Click the OK button when you finish to establish the HMUser role.
Your Roles page should look something like the one in Figure 2-10.
Figure 2-10 Roles Page Includes HMAdmin and HMUser

Add users, and assign to the Configuration Manager application the administrator or user roles that you just created, by performing the following activities:
On the Realms subtab, locate and click the link in the Users column associated with the Realm Name as shown in Figure 2-11.
Figure 2-11 Realms Subtab with Users Link

On the Users page, click the Create button under the Results label. For example:
Create
On the Add User Page add the requested details, then click OK as shown in Figure 2-12. For example:
Username: Enter the userid for logging in to the Configuration Manager.
Password/Confirm Password: Enter the password for this user; then confirm the password by entering it a second time.
Assign Roles: From the Available Roles list, select the desired role for this user then click the Move arrow to add these to the Selected Roles list. For example:
HMAdmin
or
HMUser
Note:
A single user may be assigned bothHMAdmin and HMUser roles.Click OK to complete the operation.
A Confirmation page appears where you can verify information for this new user.
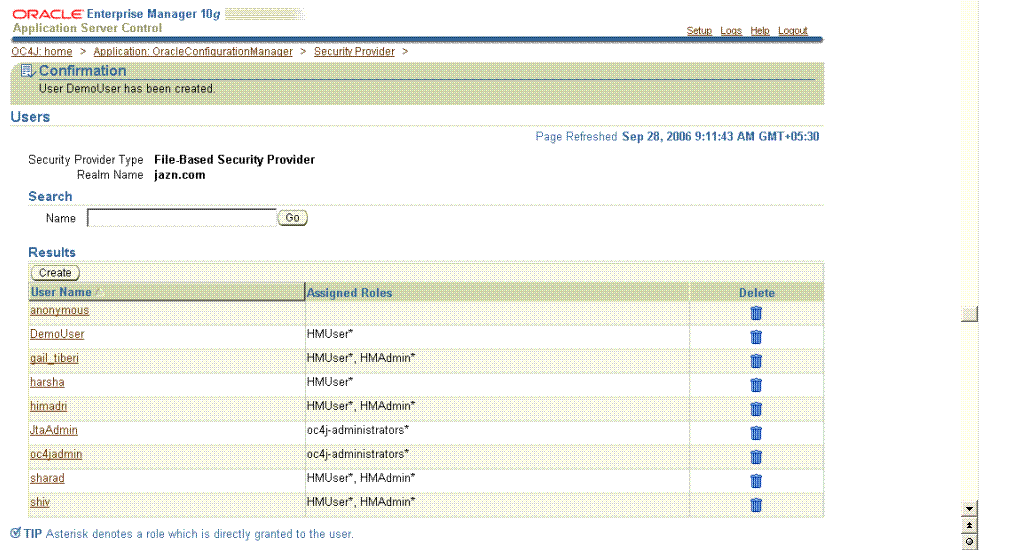
On the Confirmation page, review the User Name and Roles as shown in Figure 2-13 to ensure that everything is accurate.
Figure 2-13 Confirmation Page with User Name and Roles
Repeat step 7 to add other Oracle Access Manager Configuration Manager administrators and users, if needed.
Click Logout when you finish to leave OC4J.
With at least one Oracle Access Manager Configuration Manager administrator assigned, repository details may be added in the Configuration Manager.
After the roles and users have been created, restart the Oracle Access Manager Configuration Manager application.
Topics in this discussion provide a quick tour to orient you to Oracle Access Manager Configuration Manager.
If you log in to Oracle Access Manager Configuration Manager as a user with only HMAdmin privileges, you see only the System Configuration tab. If you log in as a user with HMUser privileges, you see all function tabs except System Configuration. If you are assigned both roles, all tabs are available. For more information see, "Assigning Configuration Manager Administrator and User Roles".
After logging in to Oracle Access Manager Configuration Manager, a Welcome page appears as shown in Figure 2-14. As with other Oracle Web-based applications. Function tabs are provided across the top of the page with corresponding links at the bottom of the page.
Figure 2-14 Oracle Access Manager Configuration Manager Welcome Page

To access the Configuration Manager
Go the Configuration Manager home page. For example:
https://hostname:port/ocm/faces/index.jsp
where hostname refers to computer that hosts the Configuration Manager; port refers to the HTTP port number on which the Configuration Manager host listens; /ocm refers to Web Module Context Root specified on the Application Attributes page while deploying the Oracle Access Manager Configuration Manager application; and faces/index.jsp connects to the Configuration Manager application's Login page.
The Login page appears.
Log in as an individual with either HMUser or HMAdmin privileges, depending upon the activities you intend to perform. For example:
HMUser_Name
     Passwword
As you proceed with the tour, refer to the following discussions:
The Logout link appears in the upper-right corner of Configuration Manager pages. You select the Logout link to conclude your session.
A Cancel button is provided on a number of Oracle Access Manager Configuration Manager pages. When you click Cancel, the current operation is terminated without completion and you are returned to the originating page for the function. For example if you cancel a migration operation, you are returned to the Select Logical Object Types to Compare page.
A Back button is included on some Oracle Access Manager Configuration Manager pages. When you click the Back button you are returned to the previous page. This is similar to using the Back button in the Web browser itself. For example if you click Back while viewing environment details, you are returned to the Environment List page.
When you have more than one environment, association, snapshot, or transaction the corresponding list page itemizes information in a table. Figure 2-15 shows a typical list page and table details.
When a table contains less than 10 items, all are visible at one time. If a table contains more than 10 items, navigational aids are included. For example, the table in Figure 2-15 includes navigational aids at the top-right side of the table:
Previous: Click Previous to return (go back) to the previous page.
List: Select a specific range of items from the list, or select Show All to display all the rows in the table.

The SnapShot function enables you to create a backup copy of the entire oblix tree in an LDAP directory of one of your environments. When you select the SnapShots tab, the SnapShot List page appears. From here, you can create a new snapshot or select a snapshot to restore or delete a snapshot.
Details for existing snapshots of the selected environment are organized in a table as shown in Figure 2-16. The table is empty until you select an environment from the Select Environment list.
For more information, see "Making and Managing Snapshots".
Figure 2-17 shows the Migration tab. Related functions are available on secondary tabs: environments, Associations, Migrate. The Migrate secondary tab includes a progress indicator, as shown inFigure 2-17.
Figure 2-17 Migration Tab, Secondary Tabs, and Migrate Progress Indicator

You choose the corresponding secondary tab to perform tasks that involve:
Environments: From this secondary tab you can create, view, modify, or delete details about existing environments. Before you can migrate data, you must add at least two environments to Configuration Manager: one to use as the source and one to use as the target.
For more information, see "Adding and Managing Environment Details in the Configuration Manager".
Associations: From this secondary tab you can create, view, modify, or delete details about directory associations. Before you can migrate data, you must create an association between two environments defined in Configuration Manager: one to use as the source and one to use as the target.
For more information, see "Creating and Managing Associations".
Migrate: After defining environments and forming an association, you can migrate configuration data using this secondary tab. You can migrate data directly using Oracle Access Manager Configuration Manager. Alternatively, you may choose to export data to an LDIF file and then use an external utility to import the data offline.
For more information, see "Migrating Data from the Source to the Target".
A transaction record is created automatically each time you migrate data using Oracle Access Manager Configuration Manager. A transaction ID is assigned automatically when the record is created. You can provide an optional transaction description.
When you select the Transactions tab, the Transactions List page appears. After selecting an association, all related transaction records are organized in a table as shown in Figure 2-18. The table is empty until you select an association.
You can view details for the record or view specific changes made during the transaction or roll back changes made during the transaction.
For more information about transactions and rolling back changes, see Chapter 5.
A repository is required to contain details about directory environments and associations, snapshot content, audit details, migration transaction data, and any optional LDIF files you may choose to create using Configuration Manager.
Only when you log in as an individual with HMAdmin privileges, is the System Configuration tab available as shown in Figure 2-19. Until a repository is defined in the Configuration Manager, the form is empty.
From the System Configuration tab, an individual with HMAdmin privileges can perform the following repository-related tasks in Configuration Manager:
View: Repository details are displayed automatically whenever the System Configuration tab is selected. The form is empty until a repository is defined in the Configuration Manager.
Edit: Enables you to add or alter repository details. Repository details must be added before migration tasks can be performed.
Cleanup Repository: Clears the data in the Oracle Access Manager Configuration Manager repository tables.
Upload Schema: Appears only when there is no Oracle Access Manager Configuration Manager schema present in the Oracle Database repository.
For more information about System Configuration functions, see "Adding Repository Details in the Configuration Manager".
There are several types of messages that may appear when working with Oracle Access Manager Configuration Manager:
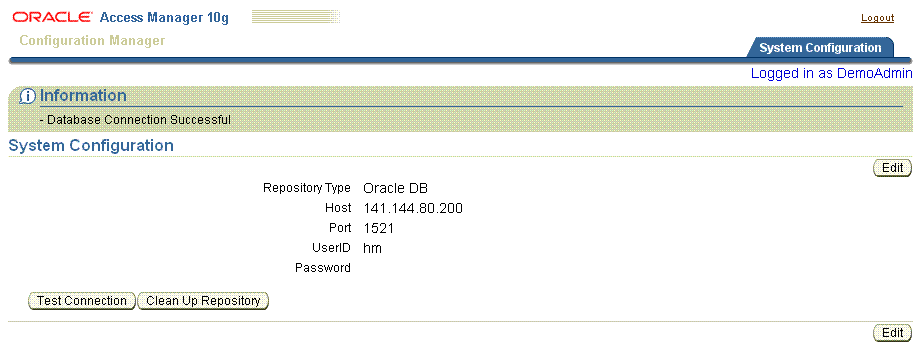
Informational or Confirmation Messages: Confirm that an operation completed successfully. Informational messages appear near the top of the page as shown in Figure 2-20. In this example, the Test Connection operation was used for the repository. Upon completion, you are returned to the System Configuration page where a message confirms the success of the operation.
Request for Action or Verification: Required before critical and irreversible operations are completed. For example, your verification is needed before deleting an environment or association or transformation rule. A window like the one in Figure 2-21 asks for your confirmation. You click OK to verify and complete the operation, or Cancel to terminate the operation without completing it.
Figure 2-21 Typical Request for Your Action

Error Messages: Announce a problem when an operation cannot be completed successfully. Error messages take the form shown in Figure 2-22 and include information to help you assess the problem and recover.
A repository is required to contain details about directory environments and associations, snapshot content, audit details, migration transaction data, and any optional LDIF files you may create using Configuration Manager. This discussion describes how to ensure that the Configuration Manager can communicate with its repository.
Before starting activities in this discussion, confirm that prerequisites described in Table 2-5 are completed.
Table 2-5 Repository Prerequisites
| Confirm | Prerequisite Task | Look In |
|---|---|---|
|
Assign Configuration Manager administrator role |
Assigning Configuration Manager Administrator and User Roles |
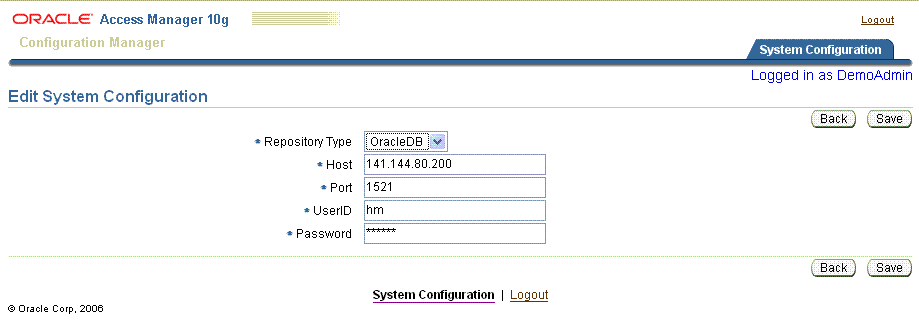
From the System Configuration page, you click the Edit button and enter details for your repository. There is no Add button for the System Configuration tab. Sample details that you need to supply are shown in Figure 2-23. If you log in with only HMUser privileges, the System Configuration tab does not appear.
Figure 2-23 A Completed Edit System Configuration Page
To add repository details to Oracle Access Manager Configuration Manager
Enter the Oracle Access Manager Configuration Manager, if you haven't already done so. For example:
https://hostname:port/ocm
where hostname refers to computer that hosts the Configuration Manager; port refers to the HTTP port number on which the Configuration Manager host listens; and /ocm refers to Web Module Context Root specified on the Application Attributes page while deploying the Oracle Access Manager Configuration Manager application.
The Welcome page appears.
Log in as an individual with HMAdmin privileges, as defined in OC4J in the previous procedure.
HMAdmin_Name
     Passwword
Click the System Configuration tab on the right side of the page.
Note:
Only users withHMAdmin privileges defined in OC4J for this application will see the System Configuration tab.On the System Configuration page, click the Edit button.
Edit
On the Edit System Configuration page, enter appropriate information to identify details for your Configuration Manager repository. For example:
Repository Type: Oracle DB is the only item listed and the only repository that is supported for this application.
Host: Your Oracle Database Host Name expressed as either the full DNS hostname or an IP address.
Port: Port number on which the Oracle Database host communicates.
Password: The password for the Oracle Database Administrator userID. There are no password restrictions.
Click Save to retain this information (otherwise, click the Back button).
The System Configuration page returns and includes a Test Connection button that you can use to ensure that the repository is accessible from the Configuration Manager.
Click the Test Connection button to ensure that this repository is accessible to the Configuration Manager. For example:
Test Connection
An informational message appears to confirm success, as shown here.

Proceed as follows:
Connection Successful: An informational message appears declaring the operation was a success. You are ready to upload the schema as described in step 8.
Connection Not Successful: An error message appears. In this case, confirm that all repository details are accurately entered (edit them if needed), confirm that the Oracle Database instance is running, test the connection again, then proceed with the next step to upload the schema.
Upload Schema: When you add repository details you need to upload the Configuration Manager schema as follows:
Click the Upload Schema button. For example:
Upload Schema
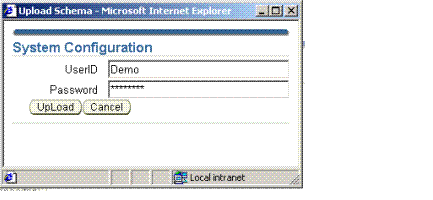
In the Upload Schema window, enter the directory administrator's UserID and password, then click Upload to complete the operation (or Cancel to terminate the operation without completion).
Proceed as follows:
Schema Upload Successful: A message informs you that the database is configured successfully and you are ready to prepare for and perform migration tasks as described in Chapter 3.
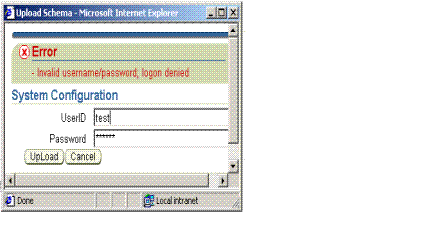
Schema Upload Not Successful: In this case, a message like the one here appears. Retry the upload, then proceed to Chapter 3.
After adding repository details to the Oracle Access Manager Configuration Manager and uploading the schema, the Configuration Manager is ready to use. For more information about adding environment details, forming associations, creating snapshots, and migrating data, see Chapter 3.
Data can be written to the repository only when it is live and accessible. Any individual with HMAdmin privileges can use the Test Connection procedure to ensure that the repository is available to the Configuration Manager.
After the operation completes successfully, an informational message confirms the status as shown in Figure 2-24.
Figure 2-24 Informational Message on the System Configuration Page
Note:
Only users withHMAdmin privileges defined in OC4J have access to the System Configuration tab. If you log in as a user with only HMUser privileges, the System Configuration tab does not appear.To confirm that the Configuration Manager repository is available
From the Oracle Access Manager Configuration Manager home page, log in as a user with HMAdmin privileges, then click the System Configuration tab on the right side of the page:
HMAdmin_Name
     Passwword
System Configuration
On the System Configuration page, click the Test Connection button then review the informational message to confirm that this repository is accessible.
Test Connection
Proceed as follows:
Connection Successful: An informational message appears and you are ready to continue with activities in this chapter.
Connection Not Successful: An error message appears. In this case, contact the Oracle Database administrator to confirm that the Oracle Database instance is running, test the connection again, then proceed with the activities in this chapter.