17 Tutorial for Building Mobile Web-to-Go Applications
There are two types of Web-to-Go applications:
-
The original Oracle Database Lite Web-to-Go application that uses an Oracle Database Lite Servlet stack. You can still use this type of application, but the Oracle Database Lite Server stack is not J2EE 1.3 compatible.
-
A Web-to-Go application built upon the OracleAS OC4J stack. Since the OC4J product is continually updated, then building your Web-to-Go application using the J2EE standards is better if you want to use future J2EE standards. This application is known as the OC4J Web-to-Go application.
To build the OC4J Web-to-Go application, follow the J2EE standards specified by Sun Microsystems and then create the snapshot with MDW and publish the application with the EAR or WAR file within the Packaging Wizard.
This tutorial demonstrates how to build, package and publish the original Oracle Database Lite Web-to-Go application with the "To Do List" demo. For details on how to create an OC4J Web-to-Go application, refer to the OC4J documentation or to the Sun Microsystems J2EE specification.
The "To Do List" application maintains a list of "To Do" items with status for each item indicating its completion. All items are stored in the Oracle database. Multiple users can access the "To Do List" application to display their corresponding To Do items.
Note:
For more information on developing Web-to-Go applications, see Chapter 6, "Developing Mobile Web-to-Go Applications".The following sections in this tutorial guide you through the phases of implementing a Web-to-Go application for Mobile devices:
-
Section 17.3, "Package the Application Using the Packaging Wizard"
-
Section 17.5, "Execute the Application on the Mobile Client for Web-to-Go"
17.1 Develop the Application
The first step is to develop and test the "To Do List" application using the Mobile Development Kit for Web-to-Go. Table 17-1 shows the components for the "To Do List" application:
Table 17-1 "To Do List" Application Components
| Component | Function |
|---|---|
|
Java Servlet |
Accesses the database and inserts To Do items. |
|
Java Server Page (JSP) |
Provides the "To Do List" application user interface in HTML. |
|
JavaBean |
Provides database access to the JSP. |
The source code for the "To Do List" application is installed along with the Mobile Development Kit. It can be found at the following location.
<ORACLE_HOME>\Mobile\Sdk\wtgsdk\src\tutorial
-
The JavaServer Page—The
ToDoList.jspgenerates an HTML page which displays the list of items that must be completed. -
The JavaBean—The
ToDoBean.javaJSP uses a JavaBean to perform operations with the Oracle database. Y -
The Java Servlet—The
InsertToDo.javaJava Servlet inserts a new To Do Item in the Oracle database, and uses the "To Do List" JSP to regenerate the HTML page.
In this section, the following tasks are discussed.
The Mobile Development Kit for Web-to-Go always uses Oracle Database Lite as the development database and a Web-to-Go server, which is known as the Mobile Client Web Server.
17.1.1 Create Database Objects in the Oracle Server
During deployment, the Mobile Server automatically creates the Oracle Database Lite database in the client device along with the requisite tables and data. To publish the application, users must create the database objects used by the application in the back-end Oracle database.
The "To Do List" application uses the following database objects.
-
The
TODO_ITEMStable—The application stores To Do Items in this database table. Table 17-2 shows the To Do Items table columns. -
The
TODO_SEQsequence—Each time a user inserts a new record in theTODO_ITEMStable, theTODO_SEQsequence generates a primary key value for the new record.
17.1.1.1 Create the Table Owner Account
Create the database user who will own the "To Do List" application objects in the Oracle database. If you have installed the samples during your Mobile Server installation, you can skip this step and continue with the next step. If you have not installed the samples, enter the following commands using the Command Prompt.
Note:
TheCONNECT_STRING is the entry where the database resides, as defined in the tnsnames.ora file, which is used to locate the back-end Oracle database.sqlplus system/<sys_password>@<CONNECT_STRING> create user master identified by master; grant CREATE SEQUENCE, CREATE SYNONYM, CREATE TABLE, CREATE VIEW, CREATE SESSION, CREATE INDEXTYPE to master;
17.1.1.2 Create the Database Objects in the Oracle Database
In order to execute the To Do List demo, set up the schema and the database objects. We have provided a SQL script that creates the database objects in the back-end database.
To create the database objects, run the tutorial.sql SQL script against the back-end Oracle database, as follows:
> cd <ORACLE_HOME>\Mobile\Sdk\wtgsdk\src\tutorial
> msql system/<sys_pwd>@jdbc:oracle:thin:@<host>:<port>:
      <oracle_sid> @tutorial.sql
> msql master/master>@jdbc:oracle:thin:@<host>:<port>:
      <oracle_sid> @tutorial.sql
When you execute the tutorial.sql command against the system schema, it creates the TODO_ITEMS and TODO_SEQUENCE in the back-end server database. When you execute the tutorial.sql command against the master schema, then it creates the TODO_ITEMS table and the TODO_SEQUENCE sequence in the user schema also, which in this example is master. This is necessary in order to create the publication item in the master schema.
Note:
While entering the above command to create database objects, you must include a mandatory space between "<oracle_sid>" and "@tutorial.sql".Where:
-
<sys_pwd>is the system password. This is required if you are creating themasterschema. However, if you have eliminated the statements that create the schema, you can usemaster/masterfor username/password. -
<host>:<port>refers to the name and listening port of the machine where the back-end Oracle database is installed.
This script creates the TODO_ITEMS table and the TODO_SEQUENCE sequence on the Oracle database.
17.1.2 Compile the Application
Compile the application by performing the following tasks:
-
Set the
CLASSPATH.You must set the
CLASSPATHto include the required Java Servlet Development Kit and Mobile Server libraries. To include these libraries, this tutorial provides a script calledsetenv.bat. Using the Command Prompt, enter the following commands.cd <ORACLE_HOME>\Mobile\Sdk\wtgsdk\bin setenv.bat -
Compile the application.
You can compile the application manually or by running the
compile.batscript. To run the script, start the Command Prompt and enter the following commands.<ORACLE_HOME>\Mobile\Sdk\wtgsdk\src\tutorial compile.batTo compile the application manually, perform the following tasks.
-
Compile the Java Servlet—Using the command prompt, enter the following commands:
cd <ORACLE_HOME>\Mobile\Sdk\wtgsdk\src\tutorial
javac -d ..\..\root\tutorial\WEB-INF\classses\InsertToDo.java
This creates the following servlet class file.
<ORACLE_HOME>\Mobile\Sdk\wtgsdk\root\tutorial\ WEB-INF\classses\InsertToDo.class -
Compile the Java Bean—Using the command prompt, enter the following command:
javac -d ..\..\root\tutorial\WEB-INF\classes ToDoBean.java
-
Install the JSP—Using the command prompt, enter the following command:
copy ToDoList.jsp <ORACLE_HOME>\Mobile\Sdk\wtgsdk\root\tutorial\ToDoList.jsp
-
17.2 Create Publication for Application
As described fully in Chapter 5, "Using Mobile Database Workbench to Create Publications", you can use MDW to create your publication. Launch MDW by executing oramdw from <ORACLE_HOME>/Mobile/Sdk/bin. The following sections detail how to use MDW to create a publication for the application in this tutorial.
Note:
While creating this publication, use Chapter 5, "Using Mobile Database Workbench to Create Publications" for a deeper understanding of how to use MDW and the type of information that you must provide.17.2.1 Create a Project
Create a new project for this application by selecting File->New->Project. This brings up a wizard where you enter the following information:
Note:
For more information, see Section 5.2, "Create a Project".-
Define a name and location for the project.
-
Enter the username, password, JDBC driver type, database host, database port and database SID for the Mobile repository.
Provide the Mobile Repository access information. Because you are interacting with the repository to create and manipulate synchronization objects, including the SQL scripts for the publication items, you need access to the Mobile Repository. For example, the Mobile Repository username and password is
mobileadmin/welcome123. The JDBC driver type used is the Oracle Thin driver. The back-end Oracle database host, port, and SID aremobile-qa11.oracle.com:1521:orcl. -
Specify schema username and password. Enter the user and password of the schema owner for the schema that you are using for the Mobile application. The Mobile application schema contains all database tables, views, synonyms used to build the snapshots for the application.
-
Verify the information that you entered and click Finish.
17.2.2 Create Publication Items
For this project, you need to create the todo_items publication item and a todo_seq sequence.
Note:
For more information, see Section 5.4, "Create a Publication Item".The following sections describe how to create the publication item and the sequence for this publication:
17.2.2.1 Create Publication Item
Perform the following to create the publication item:
-
Start the new publication item wizard by selecting File->New->Publication Item.
-
Enter the name as
todo_itemsand the type asFast. If you want this publication item to use automatic synchronization, make sure that the "Enable Automatic Synchronization" checkbox is checked. Uncheck to use manual synchronization. Click Next. -
Select the schema name as
MASTER, the object type asTable, and leave the object filter blank. Click Search. When the search ends, selecttodo_itemsfrom the object list. Click Next. -
Click >> to select all of the columns in the
todo_itemstable. Click Next. -
In the Query tab, select Edit to edit the query, as follows:
select * from master.todo_items where username=:username
Click Next.
-
If you checked the 'Enable Automatic Synchronization' checkbox, then an additional screen comes up. This screen enables you to specify users included in the compose. By default, all users are included. Leave checkbox unchecked and click Next.
-
The Summary page displays. Click Finish.
17.2.2.2 Create Sequence
Create the todo_seq sequence for the To Do List demo, as follows:
-
Start the new sequence wizard by selecting File->New->Sequence.
-
Enter the name as
todo_seqand that the sequence starts with 1, increment of 2, window size of 500, and threshold of 50. -
Uncheck the offline only checkbox, if already checked.
17.2.3 Create Publication
When you have completed the creation of the publication items, create the publication within the project by selecting File->New->Publication.
-
In the General tab, enter the name as
todo, which becomes part of the DSN for the client-side database. -
In the Publication Item tab, click Add to add the publication item that you just created with the following configuration:
Name: todo_items
Updatability: Updatable
Conflict Resolution: Server Wins
DML Callback: BLANK
Grouping Function: BLANK
Priority Condition: BLANK
My Compose: BLANK
Weight: 1
Description: Blank
-
In the Sequence tab, click Add to add the
todo_seqthat you just created and click OK. -
Optionally, if you do want to set some of the event rules for the publication, then you can select the Events tab to configure the thresholds for Automatic Synchronization rules, such as the following:
-
Sync if number of modified records in database exceeds threshold value
-
Sync if number of modified records in out queue exceeds threshold value
-
-
Save the publication by selecting File->Save and exit MDW.
17.3 Package the Application Using the Packaging Wizard
Using the Packaging Wizard, you can package and publish the To Do List application into the Mobile Server. For more information on how to use the Packaging Wizard, see Chapter 7, "Using the Packaging Wizard".
You can select and describe the To Do List application by launching the Packaging Wizard, as follows:
-
Start the Packaging Wizard, as follows:
cd <ORACLE_HOME>\Mobile\Sdk\bin
wtgpack
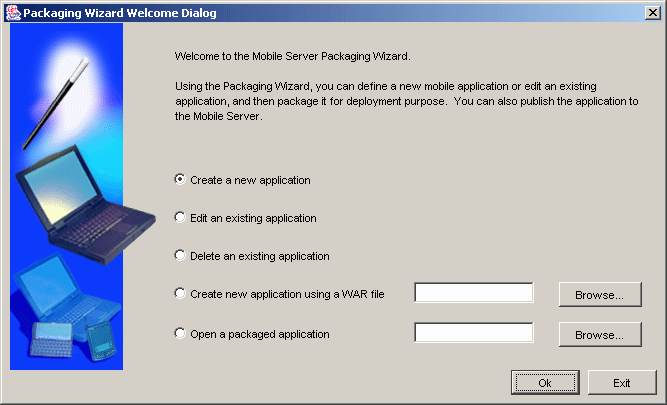
The Packaging Wizard appears and provides you with the option to create a new application, edit an existing application, delete an existing application, or open a packaged application, as displayed in Figure 17-1.
Note:
Deleting an existing application merely deletes the application from the XML file and does not remove the application from the Mobile Server. -
Select the Create a new application option and click OK.
-
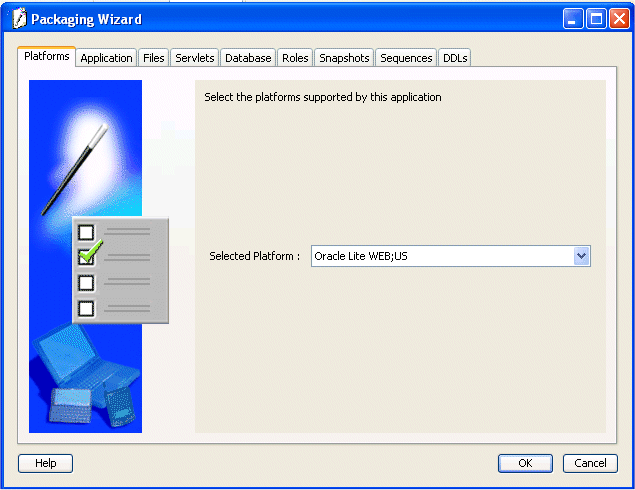
The Select a Platform panel appears. As Figure 17-2 displays, this panel enables you to specify the platform for your application. Select Oracle Lite WEB;US from the Available Platform list. Click Next.
-
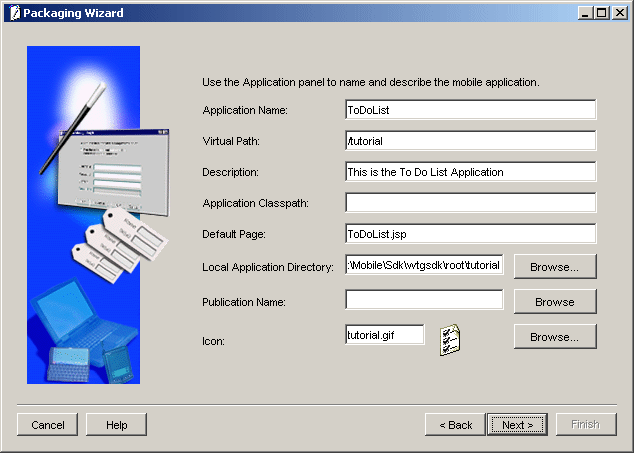
As Figure 17-3 displays, the Application panel appears. Use the Application panel to modify "To Do List" application settings. As Table 17-3 describes, enter the specified values in the corresponding fields.
Table 17-3 The "To Do List" Application Values
Field Value Application Name
ToDoList
Virtual Path
/tutorialDescription
This is the To Do List Application
Application Classpath
(Leave this field blank)
Default page
ToDoList.jsp(this is case sensitive)Local Application Directory
<ORACLE_HOME>\mobile\sdk\wtgsdk\root\tutorialPublication Name
Click on Browse. The 'Connect to database' window appears. Enter the following:
-
username:
mobiladmin -
password:
welcome123 -
database URL:
jdbc:oracle:thin:@<hostname>:<port>:<SID>
The next window shows the available publications. Select
todo.Icon
tutorial.gif -
-
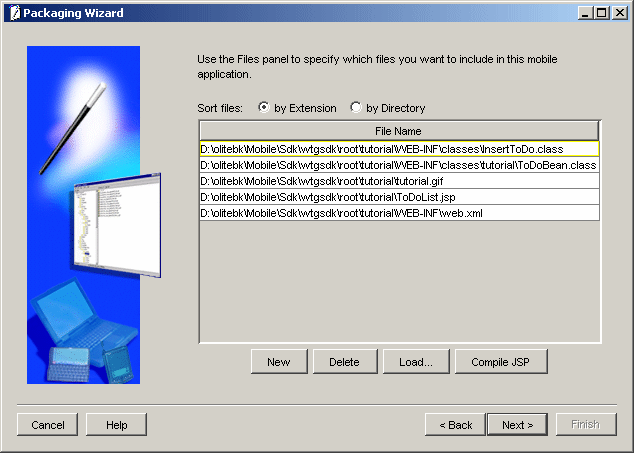
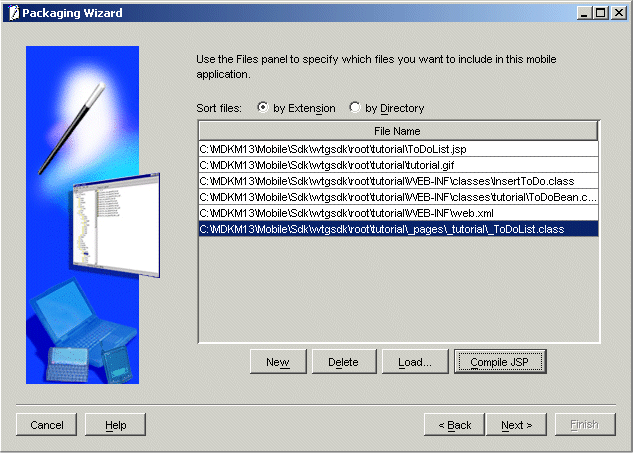
Click Next. As Figure 17-4 displays, the Files panel appears. Using the Files panel, you can select files that are part of the application. The Packaging Wizard uploads the selected files from the local application directory to the application repository on the Mobile Server.
The Files panel identifies files that the Packaging Wizard uploads from the local application directory to the application repository on the Mobile Server.
-
Click Compile JSP. The Packaging Wizard compiles all your JSP files to Java Servlet classes. As Figure 17-5 displays, the following confirmation page appears. Click OK.
Figure 17-5 JSP Compilation Completion Message
Description of "Figure 17-5 JSP Compilation Completion Message"
-
The generated files are automatically added to the list of application files.
Figure 17-6 Including Generated Files to Application Files
Description of "Figure 17-6 Including Generated Files to Application Files"
-
To view "To Do List" application servlets, click Next. To register with the Mobile Client Web Server, the Packaging Wizard automatically detects and selects servlets in your Local Application Directory. These servlets are registered with the Mobile Client Web Server.
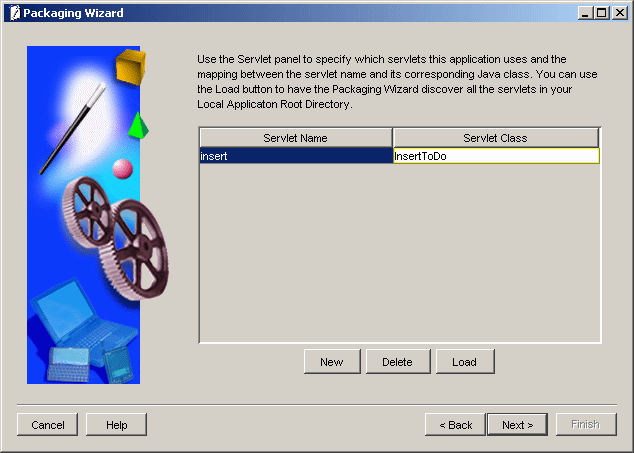
As Figure 17-7 displays, you can view the "To Do List" application servlet in the Servlets panel. Since the "To Do List" application contains only one servlet, the Servlets panel displays a single line.
The Servlets panel enables you to map virtual paths (servlet name) to the corresponding Java classes (servlet class).
Change the servlet name to insert by selecting the field, which turns white when selected. The servlet name is case sensitive, and must be in lower case. Leave the servlet class as
InsertTodo.Note:
Ensure that you change the servlet name. -
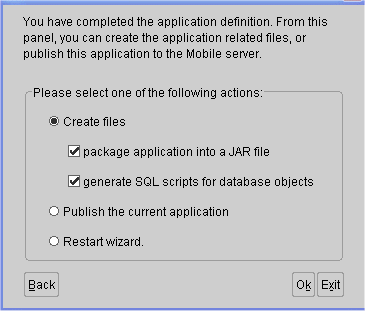
Click Next till you arrive at the Application Definition Completed Dialog as shown in Figure 17-8.
Figure 17-8 Application Definition Completed Dialog
Description of "Figure 17-8 Application Definition Completed Dialog"
Using the Application Definition Completed panel, you can package the "To Do List" application into a JAR file. The Application Definition Completed Dialog remains open for you to initiate application packaging.
-
Select the Create files option and select both the Package Application into a JAR file and Generate SQL scripts for database objects boxes.
-
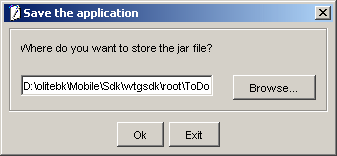
At this stage, the Save the Application dialog prompts you for the name of the JAR file, as Figure 17-9 displays. The default location is given below.
<
ORACLE_HOME>\Mobile\Sdk\wtgsdk\root\ToDoList.jarAfter choosing the JAR file, click OK. The JAR file is created and contains the application files and definition.
-
Back in the Application Definition Completed dialog, select the Publish the Current Application option and click OK.
The Publish the Application dialog appears. As Table 17-4 describes, enter the specified values.
Note:
The Mobile Server must be up for successful publishing.Table 17-4 Publish the Application Dialog Description
Field Description Value Mobile Server URL
URL or IP Address of the machine where the Mobile Server is running.
<Mobile Server>/webtogoMobile Server User Name
User name of the Mobile Server user with administrative privileges.
Administrator
Mobile Server Password
Password of the Mobile Server user with administrative privileges.
admin
Repository Directory
Directory name where all files for this application will be stored inside the Mobile Server Repository.
/tutorialPublic Application
Do not select this check box unless you want to make this application available to all users.
Clear
-
To publish the application in the Mobile Server Repository, click OK. A dialog displays the application publishing status. You must wait until the application is published.
-
To confirm that the application is published successfully, click OK.
-
To exit the Packaging Wizard, click Exit.
-
You have now completed all development tasks that are required for packaging your application. Your application is packaged.
17.4 Administer the Application
This section describes how to administer the application that you created and deployed through the following tasks.
-
Section 17.4.1, "Start the Mobile Server and the Mobile Manager"
-
Section 17.4.2, "Using the Mobile Manager to Create a New User"
-
Section 17.4.5, "Defining Snapshot Template Values for the User"
For more information about Mobile Manager tasks described in this tutorial, see the Oracle Database Lite Administration and Deployment Guide.
17.4.1 Start the Mobile Server and the Mobile Manager
The Mobile Manager is a Web-based application that enables you to administer Mobile Server applications. To start the Mobile Manager, perform the following steps.
-
Using the command prompt, go to the following directory.
<ORACLE_HOME>\Mobile\Server\bin -
To start the Mobile Server for the first time and subsequent occasions, execute the
runmobileservercommand. -
Start your Web browser and connect to the Mobile Server by enter the following URL:
http://<mobile_server>/webtogo
Note:
Replace<mobile_server>with the host name of your Mobile Server. -
Log on as the Mobile Server Administrator using
administratoras the User Name andadminas the Password. -
To launch the Mobile Manager, click the Mobile Manager link in the workspace.
-
Click the Mobile Server link.
-
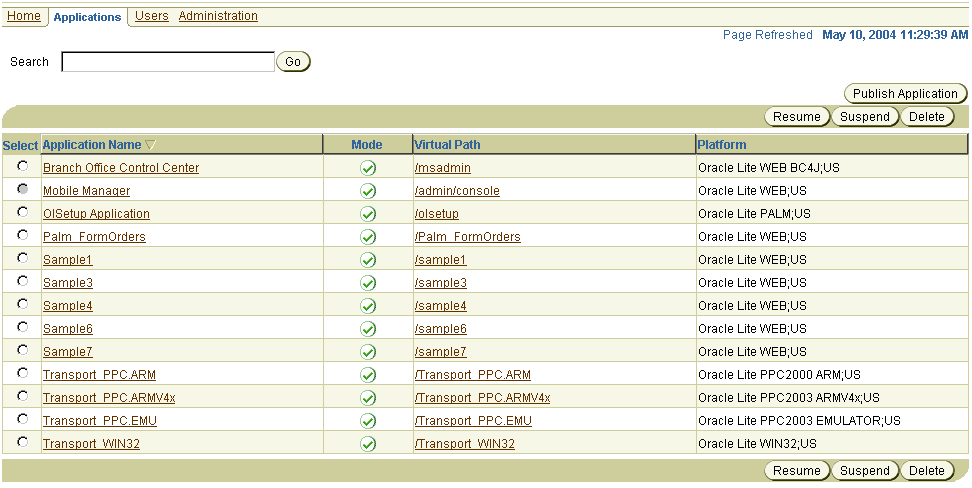
Click the Applications link. As Figure 17-10 displays, the Applications page appears. Locate the To Do List application, which should be there since you published it.
17.4.2 Using the Mobile Manager to Create a New User
To create a new Mobile Server user, perform the following steps.
-
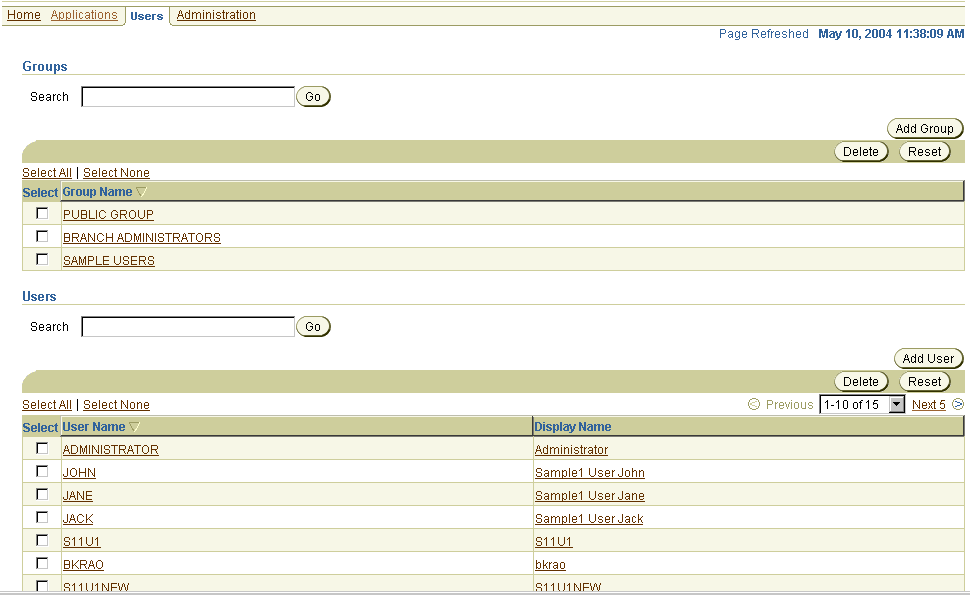
On the Mobile Manager home page, click the Users link. As Figure 17-11 displays, the Users page appears.
-
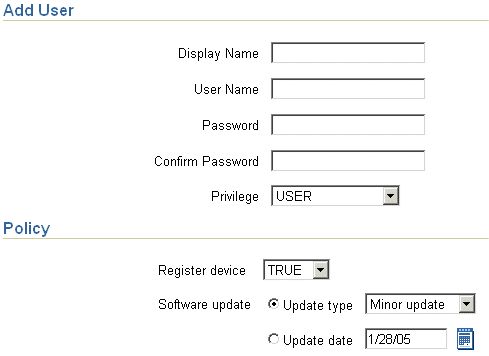
Click Add User. As Figure 17-12 displays, the Add User page appears.
-
As described in Table 17-5, enter the following information in the Add User page and click Save.
17.4.3 Setting Application Properties
To set the "To Do List" application properties, perform the following steps.
-
On Mobile Manager home page, click the Applications link. The Applications page appears.
-
To search for the application that you just published, enter To Do List in the Application Name field and click Search. The "To Do List" application appears in the workspace.
Note:
To display all the available applications, leave the search field blank and click Search. This action generates a list of all the available Mobile Server applications in the workspace. -
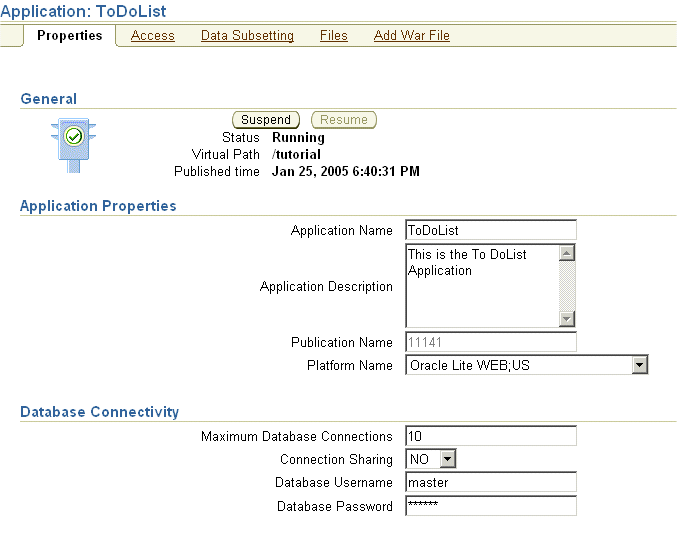
Click the To Do List application link. As Figure 17-13 displays, the Application Properties page lists application properties and database connectivity details.
-
In the Database Password field type
master. This is the default password for the Web-to-Go demo schema. Click Apply. The Mobile Manager displays a confirmation message.
17.4.4 Granting User Access to the Application
To grant the user TUTORIAL access to the "To Do List" application, perform the following steps.
-
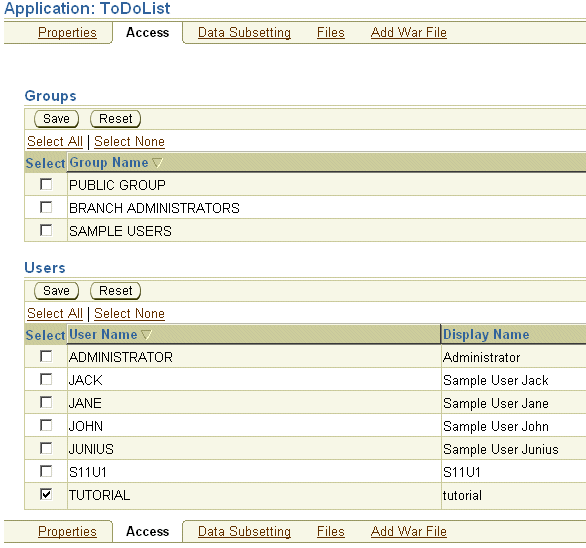
Navigate to the Application Properties page and click the Access link. As Figure 17-14 displays, the Access page lists groups and users that are associated with the application. The check boxes on this page indicate whether or not the user or group has access to the application.
-
Under the Users table, locate the user
TUTORIALand select the check box displayed against the user,TUTORIAL. -
Click Save. The Mobile Manager displays a confirmation message. The user
TUTORIALhas now been granted access to the "To Do List" application.
17.4.5 Defining Snapshot Template Values for the User
Define the snapshot template variable for the user, TUTORIAL. Each Mobile Client for Web-to-Go downloads the same application data when it synchronizes. In some cases, you may want to specify the data your application downloads for each user. You can accomplish this by modifying the user's snapshot template variable.
To modify a user's Data Subsetting parameters, perform the following steps.
-
Navigate to the Applications page and click the ToDoList application link. The Application Properties page appears. Click the Data Subsetting link. As Figure 17-15 displays, the Data Subsetting page appears.
-
Under the User Name column, click the user name link
tutorial. As Figure 17-16 displays, the Data Subsetting Parameters page appears.Figure 17-16 Data Subsetting Parameters Page

Description of "Figure 17-16 Data Subsetting Parameters Page"
-
Select the Username parameter and enter the value
tutorial. Click Save.
For more information about snapshots, refer the Oracle Database Lite Administration and Deployment Guide.
17.5 Execute the Application on the Mobile Client for Web-to-Go
This section describes how to set up a Mobile client to use the application that you created and tested in the Development section, deployed in the Deployment section, and then administered in the Administration section. In this section, you will perform the following tasks.
-
Section 17.5.3, "Manually Synchronize the Mobile Client for Web-to-Go"
Note:
You must install the application and test it on a separate machine from the Mobile Server.
17.5.1 Install the Mobile Client for Web-to-Go
You must install the Mobile client before you can use the application that you created and deployed.
Note:
You must install the Mobile Client on a machine which does not host the Mobile Server installation.To install the Mobile Client for Web-to-Go, perform the following actions.
-
Start your Web browser and connect to the Mobile Server by entering the following URL.
http://<mobile_server>/webtogo/setup
-
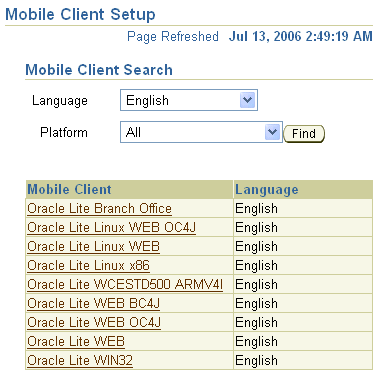
As Figure 17-17 displays, the Mobile Client Setup page lists a set of Mobile clients by platform. To download the Mobile Client for Web-to-Go setup program, click the corresponding Mobile Client link.
Note:
While installing the Mobile Client, you will be prompted for the User name and Password. Entertutorialas the user name andtutorialas the password. -
If you are using Netscape, choose a location to save the setup program and click OK. In Windows Explorer, double-click
setup.exeto run the setup program.If you are using Internet Explorer, run the setup program from your browser window.
-
While installing the Mobile Client, you will be prompted for the user name and password. Enter
tutorialas the user name andtutorialas the password. -
The setup program prompts you to choose an installation directory such as
D:\mobileclientand downloads all the required components and starts the Mobile Client for Web-to-Go on your machine. After completing the installation, the Mobile Manager login page appears as Figure 17-18 displays.
17.5.2 Log into the Mobile Client for Web-to-Go
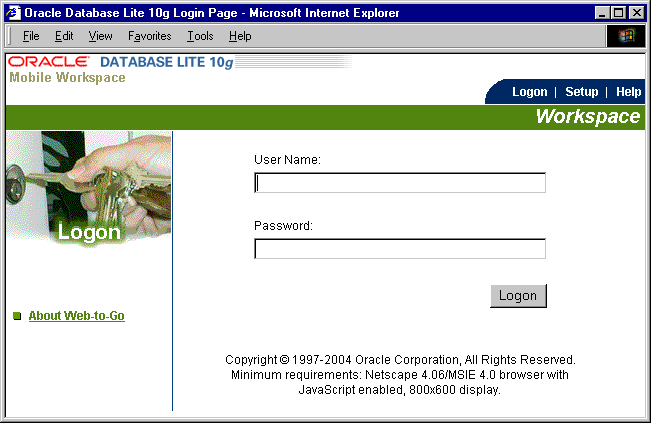
Complete the Mobile Client for Web-to-Go setup process. Your browser displays the Web-to-Go logon page. If your browser does not display the Web-to-Go login page, enter the following URL.
http://localhost/webtogo
-
Log on to Web-to-Go using
tutorialas the User Name andtutorialas the password. -
As you are logging into the Mobile Client for Web-to-Go for the first time, you must complete the initial setup process. The client initialization page appears and displays a confirmation message. "The Web-to-Go Client was installed successfully! Web-to-Go client will now synchronize your computer with the Mobile Server."
-
To start downloading your applications and data, click Next. The data synchronization page appears. This page displays the data synchronization status.
-
Once the synchronization process is finished, the Mobile Client for Web-to-Go is restarted automatically. The Mobile Server displays the following message: "New or updated application files have been downloaded. Please wait while Mobile Client for Web-to-Go is being restarted."
-
After restarting the Mobile Client for Web-to-Go, the workspace portal appears with a single icon for the "To Do List" application and a link labeled ToDoList.
-
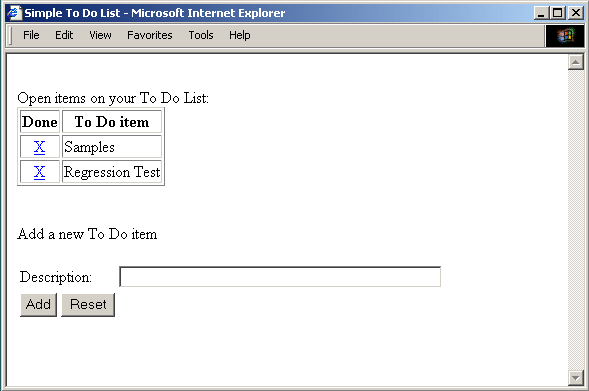
Click the To Do List application icon. As Figure 17-19 displays, Web-to-Go launches the "To Do List" application in your browser.
Figure 17-19 The "To Do List" Application
Description of "Figure 17-19 The "To Do List" Application"
-
Enter a new To Do item and save it in the database. Click Add.
-
Exit the application by closing the browser window. This action returns you to the workspace.
17.5.3 Manually Synchronize the Mobile Client for Web-to-Go
If you set up automatic synchronization, you can skip this section. To manually synchronize the Mobile Client for Web-to-Go with the Mobile Server, perform the following steps.
-
As Figure 17-20 displays, click the Sync tab in the upper right corner of the workspace.
The Mobile Client for Web-to-Go synchronizes the application and all of your data to the Oracle 10g Database. The workspace appears when the synchronization process has completed.
