| Oracle® SOA Suite Developer's Guide 10g (10.1.3.1.0) Part Number B28764-01 |
|
|
View PDF |
| Oracle® SOA Suite Developer's Guide 10g (10.1.3.1.0) Part Number B28764-01 |
|
|
View PDF |
Human workflow tasks enable you to interweave human interactions with connectivity to systems and services within an end-to-end process flow. As shown in Figure 7-29, human workflow is linked to a BPEL process through a WSDL, like any other web service. The process assigns a task to a user or role and waits for a response. The users act on the task using Oracle BPEL Worklist Application (Worklist Application).
Figure 7-29 Human Workflow in Oracle BPEL Process Manager

Features of human workflow include:
Task assignment and routing: Includes creating tasks from the business process and assigning the tasks to users or roles. Other task assignment and routing features include:
Support for task expiration and automatic renewal
Support for task delegation, escalation, and reapproval
Storage of task history information for auditing and the ability to archive and purge task details based on specified policies
JSP-based forms for viewing and updating task details
Multiple human interaction patterns: Includes standard patterns such as simple approval, sequential approval, parallel approval, and so on. Variations on patterns such as automatic escalation, renewal, and reminders are also supported. You can also mix and match patterns to create complex patterns.
Identity service: Interacts with back-end identity management systems to capture all user information from Java AuthoriZatioN (JAZN) and LDAP. Identity services provide role-based access control; you can assign permissions to roles and link an organizational hierarchy to a role model for authorization.
Notification service: Notifies users of assigned tasks and task changes using various delivery channels, such as email, voice message, fax, pager, or SMS.
The Worklist Application: Enables you to access tasks and act on them. The Worklist Application can be extended or customized based on the application.
Use a human task activity and the Human Task editor to create a human workflow task. Human Task editor inputs are saved in the human_task_name.task file.
To create a human workflow task:
Drag and drop a human task activity into the BPEL process.
Click the Create Task Definition icon, shown in Figure 7-30.
Enter a human task name and click OK.
Use the Human Task editor to configure the task.
Enter a title.
Select a priority
Use the flashlight icon to look up and select outcomes.
Enter the task owner's name, or use the flashlight icon or the expression builder icon to specify the task owner.
In the Parameters section of the Human Task editor, shown in Figure 7-31, to provide parameters.
Figure 7-31 Creating a Human Task: Parameters

Click the + icon on right side of the window.
In the Add a Parameter dialog, click Element and then the flashlight icon.
In the Type Chooser window, locate the parameter you want by expanding the Project Schema Files node and the XSD file node.
Click OK.
In the Assignment and Routing Policy section of the Human Task editor, shown in Figure 7-32, provide participant information.
Figure 7-32 Creating a Human Task: Assignment and Routing Policy

Click the + icon on the right side of the window.
In the Add Participant Type dialog, select from Single Approver, Group Vote, Management Chain, List of Single Approvers, FYI Assignee, and External Routing Service.
Enter a label for the participant type, for example, Approval Manager.
Specify users or groups that must act on the task.
Specify any participants who should be skipped if the condition is satisfied.
Expand the Advanced section to limit the duration of the task or to allow the participant to invite other participants.
Click OK.
Optionally select Allow all participants to invite other participants or Enable abrupt completion condition.
In the Expiration and Escalation Policy section, shown in Figure 7-33, select from Never Expire, Expire after, Renew after, or Escalate after, and specify any applicable parameters.
Figure 7-33 Creating a Human Task: Expiration and Escalation Policy

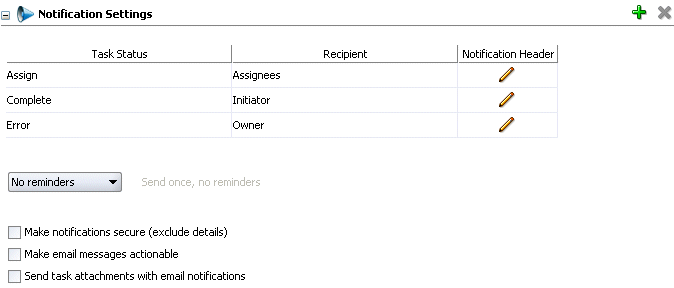
In the Notification Settings section, shown in Figure 7-34, indicate how a user is assigned a task or informed that the task status has changed.
Figure 7-34 Creating a Human Task: Notification Settings

Select one of the following task status types: Assign, Complete, Error, Expire, Request Info, Update Outcome, Suspend, Withdraw.
Use the Assign task status for tasks assigned to a user or a new user in a sequential list, for tasks that are renewed, delegated, reassigned, or escalated, or when information for a task is submitted.
Select one of the following recipients for the notification message: Assignees, Initiator (task creator), Approvers, or Owner.
Click the Edit icon to modify the default notification message text.
This message applies to the notification channel you selected when you created a notification (email, voice, fax, pager, or SMS). Email and fax messages can also include the worklist task detail defined in this message.
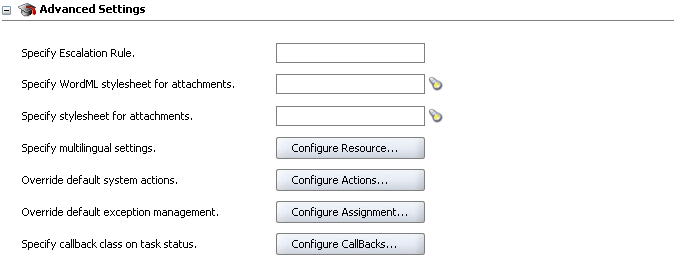
In the Advanced Settings section, shown in Figure 7-35, specify advanced settings, such as custom escalation rules, custom style sheets for attachments, multilingual settings, custom task actions and error messages, and callback classes.
Figure 7-35 Creating a Human Task: Advanced Settings

See Oracle BPEL Process Manager Developer's Guide for more information on the following topics:
Sending secure notifications
Sending actionable emails
Sending inbound and outbound attachments
Specifying advanced settings
The human task settings that you specified with the Human Task editor are stored in the metadata task configuration file. This .task file appears in the Application Navigator, under the BPEL project Integration Content directory, as shown in Figure 7-36.
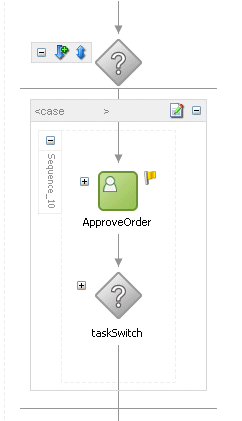
In the SOA Order Booking application, the ApproveOrder.task file is generated when you create the human workflow task ApproveOrder, shown in Figure 7-37. The ApproveOrder task is part of the requiresApproval switch activity. The workflow enables a manager to approve or reject orders over $1,000, for customers with Gold status.
Figure 7-37 The ApproveOrder Human Workflow

Use the Expression Builder to map fields to BPEL process variables.
To assign input and output parameters:
Double-click the human task activity that you created previously.
Use the Add a Human Task dialog to complete the association of the human workflow task with the BPEL process:
Enter a task title manually or use the Expression Builder to create the title dynamically.
This is a required field. Your input here overwrites the task title you entered in the Title field of the Human Task editor. This title is displayed in the Worklist Application.
Enter the initiator of the task manually or use the Expression Builder.
Using the Worklist Application, the initiator can view tasks that he created and perform actions such as approving or rejecting a request. If not specified, the initiator defaults to the task owner specified on the Advanced tab of the Human Task dialog. The initiator defaults to bpeladmin if a task owner is also not specified.
Select a priority value between 1 (the highest) and 5 from the Priority list.
This field is provided for user reference and does not make this task a higher priority during runtime.
Click the flashlight icon in the BPEL Variable column to map the task parameter to the BPEL variable.
You must map only the task parameters that carry input data. For output data that is filled in from the Worklist Application, you do not need to map the corresponding variables
Expand the Variables navigation tree and select the appropriate task variable.
In the Human Task dialog, shown in Figure 7-38, click Apply.
Use the Advanced tab of the Human Task dialog to optionally specify a scope name, global task variable name, task owner, identification key, and other advanced settings.
See Oracle BPEL Process Manager Developer's Guide for more information on the following advanced settings:
Specifying a scope name and a global task variable name
Specifying a task owner
Specifying an identification key (a user-defined task ID)
Including the task history of other human workflow tasks
Allowing task and routing customizations in BPEL callbacks
The task display form defines how a task payload is displayed in the Worklist Application. Task display forms are generated by using templates. Oracle JDeveloper includes three templates and two default JSPs:
The three templates are as follows:
Three-region JSP: Consists of the header, body and footer regions. These regions can be displayed by using custom JSP or XSL or default JSP or autogenerated JSP. The autogenerated JSP displays the body region.
Two-region JSP: Consists of the header and footer regions
One-region JSP: Consists of the body region
The two default JSPs are as follows:
Header JSP: Displays task attributes such as task number, priority, title, and so on
Footer JSP: Displays task attributes such as attachment, comments, and so on
See Oracle BPEL Process Manager Developer's Guide for information on the following topics:
Generating a custom task display form
Generating a task display form with ADF Data Controls
Creating Custom JSP forms
To generate a simple task display form:
Right-click the folder of the human workflow task for which you want a task display form (for example, the ApproveOrder task of the SOA Order Booking application).
Select Auto Generate Simple Task Form.
A simple task form is generated with the three-region template. The header region is displayed by using a Header1.jsp file. The footer region is displayed by using a Footer1.jsp file. The body region is displayed by using a payload-body.jsp file based on the payload.
Close payload-body.jsp by clicking the X in the tab.
When you generate a task display form, a .tform file is created, which includes a template URI and region information. Workflow task display forms are deployed by using the deployForm ant target, which is executed when you deploy the BPEL process. The target generates an EAR file that includes all generated default or custom JSPs. The generated EAR file is deployed as a child of the Oracle BPEL Process Manager application.
Example 7-14 shows the source code for the ApproveOrder_Display.tform file of the SOA Order Booking application.
Example 7-14 Source Code for the Task Display Form ApproveOrder_Display.tform
<?xml version = '1.0' encoding = 'UTF-8'?>
<taskDisplay targetNamespace="http://xmlns.companyABC.com/workflow/orderTaskDisplay"
 generateInternationlizedJSP="false" xmlns:po="http://xmlns.oracle.com/bpel/workflowApproveOrder"
 xmlns:task="http://xmlns.oracle.com/bpel/workflow/task"
 xmlns="http://xmlns.oracle.com/bpel/workflow/taskDisplay">
   <taskDefinitionId>${domain_id}_${process_id}_${process_revision}_ApproveOrder</taskDefinitionId>
   <applicationName>worklist</applicationName>
   <templateName>ThreeRegionJSP</templateName>
   <template>${http_url}/${domain_id}/${process_id}/${process_revision}/
     ApproveOrder/ApproveOrder.jsp</template>
   <regions>
      <defaultJSP regionName="Header">
         <jspURI>Header1.jsp</jspURI>
      </defaultJSP>
      <autoGeneratedJSP regionName="Body" editable="true">
         <jspURI>payload-body.jsp</jspURI>
         <messageAttribute editable="false">PurchaseOrder</messageAttribute>
      </autoGeneratedJSP>
      <defaultJSP regionName="Footer">
         <jspURI>Footer1.jsp</jspURI>
      </defaultJSP>
   </regions>
</taskDisplay>
The Worklist Application uses a browser interface to enable users to act on their assigned human workflow tasks. Use Internet Explorer 6.0 or Mozilla Firefox 1.0.4 to access the Worklist Application.
See Oracle BPEL Process Manager Developer's Guide for more information about the Worklist Application.
To log in to the Worklist Application:
Open a Web browser.
Go to the following URL:
http://hostname:portnumber/integration/worklistapp/Login
The hostname is the name of the host on which Oracle BPEL Process Manager is installed
The portnumber used at installation (typically 8888) is noted in bpelsetupinfo.txt, at
SOA_Oracle_Home\install\
You can also select Start, then All Programs, then Oracle - Oracle - soademo, then Oracle BPEL Process Manager, and then Worklist Application.
Type the username and password, and click Login.
You can use jcooper and welcome1 to log in.
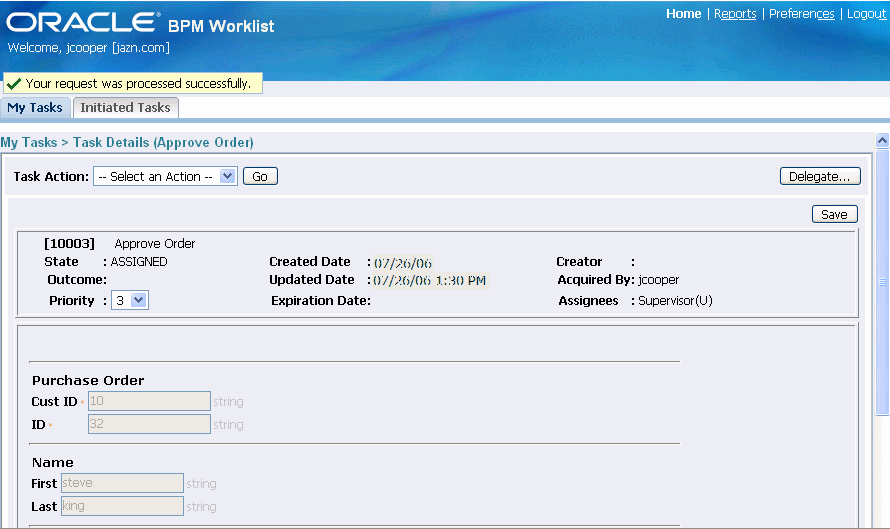
When the ApproveOrder process runs as part of the SOA Order Booking application, the process appears in Oracle BPEL Control as an initiated activity waiting for a response, that is, waiting for a manager to approve the order. The manager uses the Worklist Application to approve or reject the request. After logging in, the manager sees a list of tasks, clicks the task title, Approve Order, claims the task, and then accepts or rejects it. The task details are displayed using the task display form described in Section 7.12.4, "How to Generate a Task Display Form" and shown in Figure 7-39.
Figure 7-39 Worklist Application for the Approve Order Task

If the manager approves the order, then the message is sent back into the BPEL flow. If the manager rejects the order, then the process cancels the order.