| Oracle® SOA Suite Developer's Guide 10g (10.1.3.1.0) Part Number B28764-01 |
|
|
View PDF |
| Oracle® SOA Suite Developer's Guide 10g (10.1.3.1.0) Part Number B28764-01 |
|
|
View PDF |
The notification service in Oracle BPEL Process Manager enables you to send notifications from a BPEL process by email, telephone voice message, fax, pager, or short message service (SMS). Notifications can be asynchronous messages to which a user does not respond, for example, a purchase order acknowledgment, or actionable messages to which a user is expected to respond, for example, an expense report approval. This section discusses email notification. See Oracle BPEL Process Manager Developer's Guide for information on voice, fax, pager, and SMS notification channels.
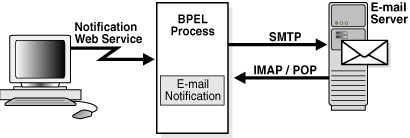
Figure 7-40 shows email notification from a BPEL process. Notification services are exposed as web services. The notification service sends email using SMTP and receives email from IMAP-based or POP-based email accounts.
Figure 7-40 Email Notification from a BPEL Process

You use the email service, available from the Component Palette, to add an email notification to a BPEL process. You can directly enter the required and optional email addresses and message content (subject and body) or you can use the following built-in functions:
Identity lookup dialog: Browse the user directory that is configured for use by Oracle BPEL Process Manager—Oracle Internet Directory (OID), JAZN/XML, LDAP, and so on. See "To use the identity lookup dialog:" for instructions.
XPath Expression Builder: For recipient email addresses (To, Cc, Bcc, Reply To), you can use the XPath Expression Builder to get email addresses dynamically from the input. For the subject and body of the email message, you can use the XPath Expression Builder to set dynamic text based on data from process variables that you specify. Dynamic data is automatically enclosed in <% %> when you use the XPath Expression Builder with free text. See "To use the XPath Expression Builder:" for instructions.
See Oracle BPEL Process Manager Developer's Guide for information on the following topics:
Sending email attachments
Using Oracle Application Server Wireless in conjunction with Oracle BPEL Process Manager, which is preconfigured to send notifications using Oracle's hosted wireless service
Starting business processes by email using the email activation agent element activationAgents
Setting up an identity service
In addition to using the email service, Identity lookup dialog, and XPath Expression Builder, you must set up configuration details for email accounts in the ns_emails.xml file, found at
SOAHOME\bpel\system\services\config
An email activity sends an email from the BPEL process to the recipient.
To add an email activity to a BPEL process:
Drag and drop an Email service to where you want an email notification within the BPEL process.
Use the Edit Email dialog to enter notification details.
In the From Account field, enter the name of the account used to send the message.
The configuration details for this email account name must exist on Oracle BPEL Server.
In the To, Cc, Bcc, and Reply To fields, enter the email addresses to which the message is to be delivered.
This can be a static email address entered at the time the message is created, an email address looked up using the identity service, or a dynamic address from the payload.
In the Subject field, enter the subject of the email message.
This can be free text or dynamic text (using the XPath Expression Builder), or a combination.
In the Body field, enter the message body of the email message.
This can be plain text, XML, free text, or dynamic text (using the XPath Expression Builder).
Select Multipart message with . . . attachments and enter a number to specify email attachments.
The number includes the body. For example, if you have a body and one attachment, you enter 2.
Click OK.
Use the Identity Lookup dialog to select users or groups to whom you want to send notifications by browsing the user directory (OID, JAZN/XML, LDAP, and so on) that is configured for use by Oracle BPEL Process Manager.
To use the identity lookup dialog:
On the Edit Email dialog, click the flashlight icon to the right of any recipient field.
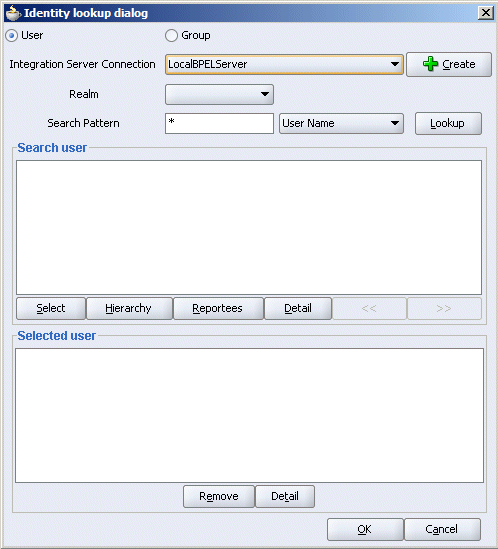
Use the Identity lookup dialog, shown in Figure 7-41, to browse the user directory (OID, JAZN/XML, LDAP, and so on) that is configured for Oracle BPEL Process Manager.
Figure 7-41 Identity Lookup Dialog Used with Email Notification

Select User or Group.
Select your integration server or create one.
Select a realm.
For the LDAP-based JAZN provider, Oracle Internet Directory, users are seeded under the realm you selected when prompted during installation.
Search by entering a search string such as jcooper, j*, *, and so on, and click Lookup to fetch all the users that match the search criterion.
Highlight one or more users or groups in the search results area and click Select.
Use the Hierarchy button to view the hierarchy of a selected user. Use the Reportees button to display the reportees of a selected user or group. Use the Details button to view the details of a selected user or group.
Click OK.
Use the XPath Expression Builder to set up email addresses that are dynamically based on certain process variables. You can also look up contact information for a specific user using the built-in XPath functions for the identity service.
To use the XPath Expression Builder:
On the Edit Email dialog, click the second icon to the right of any recipient or text field.
Use the XPath Expression Builder, shown in Figure 7-42, to get email addresses from variables or the payload.
Figure 7-42 XPath Expression Builder Used with Email Notification

Set email addresses dynamically using the following expressions:
To get the email address (or telephone number) directly from the payload, use the following XPath:
bpws:getVariableData('<variable name>', '<part>','<input xpath to get an address>')
For example, to get the email address from variable inputVariable and part payload based on XPath /client/BPELProcessRequest/client/mail:
<%bpws:getVariableData('inputVariable','payload','/client:BPELProcessRequest/client:email')%>
You can use the XPath Expression Builder to select the function and enter the XPath expression to get an address from the input variable.
To get the email address or telephone number dynamically from the payload, use the following XPath:
ora:getUserProperty(userID, propertyName)
The first argument evaluates to the user ID. The second argument is the property name.
The following example gets the email address of the user identified by the variable inputVariable, part payload, and query /client:BPELProcessRequest/client:userID:
ora:getUserProperty(bpws:getVariableData('inputVariable', 'payload','/client:BPELProcessRequest/client:userid'), 'mail')
Click OK.
Configure email accounts in the ns_emails.xml file, which is in
SOAHOME\bpel\system\services\config
To configure email accounts:
Open the ns_emails.xml file and configure it as follows:
Enter the sender's email address in the FromAddress attribute of the EmailAccount element.
<EmailAccounts EmailMimeCharset="">
  <EmailAccount>
    <Name>Default</Name>
    <GeneralSettings>
      <FromName>Oracle BPM</FromName>
      <FromAddress>bpm1@.us.oracle.com</FromAddress>
. . .
</EmailAccounts>
Ensure that a default email account is specified in the name attribute.
This account is used when no account is specified to receive an email notification. This account is also used to send task-related notifications. A default email account must always be specified in the configuration file.
Ensure that the OutgoingServerSettings and IncomingServerSettings attributes are set. For actionable notifications in a workflow, both IncomingServerSettings and OutgoingServerSettings are required.
Ensure that the XML elements shown in Table 7-1 are configured as needed.
Table 7-1 XML Elements for the Email Notification Configuration File
| Name | Description |
|---|---|
EmailAccount/Name |
Name of the account. This can be any name, but must be unique within the BPEL server. |
EmailAccount/GeneralSettings/FromName |
Name of the |
EmailAccount/GeneralSettings/FromAddress |
Email address for the |
EmailAccount/OutgoingServerSettings/SMTPHost |
Name of the outgoing SMTP server |
EmailAccount/OutgoingServerSettings/SMTPPort |
Port of the outgoing SMTP server |
EmailAccount/IncomingServerSettings/Server |
Name of the incoming email server |
EmailAccount/IncomingServerSettings/Port |
Port of the incoming email server |
EmailAccount/IncomingServerSettings/UserName |
User ID of the email address |
EmailAccount/IncomingServerSettings/Password |
User password |
EmailAccount/IncomingServerSettings/Password[encrypted |
Encrypted attribute of the password. It is |
EmailAccount/IncomingServerSettings/UseSSL |
Secure sockets layer (SSL) attribute. It is |
EmailAccount/IncomingServerSettings/Folder |
Name of the folder from which to read the incoming messages |
EmailAccount/IncomingServerSettings/PollingFrequency |
Polling interval for reading messages from the incoming messages folder |
Save the file.
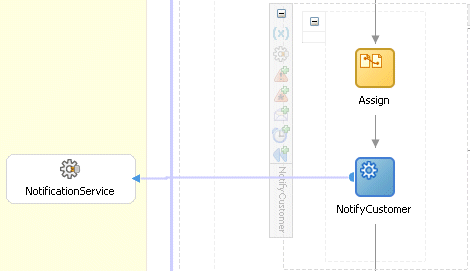
The notification service uses the email details you enter in the Edit Email dialog to creates an assign activity with the default name EmailParamsAssign, as shown in Figure 7-43.
Figure 7-43 Notification Assign and Invoke Activities

Figure 7-44 shows how the copy operations of the assign activity are automatically done for you. In the figure, demo@bpelmail.com, which was entered in the To field on the Edit Email dialog, is assigned to the variable
varNotificationReq/EmailPayload//EmailPayload/ns5:To
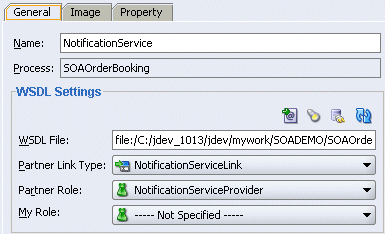
The notification service also creates an invoke activity with the default name InvokeNotificationService (shown in Figure 7-43) and a partner link with the default name NotificationService. Figure 7-45 shows how the invoke activity is automatically set to interface with the NotificationService partner link, which is shown in Figure 7-46.
Figure 7-46 NotificationService Partner Link Settings

Example 7-15 shows the source code for the NotifyCustomer scope in the SOA Order Booking application.
Example 7-15 Source Code for the NotifyCustomer Scope for Email Notification
<scope name="NotifyCustomer">
  <variables>
    <variable name="varNotificationReq"
              messageType="ns5:EmailNotificationRequest"/>
    <variable name="varNotificationResponse"
              messageType="ns5:ArrayOfResponse"/>
    <variable name="NotificationServiceFaultVariable"
              messageType="ns5:NotificationServiceErrorMessage"/>
  </variables>
  <faultHandlers>
    <catch faultName="ns5:NotificationServiceFault"
           faultVariable="NotificationServiceFaultVariable">
      <empty/>
    </catch>
  </faultHandlers>
  <sequence>
    <assign name="Assign">
      <copy>
        <from expression='"Default"'/>
        <to variable="varNotificationReq" part="EmailPayload"
            query="/EmailPayload/ns5:FromAccountName"/>
      </copy>
      <copy>
        <from expression="string('')"/>
        <to variable="varNotificationReq" part="EmailPayload"
            query="/EmailPayload/ns5:Bcc"/>
      </copy>
      <copy>
        <from expression="string('')"/>
        <to variable="varNotificationReq" part="EmailPayload"
            query="/EmailPayload/ns5:Cc"/>
      </copy>
      <copy>
        <from expression="string('')"/>
        <to variable="varNotificationReq" part="EmailPayload"
            query="/EmailPayload/ns5:ReplyToAddress"/>
      </copy>
      <copy>
        <from expression="concat('Order ',bpws:getVariableData('inputVariable','payload','/
          client:SOAOrderBookingProcessRequest/ns4:PurchaseOrder/ns4:ID'),' has been completed')"/>
        <to variable="varNotificationReq" part="EmailPayload"
            query="/EmailPayload/ns5:Subject"/>
      </copy>
      <copy>
        <from expression='"demo@bpelmail.com"'/>
        <to variable="varNotificationReq" part="EmailPayload"
            query="/EmailPayload/ns5:To"/>
      </copy>
      <copy>
        <from expression="string('')"/>
        <to variable="varNotificationReq" part="EmailPayload"
            query="/EmailPayload/ns5:Content/ns5:ContentBody"/>
      </copy>
      <copy>
        <from expression="string('text/html; charset=UTF-8')"/>
        <to variable="varNotificationReq" part="EmailPayload"
            query="/EmailPayload/ns5:Content/ns5:MimeType"/>
      </copy>
    </assign>
    <invoke name="NotifyCustomer" partnerLink="NotificationService"
            portType="ns5:NotificationService"
            operation="sendEmailNotification"
            inputVariable="varNotificationReq"
            outputVariable="varNotificationResponse"/>
  </sequence>
</scope>