| Oracle® SOA Suite Developer's Guide 10g (10.1.3.1.0) Part Number B28764-01 |
|
|
View PDF |
| Oracle® SOA Suite Developer's Guide 10g (10.1.3.1.0) Part Number B28764-01 |
|
|
View PDF |
After you define a routing service, by specifying its WSDL, you can specify the rules that determine how a message instance processed by the routing service gets to its next destination. Routing rules can be defined using a property panel in Oracle JDeveloper ESB Designer or a property sheet in Oracle ESB Control.
You must specify at least one target operation and you can specify multiple target operations. For each target operation, you can apply a data transformation, set up filtering, specify from which system messages are accepted, specify asynchronous or synchronous execution, and establish priority when there are multiple target operations.
To access the Routing Rules property panel inOracle JDeveloper ESB Designer, use either of the following two methods described here.
To access the routing rules properties panel:
From the Applications Navigator:
In the Application Navigator, expand the Resources folder under the ESB project.
In the Resources folder, double click the name of the routing service for which you want to specify routing rules.
Click the plus symbol (+) to expand the Routing Rules information.
From the Design tab:
Double-click the icon that represents the routing service for which you want to specify routing rules.
Click the plus symbol (+) to expand the Routing Rules information.
Figure 6-8 is an example of a routing rules panel with multiple rules specified.
The target operation is the only routing rule you must specify to make use of a routing service. This routing rule tells the routing service the next service, known as the target service, to which the message should be sent and the operation to perform on that message when it reaches the target service.
You can specify multiple target service and target operation pairs for each routing service.
In addition, for request/reply message flows, you can forward the reply message to another target, and specify a target service in the event that a message fault occurs. The following are the configurations that you can specify a target operation:
Specifying Target Operations for a One-Way Configuration
Specifying Target Operations to Return a Response to the Source Service
Specifying Target Operations to Forward a Response to a Non-Source Service
Specifying Target Operations for a Faulted Message
To Specify Target Operations for a Routing Rule
If you have not already done so, expand the Routing Rules information panel.
Click the large green plus (+) button.
The Browse Target Service Operation dialog opens.
In the Browse Target Service Operation dialog, follow these steps:
Navigate to, and then expand the desired target service.
Select the target service operation.
Click OK.
The Routing Rules tab is updated to reflect the newly added target service and operation, with the value expressed as target_service.target_operation.
Repeat steps two and three if you want to add an additional target service and target operation pair. You can specify the same target service and a different operation, if desired.
|
Note: To modify the target service and target service operation, click the Browse for Target Service Operation icon. |
You can indicate the ESB systems from which the routing service will accept messages.
To specify from which system the service will accept messages:
If you have not already done so, expand the Routing Rules information, as described in Section 6.10.1, "How to Access Routing Rules".
Choose one of the following options:
Any System
Choose this option to specify that the routing service accept messages that originate from any ESB system, including the one in which the routing service was created.
Same System
Choose this option to specify that the routing service accept messages that originate only from the same ESB system as the one in which the routing service was created.
Other Systems
Choose this option to specify that the routing service accept messages that originate only from ESB systems other than the one in which the routing service was created.
Synchronous execution provides an immediate response to a request; asynchronous does not. Asynchronous execution is useful for environments in which a service can take a long time to process a request. Asynchronous services also provide a more reliable fault-tolerant and scalable architecture than synchronous services.
To specify synchronous or asynchronous execution:
If you have not already done so, expand the Routing Rules information, as described in Section 6.10.1, "How to Access Routing Rules".
Click the plus (+) button to expand the routing rules information.
The Execution options display on the right side of the property sheet.
Specify Synchronous or Asynchronous execution with the appropriate button.
You can choose the priority of multiple routing rules of a routing service by placing the rules in ascending order, with the top rules having the highest priority.
To specify priority of routing rules:
If you have not already done so, expand the Routing Rules information, as described in Section 6.10.1, "How to Access Routing Rules".
Click the plus (+) button to select and expand the routing rules information.
Click the up or down triangles in the upper right of the routing rules panel to move the selected rule to order of the correct priority. For an illustration of the property sheet, see Figure 6-8.
In a routing rule, you can specify an XSL file to transform data from one XML schema to another using the XSL Data Mapper tool. This enables data interchange among applications using different schemas. For example, you can map incoming source purchase order schema to an outgoing invoice schema.
After you define an XSL file, you can reuse it in multiple routing rule specifications.
To create an XSL file for data transformation:
If you have not already done so, open the Routing Rules information, as described in Section 6.10.1, "How to Access Routing Rules".
Click the Specify Transformation icon. The icon to the right of the field in the middle of the routing rules panel, as shown in Figure 6-8.
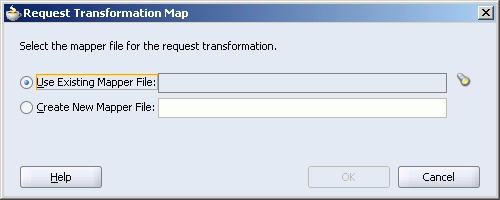
The Request Transformation Map dialog opens, as shown in Figure 6-9.
Figure 6-9 Request Transformation Map Dialog

Choose one of the following options:
Create New Mapper File and then enter a name for the file (or accept the default value).
Use Existing Mapper File and then click the flashlight icon to browse to the existing mapper file
Click OK.
If you chose Create New Mapper File, the Data Transformation Mapper tool opens to enable you to correlate source schema elements to target schema elements.
You can select and drag a component on either side of the tool to the component you want to correlate on the other side of the mapper tool. When you initially select and drag, the Auto Map Preferences dialog displays so you can set preferences for the mapping. Figure 6-10 is an example of an Auto Map Preferences dialog.
Use File > Save to save your updates.
Figure 6-11 is an example of a data transformation mapping in the Design tab of the Data Mapper tool. You can view the source code of the mapping in the Source tab.
For information about using the XSLT Data Mapper with Oracle Enterprise Service Bus, see "XSLT Data Mapper and Transformations" in Oracle Enterprise Service Bus Developer's Guide.
In a routing rule, you can specify an expression to filter messages based on their payload. You can, for example, route messages for a customer record to different offices, based on that customer's postal code.
To specify a filter expression:
If you have not already done so, expand the Routing Rules information, as described in Section 6.10.1, "How to Access Routing Rules".
Click the Add Filter Expression icon, as shown in Figure 6-8.
The Expression Builder opens.
Specify the filter expression, and then click OK.
The Expression Builder dialog displays.
You build the expression for filtering as follows:
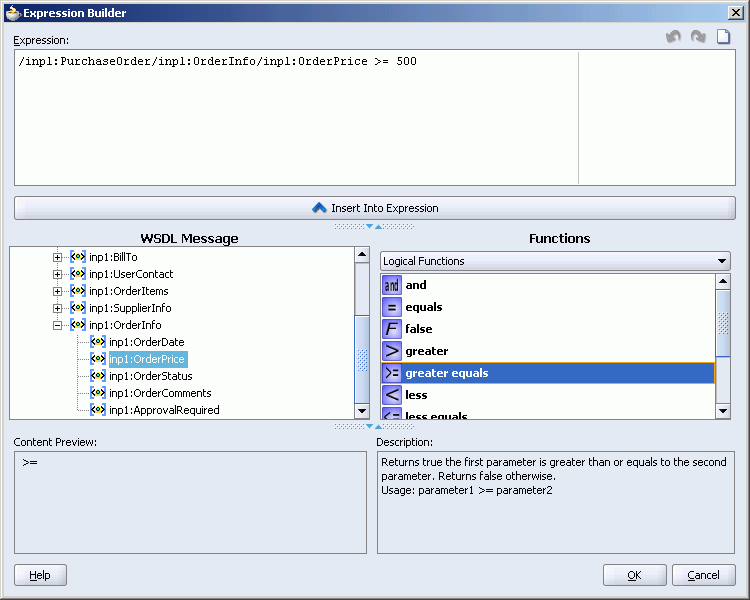
In the WSDL Message box, expand the message definition and select the message element on which you want to base the expression.
Notice that the Content Preview box indicates the XPath expression for the selected WSDL message element.
Click Insert Into Expression.
The expression is presented in the Expression box.
From the Function box, select the function that you want to apply to the WSDL Message payload.
Functions are listed within categories that are listed when you click the down arrow within the Functions box. For example, if you click the down arrow and select Logical Functions, the list appears. Notice that if you select a function within the Logical Functions list, a description of that function is presented in the Explanation box.
Click Insert Into Expression.
The XPath expression for the selected function is inserted in to the Expression box. Notice that because the expression requires editing by hand to complete the expression, a red squiggle appears at the end of the line.
Complete the expression.
Figure 6-12 is an example of a completed Expression Builder window.
Figure 6-12 Sample Expression Builder Tool

Validate the expression by clicking the green check mark.
If the expression is invalid or you need to make a change, you can edit the expression manually, or use the expression editing icons.
Click OK.
The expression is added to the Routing Rule property sheet.
To modify or delete a filter expression, double-click the Add Filter Expression icon, and then modify or delete the expression in the Expression panel of the Expression Builder.