| Oracle® SOA Suite Developer's Guide 10g (10.1.3.1.0) Part Number B28764-01 |
|
|
View PDF |
| Oracle® SOA Suite Developer's Guide 10g (10.1.3.1.0) Part Number B28764-01 |
|
|
View PDF |
The Maps view of Oracle ESB Control enables you to create, update, and delete domain-value maps, as well as view, export, and import existing domain-value maps. For information on Oracle ESB Control, see Section 12.1, "Introduction to Monitoring with Oracle ESB Control".
Applications that you want to integrate using Oracle Enterprise Service Bus likely use different values to represent the same information. For example, one application might represent a state with the long name (Massachusetts) while another application may represent the state with an abbreviation (MA). A domain-value map enables you to associate values from one application with values from another.
Each domain-value map typically holds a specific category of value mappings among multiple applications. For example, one domain-value map might hold mappings for state codes and another might hold mappings for units of measurement.
After you create a domain-value map in Oracle ESB Control, a developer can use it when defining an data transformation map XSL file with the Oracle JDeveloper ESB Designer data mapper, so that application-specific values can be used at runtime. For example, suppose you want to use a a domain-value map to perform a runtime lookup to convert long state names input to the two-letter state code output. In this scenario, the state name is passed to an Oracle Enterprise Service Bus flow. Within Oracle Enterprise Service Bus, the data is transformed by a transformation specified in the routing rule of the routing service from the state name to the state code using a domain-value map look up.
For more information, including exporting, importing and modifying domain-value maps, see "Domain-Value Maps" in Oracle Enterprise Service Bus Developer's Guide.
You can create a domain-value map in the Map view of Oracle ESB Control.
To create a new domain-value map:
At the top of Oracle ESB Control, click Maps.
Click the Create down-arrow on the left side of the console.
Two choices are presented: Create a new map and Import a new map.
Click Create a new map.
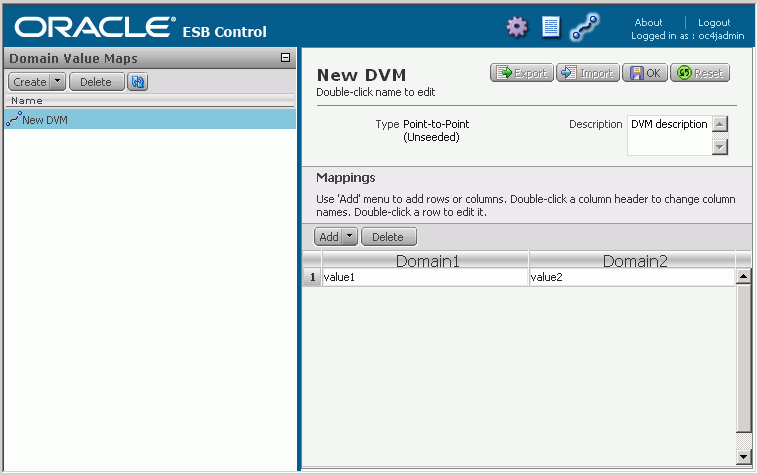
The console refreshes and appears similar to the Map view in Figure 6-13.
Figure 6-13 Oracle ESB Control Map View – Create New Map

Replace the default New DVM with a name for the domain-value map file. To edit New DVM, click in the name field in the right pane of the screen above the Mappings area.
After the domain-value map file has been saved, the map name cannot be changed.
In the Description field, enter a description of the domain-value map.
If you need additional columns, click the Add down-arrow, and then click Column once for each additional column you want to add. If you add too many columns, select the column and click Delete.
Each column represents a domain. If you will be using the domain-value map to map values among four domains, for example, you click Column twice to add two more columns. There are no restrictions on what can be considered a domain; you specify domains based on your needs. A domain might be, for example, a trading partner, an organization, a department, an application, and so on.
For example, add one column Add > Column.
Double-click a column name to change it from the default value of Applicationn to a more meaningful name. Each column name must be unique within the domain-value map.
If you need additional rows, click the Add down-arrow, and then click Row once for each additional row you want to add. If you add too many rows, select the row and click Delete, or leave it as-is. Empty rows are deleted when you save the domain-value map.
Double-click a row and enter values for the domain value map.
Repeat the previous step until you have entered the desired rows. You do not have to enter all rows that will be required by the applications. You can edit the domain-value map to add more rows later.
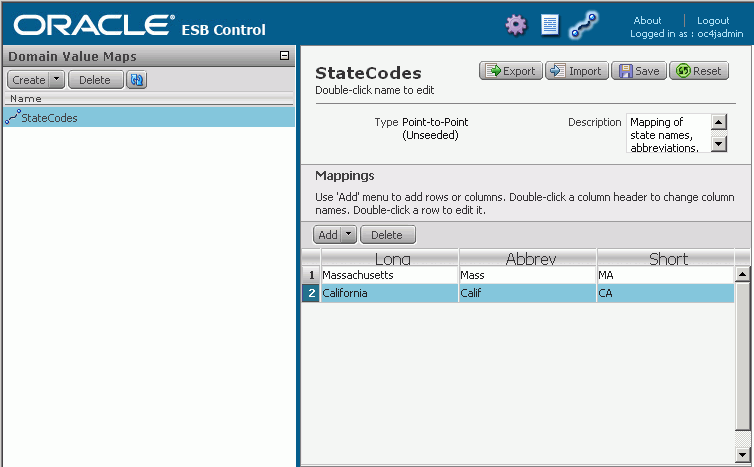
Figure 6-14, shows an example of a domain-value map that has been created.
Review the name for the domain-value map and click the Save button above the Description field.
After you click the Save button, you cannot change the name for the domain-value map. However, you can change other components of the domain-value map.
Although these instructions indicate that you click Save when you have completed a domain-value map, you can click Save at any point in the process after specifying the name.
The completed domain-value map can now be used when creating a transformation in Oracle JDeveloper ESB Designer, as described in Section 6.11.4, "How to Use a Domain-Value Map in a Data Transformation Map".
Figure 6-14 Oracle ESB Control - Domain-Value Map Created

After you have created and saved a domain-value map, you can export it to a file. You might want to do this if you have created it on a test system and now want to export it so that you can import it on a production system.
To export a domain-value map:
In the Maps view of Oracle ESB Control, select the domain-value map you want to export in the left pane of the screen.
In right pane of the Maps view, click Export.
Click OK, and then wait for the operating system dialog box to open that enables you to save the file to the local file system. If you are prompted whether to open or save the file, select Save.
In the save file dialog box, selection the location where you want to save the domain-value map file, enter a name for the domain-value map file, and click Save.
In the Download complete dialog, click Close.
After the file has been exported and saved to the file system, you can edit the file with a text editor. However, make sure that you have carefully updated the file so that the file remains valid. After you have edited the file, you can import the updated domain-value map into Oracle ESB Control.
If you have an existing domain-value map on the local file system, you can import it into Oracle ESB Control as a means to add it to the ESB repository so that it can be used when you are specifying a transformation in a routing rule.
To import a domain-value map:
In the Maps view of Oracle ESB Control, click the Create down-arrow on the left side of the window.
Two choices are presented: Create a new map and Import a new map.
Click Import a new map to open the Import a New Map dialog.
In the Import a New Map dialog box, follow these steps:
In the Import field, enter the complete specification for the file on the local file system that you want to import or use Browse to locate the file.
Select or deselect overwrite if a map with the same name already exists, as desired.
Because the name becomes the primary key for the domain-value map when it is stored in the ESB repository, the name must be unique. If you select overwrite if a map with the same name already exists and a domain-value map with the same name already exists that you do not want to overwrite, you can do either of the following:
Cancel this dialog box, rename the file on disk, and then restart the import operation.
Deselect overwrite if a map with the same name already exists.
Click OK.
Click OK in the Import Succeeded dialog.
The Console refreshes and displays the imported domain-value map file in the left pane.
The imported file is saved to the ESB repository and the domain-value map can now be used when creating a transformation in Oracle JDeveloper ESB Designer.
To include a domain-value map in an XSL data transformation, you drag and drop a lookup-dvm function from the component palette onto the connection between the source and target elements where you want the domain-value map to be used. For information on creating a data transformation maps, see Section 6.10.6, "How to Create an XSL File for Data Structure Transformation".
The following is an example of how to use a domain-value map in an XSL data transformation.
To use a domain-value map in a data transformation map:
In Oracle JDeveloper ESB Designer, open an ESB project.
In the Design tab, select a routing icon and double-click on the transformation XSL icon to display the Data Mapper window.
Expand the trees in the Source and Target panes in the Data Mapper window.
Drag and drop the source element to the target element where you want the domain-value map to be used.
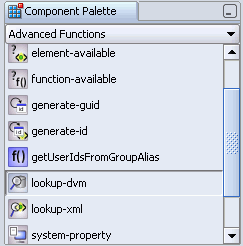
In the Components palette, click the down-arrow and then select Advanced Functions.
The lookup-dvm function is listed in the component palette, as shown in Figure 6-15.
Figure 6-15 Component Palette – lookup-dvm Function

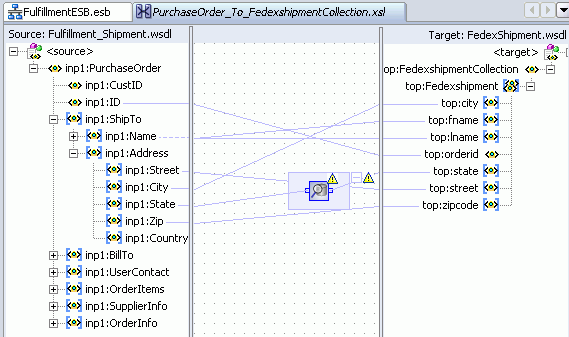
Drag and drop lookup-dvm onto the line that connects the source object to the target object.
A lookup-dvm icon appears on the connecting line, as shown in Figure 6-16. The yellow warning triangles indicate that the definition of the lookup-dvm function is not complete.
Figure 6-16 Data Mapper – look-up dvm Function Added

Double-click the look-up dvm icon.
The Edit Function – look-up dvm dialog opens.
Specify values for the fields in the Edit Function – look-up dvm dialog, as shown in Figure 6-17.
You can manually enter a value in sourceValue or the following methods:
Move the source value that appears in the dvmName field to the sourceValue field by clicking Move Down twice.
Press Ctrl-Space to launch Expression Builder. Press the up and down keys to locate an object in the list and press enter to select that item.
In the dvmName field, enter the name of the domain-value map schema that you previously defined using Oracle ESB Control.
Click the flashlight icon to the right of the dvmName field to select the name from a list of domain-value maps stored in the ESB repository.
In the sourceColumnName field, enter the name of the column in the domain-value map that is associated with the source element value.
Click the flashlight icon to the right of the sourceColumnName field to select the name from the columns defined for the domain-value map you previously selected.
In the targetColumnName field, enter the name of the column in the domain-value map that is associated with the target element value.
Click the flashlight icon to the right of the targetColumnName field to select the name from the columns defined for the domain-value map you previously selected.
Enter an optional default value.
Click OK.
From the File menu, click Save All.
Register the project with the integration server or ESB Server.
When the transformation is included in an ESB routing rule, the transformation is applied at runtime.
You can view the results of a transformation if you have set up the field in the Trackable Fields tab of the Oracle ESB Control Services view. The tracking data is displayed in the Diagram tab of the Oracle ESB Control Instances view. See Section 12.9, "Defining Trackable Fields".