| Oracle® SOA Suite Tutorial Release 3 (10.1.3.1.0) Part Number B28937-01 |
|
|
View PDF |
| Oracle® SOA Suite Tutorial Release 3 (10.1.3.1.0) Part Number B28937-01 |
|
|
View PDF |
This chapter describes how to set up the required software for creating and running the SOA Order Booking application.
This chapter contains the following sections:
Section 2.4, "Unzip the Files for the SOA Order Booking Application"
Section 2.6, "Define Data Source and Connection Pool in Oracle Application Server"
To use this tutorial, you need to download files for:
Oracle Application Server. This is your runtime environment.
JDeveloper. This is your development environment.
SOA Order Booking demo application. This is the application that this tutorial describes. The zip file that contains the files for the application is soademo_101310_prod.zip.
You can download the files from the Service-Oriented Architecture page on the Oracle Technology Network site (http://www.oracle.com/technology/soa).
Install Oracle Application Server Release 3 (10.1.3.1.0) from the zip file you downloaded. You can perform either the Basic installation or the Advanced installation. If you choose the Advanced installation, ensure that you install the SOA Suite, which is installed automatically in the Basic installation.
The tutorial assumes that your Oracle Application Server installation uses the default port of 8888. The installer configures Oracle HTTP Server or OC4J to listen on this port if the port is not in use. If the port is in use, the installer will try the next number on the list. See the Oracle Application Server Installation Guide for your platform for details.
If your installation uses a different port number, you need to change the port number in some files. These files will be pointed out as you develop the application.
Remember the password that you set for the oc4jadmin user. You will need this password for managing Oracle Application Server.
For details on installing Oracle Application Server, see the Oracle Application Server Installation Guide for your platform.
Install JDeveloper Version 10.1.3.1.0 from the zip file you downloaded. You can install JDeveloper and Oracle Application Server on the same machine or on different machines.
The tutorial assumes that JDeveloper and Oracle Application Server are installed on the same machine. If you installed them on different machines, you will need to update the hostname in certain files. These files will be pointed out as you develop the application.
Unzip the soademo_101310_prod.zip file that you downloaded for the SOA Order Booking application. You can unzip the files into a temporary directory. When you create the application, you will create the files for the application in a different directory. You will copy some files from the temporary directory to the application directory when you develop the SOA Order Booking application.
For example, you can unzip the files into C:\temp, and you can build your application in C:\soademo.
You need to have DBA privileges for the database where you want to install the SOADEMO schema.
|
Note: You must install the SOADEMO schema on Oracle Database 9i, 10g, or XE. If you want to install the schema on an Oracle Lite database, you need to modify the SQL scripts that install the SOADEMO schema and its objects. |
To install the SOADEMO schema:
Change directory to where you unzipped the soademo_101310_prod.zip file for the SOA Order Booking application.
Check that the directory contains the following files:
build.sql
createSchema.sql
createSchemaObjects.sql
populateSchemaTables.sql
Check that the ORACLE_HOME and ORACLE_SID environment variables are set.
Run build.sql as DBA using SQL*Plus:
> sqlplus "sys/password as sysdba"
SQL> @build.sql
The script creates a schema called SOADEMO with "ORACLE" as its password, and populates it with the tables described in Section 1.4, "Contents of the SOADEMO Schema".
You need to define data sources and connection pools in Oracle Application Server so that the SOA Order Booking application will be able to access the database during runtime.
Application Server Control is the web-based tool that you use to manage Oracle Application Server. To access Application Server Control, enter the following URL in a browser:
http://hostname:port/em
hostname specifies the machine running Oracle Application Server.
port specifies the HTTP listening port. The installer configures Oracle HTTP Server or OC4J to listen on port 8888 if the port is not in use. If the port is in use, the installer will try the next number on the list. See the Oracle Application Server Installation Guide for your platform for details.
When Application Server Control prompts you to log in, enter oc4jadmin as the username. The password for oc4jadmin is the password that you set during installation.
Connection pools maintain connections to your database. For the SOA Order Booking application, you need to create a connection pool called soademo_pool.
Log into Application Server Control.
Click the home link to display the OC4J:home page.
On the OC4J:home page, click the Administration tab.
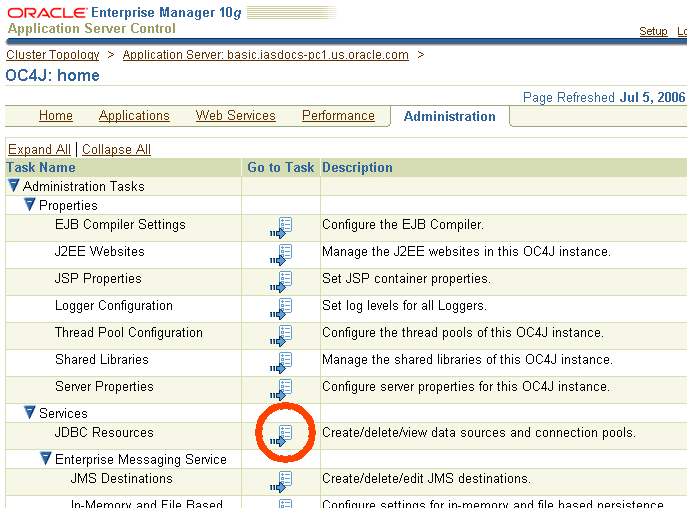
Click the icon in the Go To Task column for Services > JDBC Resources. See Figure 2-1 below. This displays the JDBC Resources page.
Figure 2-1 Click the Icon for JDBC Resources
In the JDBC Resources page, click the Create button in the Connection Pools section (not in the Data Sources section). This displays the Create Connection Pool - Application page (Figure 2-2).
Figure 2-2 Create Connection Pool - Application Page
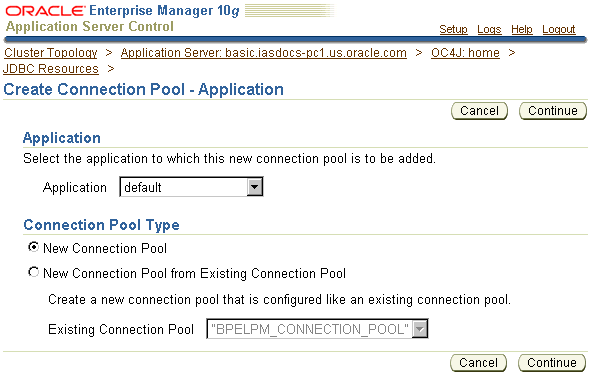
Click Continue to accept the defaults on the Create Connection Pool - Application page. This displays the Create Connection Pool page.
On the Create Connection Pool page, set the following values:
Name: enter soademo_pool.
URL section: enter the information to connect to the database where you installed the SOADEMO schema.
Credentials section: enter the username and password to connect to the database.
Click Test Connection. This displays the Test Connection page. Click Test on that page to verify that the connection information is valid. If the test failed, verify the connection values and try again.
Click Finish.
Continue with the next section to create a data source that uses the connection pool that you just created.
Create a data source that uses the connection pool that you created in the previous section.
On the JDBC Resources pages, click the Create button in the Data Sources section. This displays the Create Data Source - Application & Type page.
Figure 2-4 Create Data Source - Application & Type Page
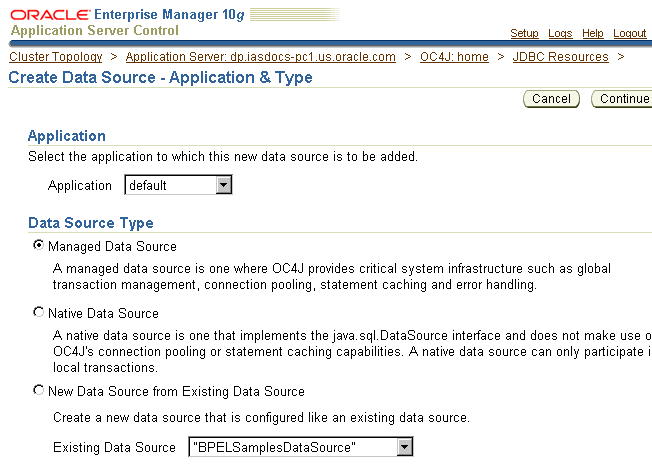
Click Continue on the Create Data Source - Application & Type page to accept the default values. This displays the Create Data Source - Managed Data Source page.
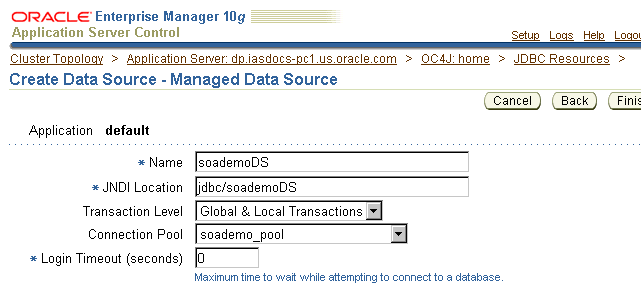
On the Create Data Source - Managed Data Source page, enter the following values:
Name: enter soademoDS.
JNDI Location: enter jdbc/soademoDS.
Connection Pool: select soademo_pool.
You can leave the other fields at their default values.
Figure 2-5 Create Data Source - Managed Data Source Page
Click Finish. This takes you back to the JDBC Resources page.
On the JDBC Resources page, click the icon in the Test Connection column for the soademoDS data source. This displays the Test Connection page. Click Test on the Test Connection page. You should get a confirmation message that the connection was made successfully.
Perform the following steps to create a database adapter connection factory:
Click the OC4J:home breadcrumb link at the top of the page.
Click the Applications link.
Click the default link in the applications table.
Click DbAdapter in the Modules table.
Click the Connection Factories link.
In the Connection Factories section, click the Create button. (Note: do not click the Create button in the Shared Connection Pools section.)
On the Create Connection Factory: Select Interface page, click Continue to accept the default values.
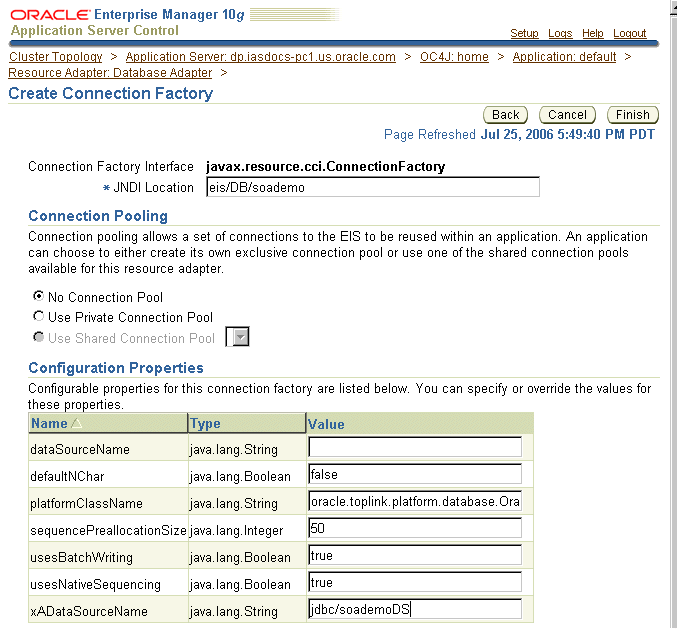
On the Create Connection Factory page, enter the following values:
JNDI Location: enter eis/DB/soademo.
xADataSourceName: enter jdbc/soademoDS.
For the other fields, accept the default values.
Figure 2-6 Create Connection Factory Page
Click Finish.
In JDeveloper, you set up connections to the database, to Oracle Application Server, and to the Integration Server in Oracle Application Server. These connections enable you to view the data in the SOADEMO schema, and to deploy the applications to Oracle Application Server from JDeveloper.
Starting JDeveloper
To start Oracle JDeveloper:
Navigate to the directory where you installed Oracle JDeveloper and double-click the jdeveloper.exe executable.
If this is the first time Oracle JDeveloper is run, a window asking "Do you wish to migrate?" appears.
Click No to continue. You will build the entire application from scratch.
In JDeveloper, create a database connection to the SOADEMO schema:
|
Note: In this tutorial, the database connection is named SOADEMO. You can use a different name if you want, but using the same naming conventions will make it easier to follow the instructions. |
In Oracle JDeveloper, select View > Connection Navigator.
Right-click the Database node and select New Database Connection.
Click Next on the Welcome page.
In Step 1, Type, enter the following values:
Connection Name: enter SOADEMO.
Connection Type: select Oracle (JDBC).
Click Next.
In Step 2, Authentication, enter the following values:
Username: enter SOADEMO.
Password: enter oracle.
Role: leave blank.
Deploy Password: select the check box.
Click Next.
In Step 3, Connection, enter the following values:
Driver: select thin.
Host Name: enter the name of the machine running the database where you installed the SOADEMO schema.
JDBC Port: enter the port number for the database. The default value is 1521.
SID: enter the system identifier for the database. The default value is ORCL.
If you are unsure about the database connection values, check with your database administrator.
Click Next.
In Step 4, Test, click Test Connection. If the test is not successful, check that the database is available and that the connection values are correct. You can click the Back button to return to the previous page to edit the connection values.
Click Finish. The connection appears below the Database node in the Connection Navigator.
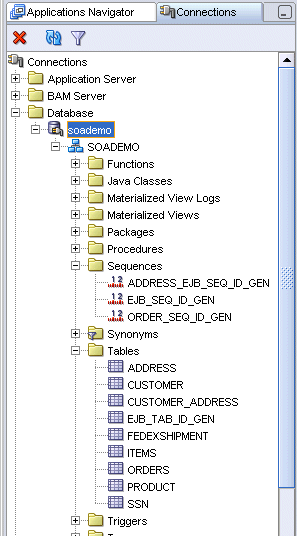
You can now examine the schema from Oracle JDeveloper. In the Connection Navigator, expand Database > soademo > SOADEMO. Expand the Sequences and Tables nodes and verify that the tables match those listed in Section 1.4, "Contents of the SOADEMO Schema".
In JDeveloper, create a connection to Oracle Application Server.
In Oracle JDeveloper, select View > Connection Navigator.
Right-click the Application Server node and select New Application Server Connection.
Click Next on the Welcome page.
In Step 1, Type, enter the following values:
Connection Name: enter SoademoApplicationServer.
Connection Type: select Oracle Application Server 10g 10.1.3.
Click Next.
In Step 2, Authentication, enter the following values:
Username: enter oc4jadmin. This is the name of the administration user.
Password: enter the password for oc4jadmin. This is the password that you set when you installed Oracle Application Server.
Deploy Password: select the check box.
Click Next.
In Step 3, Connection, enter the following values:
Connect To: select Single Instance.
Host Name: enter the name of the machine where you installed Oracle Application Server.
OPMN Port: enter the OPMN port for the Oracle Application Server instance. You can determine this port by looking in the ORACLE_HOME\opmn\conf\opmn.xml file. You want the port number specified in the request attribute. For example:
<notification-server>
    <port local="6100" remote="6202" request="6005"/>
OC4J Instance Name: enter home.
Click Next.
In Step 4, Test, click Test Connection. If the test is not successful, check that the Oracle Application Server instance is available and that the connection values are correct. You can click the Back button to return to the previous page to edit the connection values.
Click Finish. The connection appears below the Application Server node in the Connection Navigator.
In JDeveloper, create a connection to the BPEL and ESB servers running on the Oracle Application Server instance.
In Oracle JDeveloper, select View > Connection Navigator.
Right-click the Integration Server node and select New Integration Server Connection.
Click Next on the Welcome page.
In Step 1, Name, enter the following value:
Connection Name: enter SoademoIntegConnection.
Click Next.
In Step 2, Connection, enter the following values:
Application Server: enter SoademoApplicationServer, which is the Application Server connection that you just created (in Section 2.7.2, "Create a Connection to Oracle Application Server").
Hostname: The value is derived from the Application Server connection.
Port Number: enter the port number that Oracle Application Server listens at for HTTP requests from clients. This is typically the Oracle HTTP Server port. If there is no Oracle HTTP Server component, then specify the OC4J port.
The default port is 8888.
Add Hostname to the List of Proxy Exceptions: select this option.
Click Next.
In Step 3, Test Connection, click Test Connection. If the test is not successful, check that the Oracle Application Server instance is available and that the connection values are correct. You can click the Back button to return to the previous page to edit the connection values.
Click Finish. The connection appears below the Integration Server node in the Connection Navigator.
In JDeveloper, perform these steps to create an application called "SOADEMO", which will contain the projects for the SOA Order Booking application:
In Oracle JDeveloper, select View > Application Navigator.
Right-click the Applications node and select New Application.
In the Create Application dialog, enter these values:
Application Name: enter SOADEMO.
Directory Name: Accept the default directory location or edit it to specify a different directory location. JDeveloper will create this directory, which will contain all the projects in the SOA Order Booking application.
Application Package Prefix: enter oracle.soademo.
Application Template: select No Template [All Technologies].
Click OK.
In the Create Project dialog, click Cancel. You will create the projects later.
This tutorial refers to the directory that you specified as SOADEMO.