| Oracle® SOA Suite Tutorial Release 3 (10.1.3.1.0) Part Number B28937-01 |
|
|
View PDF |
| Oracle® SOA Suite Tutorial Release 3 (10.1.3.1.0) Part Number B28937-01 |
|
|
View PDF |
This chapter describes how to create the CustomerService project. It contains these sections:
Section 3.3, "Create Entity Beans from Tables in the Database"
Section 3.5, "Create a Session Bean in the business Directory"
Section 3.7, "Use a Database Sequence to Generate Address IDs in Address.java"
Section 3.8, "Edit Session Facade for the Session Bean (CustomerServiceBean.java)"
Section 3.9, "Add and Modify Methods in the Session Bean (CustomerServiceBean.java)"
Section 3.10, "Add JSR-181 Annotations to the Web Service Endpoint Interface (CustomerService.java)"
Section 3.11, "Create EJB JAR Deployment Profile for the CustomerService Project"
The CustomerService project provides methods that enable client applications, such as the SOADemo-Client application, to retrieve customer information from the database and add customers to the database.
Highlights of the CustomerService project:
The project is invoked directly by the SOADemo-Client application. When a customer logs in using the client application, the client application invokes the CustomerService project to validate the user.
The project uses Java Persistence API entity objects to manage the CUSTOMER and ADDRESS tables in the SOADEMO schema in the database.
The project uses an EJB 3.0 stateless session bean with JSR-181 Web Services annotations. This means that application servers that support JSR-181 are able to publish the bean as a web service during deployment. Methods in CustomerService that you want to make public (that is, invocable by client applications) are defined in this bean. Client applications can then invoke the methods through Web Services.
The SOAOrderBooking project, which is a BPEL process, also invokes the CustomerService project to get details on the customer, such as the customer's status (for example, platinum or gold).
Start by creating a new project for CustomerService in JDeveloper:
Right-click the SOADEMO application, and select New Project.
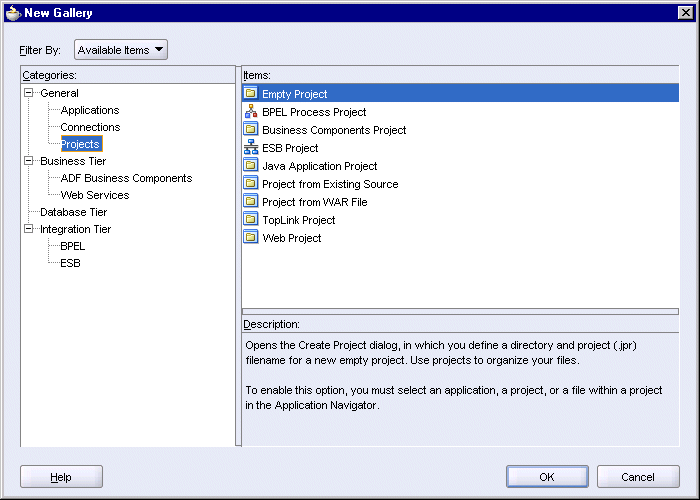
In the New Gallery, in the Categories section, expand General and select Projects. In the Items section, select Empty Project.
Figure 3-1 New Gallery for the CustomerService Project
Click OK.
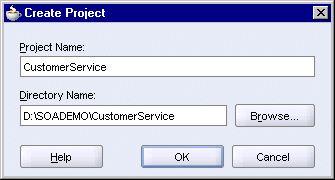
In the Create Project dialog, enter CustomerService in the Project Name field.
Figure 3-2 Create Project Dialog for the CustomerService Project
Click OK.
In the Application Navigator, you should see an empty CustomerService project located under the SOADEMO application.
Select File > Save to save your work.
You can use JDeveloper to generate entity objects for the Customer and Address tables in the SOADEMO schema. These entity objects use the Java Persistence API available in EJB 3.0.
To generate the entity beans:
Right-click the CustomerService project, and select New. In the New Gallery, in the Categories section, expand Business Tier and select EJB. In the Items section, select Entities From Tables (JPA/EJB 3.0). Click OK.
Figure 3-3 New Gallery for Creating Entity Objects from Database Tables
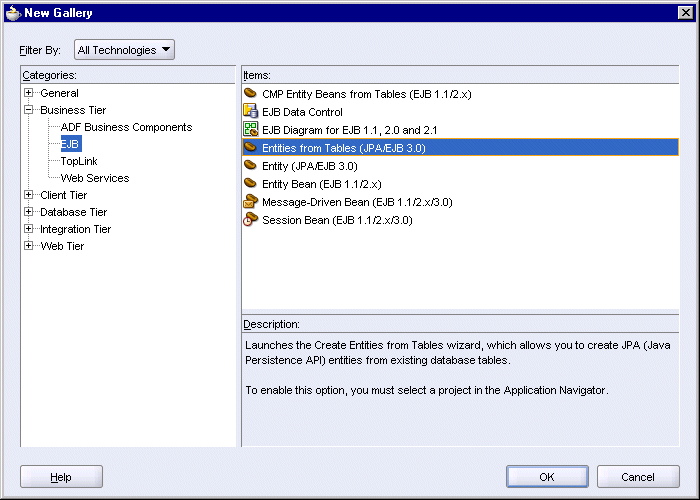
This launches the Create Entities From Tables wizard.
On the Welcome page of the Create Entities From Tables wizard, click Next.
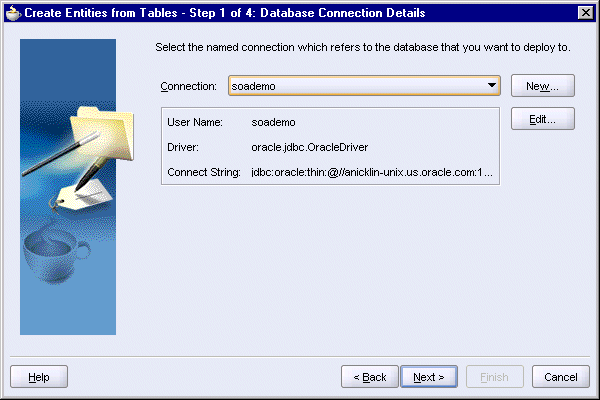
In Step 1, Database Connection Details, select the database connection and click Next.
Figure 3-4 Create Entities From Tables Wizard: Step 1, Database Connection Details
In Step 2, Select Tables, check that:
Name Filter is blank.
Auto-Query is not selected.
Schema is set to SOADEMO.
Tables is selected.
Figure 3-5 Create Entities From Tables Wizard: Step 2, Select Tables
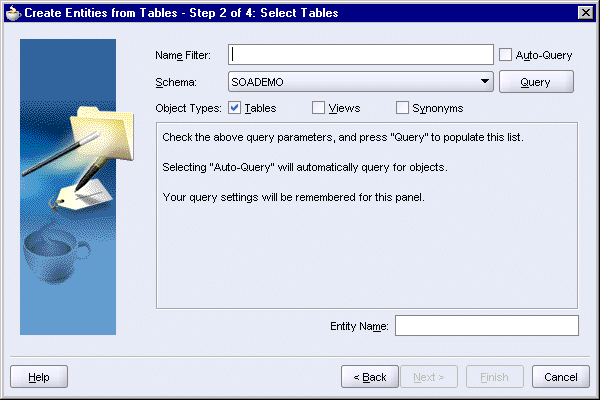
Click Query. You should see a list of tables in the SOADEMO schema.
Select Address and Customer and click the single blue arrow to move them to the Selected box.
Figure 3-6 Create Entities From Tables Wizard: Step 2, Select Tables
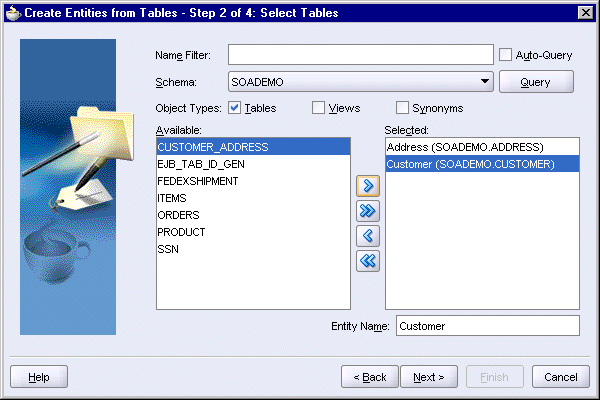
Click Next.
In Step 3, Entities From Tables:
Package Name: set it to org.soademo.customerservice.persistence.
Place member-level annotations on: Fields.
Implement java.io.Serializable: select this option.
Collection type for relationship fields: select java.util.List.
Figure 3-7 Create Entities From Tables Wizard: Step 3, Entities From Tables

Click Next.
In Step 4, Specify Entity Details:
In Table Name, select SOADEMO.ADDRESS:
Entity Name: Address.
Bean Class: org.soademo.customerservice.persistence.Address.
Figure 3-8 Create Entities From Tables Wizard: Step 4, Specify Entity Details, Showing Values for Address Table

In Table Name, select SOADEMO.CUSTOMER:
Entity Name: Customer.
Bean Class: org.soademo.customerservice.persistence.Customer.
Figure 3-9 Create Entities From Tables Wizard: Step 4, Specify Entity Details, Showing Values for Customer Table
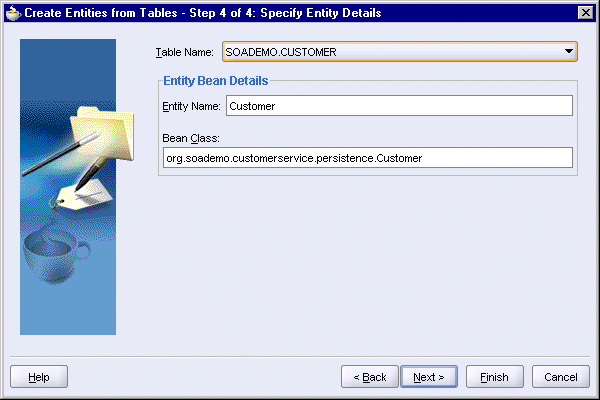
Click Next.
In the Summary screen, click Finish.
Select File > Save to save your work.
You should see these files:
Address.java and Customer.java in the SOADEMO\CustomerService\src\org\soademo\customerservice\persistence directory
persistence.xml in the SOADEMO\CustomerService\src\META-INF directory
SOADEMO refers to the directory where you created the SOADEMO application.
The Application Navigator looks something like this:
Figure 3-10 Application Navigator Showing the Created Files

In CustomerService\src\META-INF\persistence.xml:
Change the name of the persistence-unit from "CustomerService" to "customerServiceUnit".
This name is used in the CustomerServiceBean.java session bean that you will create in Section 3.5, "Create a Session Bean in the business Directory".
Add a line to define the jta-data-source: <jta-data-source>jdbc/soademoDS</jta-data-source>
jdbc/soademoDS is the data source that you created in Oracle Application Server in Section 2.6.3, "Create a Data Source".
You can make the changes using property dialogs in JDeveloper:
Check that you do not have any unsaved changes in the CustomerService project. In the Application Navigator, if you see any items that appear in italics, select the item and select File > Save.
Select View > Structure to display the Structure window.
Select persistence.xml in the Application Navigator. You should see the structure of the file in the Structure window.
Figure 3-11 Structure Window (below the Application Navigator) Showing the Structure of persistence.xml
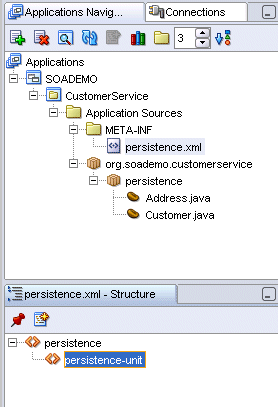
Double-click persistence-unit in the Structure window. This displays the persistence-unit Properties dialog.
In the persistence-unit Properties dialog:
jta-data-sources: enter jdbc/soademoDS.
name: change it to customerServiceUnit.
Figure 3-12 persistence-unit Properties Dialog
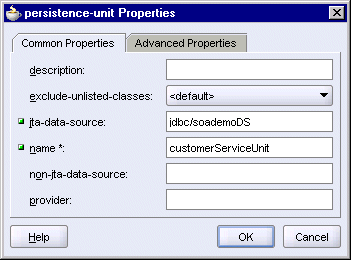
Click OK. The persistence.xml file in the Application Navigator should appear in italics, which indicates that it has unsaved changes.
Double-click the persistence.xml file in the Application Navigator. This displays the contents of the file in the editor.
The file should look like this:
Example 3-1 persistence.xml
<?xml version="1.0" encoding="windows-1252" ?>
<persistence xmlns:xsi="http://www.w3.org/2001/XMLSchema-instance"
     xsi:schemaLocation="http://java.sun.com/xml/ns/persistence
     http://java.sun.com/xml/ns/persistence/persistence_1_0.xsd"
     xmlns="http://java.sun.com/xml/ns/persistence">
  <persistence-unit name="customerServiceUnit">
    <jta-data-source>jdbc/soademoDS</jta-data-source>
  </persistence-unit>
</persistence>
Select File > Save to save the file.
Close the file in the editor.
In the business directory, you create a session bean to define the methods available to clients.
To create the session bean:
Right-click the CustomerService project, and select New. In the New Gallery, in the Categories section, expand Business Tier and select EJB. In the Items section, select "Session Bean (EJB 1.1/2.x/3.0)". Click OK.
Figure 3-13 New Gallery for Creating Session Bean
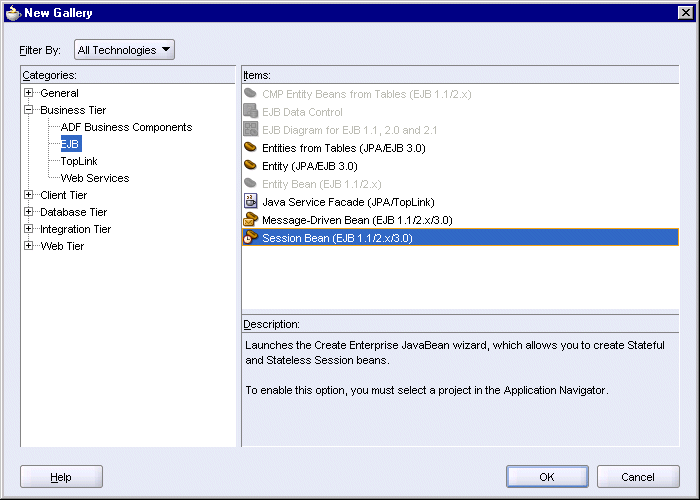
This launches the Create Session Bean wizard.
On the Welcome page of the Create Session Bean wizard, click Next.
In Step 1, EJB Name and Options:
EJB Name: enter CustomerService.
Session Type: select Stateless.
Transaction Type: select Container.
Generate Session Facade Methods: select this option.
Entity Implementation: select EJB 3.0 Entities.
Persistence Unit: select customerServiceUnit (CustomerService.jpr).
Figure 3-14 Create Session Bean Wizard: Step 1, EJB Name and Options
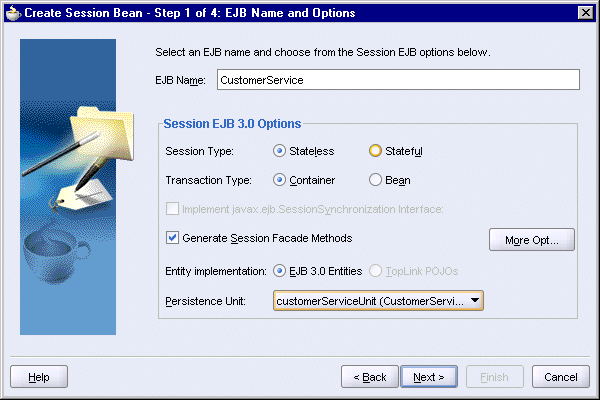
Click Next.
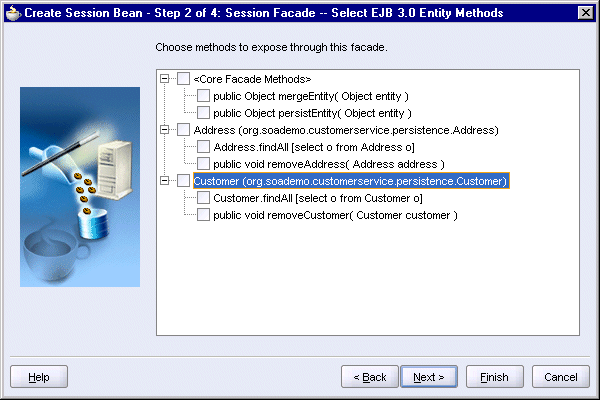
In Step 2, Session Facade - Select EJB 3.0 Entity Methods, deselect everything.
You will generate methods for the Customer entity later.
Figure 3-15 Create Session Bean Wizard: Step 2, Session Facade - Select EJB 3.0 Entity Methods
Click Next.
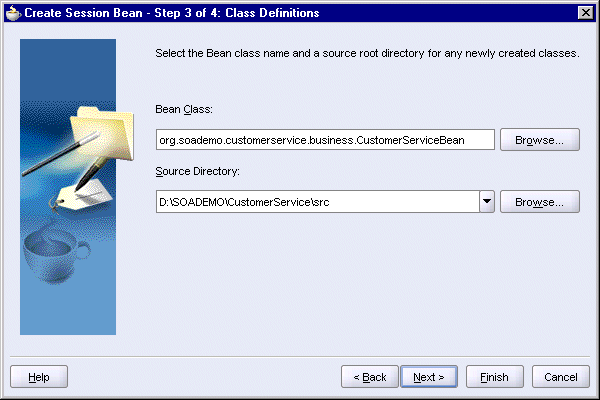
In Step 3, Class Definitions:
Bean Class: enter org.soademo.customerservice.business.CustomerServiceBean.
Source directory: accept the default (CustomerService\src directory).
Figure 3-16 Create Session Bean Wizard: Step 3, Class Definitions
Click Next.
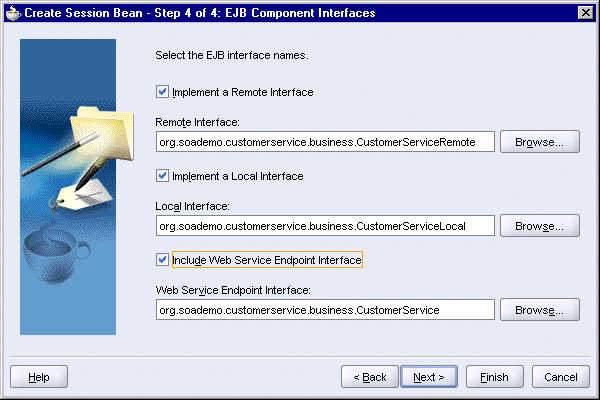
In Step 4, EJB Component Interfaces:
Implement a Remote Interface: select this option.
Remote Interface: org.soademo.customerservice.business.CustomerServiceRemote.
|
Note: The name of the remote interface is different from the default value. |
Implement a Local Interface: select this option.
Local Interface: org.soademo.customerservice.business.CustomerServiceLocal.
Include Web Service Endpoint Interface: select this option.
Web Service Endpoint Interface: org.soademo.customerservice.business.CustomerService.
|
Note: The name of the web service endpoint interface is different from the default value. |
Note that selecting the Include Web Service Endpoint Interface option adds the JSR-181 library to the project. This library is needed for the project to compile. You can also add this library to the project later, if it is not already added.
In the generated WSDL, the name of the web service endpoint interface ("CustomerService") is used as a prefix for message names. It is also used as the name for the port type. You need to consider this because this affects the SOAOrderBooking project. The CustomerSvc.wsdl file in the SOAOrderBooking\bpel directory specifies "CustomerService" as the name of the port type. The port type names in the CustomerSvc.wsdl file and in the generated CustomerService WSDL must match. After you deploy the CustomerService project, you can view the generated WSDL as described in Section 3.13, "View the WSDL for CustomerService".
Figure 3-17 Create Session Bean Wizard: Step 4, EJB Component Interfaces
Click Next.
In the Summary page, click Finish.
Select CustomerService in the Application Navigator and select File > Save to save your work.
JDeveloper displays the CustomerServiceBean.java file in the editor. You can close it.
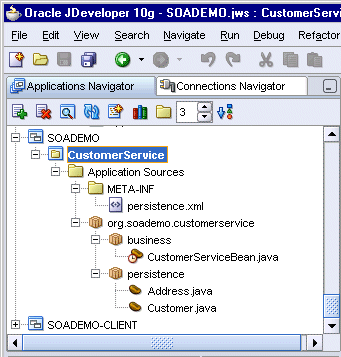
In the Application Navigator, you should see the CustomerService session bean in the business directory.
Figure 3-18 Application Navigator Showing the CustomerService Session Bean in the business Directory
Edit the Customer.java file, located in the CustomerService\src\org\soademo\customerservice\persistence directory, to define additional queries and table information.
When you deploy the CustomerService project, Oracle Application Server uses the annotations that define the queries to generate a WSDL for the project and enable clients to access the project as a Web Service. This WSDL is generated by Oracle Application Server; you can view it after you have deployed the CustomerService project. See Section 3.13, "View the WSDL for CustomerService".
Edit the Customer.java file so that it looks like the following:
Example 3-2 Customer.java
package org.soademo.customerservice.persistence;

import java.io.Serializable;

import java.util.ArrayList;
import java.util.List;

import javax.persistence.CascadeType;
import javax.persistence.Column;
import javax.persistence.Entity;
import javax.persistence.FetchType;
import javax.persistence.GeneratedValue;
import javax.persistence.GenerationType;
import javax.persistence.Id;
import javax.persistence.JoinColumn;
import javax.persistence.JoinTable;
import javax.persistence.NamedQueries;
import javax.persistence.NamedQuery;
import javax.persistence.OneToMany;
import javax.persistence.SequenceGenerator;
import javax.persistence.Table;
import javax.persistence.TableGenerator;


// Note that the query statements between the double quotes must be on one line.

@Entity
@NamedQueries( { @NamedQuery(name = "Customer.findAllCustomer",
                 query = "select object(o) from Customer o")
        ,
        @NamedQuery(name = "Customer.findCustomerById",
     query = "select object(cust) from Customer cust where cust.custid = :custid")
        ,
        @NamedQuery(name = "Customer.findCustomerByEmail",
 query = "select object(cust) from Customer cust where cust.email = :email and
 cust.password = :password")
        } )

@Table(name = "CUSTOMER")
@SequenceGenerator(name = "SEQ_ID_GENERATOR", sequenceName = "EJB_SEQ_ID_GEN")
@TableGenerator(name = "TABLE_ID_GENERATOR", table = "EJB_TAB_ID_GEN",
                pkColumnName = "ID_NAME", valueColumnName = "SEQ_VALUE",
                pkColumnValue = "SEQ_GEN")
public class Customer implements Serializable {
    private String creditcardnumber;
    private String creditcardtype;
    @Id
    @GeneratedValue(strategy = GenerationType.TABLE,
                    generator = "TABLE_ID_GENERATOR")
    @Column(nullable = false)
    private String custid;
    private String email;
    private String fname;
    private String lname;
    private String phonenumber;
    private String status;
    private String password;

    @OneToMany(fetch = FetchType.LAZY, cascade = { CascadeType.ALL } )
    @JoinTable(name = "CUSTOMER_ADDRESS",
               joinColumns = { @JoinColumn(name = "CUSTID")
                } , inverseJoinColumns = { @JoinColumn(name = "ADDRESSID")
                } )
    private List<Address> addressList;

    public Customer() {
    }

    public String getCreditcardnumber() {
        return creditcardnumber;
    }

    public void setCreditcardnumber(String creditcardnumber) {
        this.creditcardnumber = creditcardnumber;
    }

    public String getCreditcardtype() {
        return creditcardtype;
    }

    public void setCreditcardtype(String creditcardtype) {
        this.creditcardtype = creditcardtype;
    }

    public String getCustid() {
        return custid;
    }

    public void setCustid(String custid) {
        this.custid = custid;
    }

    public String getEmail() {
        return email;
    }

    public void setEmail(String email) {
        this.email = email;
    }

    public String getFname() {
        return fname;
    }

    public void setFname(String fname) {
        this.fname = fname;
    }

    public String getLname() {
        return lname;
    }

    public void setLname(String lname) {
        this.lname = lname;
    }

    public String getPhonenumber() {
        return phonenumber;
    }

    public void setPhonenumber(String phonenumber) {
        this.phonenumber = phonenumber;
    }

    public String getStatus() {
        return status;
    }

    public void setStatus(String status) {
        this.status = status;
    }

    public List<Address> getAddressList() {
        if (addressList == null) {
            addressList = new ArrayList();
        }
        return addressList;
    }

    public void setAddressList(List<Address> addressList) {
        this.addressList = addressList;
    }

    public Address addAddress(Address address) {
        getAddressList().add(address);
        return address;
    }

    public Address removeAddress(Address address) {
        getAddressList().remove(address);
        return address;
    }

    public void setPassword(String password) {
        this.password = password;
    }

    public String getPassword() {
        return password;
    }
}
Edit Address.java so that it uses the database sequence called ADDRESS_EJB_SEQ_ID_GEN to generate address IDs.
The lines in bold mark the changes that you have to make. The rest of the file remains the same.
package org.soademo.customerservice.persistence;

import java.io.Serializable;

import javax.persistence.Column;
import javax.persistence.Entity;
import javax.persistence.Id;
import javax.persistence.NamedQuery;

// add these import lines
import javax.persistence.GeneratedValue;
import javax.persistence.GenerationType;
import javax.persistence.SequenceGenerator;
import javax.persistence.Table;

@Entity
@NamedQuery(name = "Address.findAllAddress",
            query = "select object(o) from Address o")
@Table(name = "ADDRESS")
public class Address implements Serializable {
    private String addresstype;
    @Id
    @SequenceGenerator(name = "ADDRESS_ID_GEN",
                       sequenceName = "ADDRESS_EJB_SEQ_ID_GEN")
    @GeneratedValue(strategy = GenerationType.SEQUENCE,
                    generator = "ADDRESS_ID_GEN")
    @Column(nullable = false)
    private String addrid;
    private String city;
    private String country;
    private String state;
    private String street;
    private String zip;
...
Edit CustomerServiceBean.java, located in the CustomerService\src\org\soademo\customerservice\business directory, so that it adds the methods that you defined through the queries in the Customer.java file in the previous section (Section 3.6, "Define Additional Queries in Customer.java").
To add the new methods to CustomerServiceBean.java:
Right-click CustomerServiceBean.java and select Edit Session Facade. This displays the Specify Session Facade Options dialog.
In the dialog, expand Customer and select:
findCustomerById
findCustomerByEmail
You do not need to select the other methods because they are not used by the SOA Order Booking application.
Figure 3-19 Specify Session Facade Options Dialog

Click OK. JDeveloper modifies CustomerServiceBean.java to include the selected methods.
JDeveloper displays CustomerServiceBean.java in the editor. Select File > Save to save it, but do not close it yet, for you will be editing it.
Make the following changes to CustomerServiceBean.java:
Modify the queryCustomerFindCustomerById method:
Change it so that it returns a single value instead of a list.
Modify its name to findCustomerById.
Although you can edit the file directly, it is better to make the changes using the property dialog in JDeveloper because it will synchronize the changes in other files, such as the interface files (CustomerServiceRemote.java, CustomerServiceLocal.java, and CustomerService.java) that this class implements.
If CustomerServiceBean.java is not showing in the editor, double-click it in the Application Navigator.
Select View > Structure to display the Structure window.
Select CustomerServiceBean.java in the Application Navigator.
In the Structure window, right-click the queryCustomerFindCustomerById method and select Properties. This displays the Bean Method Details dialog.
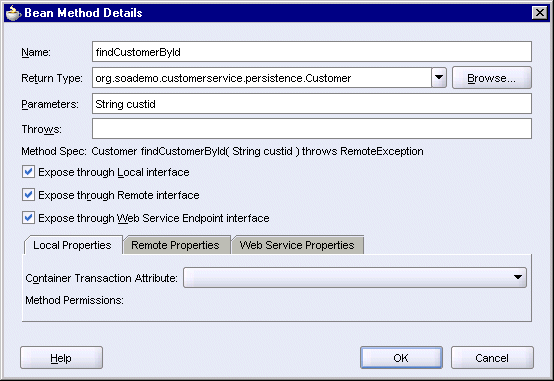
In the Bean Method Details dialog:
Name: change to findCustomerById.
Return Type: remove java.util.List and the angle brackets so that it returns only Customer, specified in its full package name (org.soademo.customerservice.persistence.Customer).
Parameters: change Object to String.
The dialog should look like this:
Figure 3-20 Bean Method Details Dialog for findCustomerById
Click OK. You can see the changes in the editor.
Make these additional changes to the findCustomerById method in the editor:
Cast the return value to Customer.
Change the last method to getSingleResult (instead of getResultList).
Example 3-3 shows what the updated method should look like.
Select File > Save to save your changes.
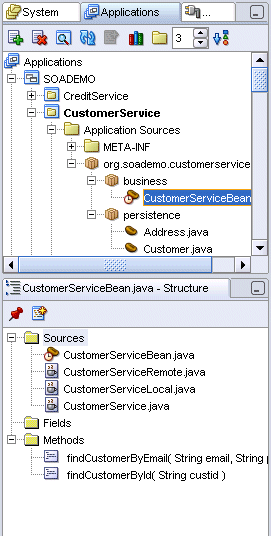
In the Structure window, expand Sources. You should see the interface files listed under Sources.
Double-click the interface files (CustomerServiceRemote.java, CustomerServiceLocal.java, and CustomerService.java) to display them in the editor. The interface files are listed under Sources in the Structure window.
After you double-click an interface file, you need to re-select CustomerServiceBean.java in the Application Navigator. The interface files are listed as the sources for CustomerServiceBean.java.
Notice that JDeveloper has updated the methods in these interface files to synchronize with your updates.
Figure 3-21 Application Navigator and Structure Window Showing the Structure for CustomerServiceBean.java
Save the interface files.
Make similar changes to the queryCustomerFindCustomerByEmail method like you did for the queryCustomerFindCustomerById method:
Change it so that it returns a single value instead of a list.
Modify its name to findCustomerByEmail.
Although you can edit the file directly, it is better to make the changes using the property dialog in JDeveloper because it will synchronize the changes in other files, such as the interface files (CustomerServiceRemote.java, CustomerServiceLocal.java, and CustomerService.java) that this class implements.
Select CustomerServiceBean.java in the Application Navigator.
In the Structure window, right-click the queryCustomerFindCustomerByEmail method and select Properties. This displays the Bean Method Details dialog.
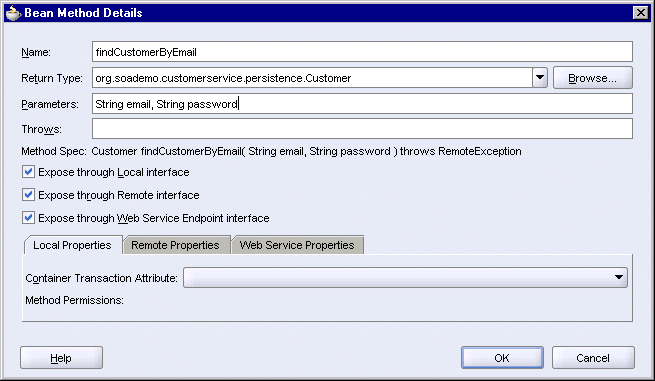
In the Bean Method Details dialog:
Name: change to findCustomerByEmail.
Return Type: remove java.util.List and the angle brackets so that it returns only Customer, specified in its full package name (org.soademo.customerservice.persistence.Customer).
Parameters: for both parameters, change Object to String.
The dialog should look like this:
Figure 3-22 Bean Method Details Dialog for findCustomerByEmail
Click OK. You can see the changes in the editor.
Make these additional changes to the findCustomerByEmail method in the editor:
Cast the return value to Customer.
Change the last method to getSingleResult (instead of getResultList).
Example 3-4 shows what the updated method should look like.
Select File > Save to save your changes.
In the Structure window, expand Source and double-click the interface files (CustomerServiceRemote.java, CustomerServiceLocal.java, and CustomerService.java) to display them in the editor. Notice that JDeveloper has updated the methods in these files to synchronize with your updates.
Save the interface files.
Add the getCustomerStatus and addNewCustomer methods to CustomerServiceBean.java. Although you can simply add these methods using the editor, it is better to enter them using the Bean Method Details dialog because JDeveloper can also update the interface files with these new methods.
To create a new method:
Display CustomerServiceBean.java in the editor.
Select View > Structure to display the Structure window, if it is not already showing.
In the Structure window, right-click Methods and select New Method. This displays the Bean Method Details dialog.
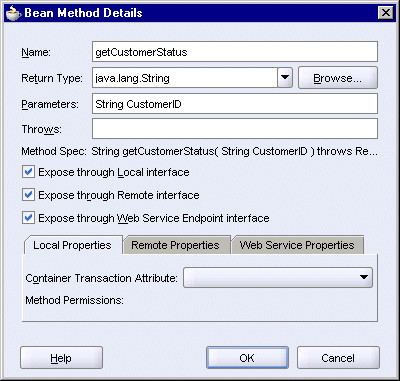
In the Bean Method Details dialog:
Name: enter getCustomerStatus.
Return Type: select java.lang.String.
Parameters: enter String CustomerID.
The dialog should look like this:
Figure 3-23 Bean Method Details Dialog for getCustomerStatus
Click OK.
In the editor for CustomerServiceBean.java, enter the body of the method. See Example 3-5:
Save the file.
Notice that JDeveloper updates the interface files with this new method.
Repeat the same procedure to create the addNewCustomer method. In the Bean Method Details dialog, enter these values:
Name: enter addNewCustomer.
Return Type: select java.lang.String.
Parameters: enter Customer customer.
The dialog should look like this:
Figure 3-24 Bean Method Details for addNewCustomer
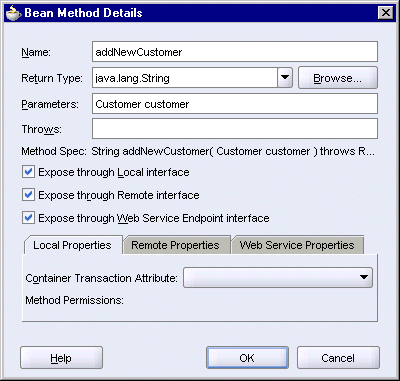
Click OK in the dialog.
In the editor for CustomerServiceBean.java, add the body for the method.
Save the CustomerServiceBean.java file.
Save the interface files.
The CustomerService.java file was generated as the web service endpoint interface for the CustomerService session bean. You add JSR-181 annotations to this file to refine the names of methods and parameters.
Edit the file so that it looks like the following. You can edit the file in the editor.
Example 3-7 CustomerService.java
package org.soademo.customerservice.business;

import java.rmi.RemoteException;

import javax.ejb.Remote;

import javax.jws.WebMethod;
import javax.jws.WebParam;
import javax.jws.WebService;

import org.soademo.customerservice.persistence.Customer;

@WebService(serviceName = "CustomerSvc",
            targetNamespace = "http://www.globalcompany.com/ns/customer")
public interface CustomerService {

    @WebMethod
    Customer findCustomerById(
           @WebParam(name = "custid",
                     targetNamespace = "http://www.globalcompany.com/ns/customer")
                String custid) throws RemoteException;

    @WebMethod
    String getCustomerStatus(
           @WebParam(name = "CustomerID",
                     targetNamespace = "http://www.globalcompany.com/ns/customer")
                String CustomerID);

    @WebMethod
    String addNewCustomer(
           @WebParam(name = "customer",
                     targetNamespace = "http://www.globalcompany.com/ns/customer")
                Customer customer);

    @WebMethod
    Customer findCustomerByEmail(
           @WebParam(name = "email",
                     targetNamespace = "http://www.globalcompany.com/ns/customer")
                String email,
           @WebParam(name = "password",
                     targetNamespace = "http://www.globalcompany.com/ns/customer")
                String password);
}
Create a deployment profile so that you can easily deploy the CustomerService project to Oracle Application Server from JDeveloper.
To create a deployment profile:
Right-click the CustomerService project and select New. In Categories, expand General and select Deployment Profiles. In Items, select EJB JAR File.
Figure 3-25 New Gallery for Creating a Deployment Profile for EJB JAR File

Click OK.
In the Create Deployment Profile -- EJB JAR File dialog:
Deployment Profile Name: enter CustomerService.
Directory: use the default (CustomerService directory).
Figure 3-26 Create Deployment Profile - EJB JAR File Dialog
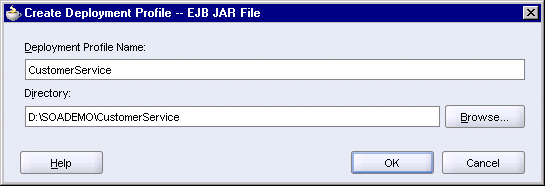
Click OK.
In the EJB JAR Deployment Profile Properties dialog, accept the defaults.
Figure 3-27 EJB JAR Deployment Profile Properties Dialog
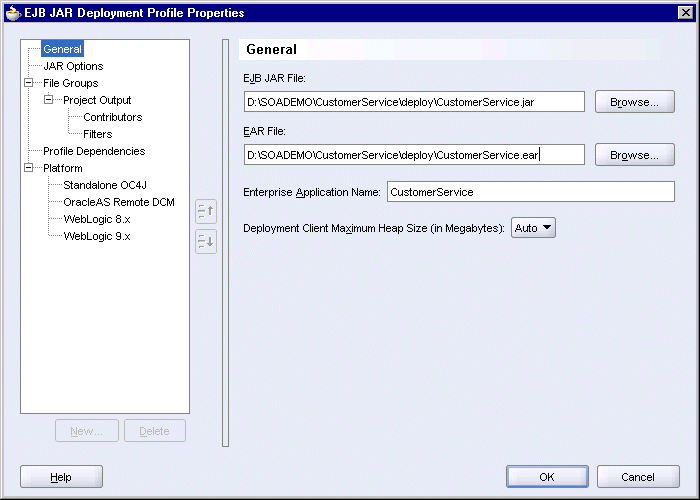
Click OK.
You should see CustomerService.deploy under Resources in the Application Navigator.
Figure 3-28 Application Navigator Showing the CustomerService.deploy Deployment Profile
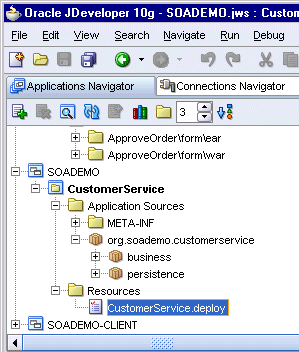
To deploy the CustomerService project, right-click CustomerService.deploy in the Application Navigator and select Deploy To > SoademoApplicationServer, where SoademoApplicationServer specifies the connection to Oracle Application Server.
JDeveloper compiles the application and creates JAR and EAR files in the CustomerService\deploy directory. If there are no errors, it displays the Configure Application dialog.
Click OK.
Watch the messages in the JDeveloper log area for any errors.
You can view the WSDL for CustomerService by entering the following URL in a browser:
http://hostname:port/CustomerService/CustomerService?WSDL
For hostname, enter the name of the machine running Oracle Application Server.
For port, enter the HTTP port at which Oracle HTTP Server or OC4J is listening. The default port is 8888.
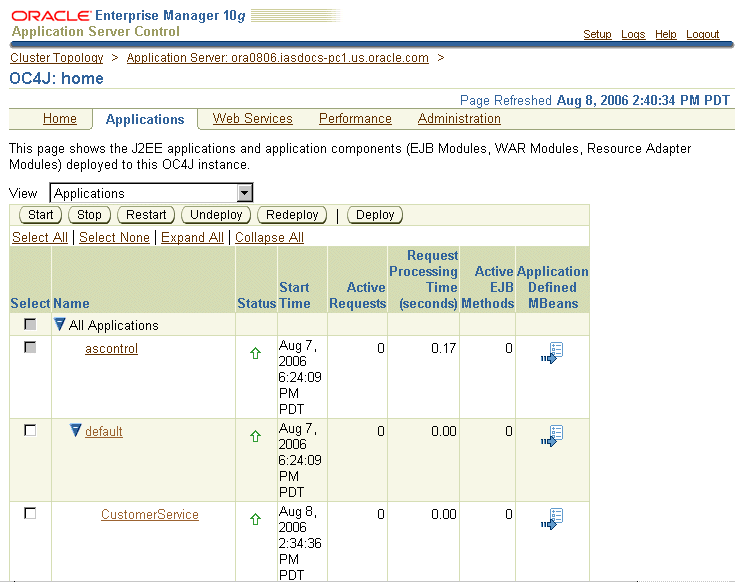
After deploying CustomerService, you should see it in two places in the Application Server Control: in the Web Services tab (Figure 3-30) and the Applications tab (Figure 3-31) of the OC4J:home page.
Figure 3-30 Web Services Tab of OC4J:home Page Showing the CustomerService Web Service
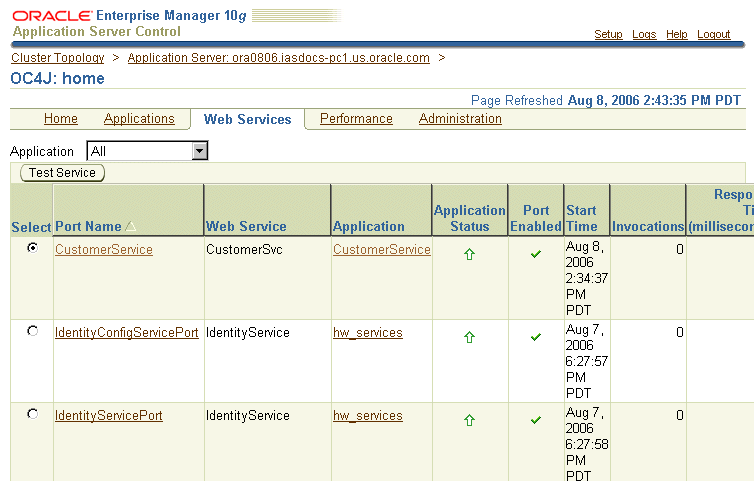
Figure 3-31 Applications Tab of OC4J:home Page Showing the CustomerService Application
