| Oracle® SOA Suite Tutorial Release 3 (10.1.3.1.0) Part Number B28937-01 |
|
|
View PDF |
| Oracle® SOA Suite Tutorial Release 3 (10.1.3.1.0) Part Number B28937-01 |
|
|
View PDF |
This chapter describes how to create the FulfillmentESB project. It contains these sections:
Section 4.4, "Create the "OrderFulfillment" Routing Service"
Section 4.6, "Create the "USPSShipment" Adapter (File Adapter)"
Section 4.7, "Create the "FedexShipment" Adapter (Database Adapter)"
Section 4.8, "Create the "FulfillmentBatch" Adapter (JMS Adapter)"
Section 4.10, "Save All Files in the FulfillmentESB Project"
After an order has been approved, the SOAOrderBooking project invokes the FulfillmentESB project to determine the shipping method for the order. Currently there are two possible shipping methods: USPS and Fedex. The FulfillmentESB project sends orders under $500 to USPS, and orders $500 and over to Fedex.
Orders are sent to the USPS through a file adapter. The order information is written to a file.
For Fedex, orders are sent through a database adapter. The order information is written to a database.
The FulfillmentESB project also sends orders to a JMS adapter. For this tutorial, the order is just sent to a JMS queue. There is no consumer of the order data from the queue. This is just to show you how to send messages to a JMS adapter, if you are planning on using one.
The FulfillmentESB project is an ESB project. In JDeveloper, the completed project looks like the following:
The FulfillmentESB project consists of:
OrderFulfillment routing service
Shipment routing service
USPSShipment file adapter
FedexShipment database adapter
FulfillmentBatch JMS adapter
Start by creating a new ESB project in JDeveloper:
Right-click the SOADEMO application, and select New Project.
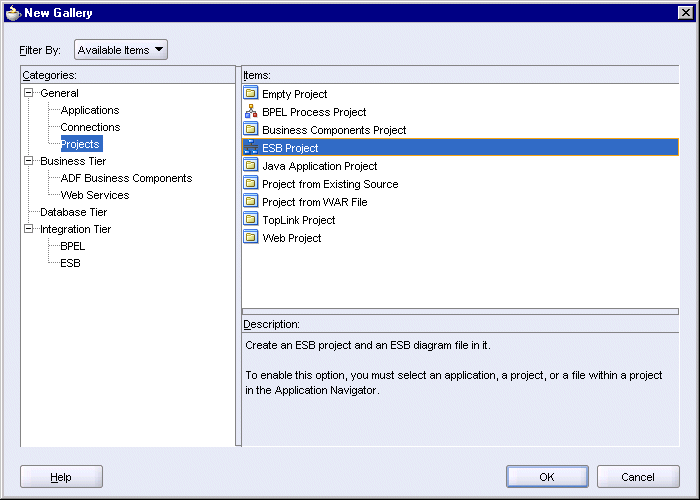
In the New Gallery, in the Categories section, expand General and select Projects. In the Items section, select ESB Project.
Figure 4-2 New Gallery: Select "ESB Project" for the FulfillmentESB Project
Click OK.
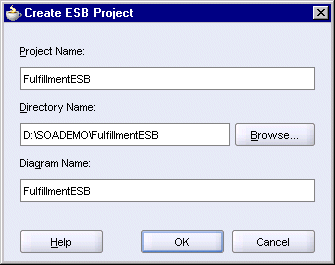
In the Create ESB Project dialog, enter FulfillmentESB in the Project Name field. Accept the defaults for the other fields.
Figure 4-3 Create ESB Project Dialog for FulfillmentESB Project
Click OK.
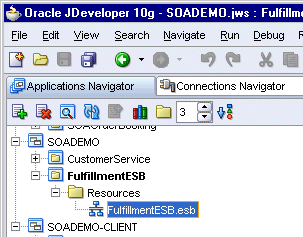
JDeveloper displays a blank page for the FulfillmentESB.esb file. In the Application Navigator, this file is located under FulfillmentESB > Resources:
Figure 4-4 Application Navigator Showing the FulfillmentESB File
For an ESB project, all ESB activities belong to a system. By default, JDeveloper places the activities in a system called "DefaultSystem".
To make your ESB projects easier to maintain, you can create a new system and set the ESB activities in a project to belong to that system. During runtime, when you manage the project in the ESB Console, you can configure properties for the activities in a system.
If you do not create a system, then in the ESB Console, you will find all your activities under "DefaultSystem".
For the FulfillmentESB project, you create a system called "Fulfillment" and set all the activities in the FulfillmentESB project to belong to this system. The OrderBookingESB project, covered in Chapter 9, also has its own system.
In the empty FulfillmentESB.esb page, click the Create System/Group icon, located at the top of the page.
Figure 4-5 Create System/Group Icon at the Top of the FulfillmentESB.esb Page
In the Create ESB System or Service Group dialog:
System: select this option.
Name: enter Fulfillment.
Description: leave blank or enter a brief description.
Figure 4-6 Create ESB System or Service Group Dialog for the "Fulfillment" System
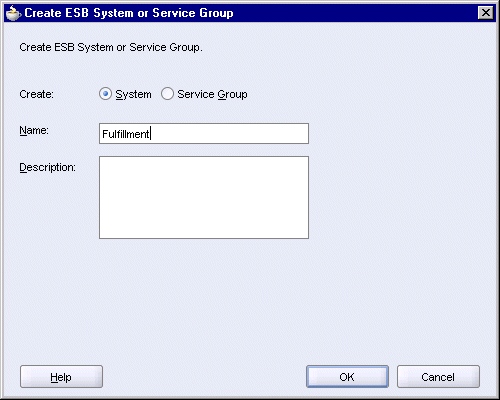
Click OK. In the Application Navigator, you should see a Fulfillment.esbsys file under FulfillmentESB > Resources.
The OrderFulfillment routing service routes requests to two places:
Shipment, which is another routing service
FulfillmentBatch, which sends messages to a Java Messaging Service (JMS)
To create the OrderFulfillment routing service:
Copy the following file from the soademo_101310_prod.zip file to the SOADEMO\FulfillmentESB directory:
OrderBookingPO.xsd
In the zip file, this file is located in the FulfillmentESB directory.
This file is needed by the OrderFulfillment routing service.
If the Component Palette is not showing in JDeveloper, select View > Component Palette to display it.
Select ESB Services from the dropdown in the Component Palette.
Drag the Routing Service icon from the Component Palette and drop it anywhere on the FulfillmentESB page.
In the Create Routing Service dialog:
Name: enter OrderFulfillment.
System/Group: set to Fulfillment. If it is not set to Fulfillment, click the flashlight, which displays the ESB Service Group Browser dialog. Select Fulfillment in the dialog and click OK.
Generate WSDL From Schemas: select this option.
Schema Location: click Browse, which displays the Type Chooser dialog. In the dialog, select Project Schema Files > OrderBookingPO.xsd > PurchaseOrder.
Figure 4-8 Type Chooser Dialog for OrderFulfillment Routing Service

Click OK in the Type Chooser dialog.
Schema Element: select PurchaseOrder.
Operation Name: enter execute.
Namespace: enter http://www.globalcompany.com/ns/Fulfillment.
The Create Routing Service dialog should now look like this.
Figure 4-9 Create Routing Service Dialog for the OrderFulfillment Routing Service
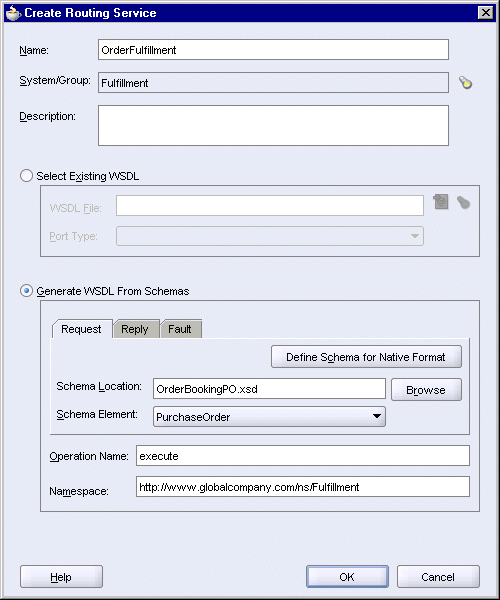
Click OK in the Create Routing Service dialog.
In JDeveloper, you should see this routing service instance:
Figure 4-10 OrderFulfillment Routing Service in JDeveloper
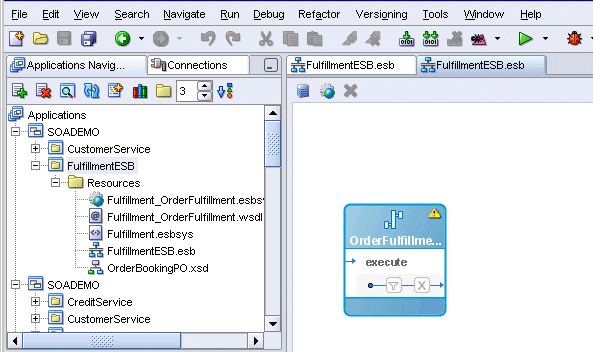
JDeveloper created the following files in the FulfillmentESB directory.
Fulfillment_OrderFulfillment.esbsvc - this file defines the "OrderFulfillment" routing service. JDeveloper prefixes the system name to the filename.
Fulfillment_OrderFulfillment.wsdl - this WSDL file is for the "OrderFulfillment" routing service.
The Shipment routing service routes requests either to the FedexShipment database adapter or to the USPSshipment file adapter. You will define a filter rule in the Shipment routing service to route orders greater than or equal to $500 to the FedexShipment, while orders less than $500 are routed to the USPSshipment.
To create the Shipment routing service:
Drag the Routing Service icon from the Component Palette and drop it anywhere on the FulfillmentESB page.
In the Create Routing Service dialog:
Name: enter Shipment.
System/Group: should be set to Fulfillment. If not, click the flashlight icon to change it.
Generate WSDL From Schemas: select this option.
Schema Location: click Browse, which displays the Type Chooser dialog. In the dialog, select Project Schema Files > OrderBookingPO.xsd > PurchaseOrder.
Figure 4-11 Type Chooser Dialog for Shipment Routing Service

Click OK in the Type Chooser dialog.
Schema Element: select PurchaseOrder.
Operation Name: enter execute.
Namespace: enter http://www.globalcompany.com/ns/shipment.
The Create Routing Service dialog should now look like this:
Figure 4-12 Create Routing Service Dialog for the Shipment Routing Service
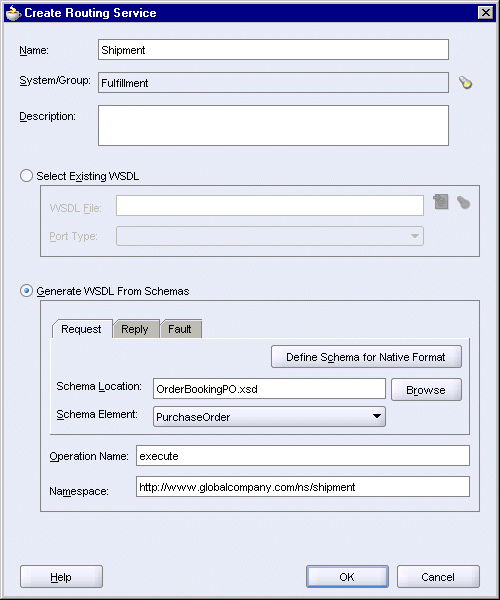
Click OK in the Create Routing Service dialog.
In JDeveloper, you should see two routing services:
Figure 4-13 JDeveloper Showing the OrderFulfillment and Shipment Routing Services
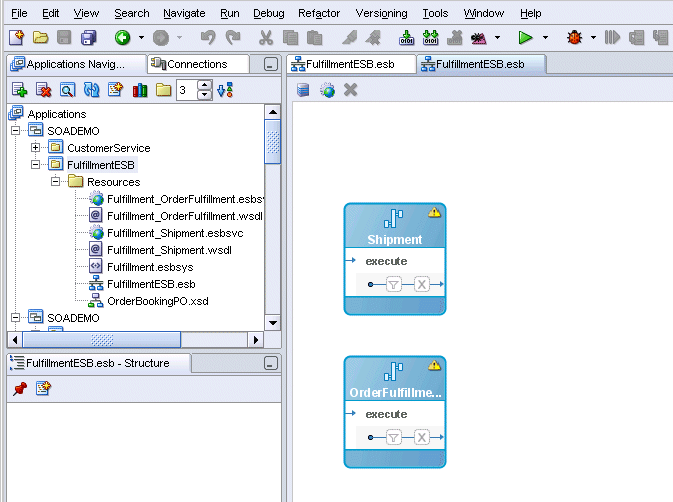
JDeveloper created the following files in the FulfillmentESB directory.
Fulfillment_Shipment.esbsvc - this file defines the "Shipment" routing service. JDeveloper prefixes the system name to the filename.
Fulfillment_Shipment.wsdl - this WSDL file is for the "Shipment" routing service.
The "USPSShipment" service is one of the targets for the "Shipment" routing service. When the "Shipment" routing service sends an order to the "USPSShipment" service, the "USPSShipment" service writes the order information to a flat file in the C:\temp directory.
To create the "USPSShipment" service:
Copy the following file from the soademo_101310_prod.zip file to the FulfillmentESB directory:
USPSShipment.xsd
In the zip file, this file is located in the FulfillmentESB directory.
In the Component Palette, select Adapter Services from the dropdown.
Drag the File Adapter icon from the Component Palette and drop it anywhere on the FulfillmentESB page.
In the Create File Adapter Service dialog:
Name: enter USPSShipment.
System/Group: should be set to Fulfillment. If not, click the flashlight icon to change it.
WSDL File: click the Configure Adapter Service WSDL icon (the one on the left), which launches the Adapter Configuration wizard.
Click Next on the Welcome page of the wizard.
Step 1, Service Name:
Figure 4-14 Adapter Configuration Wizard, Step 1, Service Name
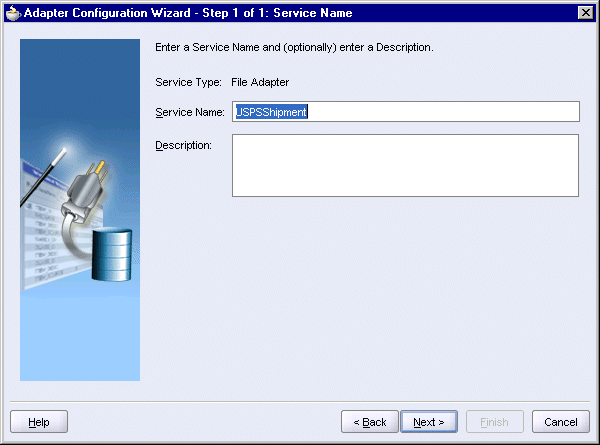
Service Name: enter USPSShipment.
Click Next.
Step 2, Operation:
Figure 4-15 Adapter Configuration Wizard, Step 2, Operation
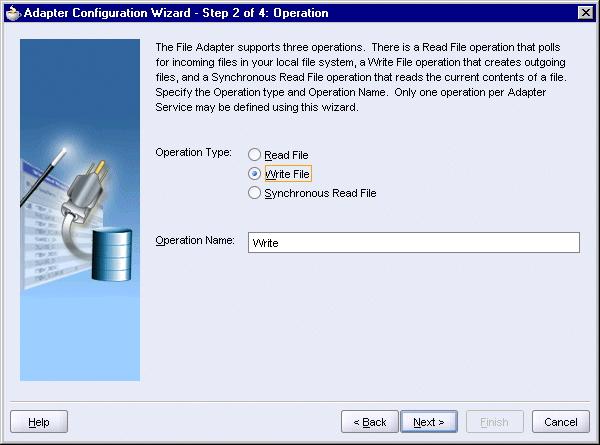
Operation Type: select Write File.
Operation Name: should be filled in with Write.
Click Next.
Step 3, File Configuration:
Figure 4-16 Adapter Configuration Wizard, Step 3, File Configuration
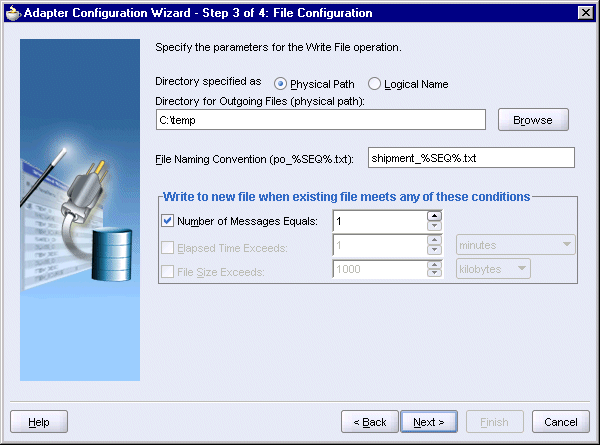
Directory for Outgoing Files: enter the directory where you want the adapter to write the files. For example, you can enter C:\temp.
|
Note: This directory is located on the machine where you are running Oracle Application Server, not the machine where you are running JDeveloper. |
File Naming Convention: specify how you want to name the files. Enter shipment_%SEQ%.txt. The %SEQ% indicates that the filenames will be numbered sequentially.
Number of Messages Equals: You can leave it at 1, which means that each order will be written in a separate file.
Click Next.
Step 4, Messages:
Figure 4-17 Adapter Configuration Wizard, Step 4, Messages
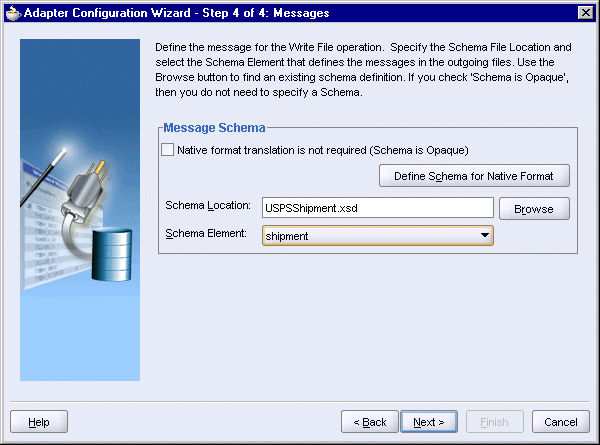
Native format translation is not required (Schema is Opaque): do not select this option.
Schema Location. Click Browse. In the Type Chooser, select Project Schema Files > USPSShipment.xsd > shipment.
Figure 4-18 Type Chooser for USPSShipment File Adapter
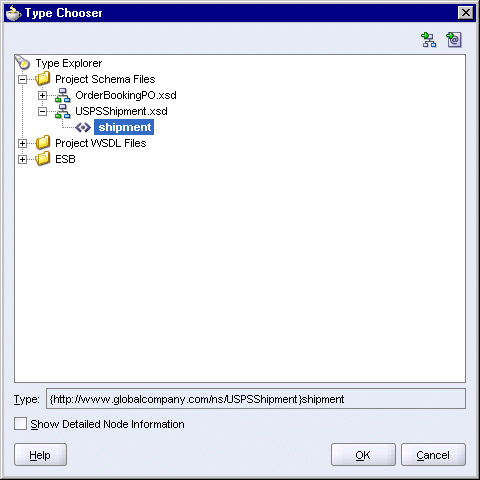
Click OK in the Type Chooser.
Schema Element: should be set to shipment.
Click Next.
On the Finish page, click Finish.
The wizard creates the following files in the FulfillmentESB directory:
USPSShipment.wsdl - this file contains the information you specified in the wizard.
fileAdapterOutboundHeader.wsdl - this file contains generic information for writing to files.
The Create File Adapter Service dialog should now look like this. JDeveloper automatically filled in Write_ptt for Port Type.
Figure 4-19 Create File Adapter Service Dialog for the USPSShipment File Adapter Service
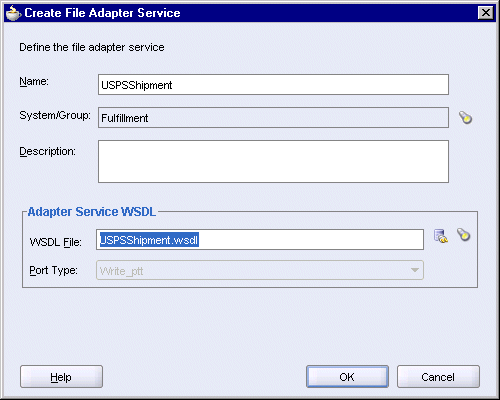
Click OK in the Create File Adapter Service dialog.
In JDeveloper, you should see two routing services and a file adapter service:
Figure 4-20 JDeveloper Showing the OrderFulfillment and Shipment Routing Services, and the USPSShipment File Adapter Service
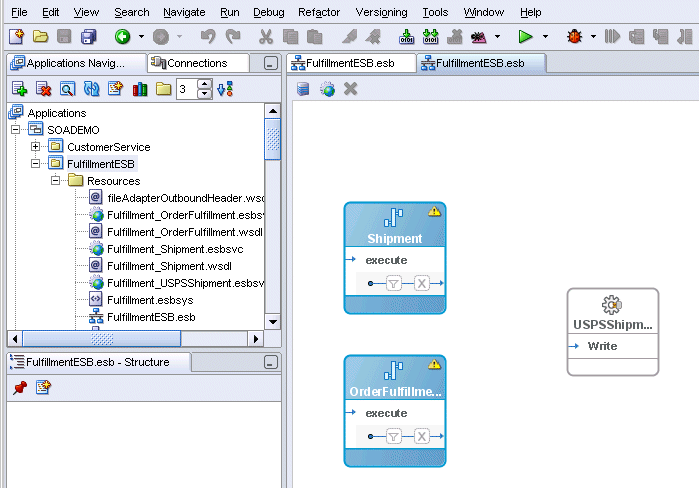
The FedexShipment service is a database adapter. When the Shipment routing service routes an order to the FedexShipment adapter, the FedexShipment adapter writes the order information to the FEDEXSHIPMENT table in the SOADEMO schema.
To create the FedexShipment adapter:
Copy the following file from the soademo_101310_prod.zip file to the FulfillmentESB directory:
FedexShipment_table.xsd
In the zip file, this file is located in the FulfillmentESB directory.
In the Component Palette, select Adapter Services from the dropdown.
Drag the Database Adapter icon from the Component Palette and drop it anywhere on the FulfillmentESB page.
In the Create Database Adapter Service dialog:
Name: enter FedexShipment.
System/Group: should be set to Fulfillment. If not, click the flashlight icon to change it.
WSDL File: click the Configure Adapter Service WSDL icon (the one on the left), which launches the Adapter Configuration wizard.
Click Next on the Welcome page of the wizard.
Step 1, Service Name:
Figure 4-21 Adapter Configuration Wizard, Step 1, Service Name
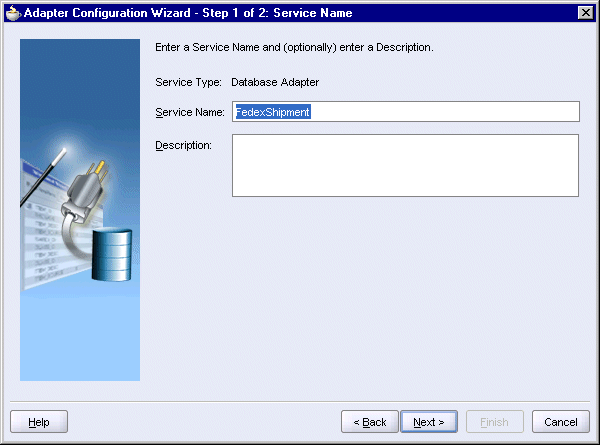
Service Name: enter FedexShipment.
Click Next.
Step 2, Service Connection:
Figure 4-22 Adapter Configuration Wizard, Step 2, Service Connection
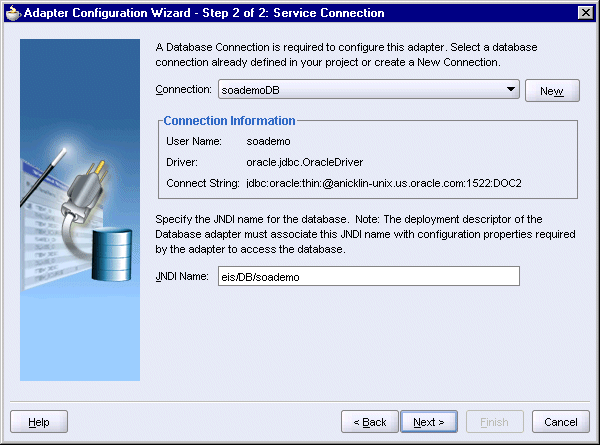
Connection: select the database connection for the SOADEMO schema.
JNDI Name: enter eis/DB/soademo. This is the JNDI location you specified when you created connection factory in Oracle Application Server (see Section 2.6.4, "Create a Database Adapter Connection Factory").
Click Next.
Step 3, Operation Type:
Figure 4-23 Adapter Configuration Wizard, Step 3, Operation Type

Select Perform an Operation on a Table, and select Insert Only. The SOA Order Booking application only needs to insert rows in the table.
Click Next.
Step 4, Select Table, click Import Tables.
In the Import Tables dialog, click Query.
Select FEDEXSHIPMENT and click the right-arrow button to move it the Selected box. The FEDEXSHIPMENT table is the table that the database adapter will write to.
Figure 4-24 Import Tables Dialog for FedexShipment

Click OK in the Import Tables dialog. Step 4, Select Table, now looks like this:
Figure 4-25 Adapter Configuration Wizard, Step 4, Select Table
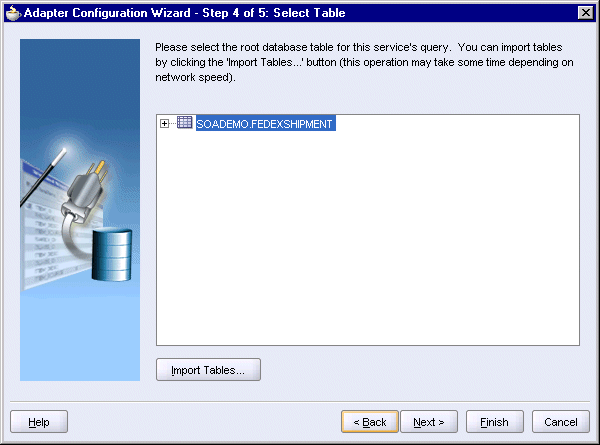
Select the SOADEMO.FEDEXSHIPMENT table and click Next.
In Step 5, Relationships, click Next.
Figure 4-26 Adapter Configuration Wizard, Step 5, Relationships
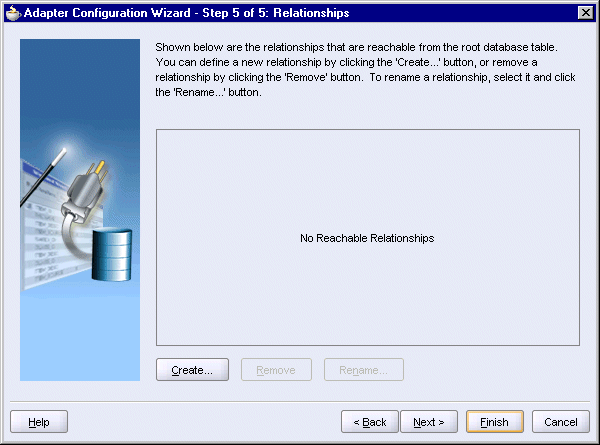
On the Finish page, click Finish.
The wizard creates the following files in the FulfillmentESB directory:
DBAdapterOutboundHeader.wsdl -- this file contains the generic information for connecting to a database.
FedexShipment.wsdl -- this file contains the information that you specified in the wizard.
src\*
database\*
toplink\*
The Create Database Adapter Service dialog now looks like this:
Figure 4-27 Create Database Adapter Service Dialog for the FedexShipment Database Adapter Service
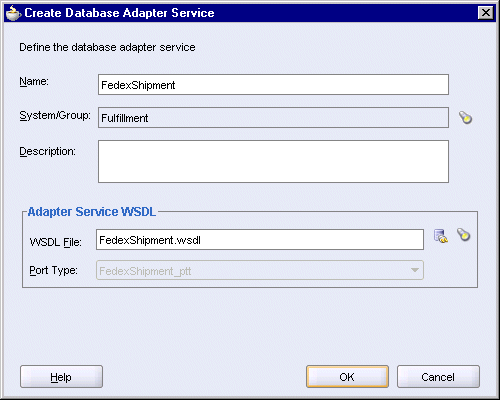
Click OK in the Create Database Adapter Service dialog.
In JDeveloper, you should see two routing services, a file adapter service, and a database adapter service.
Figure 4-28 JDeveloper Showing the OrderFulfillment and Shipment Routing Services, the USPSShipment File Adapter Service, and the FedexShipment Database Adapter Service

The "OrderFulfillment" routing service routes all orders to the "Shipment" routing service and to the "FulfillmentBatch" adapter. The "FulfillmentBatch" adapter sends the order information to a JMS server.
To create the FulfillmentBatch JMS adapter:
In the Component Palette, select Adapter Services from the dropdown.
Drag the JMS Adapter icon from the Component Palette and drop it anywhere on the FulfillmentESB page.
In the Create JMS Adapter Service dialog:
Name: enter FulfillmentBatch.
System/Group: should be set to Fulfillment. If not, click the flashlight icon to change it.
WSDL File: click the Configure Adapter Service WSDL icon (the one on the left), which launches the Adapter Configuration wizard.
Click Next on the Welcome page of the wizard.
Step 1, Service Name:
Figure 4-29 Adapter Configuration Wizard, Step 1, Service Name
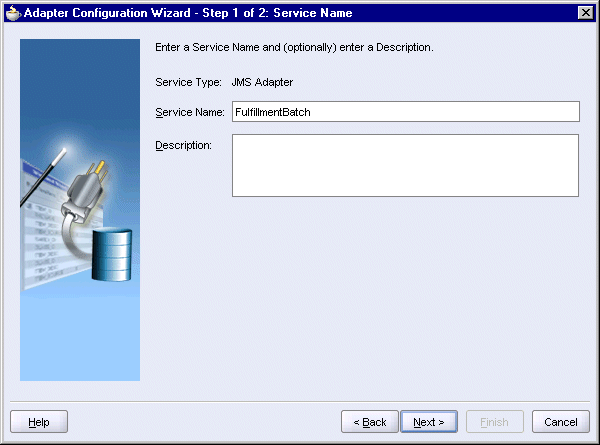
Service Name: enter FulfillmentBatch.
Click Next.
Step 2, JMS Provider:
Figure 4-30 Adapter Configuration Wizard, Step 2, JMS Provider
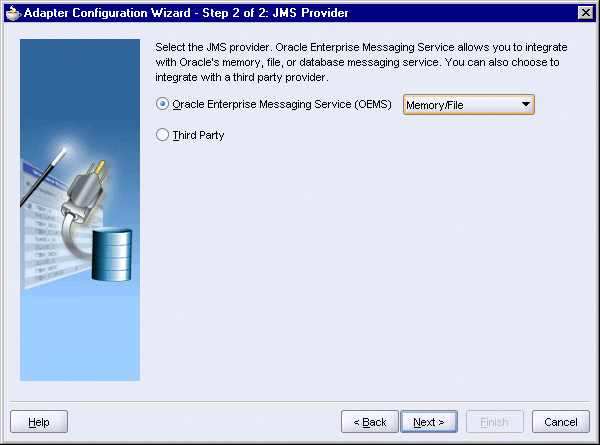
Select Oracle Enterprise Messaging Service (OEMS) and select Memory/File from the dropdown.
Click Next.
Step 3, Service Connection:
Figure 4-31 Adapter Configuration Wizard, Step 3, Service Connection

In the Connection dropdown, select the connection to Oracle Application Server.
Click Next.
Step 4, Operation:
Figure 4-32 Adapter Configuration Wizard, Step 4, Operation
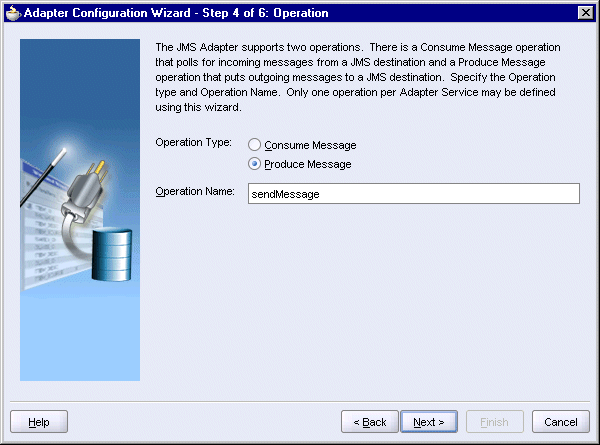
Operation Type: select Produce Message.
Operation Name: enter sendMessage.
Click Next.
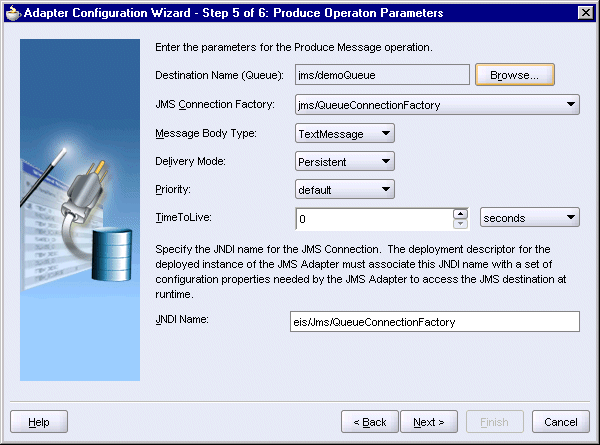
Step 5, Produce Operation Parameters, click Browse. This displays the Select Destination dialog. In the dialog, select demoQueue (queue), and click OK.
The rest of the values in Step 5 are filled in for you. You can just accept these values.
Figure 4-34 Adapter Configuration Wizard, Step 5, Produce Operation Parameters
Click Next.
Step 6, Messages:
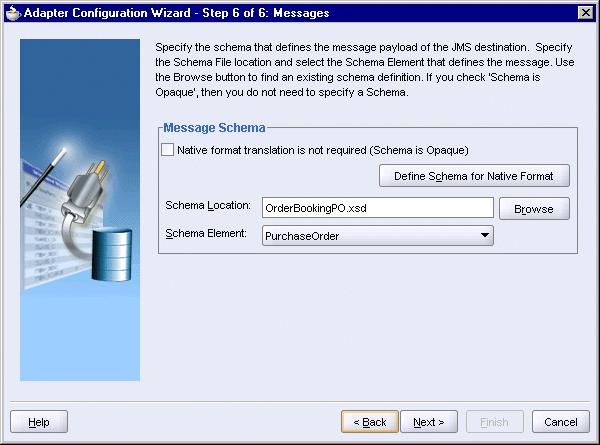
Native format translation is not required (Schema is Opaque): do not select this option.
Schema Location: click Browse, which displays the Type Chooser. Select Project Schema Files > OrderBookingPO.xsd > PurchaseOrder.
Figure 4-35 Type Chooser for the FulfillmentBatch JMS Adapter Service

Click OK in the Type Chooser.
Schema Element: select PurchaseOrder.
Figure 4-36 Adapter Configuration Wizard, Step 6, Messages
Click Next.
On the Finish page, click Finish.
The wizard created the following files in the FulfillmentESB directory:
jmsAdapterOutboundHeader.wsdl
FulfillmentBatch.wsdl
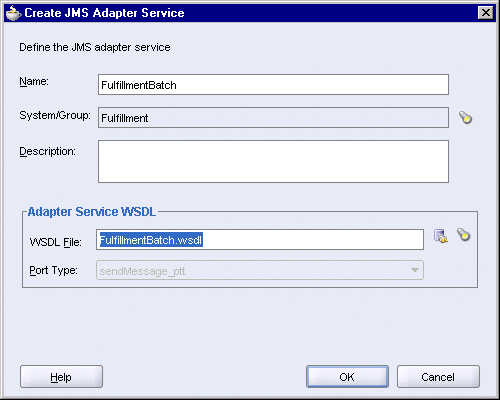
The Create JMS Adapter Service dialog now looks like this:
Figure 4-37 Create JMS Adapter Service Dialog for the FulfillmentBatch JMS Adapter Service
Click OK in the Create JMS Adapter Service dialog.
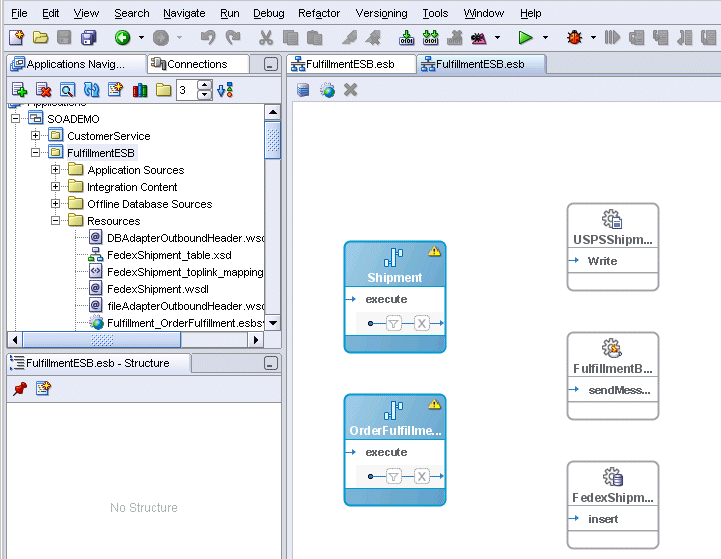
In JDeveloper, you should see two routing services, a file adapter service, a database adapter service, and a JMS adapter service.
Figure 4-38 JDeveloper Showing All the Services for the FulfillmentESB Project
To route order information from one service to another, you set up routing rules. Routing rules enable you to define filters and transformations. Filters enable you to define conditions under which a service gets to process an order, and transformations enable you to map data so that the target service is able to process the data correctly.
For the FulfillmentESB project, you create routing rules between the following services:
The OrderFulfillment routing service routes orders to two places: Shipment and FulfillmentBatch.
To create routing rule between OrderFulfillment and Shipment:
Double-click OrderFulfillment in the top section of the icon. This displays the page for the Fulfillment_OrderFulfillment.esbsvc file.
Figure 4-39 Definition for the Fulfillment_OrderFulfillment Routing Service
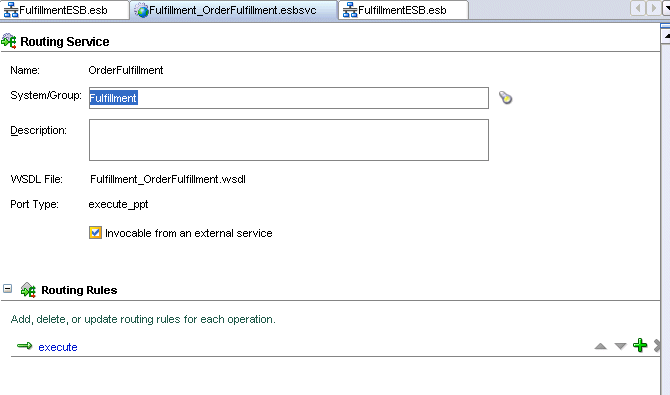
In the Routing Rules section, click the [+] to expand it.
Click the green + icon to add a routing route. This displays the Browse Target Service Operation dialog.
You may have to scroll to the right to see the green + icon.
In the Browse Target Service Operation dialog, select Services In Project > Fulfillment > Shipment > execute.
Figure 4-40 Browse Target Service Operation Dialog
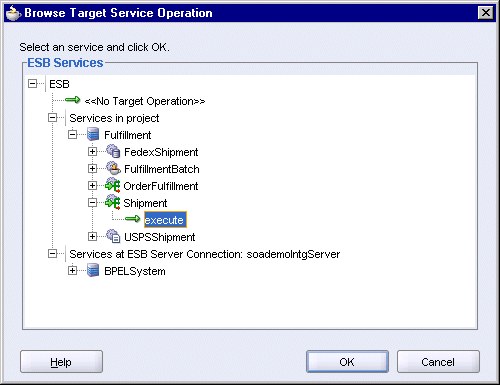
Click OK in the Browse Target Service Operation dialog.
The routing rule area now looks like this:
Figure 4-41 Routing Rule from OrderFulfillment to Shipment

Select File > Save to save your work.
For this routing rule, there are no filters and no transformations. The OrderFulfillment routing service routes all orders to the Shipment routing service. The data is not transformed in any way.
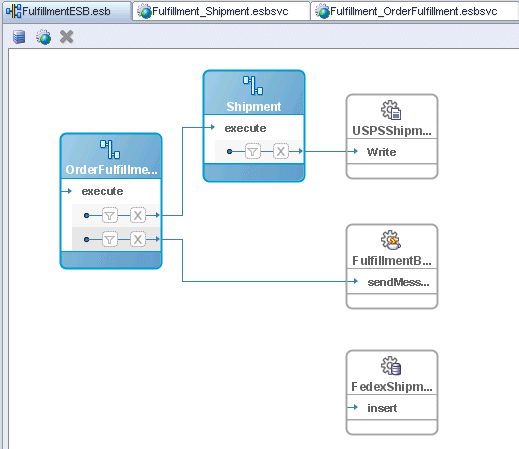
Click the FulfillmentESB.esb tab in JDeveloper. You should see an arrow going from OrderFulfillment to Shipment.
Figure 4-42 JDeveloper Showing Routing from OrderFulfillment to Shipment
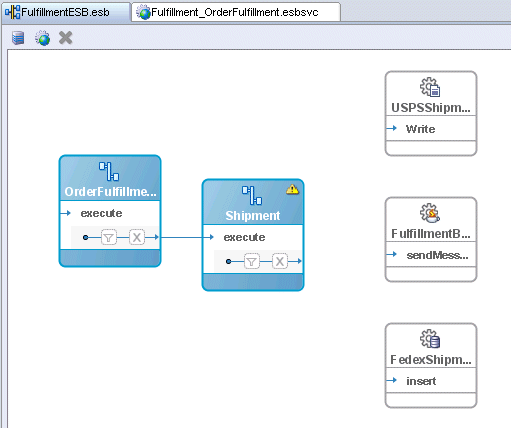
The OrderFulfillment routing service routes orders to two places: Shipment and FulfillmentBatch (which is a JMS adapter service).
To create routing rule from OrderFulfillment to FulfillmentBatch:
Double-click OrderFulfillment in the top section of the icon. This displays the page for the Fulfillment_OrderFulfillment.esbsvc file.
In the Routing Rules section, click the [+] to expand it. You should see the rule that you created in the previous section (Section 4.9.1, "Between OrderFulfillment and Shipment").
Figure 4-43 Definition for the OrderFulfillment Routing Service
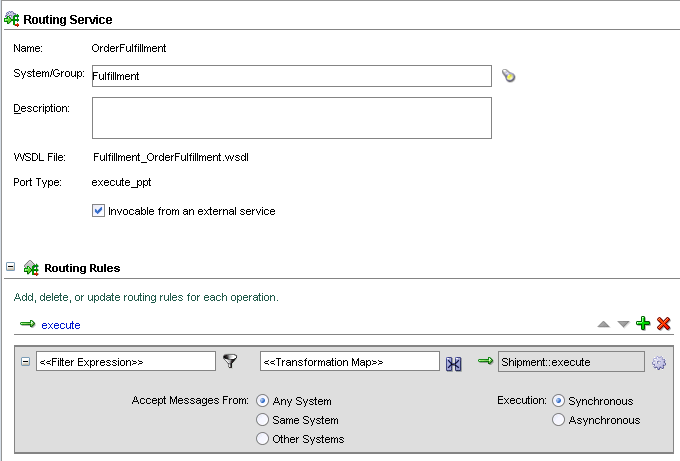
Click the green + icon to add another routing route. You may have to scroll to the right to see the + icon.
In the Browse Target Service Operation dialog, select Services In Project > Fulfillment > FulfillmentBatch > sendMessage.
Figure 4-44 Browse Target Service Operation Dialog
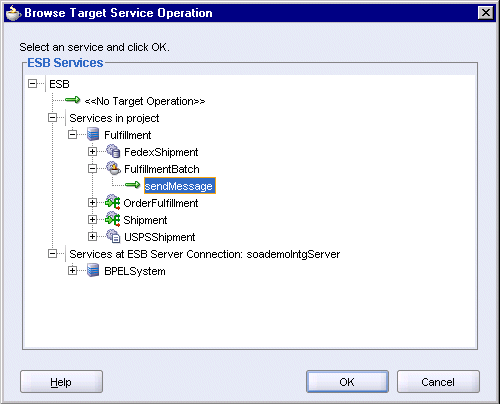
Click OK in the Browse Target Service Operation dialog.
The routing rule area now contains two rules:
Figure 4-45 Routing Rules for the OrderFulfillment Routing Service
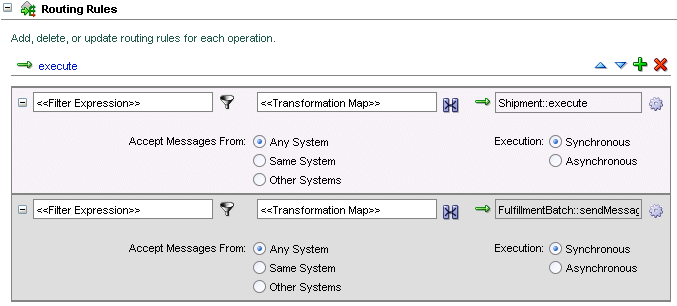
Select File > Save to save your work.
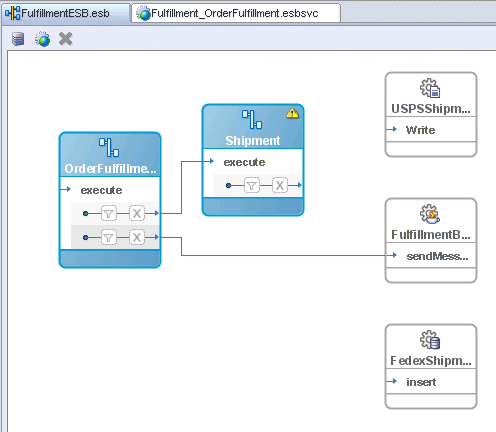
Click the FulfillmentESB.esb tab in JDeveloper. From OrderFulfillment, there should be two arrows: one going to Shipment and one going to FulfillmentBatch.
Figure 4-46 JDeveloper Showing Routing from OrderFulfillment to Shipment and JMSAdapter
The Shipment routing service routes orders that are under $500 to the USPSShipment file adapter and orders that are $500 and over to the FedexShipment database adapter.
This section shows the routing rule for USPSShipment. It uses a filter to set the $500 rule, and it uses transformation to control what information is passed to USPSShipment. USPSShipment, which is a file adapter service, then writes the information to a file in the C:\temp directory.
To create the routing rule from Shipment to USPSShipment:
Double-click Shipment in the top section of the icon. This displays the page for the Fulfillment_Shipment.esbsvc file.
In the Routing Rules section, click the [+] to expand it.
Click the green + icon to add a routing route. You may have to scroll to the right to see the + icon.
In the Browse Target Service Operation dialog, select Services In Project > Fulfillment > USPSShipment > Write.
Figure 4-47 Browse Target Service Operation Dialog
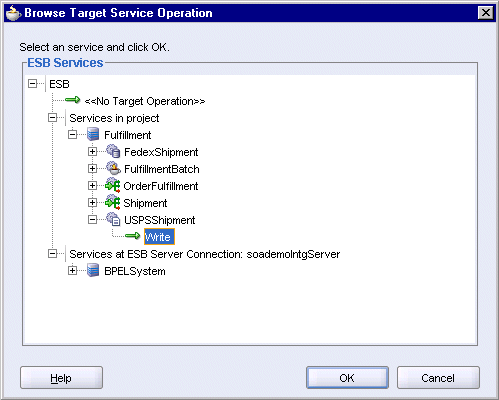
Click OK in the Browse Target Service Operation dialog.
The routing rule area now looks like this:
Figure 4-48 Routing Rule from Shipment to USPSShipment

Select File > Save to save your work.
Click the FulfillmentESB.esb tab in JDeveloper. You should see an arrow going from Shipment to USPSShipment.
Figure 4-49 JDeveloper Showing Routing from Shipment to USPSShipment
Create the filter so that only orders under $500 are directed to USPSShipment.
Double-click Shipment in the top section of the icon to display the page for the Fulfillment_Shipment.esbsvc file.
In the page for the Fulfillment_Shipment.esbsvc file, click the filter icon in the routing rules area. This displays the Expression Builder dialog.
In the Expression Builder dialog, in the WSDL Message box, select Purchase Order_request > PurchaseOrder > inp1:PurchaseOrder > inp1:OrderInfo > inp1:OrderPrice.
The Content Preview box shows the path: /inp1:PurchaseOrder/inp1:OrderInfo/inp1:OrderPrice.
Click Insert Into Expression. The path appears in the Expression box at the top of the dialog.
In the Expression box, append < 500 to the path, so that it now reads /inp1:PurchaseOrder/inp1:OrderInfo/inp1:OrderPrice < 500.
Click OK in the Expression Builder.
Select File > Save to save your work.
Create a transformation so that the USPSShipment file adapter gets the proper information in the proper fields.
Click the transformation icon in the Routing Rules area.
In the Request Transformation Map dialog, select Create New Mapper File and enter PurchaseOrder_To_USPSshipment.xsl as the filename.
Figure 4-51 Request Transformation Map Dialog
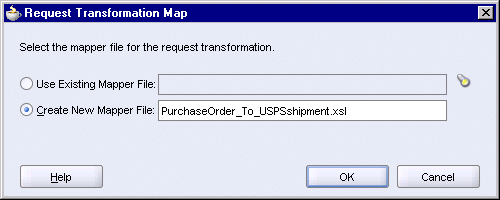
Click OK. This brings up the Data Mapper.
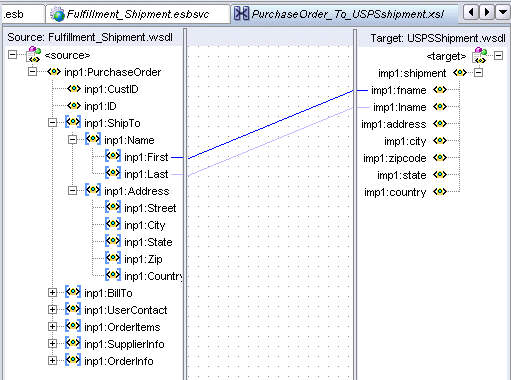
On the source (left) side, expand inp1:ShipTo > inp1:Name and inp1:ShipTo > inp1:Address.
Click and drag inp1:First to imp1:fname.
Click and drag inp1:Last to imp1:lname.
There should be two lines, one for First/fname and another one for Last/lname.
Figure 4-53 Data Mapper Showing Transformation for First/fname and Last/lname
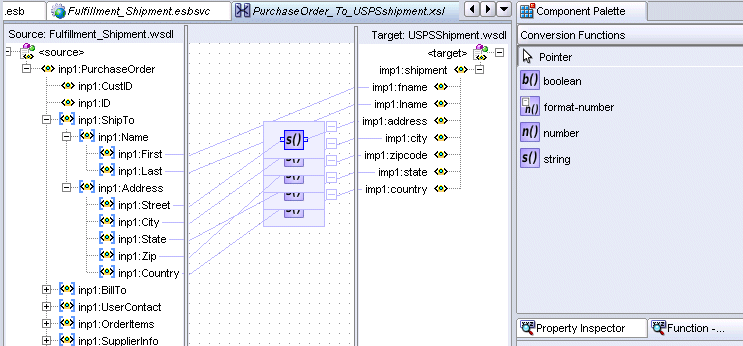
Click and drag to connect these pairs:
inp1:Street to imp1:address
inp1:City to imp1:city
inp1:State to imp1:state
inp1:Zip to imp1:zipcode
inp1:Country to imp1:country
Select Conversion Functions from the dropdown in the Component Palette. You will need the string function for the next step.
For each of the pairs listed in step (g), drag the string function from the Component Palette and drop it on each of the lines. You should end up with a diagram that looks like this:
Figure 4-54 Data Mapper Showing Use of string Function During Transformation
Select File > Save to save your work.
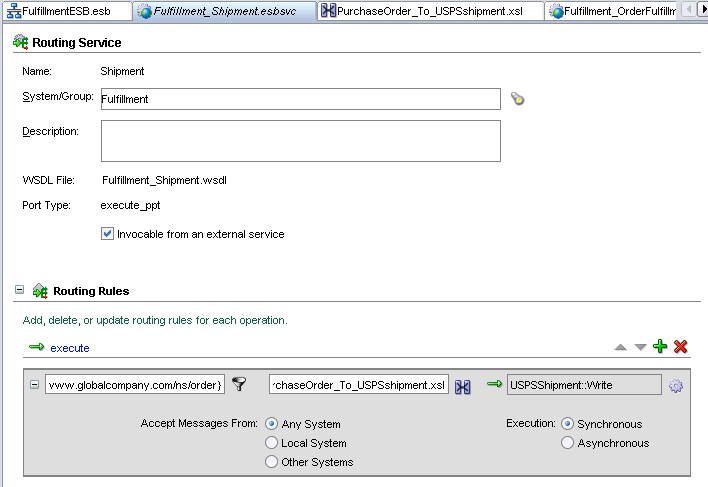
Click the Fulfillment_Shipment.esbsvc tab in JDeveloper. In the Routing Rules area, in the transformation section, you should see the name of the transformation file.
Figure 4-55 Fulfillment_Shipment.esbsvc Showing Filter Information and Name of Transformation File
Select File > Save to save Fulfillment_Shipment.esbsvc.
If you click the FulfillmentESB.esb tab, you can see that the filter and transformation icons for the Shipment routing service are no longer greyed out, unlike those for the OrderFulfillment routing service.
The Shipment routing service routes orders that are under $500 to the USPSShipment file adapter and orders that are $500 and over to the FedexShipment database adapter.
This section shows the routing rule for FedexShipment. It uses a filter to set the $500 rule, and it uses transformation to control what information is passed to FedexShipment. FedexShipment, which is a database adapter service, then writes the information to the FEDEXSHIPMENT table in the SOADEMO schema.
To create the routing rule from Shipment to FedexShipment:
Double-click Shipment or click the tab for Fulfillment_Shipment.esbsvc, if you have it open. This displays the page for the Fulfillment_Shipment.esbsvc file.
In the Routing Rules section, click the [+] to expand it.
Click the green + icon to add another routing route. You may have to scroll to the right to see the + icon.
In the Browse Target Service Operation dialog, select Services In Project > Fulfillment > FedexShipment > insert.
Figure 4-56 Browser Target Service Operation Dialog
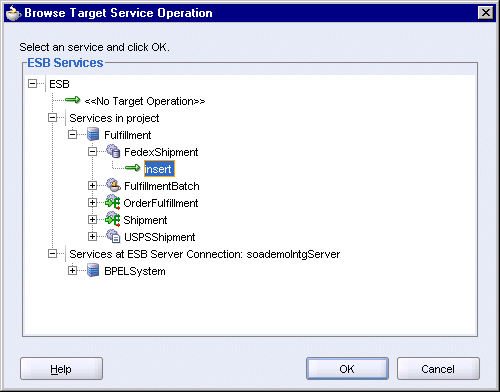
Click OK in the Browse Target Service Operation dialog.
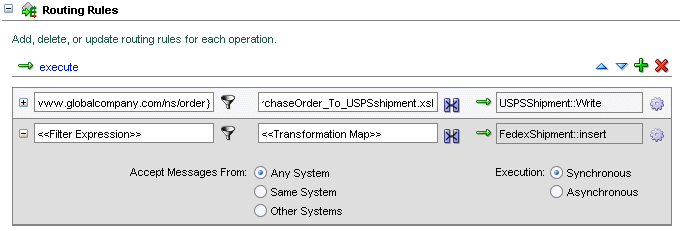
The routing rule area now looks like this:
Figure 4-57 Routing Rule from Shipment to FedexShipment
Select File > Save to save Fulfillment_Shipment.esbsvc.
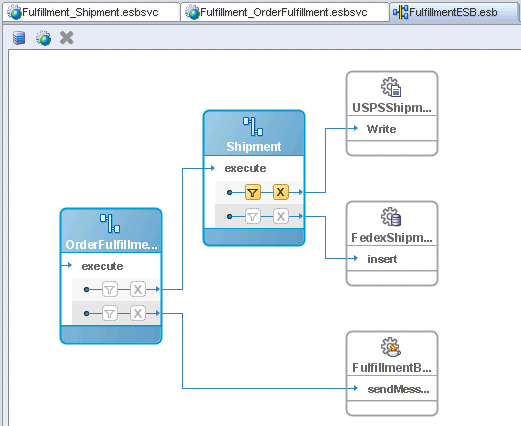
Click the FulfillmentESB.esb tab in JDeveloper. From Shipment, you should see two arrows: one going to USPSShipment and another one going to FedexShipment.
Figure 4-58 JDeveloper Showing Routing from Shipment to USPSShipment and FedexShipment
Create the filter that directs orders that are equal to or greater than $500 to FedexShipment.
Double-click Shipment to display the page for the Fulfillment_Shipment.esbsvc file.
In the page for the Fulfillment_Shipment.esbsvc file, click the filter icon for the FedexShipment rule in the routing rules area. This displays the Expression Builder dialog.
In the Expression Builder dialog, in the WSDL Message box, select Purchase Order_request > PurchaseOrder > inp1:PurchaseOrder > inp1:OrderInfo > inp1:OrderPrice.
The Content Preview box shows the path: /inp1:PurchaseOrder/inp1:OrderInfo/inp1:OrderPrice.
Click Insert Into Expression. The path appears in the Expression box at the top of the dialog.
In the Expression box, append >= 500 to the path, so that it now reads /inp1:PurchaseOrder/inp1:OrderInfo/inp1:OrderPrice >= 500.
Click OK in the Expression Builder.
Select File > Save to save your work.
Create a transformation so that the FedexShipment database adapter gets the proper information in the proper fields.
Click the transformation icon in the Routing Rules area.
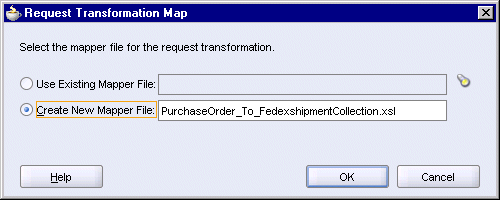
In the Request Transformation Map dialog, select Create New Mapper File and enter PurchaseOrder_To_FedexshipmentCollection.xsl as the filename.
Figure 4-60 Request Transformation Map Dialog
Click OK. This brings up the Data Mapper.
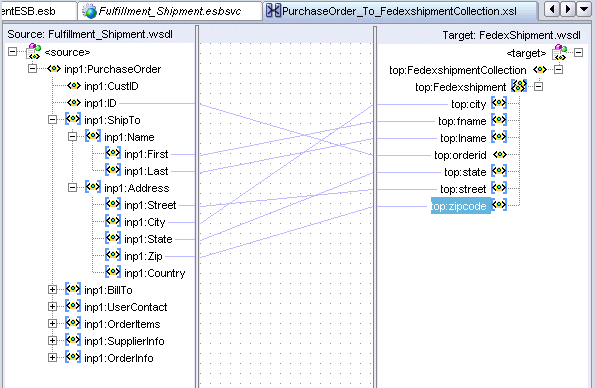
On the source (left) side, expand inp1:ShipTo > inp1:Name and inp1:ShipTo > inp1:Address.
On the target (right) side, expand top:FedexshipmentCollection > top:Fedexshipment.
Click and drag to connect these pairs:
inp1:ID to top:orderid
inp1:First to top:fname
inp1:Last to top:lname
inp1:Street to top:street
inp1:City to top:city
inp1:State to top:state
inp1:Zip to top:zipcode
Figure 4-61 Data Mapper Showing Transformation from Shipment to FedexShipment
Select File > Save to save PurchaseOrder_To_FedexshipmentCollection.xsl.
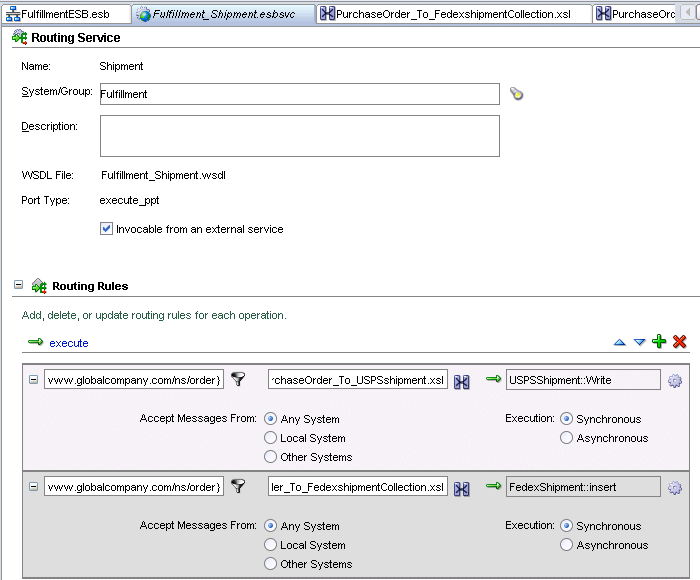
Click the Fulfillment_Shipment.esbsvc tab in JDeveloper. In the Routing Rules area, in the transformation section, you should see the name of the transformation file.
Figure 4-62 Fulfillment_Shipment.esbsvc Showing Filter Information and Name of Transformation File
Select File > Save to save Fulfillment_Shipment.esbsvc.
If you click the FulfillmentESB.esb tab, you can see that there are two rows of icons in the Shipment routing service icon and these icons are not greyed out.
Browse through the FulfillmentESB files in the Application Navigator to ensure that all the files are saved. If you see a file in italics, select the file and save it.
In the Application Navigator, right-click the FulfillmentESB project and select Register with ESB > SoademoIntegServer, where SoademoIntegServer is the name of the connection to the integration server. When registration is complete, JDeveloper displays a confirmation dialog.
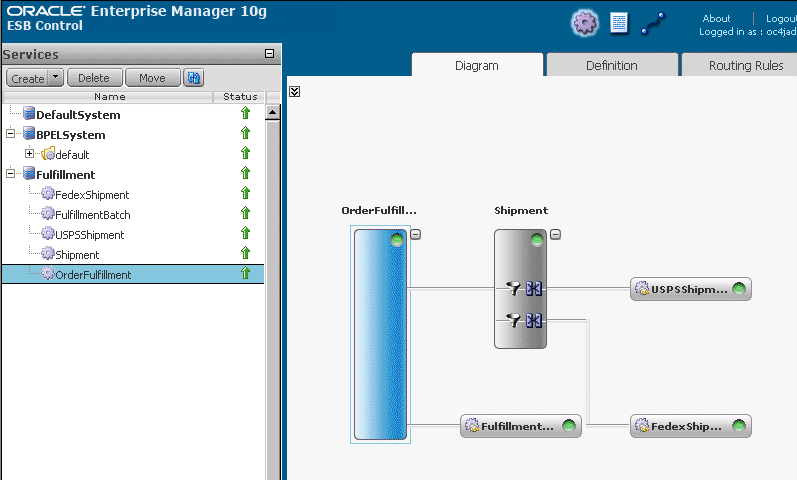
You can view the services that you created in the FulfillmentESB project in the ESB Console. To do this, enter the URL of the ESB Console in a browser:
http://host:port/esb/esb/EsbConsole.html
host specifies the name of the machine running Oracle Application Server, and port specifies the HTTP port at which Oracle HTTP Server or OC4J is listening.
Log in as the oc4jadmin user.
The services are grouped under Fulfillment, which is the name of the system that you created in Section 4.3, "Create a System Called "Fulfillment"".
Figure 4-63 ESB Console Showing the Services in the Fulfillment System
