| Oracle® SOA Suite Quick Start Guide 10g (10.1.3.1.0) Part Number B28938-01 |
|
|
View PDF |
| Oracle® SOA Suite Quick Start Guide 10g (10.1.3.1.0) Part Number B28938-01 |
|
|
View PDF |
This chapter describes installing the required prerequisites for the SOA Order Booking application and setting up the application itself.
This chapter includes the following sections:
This section takes you through prerequisite software installation tasks. If you have a prerequisite already installed, then you can skip to the next task.
The SOA Order Booking applications requires a database for its data. The SQL scripts were written for an Oracle database, so you will need some version of an Oracle RDBMS, such as 9i, 10g, or XE. The scripts will not install into Oracle Lite. If you wish to use Oracle Lite or some other database, then you will need to modify the database scripts accordingly.If you already have an Oracle database installed, then skip to Task 2: Install JDeveloper Studio 10.1.3.1.0. If not, then you can download an Oracle database from:
http://www.oracle.com/technology/index.html
Specifically, Oracle Express Edition (XE) is a small footprint database and is recommended. You can download it from:
http://www.oracle.com/technology/products/xe/index.html
You need JDeveloper to install certain parts of the SOA Order Booking application and use the design-time environment. Because the version of Oracle SOA Suite is 10.1.3.1.0, you need the corresponding version of JDeveloper.
For this quick start, you need JDeveloper 10.1.3.1.0 Studio edition. If you already have it installed, then skip to step Task 3: Install Oracle SOA Suite 10.1.3.1.0. Before you do, ensure you have 10.1.3.1.0 (not to be confused with 10.1.3.0.0) and that it is the Studio edition, not the J2EE or Java edition. You can verify these details in JDeveloper from the Help > About menu option.
You can download JDeveloper Studio 10.1.3.1.0 from:
http://www.oracle.com/technology/products/jdev/index.html
If you already have Oracle SOA Suite 10.1.3.1.0 installed, then skip to Section 2.2, "Tasks for Setting Up the SOA Order Booking Application".
This quick start assumes the following:
The AS Instance Name is soademo.
The AS Administrator Password is welcome1.
The default port is 8888.
To download Oracle SOA Suite 10.1.3.1.0:
From the following page, select the Download and install Oracle SOA Suite 10.1.3.1 link:
http://www.oracle.com/technology/soa
On the download page, select Oracle SOA Suite 10.1.3.1.
When you install Oracle SOA Suite, ensure you do the following:
Select Basic Install.
Set the AS Instance Name to soademo.
Set the AS Administrator Password to welcome1.
The Oracle SOA Suite installation sets the ORACLE_HOME environment variable for your computer. In some cases, this setting can cause a conflict with the Oracle Database. Specifically you may get errors from your Oracle Net Listener. If this is the case, then reset the ORACLE_HOME environment variable to your database location. On Windows, you may need to restart your PC.
Download the SOA Order Booking application ZIP file (soademo_101310_prod.zip) and extract it to a working directory.
To access the ZIP file:
From the following page, select the Download and install Oracle SOA Suite 10.1.3.1 link:
http://www.oracle.com/technology/soa
On the download page, select SOA Order Booking Demo application.
To use the SOA Order Booking application, you must complete the following tasks:
Task 3: Note the Name of the OC4J Instance Running the Oracle BPEL Server
Task 6: Install and Deploy the SOA Order Booking Application
This guide uses the following references:
JDEV_HOME refers to the location of the your JDeveloper installation
ORACLE_HOME refers to the location of the your Oracle SOA Suite installation.
DEMO_HOME refers to the location where you unzipped the SOA Order Booking ZIP file.
The SOA Order Booking application tables are contained within one schema.
To install the schema:
Connect to your database and create a user named soademo.
For example:
SQL> CREATE USER soademo IDENTIFIED BY soademo;
SQL> GRANT CONNECT, RESOURCE TO soademo;
Connect to the database as user soademo:
SQL> CONNECT soademo/soademo
Run the following scripts from the DEMO_HOME directory:
|
Note: Ignore any issues the first time you run these scripts when objects are dropped. These errors are fine, as the objects have not been created yet. |
Once you install Oracle SOA Suite, you need to create a connection pool, data source, and database adapter for the SOA Order Booking application.
To configure the container:
Point your browser to the Welcome to Oracle SOA Suite (10.1.3.1.0) page:
http://localhost:8888
8888 is the default HTTP port. Use the port number that the installer selected for your environment. If port 8888 does not work for you and you are not sure what your port number is, use a text editor and open:
ORACLE_HOME\install\readme.txt
Look for the line Access the Oracle SOA Suite 10g Application Server Welcome Page via the following URL and the next line will show you the URL for your welcome page.
From the right-hand side Manage Your SOA Suite portlet, select the Application Server Control link.
The Oracle Enterprise Manager 10g Application Server Control Console displays the administrator logon dialog box.
Enter oc4jadmin as the username and enter the password created during installation, welcome1.
In the Members section, expand the home OC4J container.
Ensure the applications all have a status of Up.
Create a connection pool and JDBC data source for the OC4J instance.
A data source enables you to retrieve a connection to a database server. A managed data source uses a connection pool to efficiently manage connections. You must define one connection pool and its connection factory.
Select the home OC4J link.
The OC4J: home page appears.
Click the Administration tab.
In Services > JDBC Resources, click the Go To Task icon.
The JDBC Resources page appears.
In the Connection Pools section, click the Create button.
The Create Connection Pool - Application page appears.
Accept defaults, and click Continue.
The Create Connection Pool page appears.
Enter the following values, leaving the defaults for the other fields:
| Element | Value |
|---|---|
| Name | soademo_pool |
| JDBC URL | URL for your database.
For example: |
| Username | soademo |
| Password | soademo or customized password entered when creating the soademo user in the database |
Click Test Connection.
The Test Connection page appears.
Click Test.
The JDBC Resources page updates with a successful connection confirmation message. If you get an error message, check the URL and credentials to ensure you entered the right information.
Click Finish.
Back in the JDBC Resources page, under Data Sources, click Create.
The Create Data Source - Application & Type page appears.
Accept the defaults, and click Continue.
The Create Data Source - Managed Data Source page appears.
Enter the following values, leaving the defaults for the other fields:
| Element | Value |
|---|---|
| Name | soademoDS |
| JNDI Location | jdbc/soademoDS |
| Connection Pool | soademo_pool |
Click Finish.
Back on the Data Sources section, locate the soademoDS data source, and click the Test Connection icon.
The Test Connection page appears.
Click Test.
The JDBC Resources page updates with a successful connection confirmation message.
Create a database adapter connection factory:
At the top of the JDBC Resources page, click the OC4J:home breadcrumb link.
The OC4J: home page appears.
Click the Applications tab.
In the table of applications, click the default link.
The Application: default page appears.
In the Modules section, click the DbAdapter link.
The Resource Adapter: Database Adapter page appears.
Click the Connection Factories tab.
At the top of the page, click the Create button.
|
Note: Do not click the Create button in the Shared Connection Pools section. |
The Create Connection Factory: Select Interface page appears.
Accept the default interface, and click Continue.
The Create Connection Factory page appears.
In the JNDI Location field, enter eis/DB/soademo.
In the Configuration Properties section, for xADataSourceName, enter jdbc/soademoDS.
Leave the defaults for the other fields.
Click Finish.
Leave the Application Server Control Console running, as you need it for the next task.
In several upcoming procedures you will be promoted to specify an OC4J instance name. If you did the recommended Basic Install, then one instance is installed. By default, the instance name is home. If you did an Advanced Install, then two instances are installed. By default, they are home and oc4j_soa. The oc4j_soa instance runs the Oracle BPEL Server, which is the one you must specify.
To find the OC4J instance name:
From Application Server Control Console, click the Cluster Topology breadcrumb link.
In the Members section, note the instance names.
If you did an Advanced Install, expand oc4j_soa and verify that orabpel is one of the services.
The SOA Order Booking Application has some configuration files that use the default port numbers. Your installation may not be using the default port numbers and may need to be reconfigured. This section explains how to find the port numbers being used in your environment.
To find the port numbers:
In the Cluster Topology page of the Application Server Control Console, in the Administration section, select Runtime Ports.
The Runtime Ports page shows the ports being used by your installation.
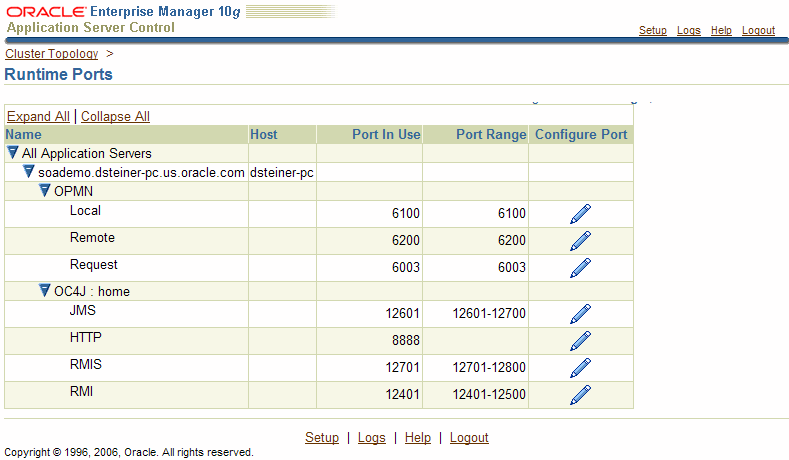
These are the important ones to note for the SOA Order Booking Application installation:
OPMN Request (defaults to 6003)
OC4J:home HTTP (defaults to 8888)
OC4J:home RMI (defaults to 12401)
If your ports are the same as the preceding defaults, then you don't need to worry since the configuration files already use those defaults. If one or more of your ports are different, then note them down for now. In some later installation steps you will be asked to refer to these port numbers.
Before you can use JDeveloper to deploy the application to the server, JDeveloper needs to know how to connect to the server. This includes the application server and the database.
To create these connections in JDeveloper:
Start JDeveloper by running JDEV_HOME\jdeveloper.exe.
Create a connection to the database using the SOADEMO schema:
Click the Connections tab, or if it not currently displayed, choose View > Connection Navigator.
Double-click the Database folder to open the Create Database Connection Wizard.
Complete the wizard, ensuring you complete the following:
- On the Step 1 of 4: Type 1 page, enter soademo for the Connection Name.
- On the Step 2 of 4: Authentication page, enter soademo for the Username and Password fields, and click Deploy Password.
- Enter the appropriate values for where you installed the schema.
Create the application server connection:
Double-click Application Server to open the Create Application Server Connection wizard.
On the Step 1 of 4: Type page, perform the following and then click Next.
| Element | Action |
|---|---|
| Connection Name | Enter OrderBookingAS. |
| Connection Type | Select Oracle Application Server 10g 10.1.3. |
On the Step 2 of 4: Authentication page, perform the following and then click Next.
| Element | Action |
|---|---|
| User | Enter oc4j_admin. |
| Password | Enter welcome1. |
| Deploy Password | Click this checkbox. |
On the Step 3 of 4: Connection page, perform the following and then click Next.
| Element | Action |
|---|---|
| Host Name | Enter the host name in which you installed Oracle SOA Suite. |
| OPMN | Enter the OPMN request port. The default is 6003.
See Also: "Task 4: Note the Important Port Numbers" to find out what the port number is for your environment |
| Group/OC4J Instance Name | Enter home. |
On the Step 4 of 4: Test page, click Test the Connection.
If the test does not succeed, use the Back button to verify and change values, if needed.
Click Finish.
Create a connection to the Oracle BPEL Process Manager and Enterprise Service Bus integration server.
Creating this connection enables you to deploy business processes to Oracle BPEL Process Manager and services to the Enterprise Service Bus.
Double-click Integration Server to open the Create Integration Server Connection Wizard.
On Step 1 of 3: Name, enter OrderBookingIS in the Name field.
On Step 2 of 3: Connection, perform the following and then click Next.
| Element | Action |
|---|---|
| Application Server | Select OrderBookingAS, which is the name of the application server you created in Step 3. |
| Host Name | Enter the host name in which you installed Oracle SOA Suite |
| Port | Enter the port for the Oracle HTTP Server installed with the SOA Suite. The default is 8888.
See Also: "Task 4: Note the Important Port Numbers" to find out what the port number is for your environment |
On Step 3 of 3, Test, click Test the Connection.
If the test does not succeed, use the Back button to verify and change values, if needed.
Click Finish.
To deploy the individual SOA Order Booking applications to the container using JDeveloper:
Open the applications in JDeveloper:
Choose File > Open.
Navigate to the DEMO_HOME directory and open the SOADEMO.jws file.
Choose File > Open again.
Navigate to the DEMO_HOME/SOADEMO-CLIENT directory and open the SOADEMO-CLIENT.jws file.
Both applications appear in the Application Navigator. Review Section 1.3, "Introduction to SOA Order Booking Application" on page 1-5 for a description of these applications.
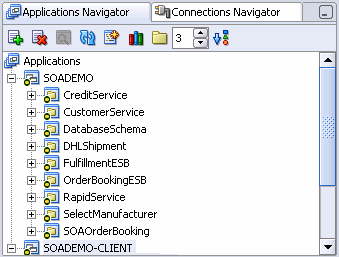
Deploy the FulfillmentESB project:
Expand the SOADEMO application.
If you are using port 8888 as your HTTP port, then proceed to Step g. If you are not using the default HTTP port, expand the Resources node and double-click the PurchaseOrder_To_DHLShipmentProcessRequest.xsl file to open it.
Disregard any errors that appear.
In the PurchaseOrder_To_DHLShipmentProcessRequest.xsl page, replace all instances of 8888 with your port number. See "Task 4: Note the Important Port Numbers" to find out what the port number is for your environment.
Click the Source sub-tab, located at the bottom of the PurchaseOrder_To_DHLShipmentProcessRequest.xsl page, to switch to the Source view.
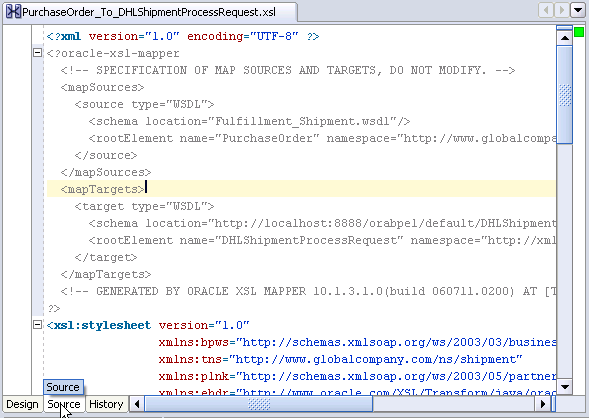
Replace all instances of 8888 with your port number. See "Task 4: Note the Important Port Numbers" to find out what the port number is for your environment.
Choose File > Save to save your work.
Right-click FulfillmentESB, and select Register with ESB > OrderBookingIS.
Click OK in the ESB Registration Summary dialog.
Deploy the SelectManufacturer BPEL process using Ant:
Expand SelectManufacturer > Resources.
Open the build.properties file and verify values are set as follows.
admin.user: Set to oc4jadmin.
admin_password: Set to welcome1.
hostname: Set to host name in which you installed Oracle SOA Suite. You can also use localhost or 127.0.0.1.
http.port: Set to the Oracle HTTP Server. The default for this port is 8888.
rmi.port: Set to 12401. See "Task 4: Note the Important Port Numbers" to find out what the port number is for your environment.
oc4jinstancename: Set to the name to the OC4J instance running the Oracle BPEL Server. For a Basic Install, the default is home. See "Task 3: Note the Name of the OC4J Instance Running the Oracle BPEL Server" to find out what the instance name is for your environment.
asinstancename: You do not need to set this property.
opmn.requestport: Set to the OPMN request port. The default for this port is 6003. See "Task 4: Note the Important Port Numbers" to find out what the port number is for your environment.
platform: Set to ias_10g.
In the Application Navigator, right-click build.xml, and select Run Ant.
The Run Ant dialog appears.
Click the Properties tab. If there are any properties in the Properties section, located in the upper part of the dialog, then remove them.
In the Property Files section, located in the lower part of the window, click Add.
The Add Ant Property File dialog appears.
Select the build.properties file and then click Open.
In the Run Ant dialog, click OK.
This action starts the deployment process, which may take anywhere from 30 to 60 seconds. You can monitor the progress in the Messages pane, in the Apache Ant - Log tab, in the Apache Ant sub-tab. You will know the deployment is complete when you see the text BUILD SUCCESSFUL.
Deploy the CreditService application:
Expand CreditService > Resources.
Right-click the WebServices.deploy file, and select Deploy to > OrderBookingAS.
When the Configure Application dialog appears, click OK.
When deployment completes, the Deployment - Log displays a Deployment finished message.
Deploy the CustomerService application:
Expand CustomerService > Resources.
Right-click the CustomerService.deploy file, and select Deploy to > OrderBookingAS.
When the Configure Application dialog appears, click OK.
When deployment completes, the Deployment - Log displays a Deployment finished message.
Deploy the RapidService application:
Expand RapidService > Resources.
Right-click the WebServices.deploy file, and select Deploy to > OrderBookingAS.
When the Configure Application dialog appears, click OK.
When deployment completes, the Deployment - Log displays a Deployment finished message.
Deploy the SOAOrderBooking BPEL process using Ant:
Expand SOAOrderBooking > Resources.
Open the build.properties file and verify values are set as follows.
admin.user: Set to oc4jadmin.
admin_password: Set to welcome1.
hostname: Set to host name in which you installed Oracle SOA Suite. You can also use localhost or 127.0.0.1.
http.port: Set to the Oracle HTTP Server. The default for this port is 8888.
rmi.port: Set to 12401. See "Task 4: Note the Important Port Numbers" to find out what the port number is for your environment.
oc4jinstancename: Set to the name to the OC4J instance running the Oracle BPEL Server. For a Basic Install, the default is home. See "Task 3: Note the Name of the OC4J Instance Running the Oracle BPEL Server" to find out what the instance name is for your environment.
asinstancename: You do not need to set this property.
opmn.requestport: Set to the OPMN request port. The default for this port is 6003. See "Task 4: Note the Important Port Numbers" to find out what the port number is for your environment.
platform: Set to ias_10g.
If you are using port 8888 as your HTTP port, then proceed to Step k. If you are not using the default HTTP port, expand the Integration Content node and double-click the bpel.xml file to open it.
In the bpel.xml page, replace all instances of 8888 with your port number. See "Task 4: Note the Important Port Numbers" to find out what the port number is for your environment.
Choose File > Save to save your work, and then restart JDeveloper.
Under the Integration Content node, double-click the CreditValidatingService.wsdl file to open it.
Click the Source sub-tab to switch to the Source view.
Replace all instances of 8888 with your port number. See "Task 4: Note the Important Port Numbers" to find out what the port number is for your environment.
Choose File > Save to save your work.
Repeat Steps f through i for CustomerSvc.wsdl and RapidService.wsdl.
In the Application Navigator, right-click build.xml, and select Run Ant.
The Run Ant dialog appears.
Click the Properties tab. If there are any properties in the Properties section, located in the upper part of the dialog, then remove them.
In the Property Files section, located in the lower part of the window, click Add.
The Add Ant Property File dialog appears.
Select the build.properties file and then click Open.
In the Run Ant dialog, click OK.
This action starts the deployment process, which may take anywhere from 30 to 60 seconds. You can monitor the progress in the Messages pane, in the Apache Ant - Log tab, in the Apache Ant sub-tab. You will know the deployment is complete when you see the text BUILD SUCCESSFUL.
Deploy the DHLShipment service using Ant:
Expand DHLShipment > Resources.
Open the build.properties file and verify values are set as follows.
admin.user: Set to oc4jadmin.
admin_password: Set to welcome1.
hostname: Set to host name in which you installed Oracle SOA Suite. You can also use localhost or 127.0.0.1.
http.port: Set to the Oracle HTTP Server. The default for this port is 8888.
rmi.port: Set to 12401. See "Task 4: Note the Important Port Numbers" to find out what the port number is for your environment.
oc4jinstancename: Set to the name to the OC4J instance running the Oracle BPEL Server. For a Basic Install, the default is home. See "Task 3: Note the Name of the OC4J Instance Running the Oracle BPEL Server" to find out what the instance name is for your environment.
asinstancename: You do not need to set this property.
opmn.requestport: Set to the OPMN request port. The default for this port is 6003. See "Task 4: Note the Important Port Numbers" to find out what the port number is for your environment.
platform: Set to ias_10g.
In the Application Navigator, right-click build.xml, and select Run Ant.
The Run Ant dialog appears.
Click the Properties tab. If there are any properties in the Properties section, located in the upper part of the dialog, then remove them.
In the Property Files section, located in the lower part of the window, click Add.
The Add Ant Property File dialog appears.
Select the build.properties file and then click Open.
In the Run Ant dialog, click OK.
This action starts the deployment process, which may take anywhere from 30 to 60 seconds. You can monitor the progress in the Messages pane, in the Apache Ant - Log tab, in the Apache Ant sub-tab. You will know the deployment is complete when you see the text BUILD SUCCESSFUL.
Deploy the OrderBookingESB project:
If you are using port 8888 as your HTTP port, then skip this step and proceed to Step c. Using a text editor, open the following file and change all references of 8888 with your port number. See "Task 4: Note the Important Port Numbers" to find out the HTTP port for your environment.
DEMO_HOME\OrderBookingESB\OrderBooking.esbsys
DEMO_HOME\OrderBookingESB\OrderBooking_OrderBookingProcess.esbsvc
Choose File > Save to save your work.
Right-click OrderBookingESB, and select Register with ESB > OrderBookingIS.
Click OK in the Summary dialog.
Deploy the SOADEMO-CLIENT Web client:
If you are using port 8888 as your HTTP port, then skip this step and proceed to Step c. Using a text editor, open the following files and change all references of 8888 with your port number. See "Task 4: Note the Important Port Numbers" to find out the HTTP port for your environment.
DEMO_HOME\SOADEMO-CLIENT\CustomerService\src\oracle\soademo\view\services\runtime\CustomerServiceSoapHttp_Stub.java
DEMO_HOME\SOADEMO-CLIENT\OrderService\src\oracle\soademo\view\services\runtime\__soap_initiate_ppt_Stub.java
Choose File > Save to save your work.
Expand SOADEMO-CLIENT > Assembly > Application Sources.
Right-click the SOADEMO.deploy file, and select Deploy to > OrderBookingAS.
When the Configure Application dialog appears, click OK.
If your HTTP port is 8888, which is the default, then skip this task and proceed to "Task 8: Familiarize Yourself with the Schema". Otherwise, follow these steps:
Point your browser to the Welcome to Oracle SOA Suite (10.1.3.1.0) page:
http://localhost:http_port
|
See Also: "Task 4: Note the Important Port Numbers" to find out what the port number is for your environment |
From the right-hand side Manage Your SOA Suite portlet, select the ESB Control link.
The Oracle Enterprise Manger 10g ESB Control displays.
In the Services pane, select the DefaultSystem group.
Configuration information appears in the right-hand pane.

In the Port field, change the HTTP port to the HTTP port number used in your environment.
|
See Also: "Task 4: Note the Important Port Numbers" to find out what the port number is for your environment |
Click Apply.
Repeat Steps 3 through 5 for other groups in the Services pane: BPELSystem, OrderBooking, and Fulfillment.
Close the Oracle Enterprise Manger 10g ESB Control.
The SOADEMO schema consists of the following tables:
For the SOADEMO-CLIENT Web client:
For the SOAOrderBooking BPEL flow:
For the CustomerService application:
CUSTOMER: Contains customer information, such as name, email, and credit card number
CUSTOMER_ADDRESS: Maps a customer to an address. This join table allows a customer to have more than one address, and an address to belong to more than one customer.
EJB_TAB_ID_GEN: Contains the IDs used in the CustomerService application
For the FulfillmentESB:
To view the schema for the SOA Order Booking application using JDeveloper:
Click the Connections Navigator tab.
Expand Database > soademo > SOADEMO >Tables.
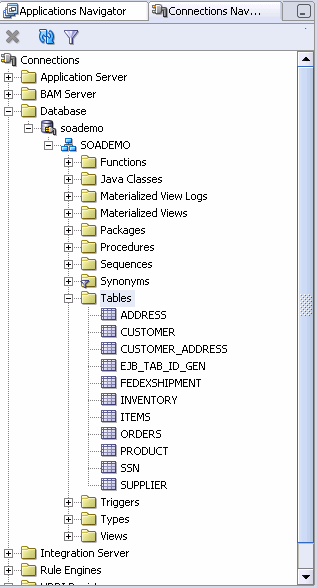
Double-click CUSTOMER, and then click the Data tab to view the customer information.

The CUSTOMER table shows data for preregistered customers, as described in Table 2-1.
Table 2-1 Pre-Registered Customers in the SOA Order Booking Application
| Password | Customer Status | Notes | |
|---|---|---|---|
|
|
|
Gold |
Requires manual approval for orders over $1,000. |
|
|
|
Platinum |
Has an invalid credit card number. |
|
|
|
Silver |
Requires manual approval for all orders. |
In Chapter 3, you will place an order through the Web client as sking, and monitor that order process.
Double-click PRODUCT, and then click the Data tab to view the product inventory.
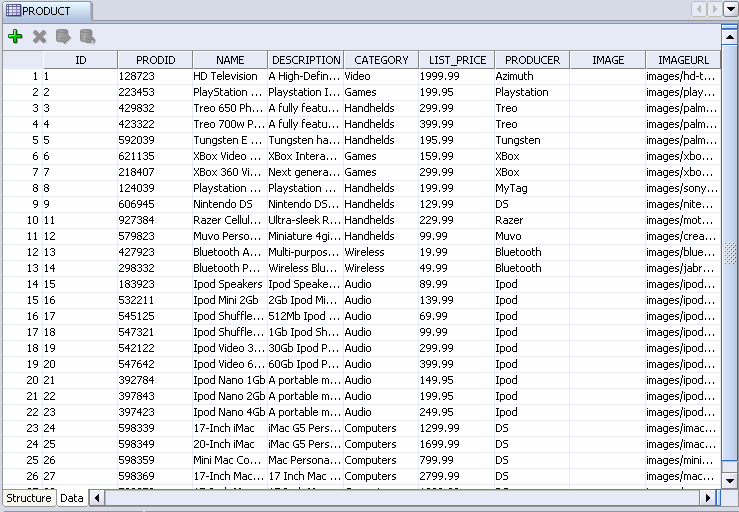
The PRODUCT table shows the electronic devices available through the Web-client interface.
View any of the other tables you are interested in.