| Oracle® SOA Suite Quick Start Guide 10g (10.1.3.1.0) Part Number B28938-01 |
|
|
View PDF |
| Oracle® SOA Suite Quick Start Guide 10g (10.1.3.1.0) Part Number B28938-01 |
|
|
View PDF |
This chapter describes how to use the SOA Order Booking application. It explains three different order scenarios for the Web client and how to monitor orders process through the SOA Order Booking business flow.
This chapter includes the following sections:
In this scenario, you will place an order as preregistered user sking for over $1000 and watch it process. As you will see, by default, orders for over $1000 for Gold status customers like sking require manual approval. The approval is routed to jcooper, an internal Global Company supervisor with approval privileges.
In this scenario, you will perform the following tasks:
Task 3: View the Order in the Oracle Enterprise Manager 10g BPEL Control Oracle BPEL Control
Task 4: Use the Oracle BPEL Worklist Application to Approve Order
Task 6: View Instances in Oracle Enterprise Manager 10g ESB Control
For orders over $1000, the Order Booking BPEL process (SOAOrderBooking) invokes the human workflow, which routes a message to the manager of the person who entered the order. In this case, the approval is routed to jcooper through the Oracle BPEL Worklist Application.
To start the Worklist Application:
Select Start > All Programs > Oracle - Oracle - soademo > Oracle BPEL Process Manager > Worklist Application.
When prompted, enter jcooper in the Username field and welcome1 in the Password field.
jcooper is a defined Oracle BPEL Process Manager administrator.
Click Login.
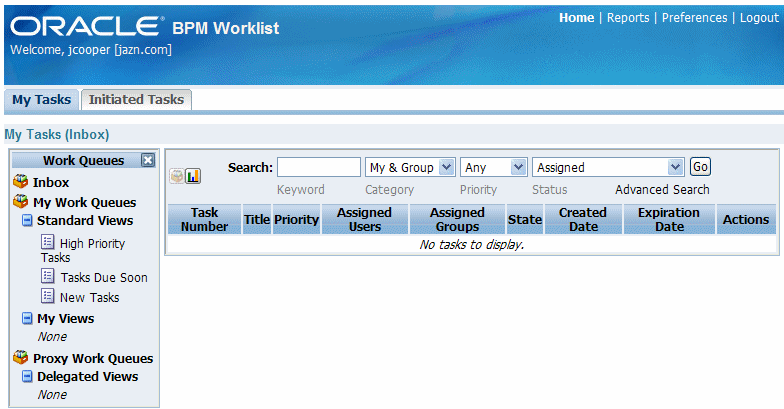
The My Tasks tab shows that no worklist tasks are currently assigned.
Keep the Worklist Application running, as you will need it for future tasks.
The ordering process begins in the Web client application where a user shops for and orders products. The Web application kicks off the Order Booking ESB (OrderBookingESB) flow, which in turn invokes SOAOrderBooking process flow. The BPEL flow handles the actual ordering process.
To place a new order, run the Web client:
Point to the following URL:
http://localhost:8888/soademo
The Application Login page for the Web client appears.

Enter sking@soademo.org. in the Email field and welcome1 in the Password field.
sking is a preregistered user with a Gold status. Customers with a Gold status require manual approval for orders over $1000.
Click Login.
The welcome page appears.

Click the Browse products and create a new order link.
The Browse and Select Items page appears.
Click Next 10, and select Ipod Mini 2 Gb.
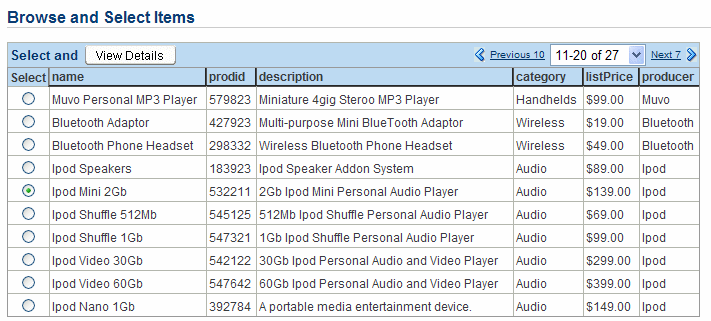
Click View Details.
The Item Details page appears. It displays detailed information about the product, and enables the user to select a quantity to add to their cart.

From the Quantity list, select 10, and click Add to cart.
Click Go to Shopping Cart.
The Shopping Cart Contents page appears.

Click Place Order to submit the order.
The welcome page updates with an Order Submitted message.

Once you placed the order, a message was sent to OrderBookingESB, which initiated a the SOAOrderBooking process. You can monitor the progress of that BPEL process from the Oracle Enterprise Manager 10g BPEL Control (Oracle BPEL Control).
To view monitor the SOAOrderBooking process:
Log into the Oracle BPEL Control by selecting Start > All Programs > Oracle - Oracle - soademo > Oracle BPEL Process Manager > BPEL Control.
When prompted, enter oc4jadmin in the Username field and welcome1 in the Password field.
The Dashboard tab of the Oracle BPEL Control appears. The Name column lists all of the BPEL processes that are deployed to this server. You could click those to perform some management activities of initiate them for testing. For now, you will view a particular running instance of one of those processes.
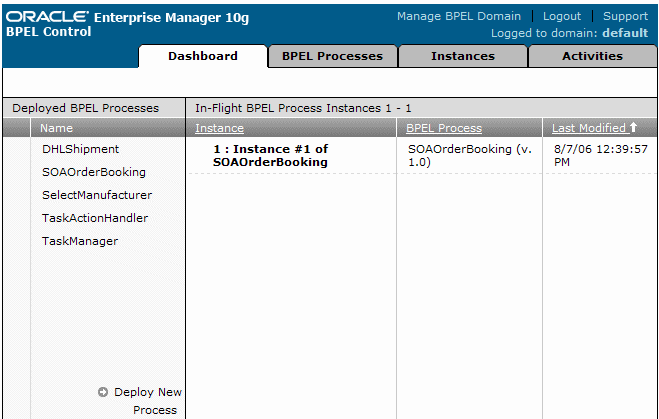
This tab lists all of the instances. Those with a green checkmark are completed; those without a green checkmark are still in progress. The order you just submitted is not complete.
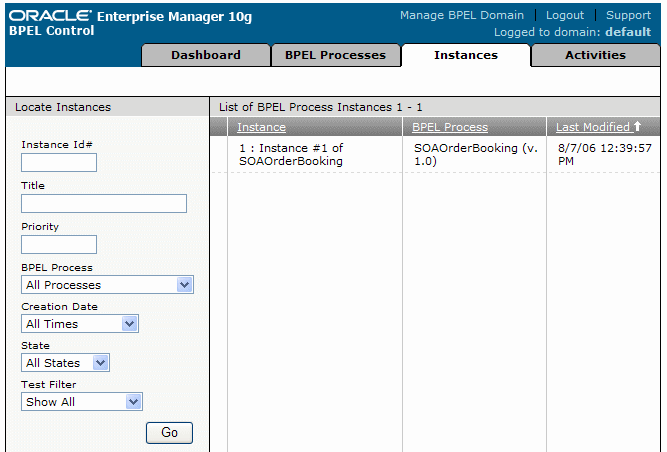
Find the most recent instance of SOAOrderBooking by using the timestamp in the Last Modified column, and click the nnn : Instance #nnn of SOAOrderBooking (where nnn is some number) in the Instance column to select the instance. You may see more than instance if other orders were previously submitted.
If you do no see the link, refresh the page. The first time you run a BPEL process after starting the server can sometimes be a little slower, as everything needs to initialize.
The instance information for the select instance displays. There are various tasks and actions that you can perform for an instance.
Click the Flow sub-tab for a visual representation of this instance.
This view enables you to view the progress of the process.
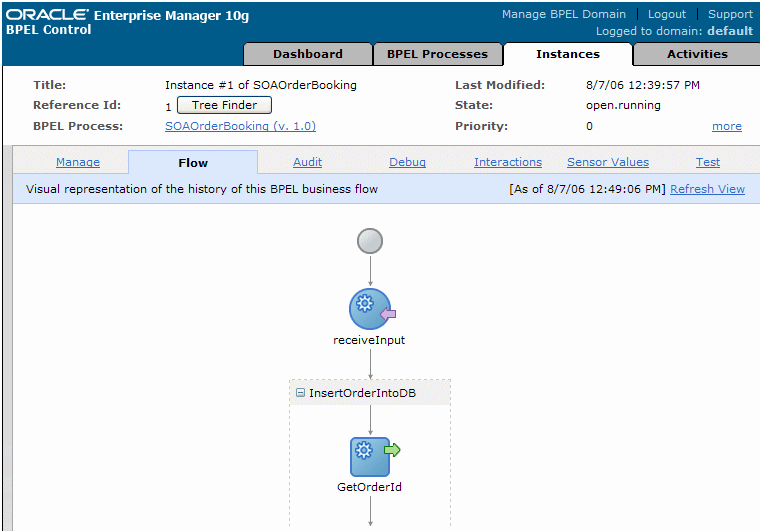
The icons in the flow are referred to as activities. You can click them to view their details.
Click the first activity, the blue, circle receive activity labelled receiveInput.
The Activity Audit window displays with the XML associated with the activity.

In this case, the audit trail displays the XML input to this BPEL process instance that came from the client Web page through ESB. Note the following:
CustId is 10: Represents the ID of the customer submitting the order
EmailAddress is sking@soademo.org: Identifies the email address you used to login
<OrderItems> element: Shows the item you ordered
The green text shows the XML namespaces being used, and can be ignored.
Close the Activity Audit Trail window to return to the flow diagram.
Under receiveInput, you will see a grey box labelled InsertOrderIntoDB, which contains several activities. InsertOrderIntoDB is a scope and it groups activities together into logical chunks. Therefore, all of the activities in InsertOrderIntoDB are related to writing the order into the database.
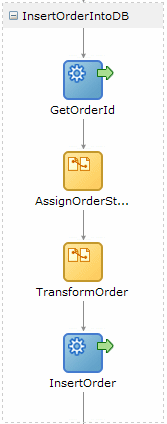
Click the invoke activity labelled GetOrderId to open the XML information Activity Audit window.
An invoke activity is used to invoke a service. In this case, a service is called to generate a unique order number for this order. Notice that a number is being returned in the <order_seq_id_gen.nextval> element. This is the order ID that has been generated.
Close the Activity Audit Trail window to return to the flow diagram.
Click the InsertOrder invoke activity to open the XML information Activity Audit window.
This invoke activity is invoking the database adapter to actually write the record to the database. The database adapter exposes this functionality as a service, which is why the invoke activity is used.
The XML that appears in the Activity Audit Trail window shows the data being written to the database. Notice that <ordid> is set to the number you saw in the previous step. Also note that the other data came from the input data received by the process.
Close the Activity Audit Trail window to return to the flow diagram.
In the CustomerService scope, click the GetCustInfo invoke activity.
In the <customerServiceRequest> element, you will see the data passed to the service as input to that service. In this case, <custid> is 10, which is the ID of the customer submitting this order.
The reason you see both the input and output to this service is because it is being invoked synchronously (as opposed to asynchronously).
Close the Activity Audit Trail window to return to the flow diagram.
In the CreditService scope, click the InvokeCreditService invoke activity
Recall that BPEL is used to define your business process. This service takes credit card information as input and returns true or false depending on the validity of the credit card.
Since this is a synchronous invocation, you see the request and response data. The request data is in the <validateRequest> element. As you can see, the credit card information obtained in the previous step is submitted.
In the <validateResponse> element, notice that the service returns true, meaning this customer's credit card is valid.
Close the Activity Audit Trail window to return to the flow diagram.
Scroll down to the DecisionService activity, near the end:

This decision service activity represents the invocation of the rules engine for a dynamic decision at runtime. As previously explained, orders over $1000 require manager approval, unless this customer is a Platinum customer. Because sking is a Gold customer, manual approval is required.
Click the + icon to expand the decision service scope, and then click the invoke icon labelled Invoke, which is were the rules engine service is actually invoked.
The <dsIn> element contains the input data that was sent to the service. Within that element, you see a sub-element called <approve>, which shows the price and customer status. The decision service needs this information to make its decision.
Since the order price is over $1000 and this customer is not Platinum, the decision service returns true, signifying that approval is required. You can see this return value from the service in the <dsOut> element:
<approvalRequired>true</approvalRequired>
In a later task, you will modify the business rule to change its behavior.
Close the Activity Audit Trail window to return to the flow diagram.
Scroll to the bottom of the process flow, and click the ApproveOrder activity.
The Activity Audit Trail window shows information pertaining to this human workflow activity rather than XML.
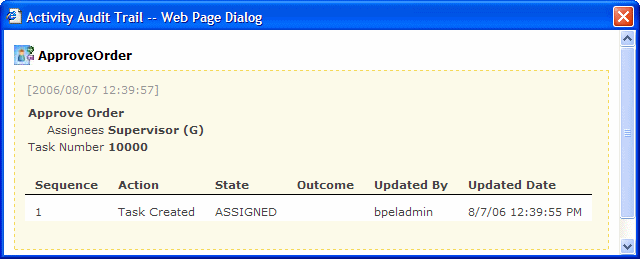
In the Assignees field, notice that this task has been assigned to the Supervisor group.
Close the Activity Audit Trail window to return to the flow diagram.
In the next task, you will approve this order by "changing hats" to a user that has approval privileges.
Keep the Oracle BPEL Control running, as you will need it for future tasks.
To approve the order, you will use the worklist application supplied when you installed Oracle SOA Suite.
Once you are familiar with Oracle SOA Suite, you can use the workflow engine, which has a rich API, to create your own custom GUIs to let your users perform approval and management tasks.
To use the Worklist Application to approve the order:
Go to the browser running the Worklist Application, and then click the Refresh button in your browser.
The My Tasks tab shows the Approve Order tasks assigned to the Supervisor group. jcooper is a defined member of that group.
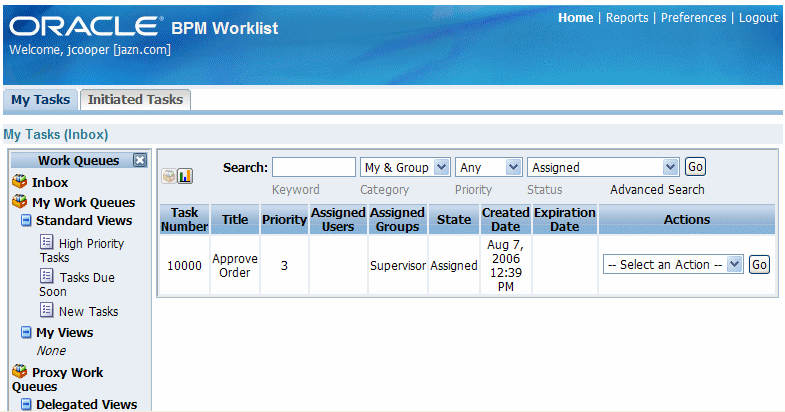
The Worklist Application enables users to manage their tasks, create escalations, setup routing rules to automatically handle tasks, create vacation rules to say how tasks should be handled while away, run reports, and so on. All of this functionality is based on the engine APIs. Therefore, you can also add this functionality to any customized screens you create.
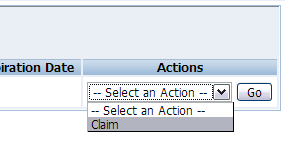
Because this task was assigned to a group, it needs to be acquired by someone from the group to ensure that only one person at a time makes any changes.
From the Actions list, on the right-hand side, select Claim, and then click Go.
The Tasks Details page appears, displaying details of the order to help you make your decision about whether or not to give approval. You can add comments or attachments. In this case none of the other fields can be edited, but that is just in this application. It is possible to make the data fields editable.
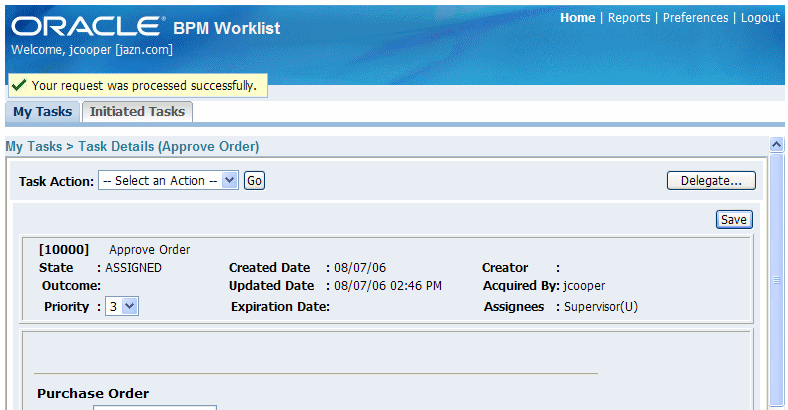
From Task Action list, at the top left of the page, select APPROVE, and then click Go.
The My Tasks tab updates to show that no worklist tasks are currently assigned.
Go back to the Oracle BPEL Control browser window, and then click the Refresh button in your browser.
In the Flow view of the Instances tab, scroll down to the ApproveOrder human task that the process was previously stopped at:
Notice that there are more activities beneath it, indicating that the BPEL process has progressed.
Click the ApproveOrder activity to again see the workflow information.
The Activity Audit Trail window shows information pertaining to this human workflow activity rather than XML.

Notice the audit trail of the activities that took place on the task. In this case it was a straightforward approval task. But you can have very complex workflow tasks that involve sophisticated routing rules and approval chains. You can monitor the progress of a workflow from the Oracle BPEL Control or the Worklist Application.
Close the Activity Audit Trail window to return to the flow diagram.
Scroll down to the large scope labelled SelectSupplier.
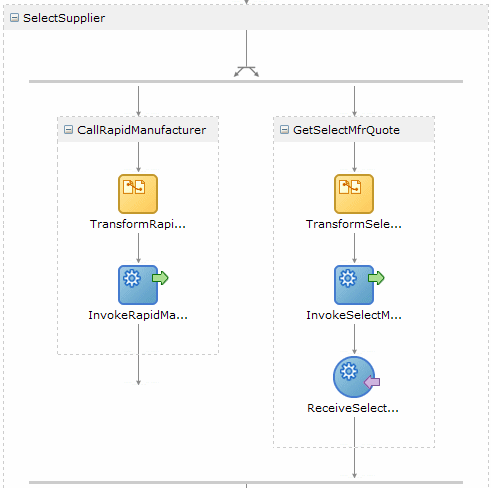
This scope contains a flow activity which lets a BPEL process perform tasks in parallel. In this case, it solicits the rapid and select manufacturer partners to determine who can sell the required items for the cheapest price. It does not make sense to call one partner, wait for their response, then call another partner and wait for their response, and so on. One slow response can cause delays to your process.
By using a flow activity, BPEL can execute these requests in parallel, and wait for all responses before continuing. In this case, the flow has just two parallel groups.
The rapid manufacturer service is synchronous, which is why it only has a single invoke. The select manufacturer service is asynchronous because it can take a relatively long time to respond. Asynchronous services are invoked in the same way as a synchronous service, but the return data is received using a receive activity.
Click the InvokeSelectManufacturer invoke activity to open the XML information Activity Audit window.
In the Activity Audit window, notice that the only input to the service being invoked is shown. Further, only the minimal information the service needs is sent: the items to buy and their quantity. Private customer data is not sent to external partners. The partners only need to know the quantity and items to provide a quote.
Close the Activity Audit Trail window to return to the flow diagram.
Click the ReceiveSelectManufacturer invoke activity to open the XML information Activity Audit window, and then click the View xml Document link.
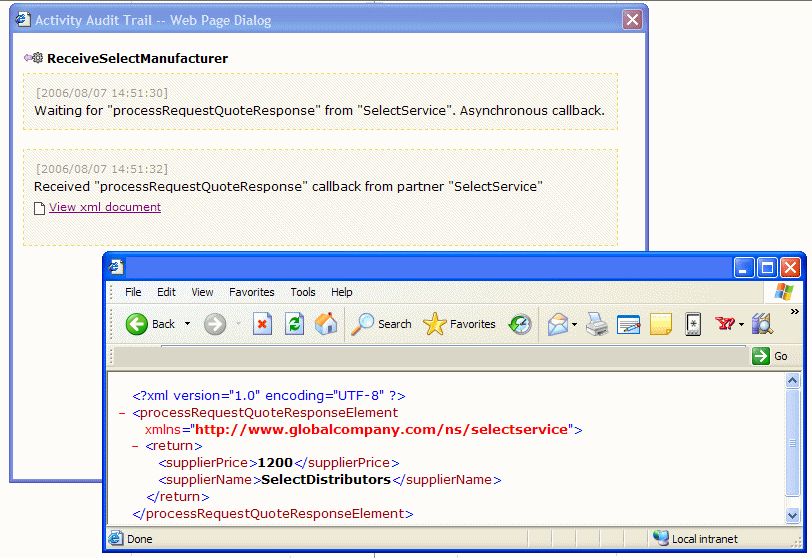
The return data from the select manufacturer service displays, the supplier name and their price. Note the price $1,200 price, as you will compare it to the price returned by the rapid manufacturer service in the following steps.
Close the XML window, and then close the Activity Audit Trail window to return to the flow diagram.
Click the InvokeRapidManufacturer invoke activity to open the XML information Activity Audit window.
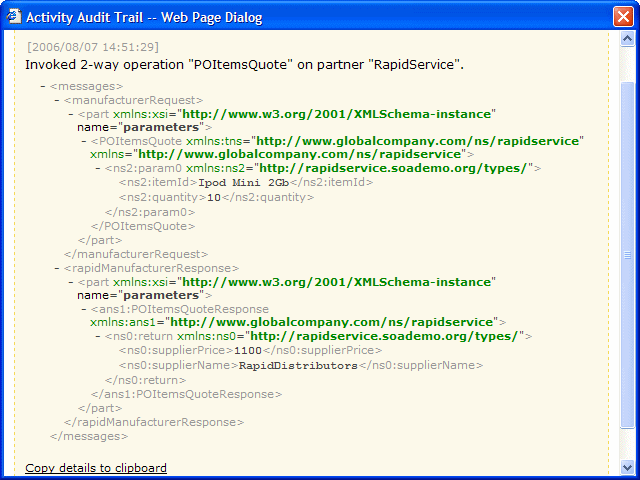
Notice the input to the service in the <manufacturerRequest> element. Again, it provides only enough information for the partner to provide a quote.The response data is in the <rapidManufacturerResponse> element. The value from the rapid manufacturer service is $1,100, which is lower than the select manufacturer price.
Close the Activity Audit Trail window to return to the flow diagram.
Look at the Switch activity under the flow activity:
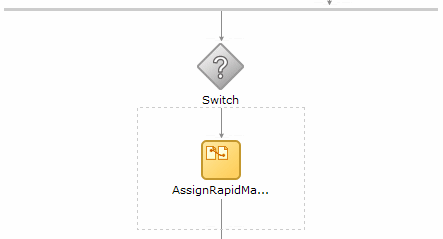
A switch activity in BPEL is like an if-then-else or case or switch statement in other program languages. In this case, the switch activity compares the two prices and selects the lowest one.
Scroll to the next scope labelled PostFulfillmentReq.

Now that the order is approved and the manufacturing partner is selected, the next step in the business process is to fulfill the order, that is actually send it to the customer.
The SOAOrderBooking process defines that FulfillmentESB is responsible for routing the order to the correct fulfillment destination. The PostFulfillmentReq activity invokes FulfillmentESB.
Click the PostFulfillmentReq activity to open the XML information Activity Audit window to see ESB being invoked.
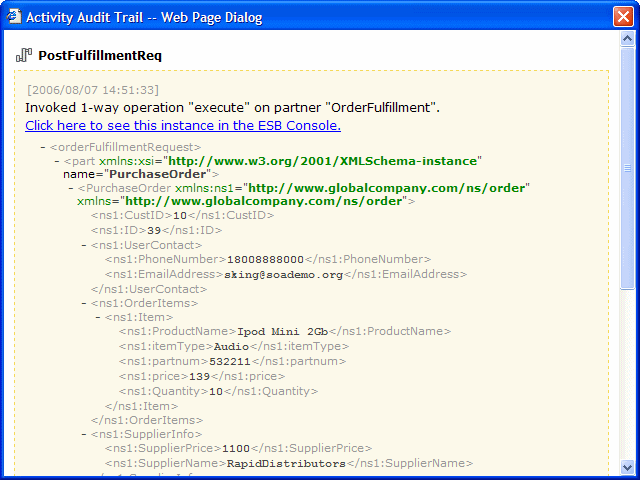
While it is possible to click link Click here to see this instance in the ESB Console, in this scenario, it is important to complete viewing the SOAOrderBooking process flow first.
Close the Activity Audit Trail window to return to the flow diagram.
Scroll to the next two scopes, SetFinalOrderStatus and NotifyCustomer.
In these scopes, the database is updated with supplier information and invokes a notification service which emails the customer details of the order.
Scroll to the callbackClient invoke activity.

This activity is the final step. Remember, anytime you have a BPEL process it is also a service. Some services return data and some do not. In this case, the BPEL process does not return data. However, sometimes a BPEL process returns data, and you can see that data by clicking on the final activity.
Log into the Oracle Enterprise Manger 10g ESB Control (Oracle ESB Control) by selecting Start > All Programs > Oracle - Oracle - soademo > Oracle ESB > ESB Console.
When prompted, enter oc4jadmin in the Username field and welcome1 in the Password field.
The initial screen shows the available services and their definitions. They are grouped into logical groups.
Under OrderBooking, click OrderBookingProcess.
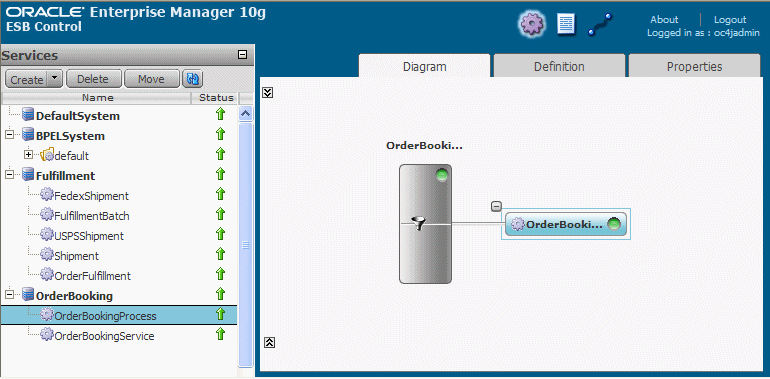
The Oracle ESB Control shows the BPEL process was initiated. The grey box labelled OrderBooking represents a routing service that routes messages. In this case, it is only routing one message, to start the BPEL process, indicated in the blue box labelled OrderBooking.
Under Fulfillment, click OrderFulfillment.
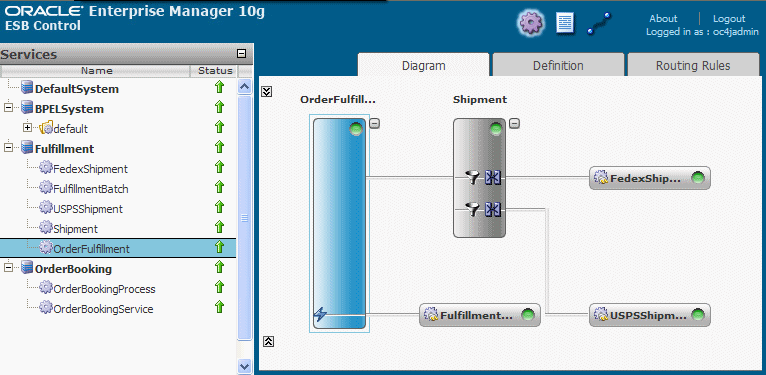
This service is more complex. A message arrives from the SOAOrderBooking BPEL process to process an order. OrderFulfillment routes the message to two places, the Shipment routing service and FulfillmentBatch. FulfillmentBatch is a JMS queue that is responsible for storing all fulfillment orders for overnight batch processing.
The Shipment routing service is responsible for making sure the right shipping service is used. For orders over $500, Fedex (FedexShipment) is used. Otherwise, USPS (USPSShipment) is used. Oracle ESB supports content-based routing and can inspect the message to use the order price to route the message the correct destination.
Click the Instances icon, at the top of the screen, toward the right-hand side.
The Instances pane appears on the left-hand side.

Click the instance at the top of the list.
The Fulfillment flow displays. It shows the runtime instance of the ESB service and which path the messages took, as represented by the green. In this case, notice that OrderFulfillment invoked both the FulfillmentBatch and FedexShipment services.

Hover your mouse over the filter icon in the Shipment routing service for USPS.
It shows OrderPrice < 500, meaning that this service should be invoked if the order price is less than $500. Since the order price was greater than 500, this service was not invoked, as represented by the grey.
Hover your mouse over one of the transformation icons in the Shipment routing service.

This icon represents a data transformation. When ESB routes a message to FedexShipment or USPSShipment, they expect the data to be in a certain format. Data is transformed from Global Company's format to that which the target service expecting. In this case, that format is XSL.
XSL stands for XML Stylesheet and is the standard way to do XML data transformations. You can create XSL files using JDeveloper or third party tools.
Keep the respective browser windows for the Web client, Oracle BPEL Control, and Oracle ESB Control running.
You will use these applications in the next task.
As explained in Section 1.3, "Introduction to SOA Order Booking Application", the SOAOrderBooking process uses a decision service to determine whether or not the order requires manual management approval. This service, in turn, uses rules in the Oracle Rules Engine to determine if approval is required.
In this scenario, you will increase the approval amount from $1000 to $2000 without redeploying the SOA Order Booking application. You will then submit an order for over $1000 and watch it process without manual approval.
In this scenario, you will perform the following tasks:
In this task, you change the approval amount of $1000 to $2000 in the Oracle Business Rules Rule Author. The Rule Author enables you to create or modify rules and to create a data model that describes the business objects that you use with rules.
Open the Rule Author by pointing to the following URL:
http://localhost:8888/ruleauthor
When prompted, enter oc4jadmin in the Username field and welcome1 in the Password field.
The Welcome page appears.
Select File for the Repository Type and set the File Location to:
ORACLE_HOME\j2ee\home\applications\rules_default_SOAOrderBooking_1_0_DecisionService\DecisionService-web\WEB_INF\repository\sample_repository
Click Connect.
A Confirmation message displays with the connection details.
Click the Load subtab.
The Load Dictionary page appears.
Select OrderBookingRules from the Existing Dictionaries list and INITIAL from Version list.
The Load Dictionary page appears.
Click Load.
A Confirmation message displays with loaded dictionary details.
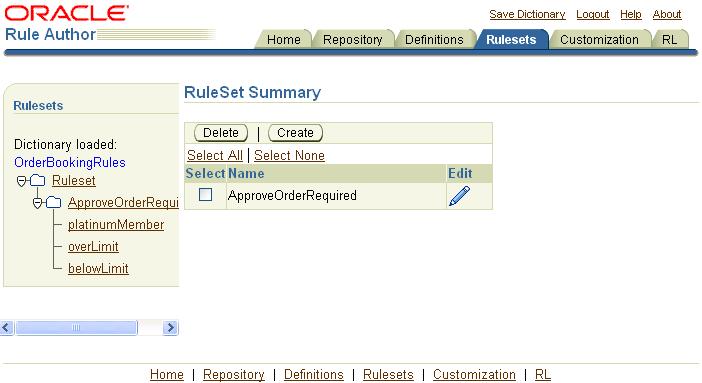
It shows a single rule set called ApproveOrderRequired, which has three rules: platinumMember, overLimit, and belowLimit.
Select the platinumMember link from the left-hand margin.
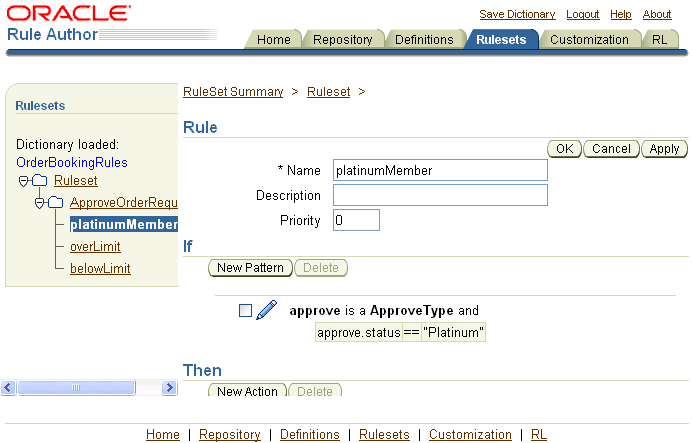
The Rule section the rule definition for platinumMember. The If section specifies the condition and the Then section specifies the result. In this case, if the customer status is Platinum, then approvalRequired is false, meaning no approval is required.
Select the overLimit link from the left-hand margin.
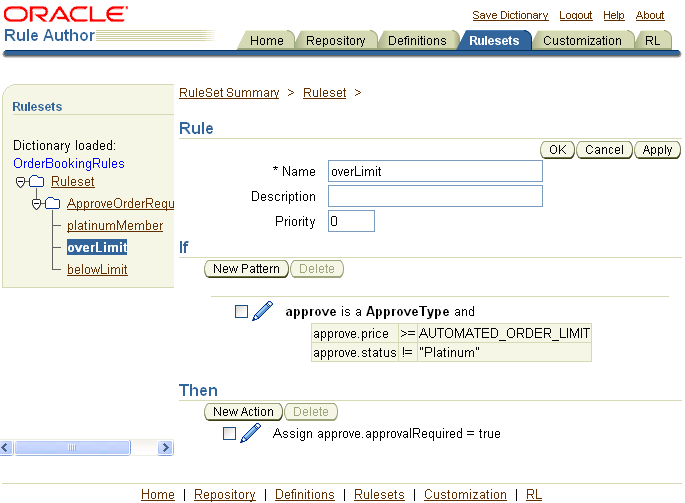
The Rule section specifies that if the price is over a certain limit and the customer status is not Platinum, approval is required. Notice that the limit is specified by the constant AUTOMATED_ORDER_LIMIT.
Select the belowLimit link from the left-hand margin.
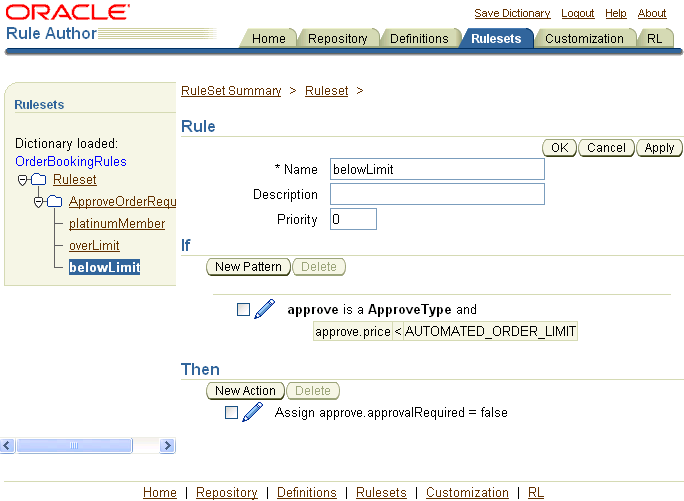
This rule specifies that if the price is under a certain limit, no approval is required. The constant AUTOMATED_ORDER_LIMIT is the same one used in the overLimit rule.
The navigation tree shows the Definitions folder, which contains the available definitions.
Click the Variable (1) folder.
The Variable Summary page displays.
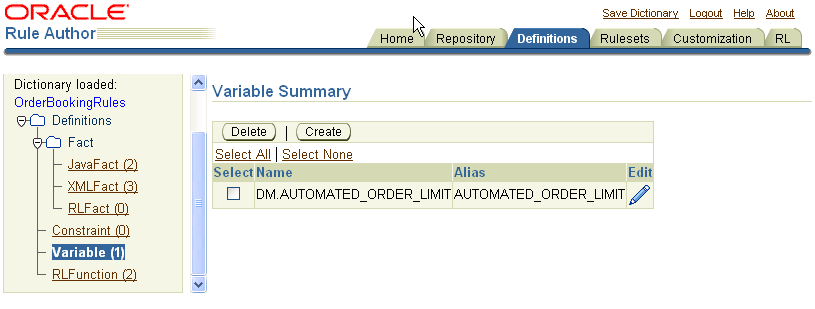
Click the Edit icon next to DM.AUTOMATED_ORDER_LIMIT.
Change the amount from 1000 to 2000 in the Expression text entry area.
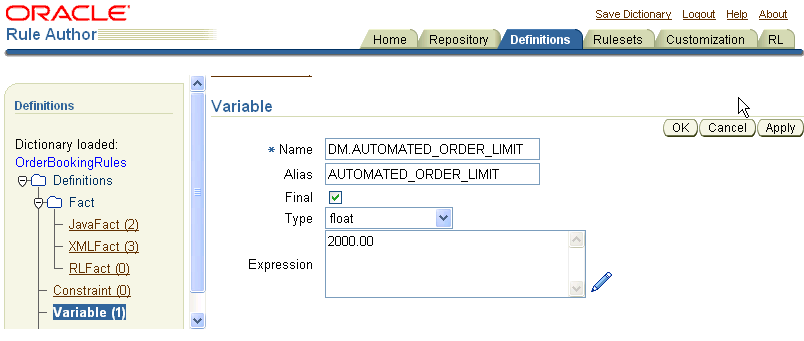
Click Apply.
A Confirmation message displays with the update status.
Click Save Dictionary, located at the top of the Rule Author window.
When prompted to save the dictionary, click Save.
A Confirmation message displays with the dictionary save status.
Close the Rule Author window.
To place the order:
In the welcome page, click the Browse products and create a new order link.
The Browse and Select Items page appears.
Click the Next 10 link, and select Ipod Mini 2 Gb.

Click View Details.
The Item Details page appears. It displays detailed information about the product, and enables the user to select a quantity to add to their cart.

In the Quantity list, select 10, and click Add to cart.
Click Go to Shopping Cart.
The Shopping Cart Contents page appears.

Click Place Order to submit the order.
The welcome page updates with an Order Submitted message.

Go back to the Oracle BPEL Control browser window.
Click the Refresh button in your browser.
The Dashboard tab shows the SelectManufacturer and SOAOrderBooking flows completed without manual approval.
