| Oracle® SOA Suite Quick Start Guide 10g (10.1.3.1.0) Part Number B28938-01 |
|
|
View PDF |
| Oracle® SOA Suite Quick Start Guide 10g (10.1.3.1.0) Part Number B28938-01 |
|
|
View PDF |
In Chapter 3, you placed orders and watched them process through the SOA Order Booking business flow. In this chapter, you will learn how to use the JDeveloper BPEL and ESB Designers to add BPEL and ESB elements.
This chapter includes the following sections:
Section 4.2, "Adding a Credit Rating Service to the SOAOrderBooking Process"
Section 4.4, "Adding a New Shipping Target to FulfillmentESB Project"
This section provides a brief introduction to the JDeveloper BPEL designer. In the next section, Section 4.2, "Adding a Credit Rating Service to the SOAOrderBooking Process", you will make modifications to the SOAOrderBooking BPEL process.
To familiarize yourself with the JDeveloper BPEL designer:
In the Applications Navigator of JDeveloper, expand SOADEMO > SOAOrderBooking > Integration Content.
Double-click SOAOrderBooking.bpel.
The process displays in the JDeveloper BPEL Designer.
Right-click the Start icon at the top of the scope and select Collapse All Children.
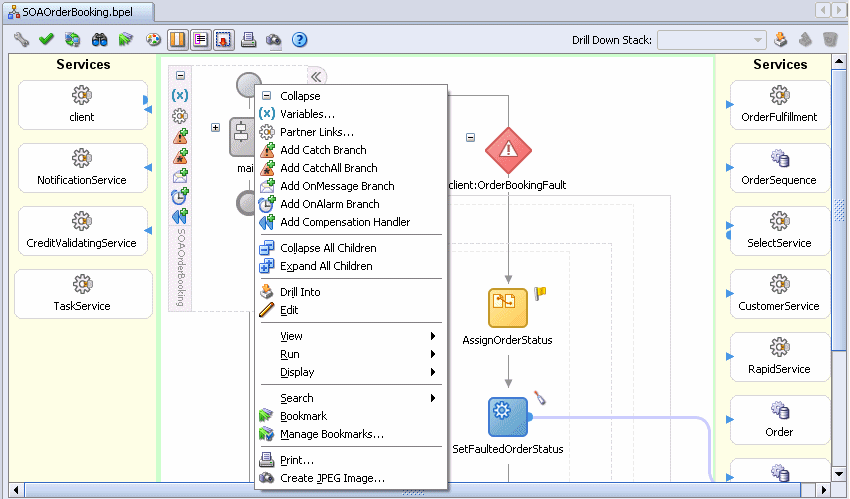
The main logic of this BPEL process collapses into a scope called main. The other activities to the right under client:OrderBookingFault is the main exception handler for the process and can be ignored for now.
The yellow swim lanes on the left and right-hand sides of the main window are where the services resides. These are the services that are invoked at various stages of the BPEL process. The white area in the middle is where the BPEL logic resides.
Expand the main scope by clicking the Expand icon (+).

The first round blue icon named receiveInput represents when something invokes this BPEL process. The input to this process is passed to this receive activity.
Scroll all the way to the bottom of the main scope to see a square blue invoke activity called callbackClient.

This activity represents the end of the BPEL process and returning the result data to the client that invoked this process. (BPEL processes do not have to return data. BPEL processes can simply end.)
Everything between receiveInput and callbackClient contains the logic of the BPEL process.
The BPEL language has several container activities, that is, activities that can contain other activities. The most commonly used is the scope activity. A scope activity does not actually execute or do anything, it simply holds other activities, including other scopes. Scopes are analogous to curly braces in Java. You can use them to break up your process into logical chunks.
Expand the CustomerService scope, located toward the beginning of the process, by clicking the Expand icon (+).
Sequence_9 appears. Many scopes contain an inner sequence. If you come across one, simply expand it to see the activities it contains.
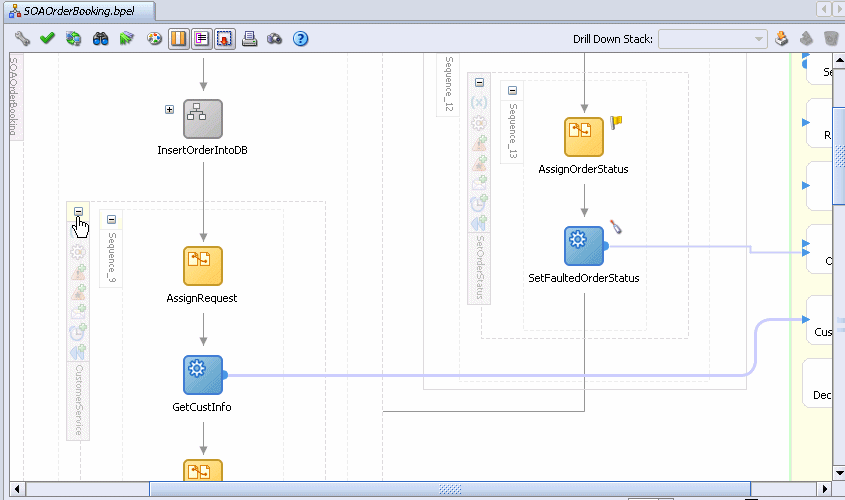
Expand the Sequence_9 sequence by clicking the Expand icon (+).
When this BPEL process was invoked, part of the input to the process is the customer ID of the customer submitting the order. The business process takes that ID and retrieves the customer's details, such as address and credit card number. You can see this process with the GetCustInfo invoke activity. An invoke activity invokes a service. If you follow the blue line coming out of GetCustInfo, you will see that it invokes CustomerService.
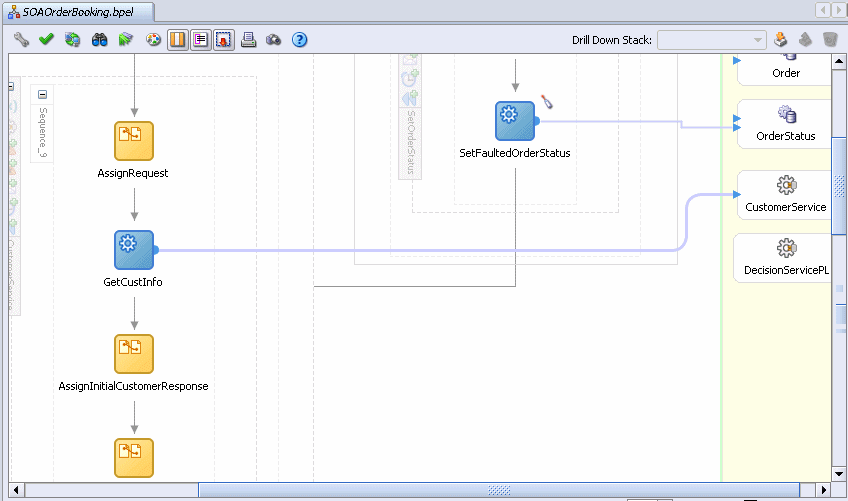
In this case, CustomerService is being invoked synchronously, so the BPEL process will wait until the service returns the results before continuing.
Before and after the GetCustInfo invoke activity, there are assign activities. An assign activity assigns data to variables. In this case, the customer ID is assigned to the variable that is sent as input to CustomerService, and another assign activity copies the return data from that service to a variable that can be used and referred to later in the BPEL process.
All of the activities in this scope are loosely involved in retrieving the customer information, which is why they are grouped together in a scope. Scopes break up the process into logical chunks to simplify development and make the process easier to read and work with.
Click the Collapse icon (-) icon on the CustomerService scope to collapse it.
Scroll down to the requiresApproval switch activity and click the Expand icon (+).
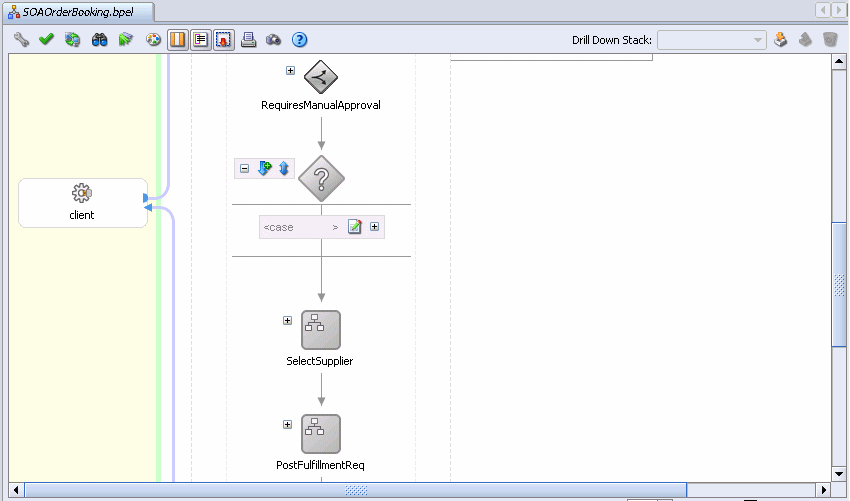
Click the Expand icon (+) on the case statement.
The sequence appears.
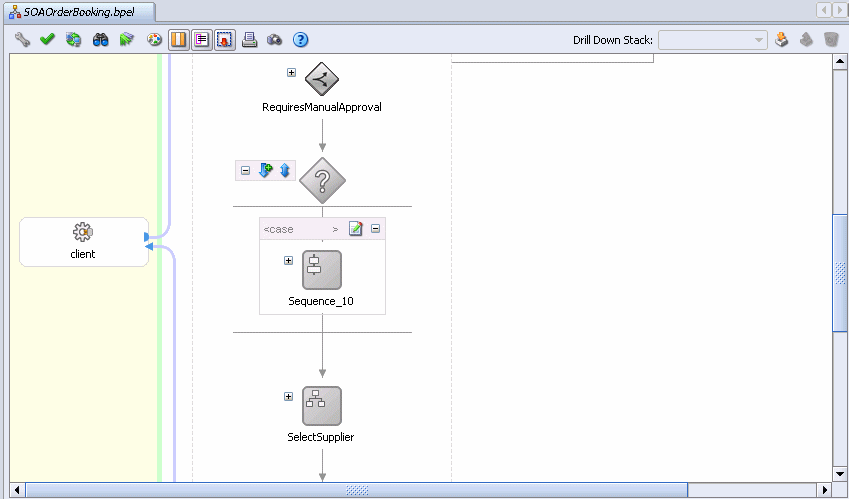
Click the Expand icon (+) on the sequence.
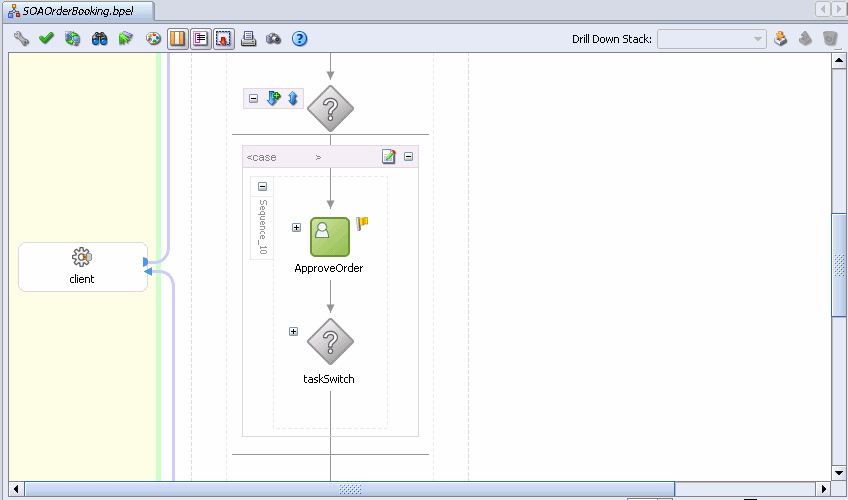
The green ApproveOrder activity represents invoking a human workflow activity as part of this BPEL process.
Double-click ApproveOrder.
The Human Task dialog appears.
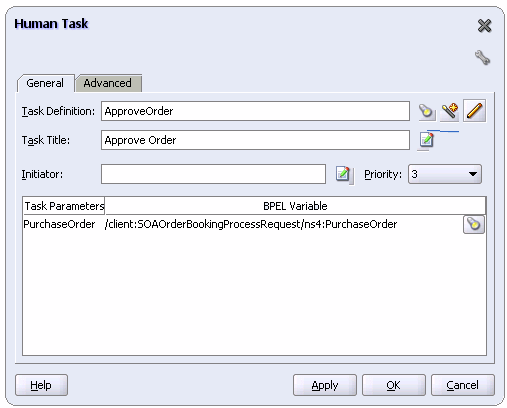
Click the Edit Task Definition icon. It is the third icon to the right of the Task Definition field that looks like a pencil.
The ApproveOrder.task page displays. This screen enables you to define the behavior of your human workflow.
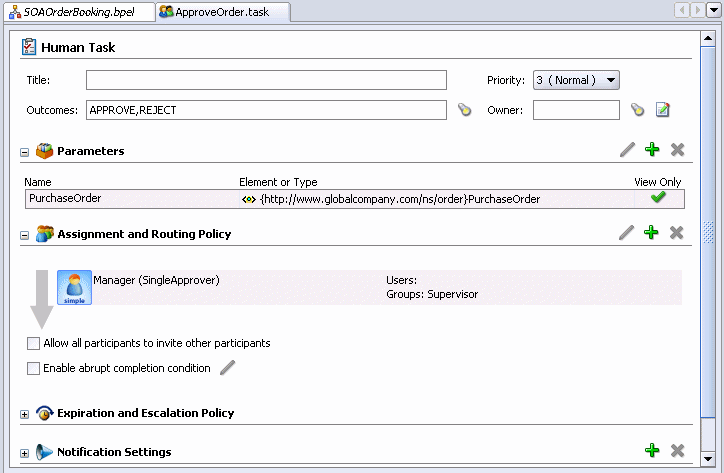
In this case, the Outcomes field shows that a request can be approved or rejected. You can define routing policies in the Assignment and Routing Policy section. In this case, a task is submitted to the Supervisor group for approval. For you process, you can specify a complex series of routing rules. For example, a workflow could specify to get approval from Sales, then from the Sales Manager, and then obtain final approval from a person named Fred.
There are several other settings that can be specified, such as how long until the task expires, how to notify participants in the workflow, escalation rules, and so on.
Close the ApproveOrder.task page by hovering your mouse over the tab and pressing X.

Back in the Human Task dialog, click Cancel.
Click the Expand icon (+) on the taskSwitch switch activity.
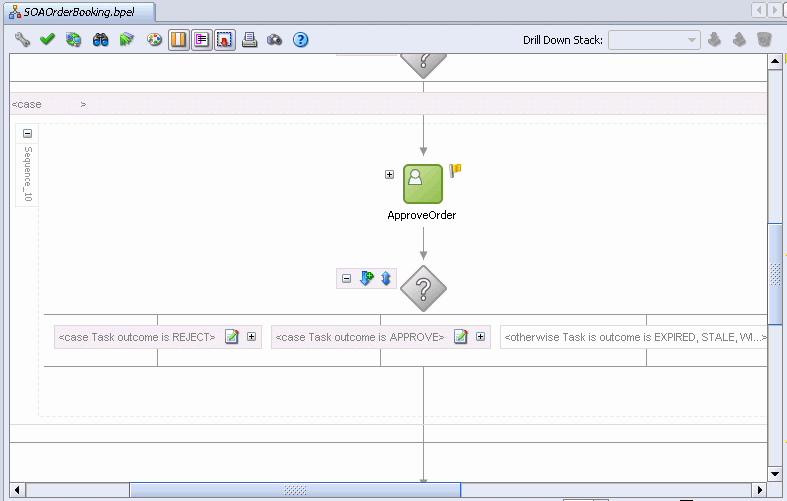
A switch activity is like an if-then-else or case or switch statement in other languages.
Notice that the taskSwitch activity has cases for handling if the human workflow task is rejected, approved, or something else, such as expired.
Click the View Condition Expression icon for the REJECT case to see the XPath evaluation expression, and then press the Escape key when done viewing.

Click the Expand icon (+) on the same REJECT case, and then the inner sequence.
It shows the activities that execute if the workflow task is rejected. In this case, data is assigned to some variable and an exception is thrown.
Scroll all the way to the top of the BPEL process, right-click the Start icon at the top of the scope, and select Collapse All Children.
One of the strengths of BPEL is that it is an implementation-independent language for describing a business process. Because the logic of your business process is separate from the code, it is easy to re-orchestrate your BPEL flows when your business process changes.
For example, after deploying the existing BPEL process, you discover that Global Company has been selling its products to customers with a bad credit rating, resulting in a loss of money from these types. You can adjust the business process to check the credit rating of the buyer before selling the product.
The SOAOrderBooking BPEL process already does a credit check on the customer by checking their credit card. You can see this by following these steps:
Click the Expand icon (+) on the main scope.
Scroll down to the CreditService scope and click the Expand icon (+).
Expand the inner sequence, called Sequence_5.
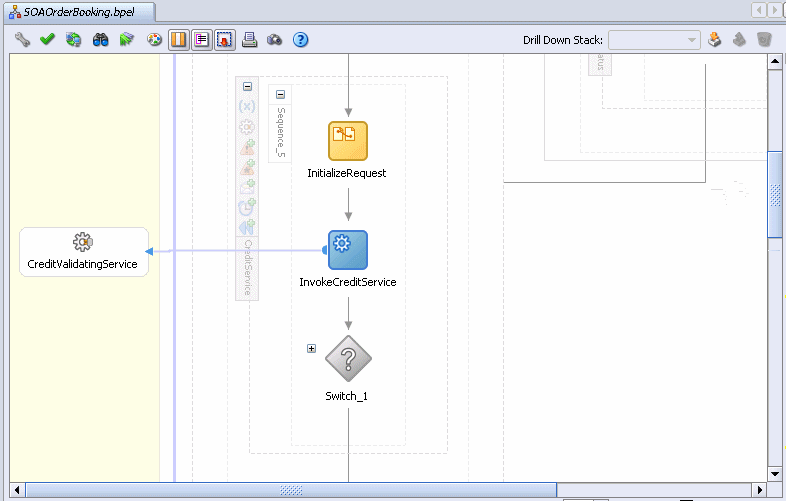
Notice there is an invoke activity called InvokeCreditService, which invokes the service called CreditValidatingService. In this case, the process is sending the credit card information to the Credit Validation service, and the service responds by determining if the credit card is valid or not.
Click the Collapse icon (-) icon on the CreditService scope to collapse it
In addition to checking if the customer's credit card is valid, you can modify the process to check the credit rating of customers. A Web service called CreditRatingService exists that the process can utilize. The Web service takes a Social Security number as its input, and returns the credit rating for that Social Security number.
The BPEL process needs to retrieve the Social Security number for the customer. Early in the BPEL process, CustomerService is called to retrieve several details about the customer, but Social Security number is not included. The Social Security number information is stored in a different database. In typical deployments, it is common for companies to store data in multiple places. Using BPEL, you can easily retrieve that different data and pull it together for your business processes.
In this scenario, you will modify the existing BPEL process to retrieve the Social Security number for customer sking from a different database. The BPEL process will then pass that Social Security number to the CreditRatingService service to get the customer's credit rating. You will perform the following tasks:
Task 1: Create a Database Connection for the Database Containing the Social Security Number
Task 2: Use a Database Adapter As a Service to Access the Database
Task 9: Assign Data to the Input Variable for CreditServiceRating
To access the Social Security number information, create a database connection to the database containing it. In this case, you will create another connection to the SOADEMO schema, which connection soademo is already using. In a real-world deployment, this connection would point to a different database. However, using a different table in the same database in adequate for this demonstration.
To create a database connection:
Start JDeveloper by running JDEV_HOME\jdeveloper.exe.
Create a connection to the database using the SOADEMO schema:
Click the Connections tab, or if it not currently displayed, choose View > Connection Navigator.
Double-click the Database folder to open the Create Database Connection Wizard.
Complete the wizard, ensuring you complete the following:
- On the Step 1 of 4: Type 1 page, enter soademo_ssn for the Connection Name.
- On the Step 2 of 4: Authentication page, enter soademo for the Username and Password fields, and click Deploy Password.
- Enter the appropriate values for where you installed the schema.
In this task, you create a service that uses a database adapter to query the SSN table in the SOADEMO schema.
In the Component Palette, select Services from the dropdown.
Click and then drag the Database Adapter icon from the Component Palette and drop it in one of the yellow Services swim lanes of the SOAOrderBooking.bpel page.
The Adapter Configuration Wizard appears.
On the Welcome page, click Next.
On the Step 1 of 2: Service Name page, in the Name field, enter getSsn, and then click Next.
On the Step 2 of 2: Service Connection page:
Connection: Select the soademo_ssn database connection.
JNDI Name: Ensure the name is set to eis/DB/soademo_ssn. The name is case sensitive. Ensure that it correctly matches the case of the connection name.
Click Next.
On the Step 3 of 3: Operation Type page, select Perform an Operation on a Table, deselect all operations, except for Select, which is required.
Click Next.
In the Select Table page, click Import Tables.
The Import Tables dialog appears.
Click Query to display the tables.
Select SSN, and click > to move this table to the Selected area.
Click OK to save the setting, and return to the wizard.
On the Step 4 of 7: Select Table page, the SOADEMO.SSN table displays. Click Next.
On the Step 5 of 8: Define Primary Key page, select CUSTOMERID , and click Next.
On the Step 6 of 8: Relationships, click Next, as there are no relationships.
On the Step 7 of 8: Object Filtering page, leave the settings as they are, and click Next.
When the Step 8 of 8: Define Selection Criteria page displays, notice the SQL query is set to:
SELECT CUSTOMERID, SSN FROM SSN
On the Step 8 of 8: Define Selection Criteria page, in the Parameters section, click Add to add a parameter.
The Parameter Name dialog appears.
Enter custIdToGet, and then click OK.
At runtime, this parameter gets populated.
Back on the Step 8 of 8: Define Selection Criteria page, in the SQL section, click Edit.
The Expression Builder dialog appears.
Click Add to add a where clause.
In the Second Argument section, change the selection from Literal to Parameter, making sure the populated list underneath specifies custIdToGet, and then click OK.
Back on the Step 8 of 8: Define Selection Criteria page, notice the SQL query changes to:
SELECT CUSTOMERID, SSN FROM SSN WHERE (CUSTOMERID =#custIdToGet)
Click Next.
On the Finish page, click Finish to create the database adapter partner link.
The Create Partner Link dialog appears and is automatically completed as follows:
| Element | Value |
|---|---|
| Name | getSsn |
| WSDL File | file:DEMO_HOME/SOAOrderBooking/bpel/getSsn.wsdl |
| Partner Link Type | getSsn_plt |
| Partner Role | getSsn_role |
| My Role | unspecified |
Click OK.
The SOAOrderBooking.bpel page updates with the getSsn service. By making this database adapter into a service, you have made it appear as a Web service to the SOAOrderBooking process. You can now invoke this service just as you would with any Web service, and it will return a row from the database.
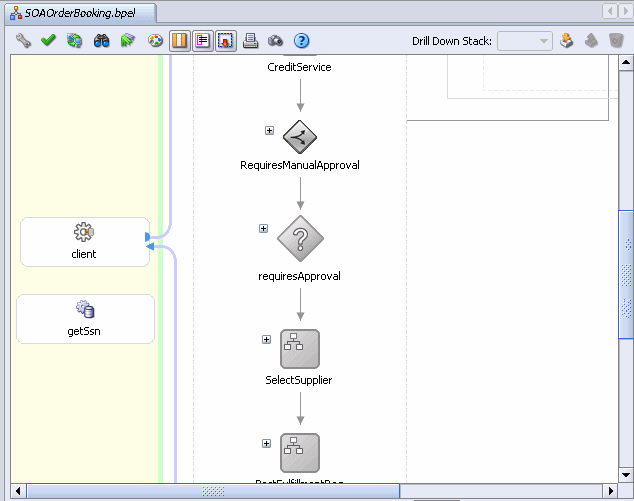
You now create a scope activity to group all activities that form a logical step to be executed.
In the Component Palette, select Process Activities from the dropdown.
Drag and drop a Scope activity from the Component Palette section below the CreditService activity, but above the RequiresManualApproval activity
Rename this activity by double-clicking the name underneath the icon. Do not double-click the activity icon itself.
Click the Expand (+) icon to expand the getCreditRating scope.
To call a service from BPEL, you use the invoke activity. The invoke activity will call the service and pass it data, and in this case, wait for a response from the service with the return data.
To create an invoke activity:
Drag and drop an Invoke activity from the Component Palette section inside the getCreditRating scope activity.
Rename this activity by double-clicking name underneath the icon. Do not double-click the invoke icon itself.
In the edit field, change the name to invokeGetSsn.
Drag the mouse from the left side of invokeGetSsn to the getSsn database adapter service.
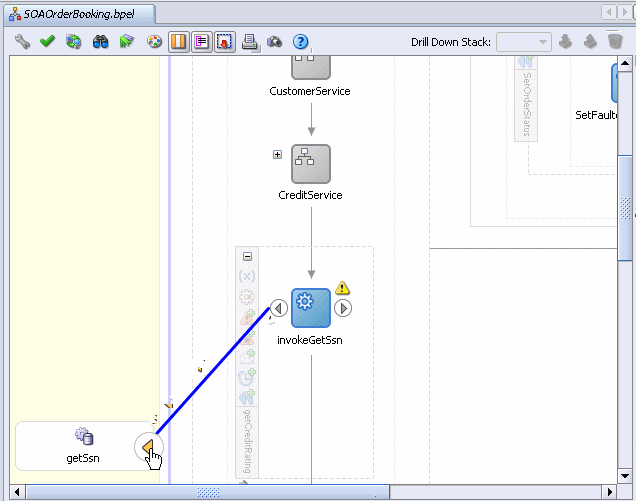
The Edit Invoke dialog appears and is automatically filled in with the following information:
| Element | Value |
|---|---|
| Name | invokeGetSsn |
| Partner Link | getSsn |
| Operation | getSsnSelect_custIdToGet |
Click the Automatically Create Input Variable icon. It is the first icon to the right of the Input Variable field.
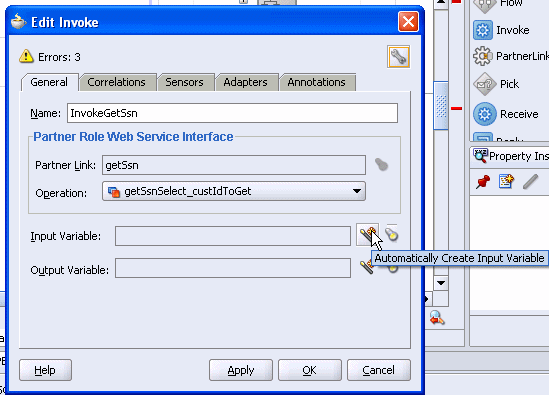
The Create Variable dialog appears with the input variable. A variable named invokeGetSsn_getSsnSelect_custIdToGet_InputVariable is automatically created in the Name field. This variable is automatically assigned a message type.
The variable name is based on the invoke activity (invokeGetSsn), database adapter (getSsn), and database adapter parameter (custIdToGet).
Leave Global Variable selected, and click OK.
The Edit Invoke dialog populates with the variable in the Input Variable field.
Click the Automatically Create Output Variable icon. It is the first icon to the right of the Output Variable field
The Create Variable dialog appears with the output variable. A variable named invokeGetSsn_getSsnSelect_custIdToGet_OutputVariable is automatically created in the Name field. This variable is automatically assigned a message type.
Leave Global Variable selected, and click OK.
The Edit Invoke dialog populates with the variable in the Output Variable field.
These variables provide input and output data for the getSsn service.
Click OK to save the variable settings.
You now create an assign activity to take the customer ID and assign it to the input variable invokeGetSsn_getSsnSelect_custIdToGet_InputVariable, which in turn sends a request to the getSsn service.
Drag and drop an Assign activity from the Component Palette section to above the invokeGetSsn invoke activity and inside the getCreditRating scope activity.
An assign activity references variables in an invoke activity, which is why you create it after creating the invoke activity.
Rename this activity by double-clicking name underneath the icon. Do not double-click the invoke icon itself.
In the edit field, enter assignCustID.
Double-click the assignCustID activity.
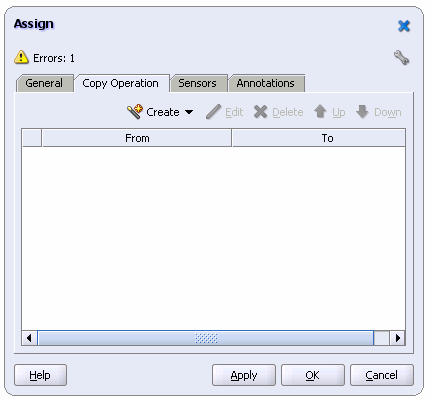
The Assign window displays.
|
Tip: When using these type of windows in JDeveloper, do not click the X icon to apply changes. The X icon removes your changes. You must click OK to apply changes. If you cannot see the OK button, scroll down until you see it. |
From the Create menu, select Copy Operation.
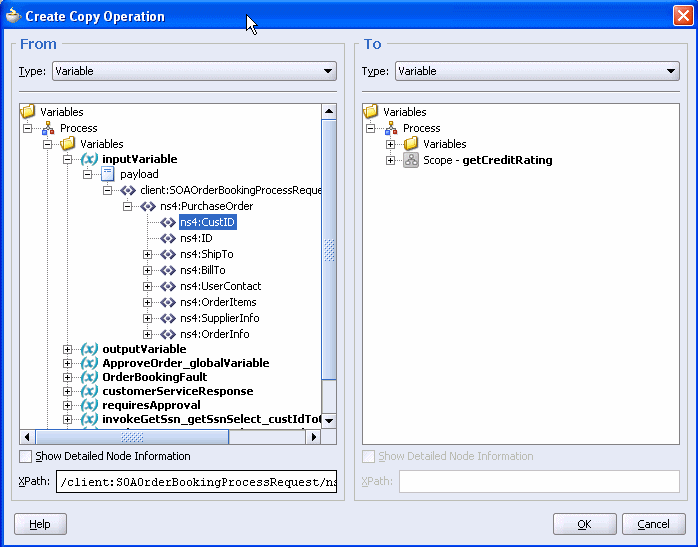
The Create Copy Operation dialog appears. It enables you to create a copy rule. In this dialog, you will specify a rule for populating the database adapter parameter (custIdToGet) with CustID in the input variable invokeGetSsn_getSsnSelect_custIdToGet_InputVariable.
On the From side, expand Variables > inputVariable > payload > client:SOAOrderBookingProcessRequest > ns4:PurchaseOrder.
Select ns4:CustID. Your system may show a different prefix than ns4.
On the To side, expand Variables > invokeGetSsn_getSsnSelect_custIdToGet_InputVariable > getSsnSelect_custIdToGet_inparameters > ns32:getSsnSelect_custIdToGetInputParameters.
Select ns32:custIdToGet. Your system may show a different prefix than ns32.
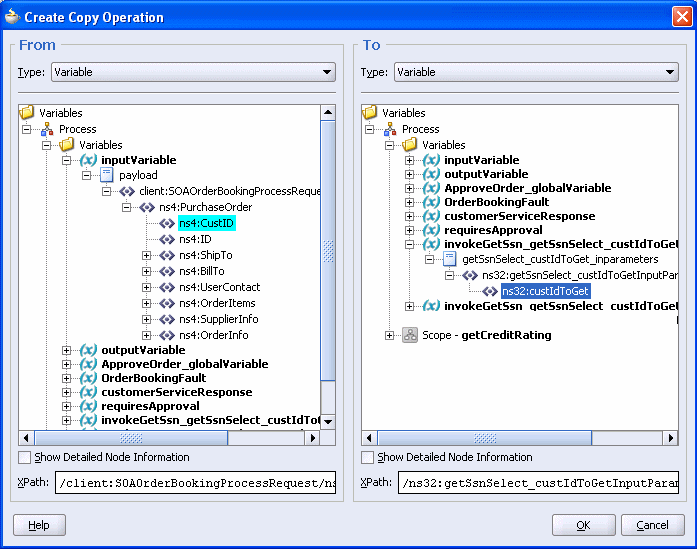
Click OK.
The Copy Operation tab in the Assign window updates to show the rule.
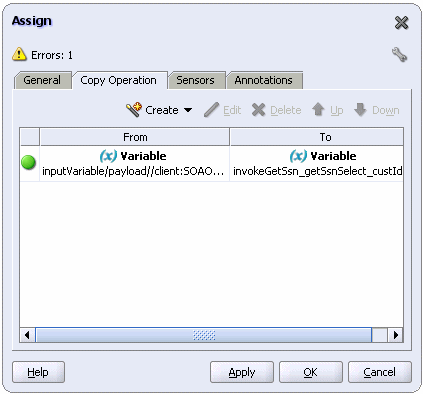
Back in the Assign window, scroll-down and click OK.
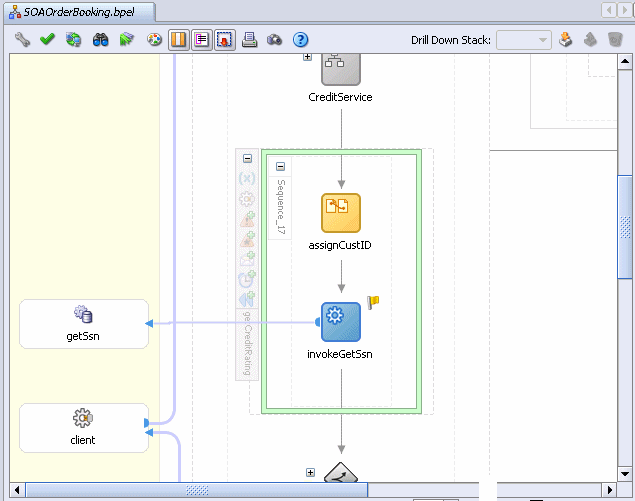
The SOAOrderBooking.bpel page should now look like the following:
|
Summary: You created a getCreditRating scope activity that takes the customer ID provided by the SOAOrderBooking process and assigns it to the input variable, invokeGetSsn_getSsnSelect_custIdToGet_InputVariable. The input variable is passed as input to the getSsn service, which in turn returns the Social Security number to the output variable, invokeGetSsn_getSsnSelect_custIdToGet_OutputVariable. Next, you will create a CreditRatingService, and assign this output variable as input to that Web service. |
At this point in the procedure, you have modified the BPEL process to extract the customer's Social Security number from the database. The next step is to pass the Social Security number to the credit rating service, which returns the credit rating.
In this task, you install the credit rating service. The service is called CreditRatingService and is one of the samples shipped when you install Oracle SOA Suite. The following steps can also be used to install any of the many other samples that also shipped.
Select Start > All Programs > Oracle - Oracle - soademo > Oracle BPEL Process Manager > Developer Prompt.
A command prompt displays. Notice you are in the samples directory.
Enter the following command:
cd utils\CreditRatingService
Enter following command:
ant
This command runs the ant script to install the CreditRatingService service. It takes 30 to 60 seconds to run the script.
When you run ant, the script looks in the current directory for a build.xml file, which contains ant scripts for installing the sample. You can explore the samples directory and any directories under it. Anywhere there is a build.xml file, you can simply run ant to install that sample.
Enter exit to close the command window.
CreditRatingService is now implemented as a BPEL process. Whenever you create a BPEL process, it is exposed as a service. This means there is now a service called CreditRatingService that can be invoked by anything that can invoke a service. In the next task, you will invoke that service from the SOAOrderBooking process.
If you receive an authentication error when you run ant, it is probably because you are using a password other than welcome1. To resolve this issue:
Use a text editor and open:
ORACLE_HOME\bpel\utilities\ant-orabpel.properties
Modify the value of admin.password from welcome1 to the password you are using.
In this task, you create a partner link to a Web service that maintains ratings for Social Security numbers.
Drag and drop PartnerLink into one of the yellow Services swim lanes of the SOAOrderBooking.bpel page.
The Create Partner Link dialog appears.
Provide values for the elements as follows:
| Element | Value |
|---|---|
| Name | CreditRatingService |
| WSDL File |
|
| Partner Link Type | CreditRatingService |
| Partner Role | CreditRatingServiceProvider |
| My Role | unspecified |
Click OK.
The SOAOrderBooking.bpel page updates with the CreditRatingService partner link.
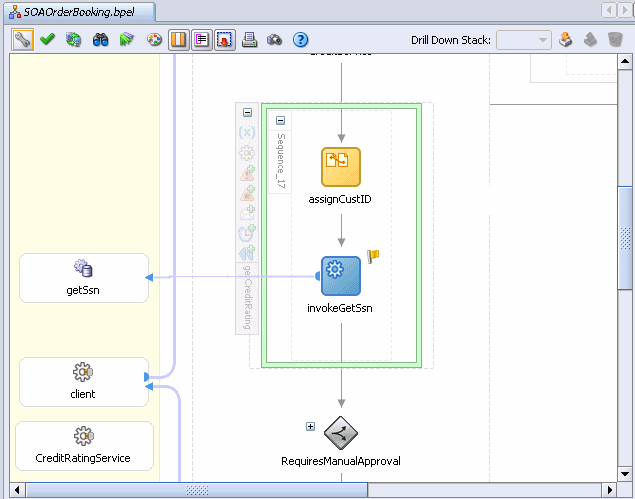
In this task, you create an invoke activity to send request data from the SOAOrderBooking process to the CreditRatingService partner link and receive a response.
To create the invoke activity:
Drag and drop an Invoke activity from the Component Palette section below the invokeGetSsn activity inside the getCreditRating scope activity.
Rename this activity by double-clicking name underneath the icon. Do not double-click the invoke icon itself.
In the edit field, change the name to invokeCreditRatingService.
Drag the mouse from the left side of invokeCreditRatingService to the CreditRatingService partner link.
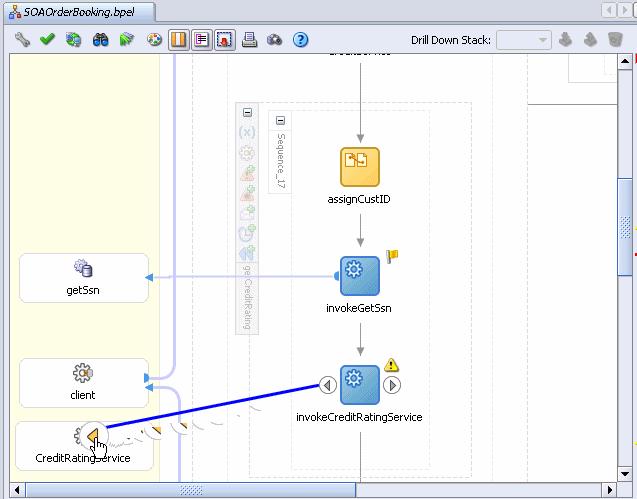
The Edit Invoke dialog appears and is automatically filled in with the following information:
| Element | Value |
|---|---|
| Name | invokeCreditRatingService |
| Partner Link | CreditRatingService |
| Operation | process |
Click the Automatically Create Input Variable icon. It is the first icon to the right of the Input Variable field.
The Create Variable dialog appears with the input variable. A variable named invokeCreditRatingService_process_InputVariable is automatically created in the Name field. This variable is automatically assigned a message type.
The variable name is based on the invoke activity (invokeCreditRatingService) and operation (process). This variable provides input data to the CreditRatingService service.
Leave Global Variable selected, and click OK.
The Edit Invoke dialog populates with the variable in the Input Variable field.
Click the Automatically Create Output Variable icon. It is the first icon to the right of the Output Variable field.
The Create Variable dialog appears with the output variable. A variable named invokeCreditRatingService_process_OutputVariable is automatically created in the Name field. This variable is automatically assigned a message type.
Leave Global Variable selected, and click OK.
The Edit Invoke dialog populates with the variable in the Output Variable field.
This variable provides output data from the CreditRatingService service.
In the Edit Invoke dialog, click OK to save the variable settings.
You now create an assign activity to take the Social Security number from the invokeGetSsn_getSsnSelect_custIdToGet_OutputVariable variable and assign it to the input variable invokeCreditRatingService_process_InputVariable, which in turn sends a request to CreditRatingService for the Social Security number.
Drag and drop an Assign activity from the Component Palette section to above the invokeCreditRatingService invoke activity, but below the invokeGetSsn invoke activity.
Rename this activity by double-clicking name underneath the icon. Do not double-click the assign icon itself.
In the edit field, enter assignSsn.
Double-click the assignSsn activity.
The Assign window displays.
From the Create menu, select Copy Operation.
The Create Copy Operation dialog appears. Previously, you used the database adapter to retrieve the Social Security number from the database. To use that Social Security number and pass it to CreditRatingService, on the From side, you specify to take the Social Security number from the variable that was returned by getSsn.
On the From side, expand Variables > invokeGetSsn_getSsnSelect_custIdToGet_OutputVariable (of the database adapter) > SsnCollection > ns32:SsnCollection. Your system may show a different prefix than ns32.
Select ns32:ssn, where ssn represents the ssn column in the SSN table of the SOADEMO schema.
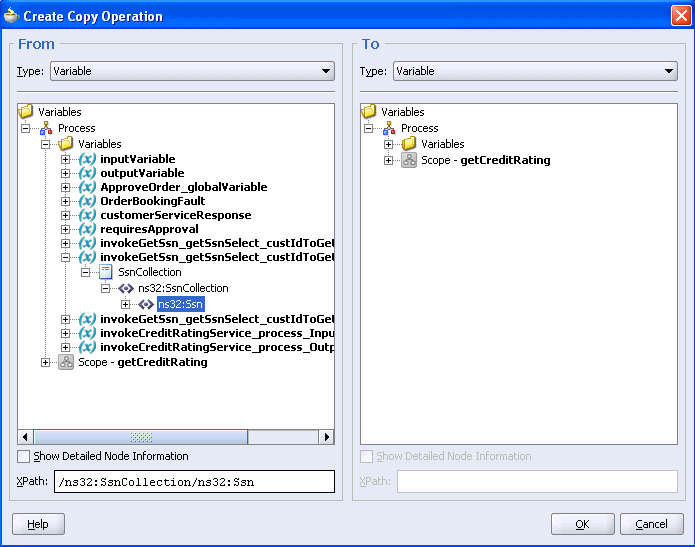
On the To side, expand Variables > invokeCreditRatingService_process_InputVariable > payload.
Select ns33:ssn. Your system may show a different prefix than ns32.
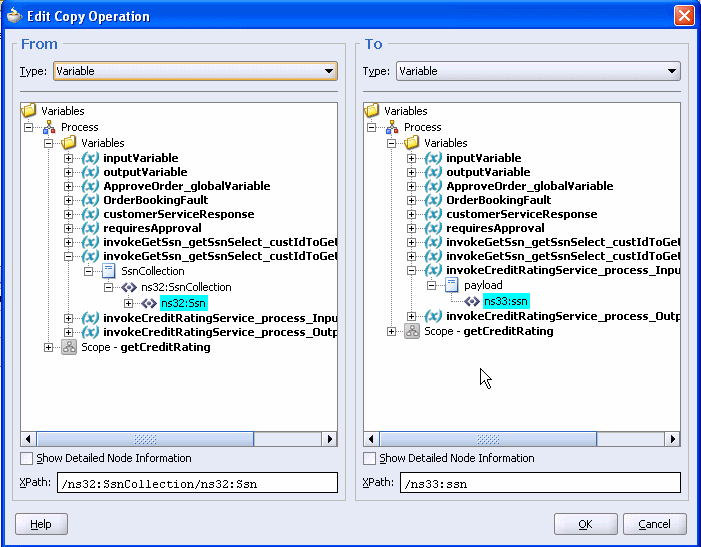
Click OK.
The Copy Operation tab in the Assign window updates to show the rule.
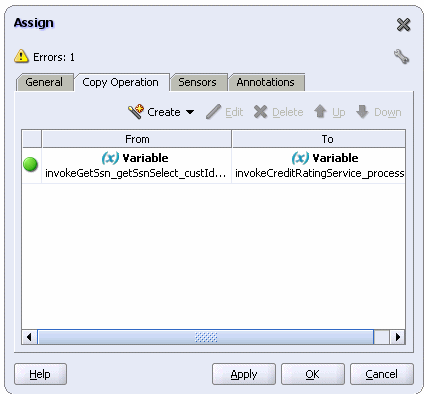
Back in the Assign window, scroll-down and click OK.
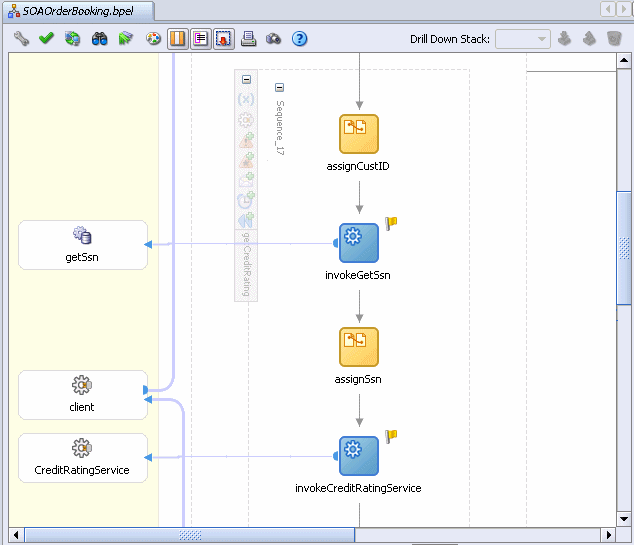
The SOAOrderBooking.bpel page should now look like the following:
Choose File > Save to save your work.
|
Summary: You created a getCreditRating scope activity that takes the customer ID provided by the SOAOrderBooking process and assigns it to the input variable, invokeGetSsn_getSsnSelect_custIdToGet_InputVariable. The input variable is passed as input to thegetSsn service, which in turn returns the Social Security number to the output variable, invokeGetSsn_getSsnSelect_custIdToGet_OutputVariable. Next, you assigned this variable as input to a CreditRatingService Web service, which in turn returns the rating for the Social Security number to the output variable, invokeCreditRatingService_process_OutputVariable. |
Now that you have modified and saved the BPEL process, it is time to test it. To do that, deploy it to the server, and then place a new order, which will use the updated BPEL process.
To redeploy SOAOrderBooking:
In the Application Navigator, expand SOAOrderBooking > Resources.
In the Application Navigator, right-click build.xml, and select Run Ant.
The Run Ant dialog appears.
Click the Properties tab, and if any properties exist, remove them.
In the Property Files section, click Add and select the build.properties file.
Click Open and click OK.
This action starts the deployment process, which may take anywhere from 30 to 60 seconds. You can monitor the progress in the Messages pane, in the Apache Ant - Log tab, in the Apache Ant sub-tab. You will know the deployment is complete when you see the text BUILD SUCCESSFUL.
To place an order in the Web client:
Click the Browse products and create a new order link.
The Browse and Select Items page appears. It lists the electronic products available for sale.
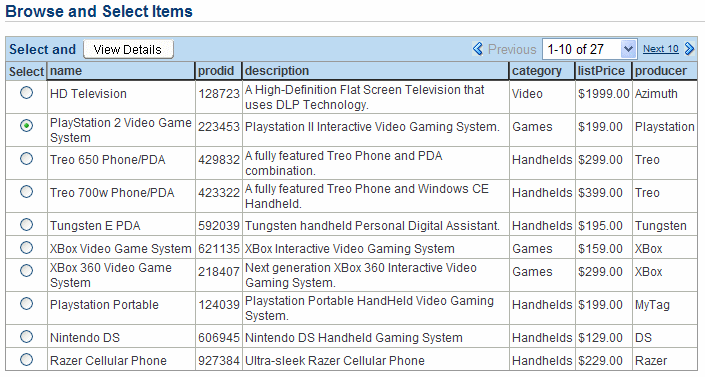
Select the PlayStation 2 Video Game System, priced at $199.00, and click View Details.
The Item Details page appears. It displays detailed information about the product, and enables the user to select a quantity to add to their cart.

In the Quantity list, select 1, and click Add to cart.
Click Go to Shopping Cart.
The Shopping Cart Contents page appears.

Click Place order to submit the order.
The welcome page updates with an Order Submitted message.

If the Oracle BPEL Control is not running, select Start > All Programs > Oracle - Oracle - soademo > Oracle BPEL Process Manager > BPEL Control.
When prompted, enter oc4jadmin in the Username field and welcome1 in the Password field.
The Dashboard tab updates to show the order has completed.

Notice the addition of the CreditRatingService, which you just created.
Click the Instances tab.
Click the last instance of SOAOrderBooking.
Click the Flow subtab, and the scroll to the getCreditRating scope.

Click invokeCreditRatingService.
The Activity Audit Trail window displays. It shows Social Security number (ssn) 123456789 was returned for customer ID (customerid) 10 from the previous activity. For this activity, it shows CreditRatingService returned a rating of 560.
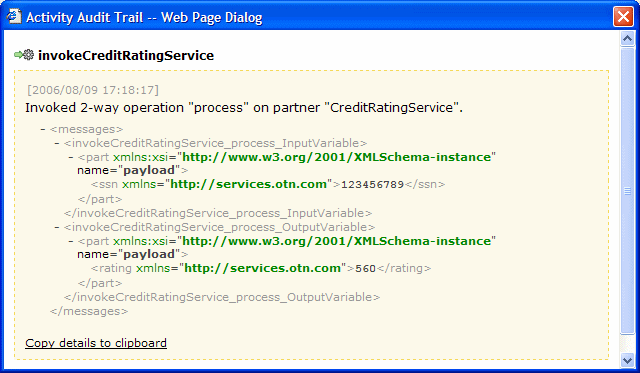
Close the Activity Audit Trail window.
Click the Dashboard tab to navigate back to the main view.
This section provides a brief introduction to the JDeveloper ESB Designer. In the next section, Section 4.4, you will make modifications to the FulfillmentESB project.
To familiarize yourself with the JDeveloper ESB Designer:
In the Applications Navigator of JDeveloper, expand SOADEMO > FulfillmentESB > Resources.
Double-click FulfillmentESB.esb.
The JDeveloper ESB Designer displays the following in the flow:
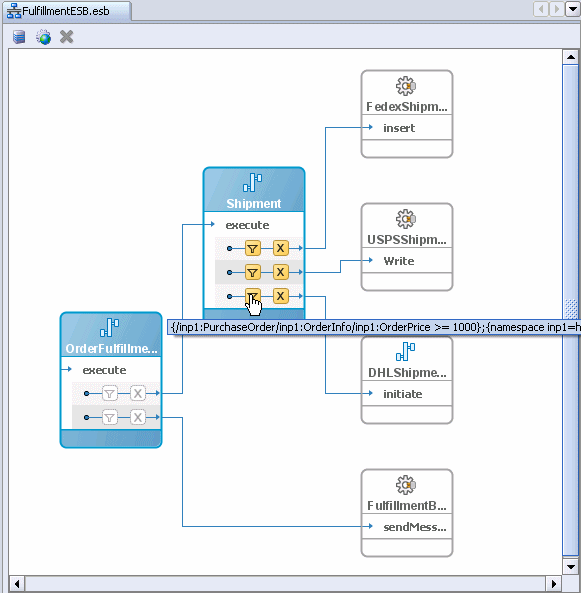
OrderFulfillment routing service, which routes messages to Shipment and FulfillmentBatch
Shipment routing service, which is responsible for sending shipment information to either USPS (USPSShipment) or Fedex (FedexShipment).
FulfillmentBatch JMS adapter, which is responsible for storing all fulfillment orders for overnight batch processing
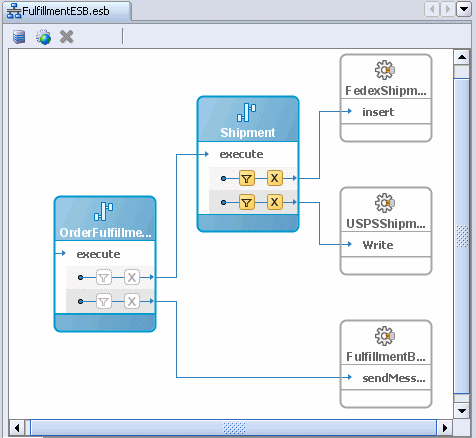
In Shipment, hover your mouse over the filter icons.
The first filter shows the following for orders to be shipped by Fedex:
/inp1:PurchaseOrder/inp1:OrderInfo/inp1:OrderPrice >= 500
The second filter shows the following for orders to be shipped by USPS
/inp1:PurchaseOrder/inp1:OrderInfo/inp1:OrderPrice < 500
As described and shown in previous chapters, after an order has been approved, Fulfillment sends the order to the appropriate shipping target. Orders under $500 are routed to USPS; orders $500 and over are routed to Fedex using these filters. USPS orders are sent through a file adapter and written to a file. Fedex orders are sent through database adapter and written to the FEDEX table in the database.
To familiarize yourself with designing ESB elements in the JDeveloper ESB Designer, you will create a third shipping target for DHL that uses a SOAP service for orders over $1000.
In this scenario, you will perform the following tasks:
To create the DHLShipment service:
Double-click the Shipment routing service
The Fullfillent_Shipment.esbsvc page displays with Routing Service information.
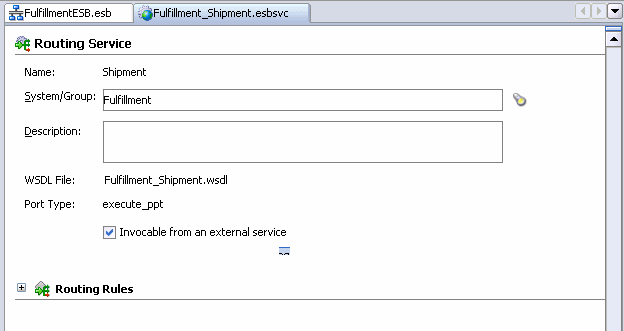
In the Routing Rules section, click the Expand the Routing Rule icon (+) sign to expand it.
Scroll to the far right, and click the green + icon to add another routing rule.
The Browse Target Service Operation dialog appears.
Expand Services at ESB Server Connection: OracleBookingIS > BPEL System > default > DHLShipment > DHLShipment_1_0.
DHLShipment is a service that you deployed in Chapter 2.
Under DHLShipment_1_0, click initiate.
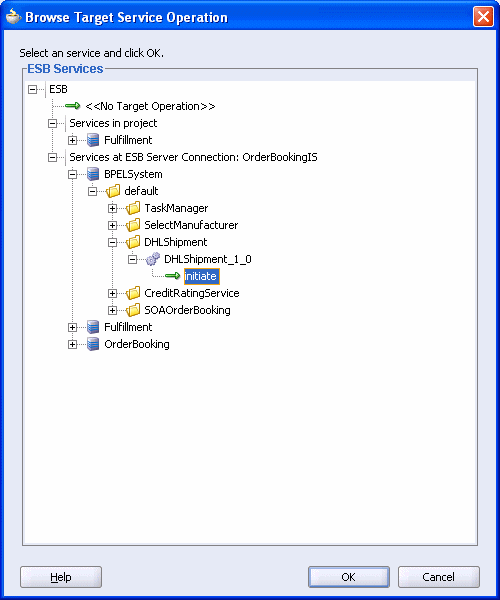
Click OK in the Browse Target Service Operation dialog.
The Routing Rules section now looks like this:
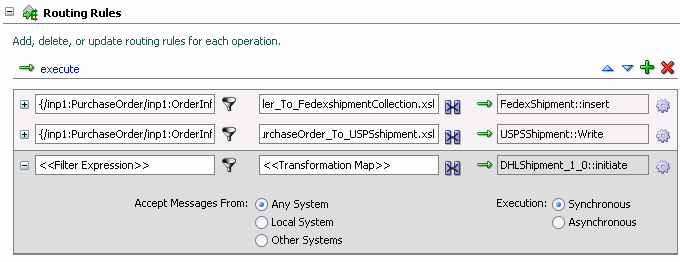
Create a filter to direct orders $1000 and over to DHLShipment.
Click the filter icon for the DHLShipment rule.
The Expression Builder dialog appears
In the WSDL Message section, expand PurchaseOrder > inp1:PurchaseOrder > inp1:OrderInfo, and then select inp1:OrderPrice.
The Content Preview box also shows the path: /inp1:PurchaseOrder/inp1:OrderInfo/inp1:OrderPrice
Click Insert Into Expression.
The path appears in the Expression box at the top of the dialog.
In the Expression box, append >= 1000 to the path, so that it now reads /inp1:PurchaseOrder/inp1:OrderInfo/inp1:OrderPrice >= 1000.
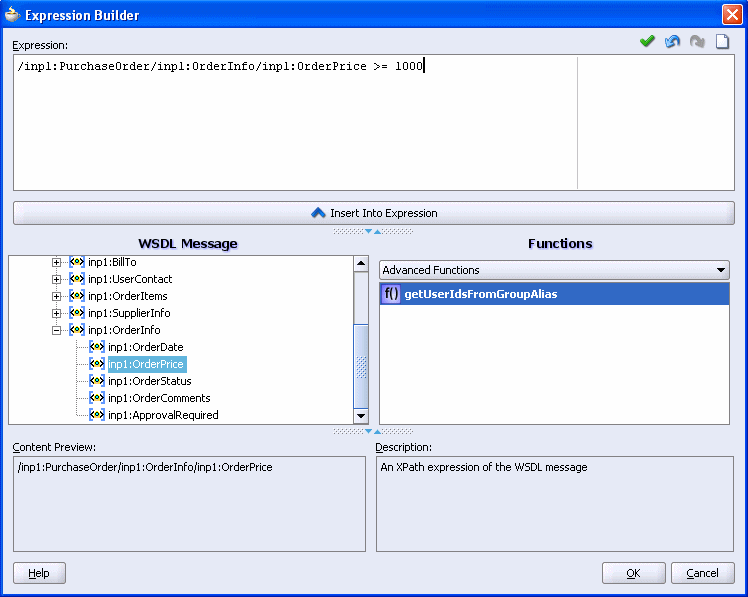
Click OK in the Expression Builder.
The Routing Rules section now looks like this:

Create a transformation so that the DHLShipment SOAP service gets the proper information:
In the Routing Rules section, click the transformation icon.
The Request Transformation Map dialog appears.
Select Use Existing Mapper File, and click the flashlight icon.
The Select XSL Transformation File dialog appears.
Expand Project XSL Files, and select PurchaseOrder_To_DHLShipmentProcessRequest.xsl.
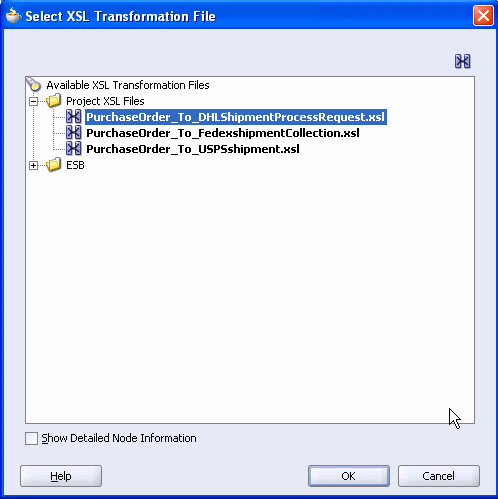
Click OK to return back to the Request Transformation Map dialog.
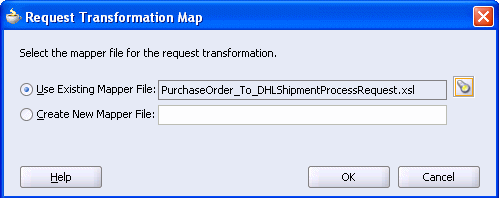
In the Request Transformation Map dialog, click OK.
Scroll to the far lower right, and click Asynchronous.
The Routing Rules section now looks like this:
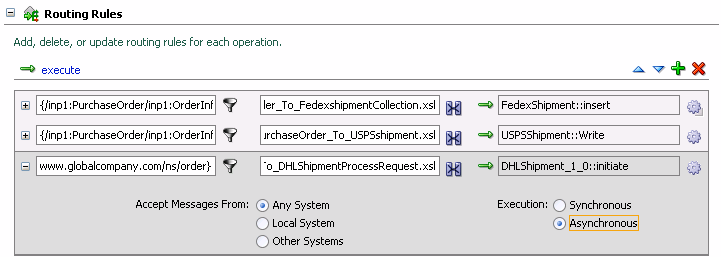
Select File > Save to save your work.
Close the Fulfillment_Shipment.esbsvc window by hovering your mouse over the tab and pressing X.
The FulfillmentESB.esb page updates. From Shipment, you should now see three arrows: one going to FedexShipment, a second one going to USPSShipment, and a third one going to DHLShipment.
If you hover your mouse over the filter icon third filter in Shipment, it shows the filter used for orders to be shipped by DHL:
/inp1:PurchaseOrder/inp1:OrderInfo/inp1:OrderPrice >= 1000
Now that you have modified and saved the FulfillmentESB, it is time to test it. To do that, deploy it to the server, and then place a new order for over $1000 to see if it is sent DHL.
To redeploy FulfillmentESB:
In the Application Navigator, right-click FulfillmentESB, and select Register to ESB > OrderBookingIS.
Click OK in the Summary dialog.
To place an order in the Web client:
In the welcome page, click the Browse products and create a new order link.
The Browse and Select Items page appears.
Click the Next 10 link, and select Ipod Mini 2 Gb.
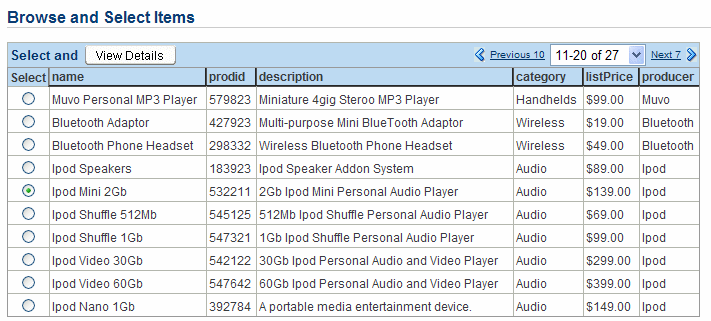
Click View Details.
The Item Details page appears. It displays detailed information about the product, and enables the user to select a quantity to add to their cart.

In the Quantity list, select 10, and click Add to cart.
Click Go to Shopping Cart.
The Shopping Cart Contents page appears.

Click Place order to submit the order.
The welcome page updates with an Order Submitted message.

If the Oracle BPEL Control is not running, select Start > All Programs > Oracle - Oracle - soademo > Oracle BPEL Process Manager > BPEL Control.
When prompted, enter oc4jadmin in the Username field and welcome1 in the Password field.
The Dashboard tab shows the order completed.
In Section 3.2, "Increasing Approval Order Amount from $1000 to $2000 and Resubmitting Order", you changed the approval amount. Therefore, the order should complete without approval. If you did not complete Section 3.2, then you must use the Worklist Application to approve the order. See Section 3.2 for further information on using the Worklist Application.
If the Oracle ESB Control is not running, select Start > All Programs > Oracle - Oracle - soademo > Oracle ESB > ESB Control.
When prompted, enter oc4jadmin in the Username field and welcome1 in the Password field.
Click the Instances icon, at the top of the screen, toward the right-hand side.
The Instances pane appears on the left-hand side. The Status column shows the OrderBooking and Fulfillment instances were successfully completed.
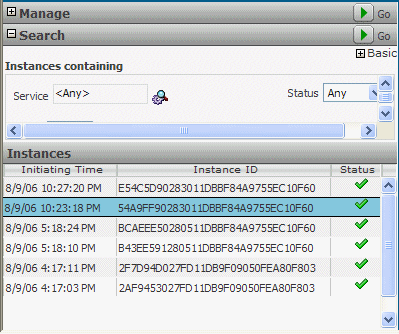
Click the instance at the top of the list.
This view shows the Shipment service routed the over $1000 order to the new DHLShipment service, as shown by the green line. However, also notice the green line extends from Shipment to FedexShipment. In other words, the product will be shipped by two different shipment vendors. This quick start did not ask you to adjust the routing rule for Fedex, which accepts orders for $500 or above. Therefore, you need to be careful when adding ESB elements to avoid unexpected results.
In a real-world enterprise, you would need to alter the filter rule for Fedex, so orders $500 and up to $1000 are routed to Fedex. By making this change, orders for $1000 and over would route only to DHL. To gain further experience with ESB, feel free to make this change yourself.
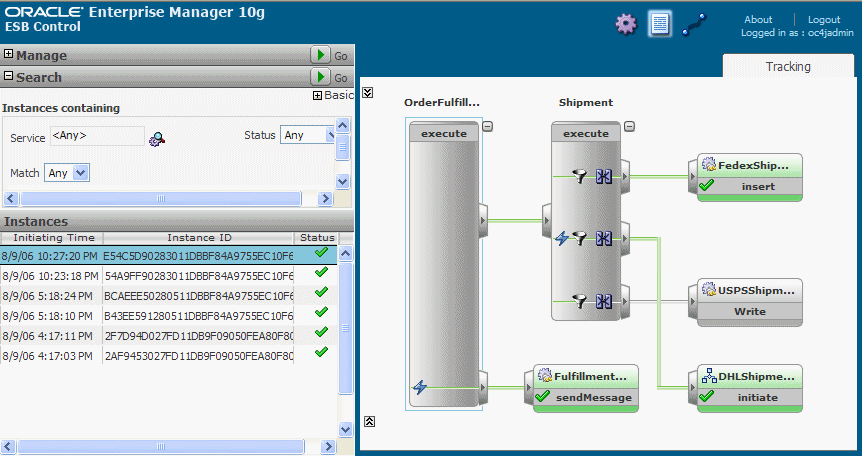
At the bottom of the Fulfillment instance, click the Expand icon.

Click the DHLShipment service.
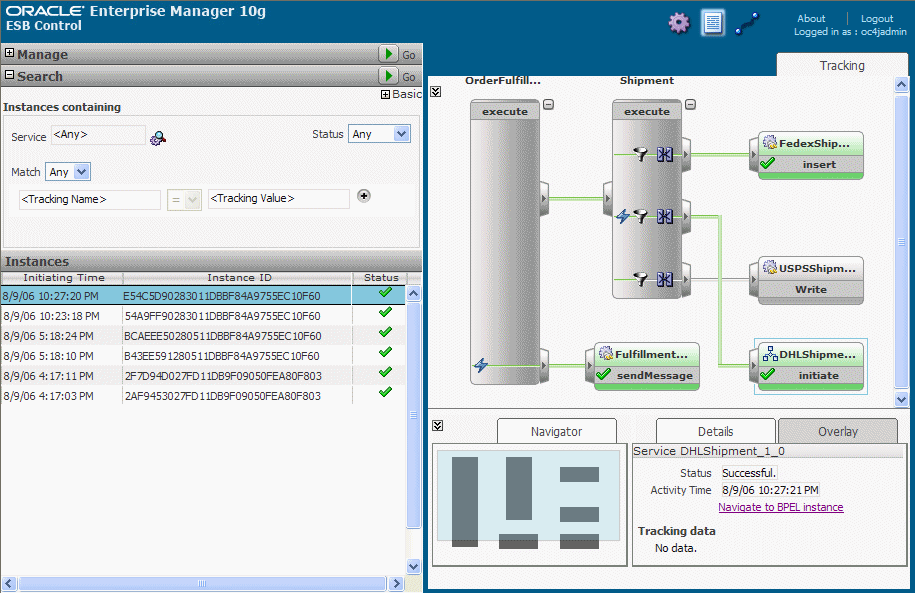
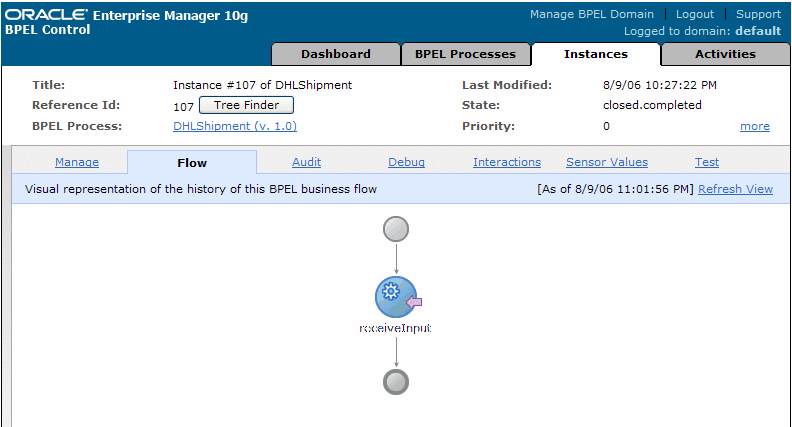
Click the Navigate to BPEL instance link to see the integration with the Oracle BPEL Control.
The Oracle BPEL Control displays with the Flow view for the DHLShipment service.
To learn about Oracle SOA Suite, refer to the following resources:
Oracle's Service-Oriented Architecture Technology Center:
http://www.oracle.com/technology/soa
Oracle Application Server Tutorial for a step-by-step approach for building the SOA Order Booking application yourself
Oracle SOA Suite Developer's Guide for an in-depth description of designing and developing an SOA application, using the SOA Order Booking application as an example