| Oracle® Identity Manager Design Console Guide Release 9.0 B25940-01 |
|
 Previous |
 Next |
| Oracle® Identity Manager Design Console Guide Release 9.0 B25940-01 |
|
 Previous |
 Next |
This chapter describes the full suite of development tools in Oracle Identity Manager. It contains the following topics:
Oracle Identity Manager provides a full suite of development tools that enable advanced System Administrators or developers to customize Oracle Identity Manager. This folder contains the following forms:
Adapter Factory: This form is used to create and manage the code, which enables Oracle Identity Manager to communicate with any IT Resource simply by connecting to that resource's API. This code is known as an adapter.
Adapter Manager: This form is used to compile multiple adapters simultaneously.
Form Designer: This form is used to create process and resource object forms that do not come packaged with Oracle Identity Manager.
Error Message Definition: This form is used to create the error messages that appears in dialog boxes when certain problems occur while using Oracle Identity Manager. In addition, this form enables a System Administrator or developer to define the error messages that users can access when they create error handler tasks using the Adapter Factory form.
The Development Tools/Business Rule Definition folder provides System Administrators and developers with the tools necessary to manage event handlers and data objects in Oracle Identity Manager. This folder contains the following forms:
Reconciliation Rules: This form is used to create and manage reconciliation rules in Oracle Identity Manager.
The Adapter Factory is a code-generation tool, provided by Oracle Identity Manager that enables a user to create Java classes, known as adapters. Figure 9-1 displays the Adapter Factory Form.
Adapters extend the internal logic and functionality of Oracle Identity Manager. In addition, they interface with any IT Resource, simply by connecting to that resource's API.
|
Note: For more information on adapters or the Adapter Factory, refer to Oracle Identity Manager Tools Reference Guide. |
The Adapter Manager form is located in the Development Tools folder. It is used to compile multiple adapters simultaneously, as shown in Figure 9-2.
Sometimes, the information required to provision resources to a target user or organization cannot be retrieved from any existing Oracle Identity Manager form. When this occurs, you need to use the Form Designer form (located in the Development Tools folder) to create a form with fields that contain the relevant information. Then, you have to assign this form to the process or resource object that is associated with provisioning resources to the user or organization. Figure 9-3 displays the Form Designer Form.
There are four reasons why Oracle Identity Manager displays a resource object or process form that a user creates using the Form Designer form. These reasons, in order of importance, are:
If the resource object form is attached to a resource object that is requested, and the Launch Object Form menu command is selected (by right-clicking the resource object from the Process Console tab of the Requests form).
When the resource object form is attached to a resource object that is direct provisioned.
If the process form is attached to the standard approval process, and the Launch Form menu command is selected (by right-clicking the process from the Process Console tab of the Requests form).
When the process form is attached to the appropriate provisioning process, and the Launch Form menu command is selected (by right-clicking the process from the Object Process Console tab of the Organizations or Users forms).
As an example, when Oracle Identity Manager or one of its users attempts to complete the resource object or process, the assigned form is triggered. When this occurs, either Oracle Identity Manager or a user populates the fields of this form. After the data is saved, the corresponding process or resource object can achieve a status of Completed, and Oracle Identity Manager can provision the appropriate resources to the target organizations or users.
For this example, the Solaris form (represented by the UD_SOLARIS name in the Table Name field) has been created and assigned to both the Solaris resource object and provisioning process.
|
Note: The table name contains theUD_ prefix, followed by the form name. So, for this example, since the name of the form is SOLARIS, its table name is UD_SOLARIS. |
The following table describes the data fields of the Form Designer form
| Field Name | Description |
|---|---|
| Table Name | The name of the database table that is associated with the form.
Note: The table name contains the |
| Description | Explanatory information about the form.
Important: The text that appears in the Description field is the name of the form. |
| Preview Form | When you click this button, the form appears. This way, you can see how it looks and functions before you make it active. |
| Form Type | These radio buttons are used to designate whether the form is to be assigned to a process or a resource object.
If you select the Process radio button, then the form is associated with an approval or provisioning process. By selecting the Object radio button, the form is to be assigned to a resource object. |
| Object Name | This is the name of the resource that can be provisioned (for example, a database, server, software application, file, or directory access). Also, referred to as a resource object name.
Double-click in this field to see the available resource object names. |
| Latest Version | The most recent version of the form. |
| Active Version | The version of the form that is used with the designated process or resource object.
Note: Once a version of the form appears in the Active Version field, it cannot be modified. |
| Current Version | This version of the form is the one being viewed and has information, which appears throughout the various tabs of the Form Designer form. |
| Create New Version | If you click this button, you can assign an additional name to the existing version of a form. As a result, you can modify this version, without impacting the original version of the form.
Note: If you create a new version of the form and click Refresh, the name that you provided for this version appears in the Current Version combo box. |
| Make Version Active | By clicking this button, you can specify that the current version of the form is be the one that is to be assigned to the process or resource object. In other words, this version is now active.
Note: Once a version of the form is active, it cannot be modified. Instead, you must construct an additional version of the form (by clicking the Create New Version button). |
Now that we have reviewed forms and the data fields of the Form Designer form, you are ready to create a form.
To create a form, perform the following steps:
Open the Form Designer form.
In the Table Name field, type the name of the database table that is associated with the form.
|
Note: The table name contains theUD_ prefix, followed by the form name. So, if the name of the form were SOLARIS, its table name would be UD_SOLARIS. |
In the Description field, enter explanatory information about the form.
If the form is assigned to an approval or provisioning process, select the Process radio button. If the form is to be assigned to a resource object, select the Object radio button.
Click Save. The form is created. In addition, the words Initial Version appear in the Latest Version field. This signifies that you can populate the tabs of the Form Designer form with information, so the form is functional with its assigned process or resource.
Once you launch the Form Designer form, and create a form, the tabs of this form become functional. The Form Designer form contains the following tabs:
Each of these tabs is covered in greater detail in the following sections.
Figure 9-4 displays the Additional Columns tab of the Form Designer Form. This tab is used to create and manage data fields. These data fields appears on the associated form that is created through the Form Designer form.
Figure 9-4 The Additional Columns Tab of the Form Designer Form
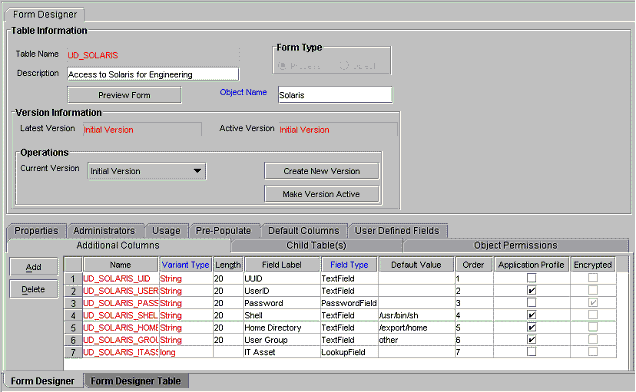
The following table contains various characteristics of the data fields.
| Name | Description |
|---|---|
| Name | The name of the data field, which appears in the database, and is recognized by Oracle Identity Manager.
Note: This name is comprised of the <TABLENAME_> prefix, followed by the name of the data field. So, if the name that appears in the Table Name field of the Form Designer form is UD_PASSWORD, and the name for the data field is USERNAME, the data field name, which appears in the database, and Oracle Identity Manager recognizes, would be UD_PASSWORD_USERNAME. |
| Variant Type | From this Lookup field, select the variant type for the data field. The variant type denotes the type of data that the field accepts.
This data field must be one of nine variant types: Byte, Double, Date, Byte Array, Boolean, Long, String, Short, and Integer. |
| Length | The length (in characters) of the data field. |
| Field Label | The label that is associated with the data field. This label appears next to the data field on the form that is generated by Oracle Identity Manager. |
| Field Type | From this Lookup field, select the data type of the data field. The data type represents how the data appears within the field.
This data field must be one of the following nine data types:
|
| Default Value | This value appears within the associated data field once the form is generated, and if no other default value has been specified from the scenarios listed below:
|
| Order | The sequence number, which represents where the data field is positioned on the generated form.
For example, a data field with an order number of 2 appears below a data field with an order number of 1. |
| Application Profile | This check box is used to designate whether the most-recent value of this field should appear on the Object Profile tab of the Users form once the resource associated with this form has been provisioned to the user, and achieved a status of Enabled.
If this check box is selected, the label and value of this field appears on the Object Profile tab of the Users form for users provisioned with the resource. If this check box is cleared, the value of this field does not appear on the Object Profile tab of the Users form for users provisioned with the resource. |
| Encrypted | This check box is used to determine whether the information, which appears within the associated data field, is to be encrypted when it is transmitted between the Server and the Client.
If this check box is selected, the information that is displayed within the data field will be encrypted when it is transmitted between the Client and the Server. When this check box is cleared, the information that appears in the data field will not be encrypted as it is transmitted between the Server and the Client. |
|
Important: When creating a data field of text (field type) with the Encrypted option selected, the values appears as clear text in the Administrative and User Console and the data will be encrypted in the database.When creating a data field of password (type field) with the Encrypted option selected, the value appears as asterisks (*) in the Administrative and User Console and the data will be encrypted in the database. |
Now that we have reviewed the relationship between data fields and a form, you will learn how to add a data field to a form. In addition, once a data field is no longer valid, you will learn how to remove it from the form.
To add a data field to a form, perform the following steps:
Click Add. A blank row appears within the Additional Columns tab.
In the Name field, enter the name of the data field, which appears in the database, and is recognized by Oracle Identity Manager.
|
Note: This name is comprised of the <TABLENAME_> prefix, followed by the name of the data field.So, if the name that appears in the Table Name field is |
Double-click the Variant Type lookup field. From the Lookup window that appears, select the variant type for the data field. Currently, a data field can have one of nine variant types: Byte, Double, Date, Byte Array, Boolean, Long, String, Short, and Integer.
In the Length field, enter the length (in characters) of the data field.
In the Field Label field, enter the label that will be associated with the data field. This label appears next to the data field on the form that is generated by Oracle Identity Manager.
Double-click the Field Type lookup field. From the Lookup dialog box that is displayed, select the data type for the data field. Presently, a data field can have one of nine data types: Text Field, Lookup Field, Text Area, IT Resource Lookup Field, Date Field, Check Box, Password Field, Radio Button, and Combo Box.
|
Note: For more information on data types, refer to the table, which appears earlier in this section. |
In the Default Value field, enter the value that appears within the associated data field once the form is generated, and if no other default value has been specified.
|
Note: For more information on the scenarios where a default value could be set, refer to the table that appears earlier in this section. |
In the Order field, enter the sequence number, which will represent where the data field will be positioned on the generated form. For example, a data field with an order number of 2 appears below a data field with an order number of 1.
If you want a specific organization or user's values to supersede the value that appears in the Default Value field, select the Application Profile check box. Otherwise, proceed to Step 10.
If you want the information that appears within the data field to be encrypted when it is transmitted between the Client and the Server, select the Encrypted check box. Otherwise, proceed to Step 11.
Click Save. The data field is added to the form.
Figure 9-5 displays the Child Table(s) tab on the Form Designer Form.
Figure 9-5 The Child Table(s) Tab of the Form Designer Form
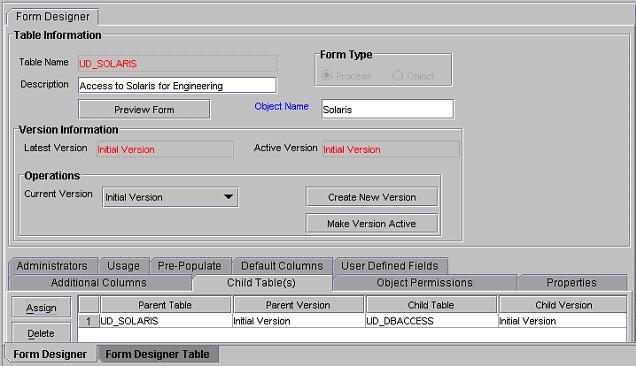
Sometimes you may have to add the same data fields to multiple forms that are created using the Form Designer form. There are two ways to do this:
You can add the data fields to each form manually, through the form's Additional Columns tab.
You can group the data fields together and save them under one form name. Then, you can assign this form to each form that requires these data fields.
This form, which contains the data fields that are required by another form, is known as a child table.
Assigning child tables to a form increases your efficiency as a user. Without child tables, for every form that needs data fields, you would have to set the parameters for each field. So, if five forms require the identical data field, you would have to set the parameters for this field five, separate times (one for each form).
If you use a child table for one form, and then decide that you want to apply it to another form, Oracle Identity Manager enables you to do so. Simply remove the child table from the first form, and assign it to the target form. This way, the child table that you assign to one form can be reused for all forms created with the Form Designer form.
In addition, you can configure Oracle Identity Manager to perform one of the following actions within a column of a child table:
Insert. Add a new value to the designated column of the child table.
Update. Modify an existing value from the corresponding column of the child table.
Delete. Remove a value from the designated column of the child table.
|
Note: For more information on setting up Oracle Identity Manager to insert, edit, or delete a value from within a column of a child table, refer to "The Process Definition Form". |
For this example, the UD_SOUTH child table is assigned to the Results of 1Q 2004 Sales form (represented by the UD_SALES2 table name). Once this form is launched, the data fields contained within the UD_SOUTH child table appears within the form.
Now that we have reviewed child tables, you will learn how to assign a child table to a form. In addition, when you no longer want the data fields of a child table to appear on a form, you will learn how to remove a child table from a form.
|
Important: If the form, which is represented by the child table, has not been made active, you cannot assign it to the parent form. |
To assign a child table to a form, perform the following steps:
Click Assign. The Assignment window is displayed.
From this window, select the child table, and assign it to the form.
Click OK. The selected child table is assigned to the form.
|
Important: If the form, which is represented by the child table, has not been made active, it will not appear within the Assignment window. As a result, you cannot assign it to the parent form. |
Figure 9-6 displays the Object Permissions tab of the Form Designer Form. This tab is used to select the user groups that can add, modify, and/or remove information from within the custom form when it is instantiated.
Figure 9-6 The Object Permissions Tab of the Form Designer Form
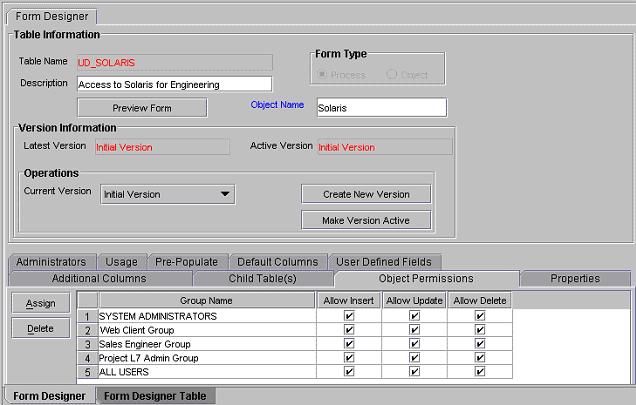
In addition, the Allow Insert, Allow Update, and Allow Delete check boxes are visual indicators of the privileges that a user group has with the form. When the Allow Insert check box is selected, the corresponding user group can add information into the fields of the user-created form. If this check box is cleared, the user group cannot populate the fields of this form.
Similarly, when the Allow Update check box is selected, the associated user group can modify existing information in the fields of the user-created form. If this check box is cleared, the user group cannot edit the fields of this form.
Lastly, when the Allow Delete check box is selected, the corresponding user group can delete data from instantiations of the user-created form. If this check box is cleared, the user group cannot delete data from fields of this form (when it is instantiated).
For this example, the SYSTEM ADMINISTRATORS user group can create, modify, and delete information that appears in the Results of 1Q 2004 Sales form (represented by the UD_SALES2 name in the Table Name field). The IT DEPARTMENT user group can only delete records of this form (Its Allow Insert and Allow Update check boxes are cleared.). The HR DEPARTMENT user group can create and modify information from within the Results of 1Q 2004 Sales form. However, because the Allow Delete check box is cleared, this user group is not able to delete this information.
Now that we have reviewed the Object Permissions tab, you will learn how to assign a user group to a user-created form, and remove a user group from a user-created form.
To assign a user group to a user-created form, perform the following steps:
Click Assign. The Assignment dialog box is displayed.
Select the user group, and assign it to the form that was created by a user.
Click OK. The user group appears in the Object Permissions tab.
If you do not want this user group to be able to add information into a record of the user-created form, double-click the corresponding Allow Insert check box. Otherwise, proceed to Step 5.
If you do not want this user group to be able to modify information from within a record of the user-created form, double-click the associated Allow Update check box. Otherwise, proceed to Step 6.
If you do not want this user group to be able to delete a record of the user-created form, double-click the corresponding Allow Delete check box. Otherwise, proceed to Step 7.
Click Save. The user group is assigned to the user-created form.
Figure 9-7 displays the Properties Tab of the Form Designer Form. This tab is used to assign properties and property values to the data fields, which appear on the form that is created through the Form Designer form.
Figure 9-7 The Properties Tab of the Form Designer Form
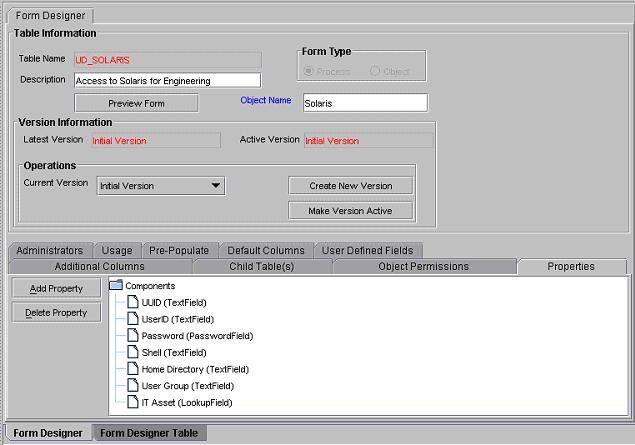
For this example, the Results of 1Q 2004 Sales form are comprised of two data fields: User Name and Password. Each data field contains the following properties:
Required, which determines whether the data field needs to be populated for the generated form to be saved. The default property value for the Required property is false.
Visible Field, which establishes whether the data field appears on the form, once Oracle Identity Manager generates the form. The default property value for the Visible Field property is true.
Since the property values for the Required and Visible Field properties are true for both data fields, once the Results of 1Q 2004 Sales form is generated, both of these data fields appears. In addition, each field needs to be populated for the form to be saved.
Now that we have reviewed how properties and property values relate to data fields, you will learn how to add a property and property value to a data field. Also, when a property and property value are no longer valid for a data field, you must remove them from the data field.
|
Note: The Properties tab will be disabled until you create a data field for the form, using the Additional Columns tab. For more information on the properties and property values you can select, refer to "Data Types". |
To add a property and property value to a Data Field, perform the following steps:
Highlight the data field to which you want to add a property and property value.
Click Add Property. The Add Property dialog box is displayed, as shown in Figure 9-8.
|
Note: The text that appears in the Column Name and Column Type text boxes reflects the name and type of the data field you selected. |
In this example, the User Name data field has been selected (as indicated by User Name appearing within the Column Name field). In addition, the data type of this field is a text field.
The following table will help you understand the various regions of the Add Property dialog box.
| Name | Description |
|---|---|
| Column Name | The name of the data field. |
| Column Type | The data type of the data field. |
| Property Name | From this combo box, select the property for the data field. |
| Property Value | In this text box, enter the property value, which is associated with the property that appears within the Property Name combo box. |
|
Note: The menu items displayed within the Property Name combo box reflect the data type of the selected data field. |
Set the parameters for the property and property value that you are adding to the data field. Figure 9-9 displays values filled in the Add Property dialog box.
Figure 9-9 The Add Property Dialog Box - Filled
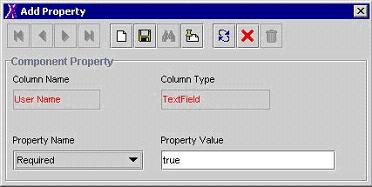
For this example, since the value of the Required property for the User Name data field has been set to true, once the associated form is generated, this field must be populated. Otherwise, the form cannot be saved.
|
Note: For more information on which parameters and property values to select, refer to "Data Types". |
From the Add Property window's Toolbar, click Save.
Click Close. The property and property value are added to the data field.
To add a property and property value for customized lookup query, perform the following steps:
Highlight the data field to which you want to add a property and property value.
Click Add Property. The Add Property dialog box is displayed, as shown in Figure 9-10.
|
Note: The text that appears in the Column Name and Column Type text boxes reflects the name and type of the data field you selected (from the Properties tab of the Form Designer). |
In this example, the Name data field has been selected (as indicated by Name appearing within the Column Name field). In addition, the data type of this field is a lookup field.
The combo boxes of the Add Property dialog box are used to help build the "where" clause in the custom lookup query. As you select the values for each box (from the drop-down menu), the where clause (the "WHERE" word is not added automatically) is appended to the custom lookup query.
The following table will help you understand the various regions of the Add Property dialog box. The initial state of all the fields are disabled. Once you have defined the "lookup query" and click Save, the fields become active.
| Name | Description |
|---|---|
| Column Name | The name of the data field. |
| Column Type | The data type of the data field. |
| Property Name | From this combo box, select the property for the data field. |
| Property Value | In this text box, enter the property value, which is associated with the property that appears within the Property Name combo box.
In the case of a lookup query, you need to specify both the Oracle Identity Manager form and field, which will be referenced for the query and will be recognized by the database. For example, if Oracle Identity Manager is referring to the user's login, you would enter in the Property Value field, "select usr_key fromusr". After clicking the Save button, the Filter Column is active with all the columns of tables. |
| Filter Column | This is the Oracle Identity Manager form field that is referenced for the lookup query, and which is recognized by the database. This field is populated with all columns of table specified in the Property Value field. If multiple tables are used in the query, then all tables are shown.
For example, "usr.USR_LOGIN" signifies that Oracle Identity Manager will refer to User Login field from the Users form for the lookup query. |
| Source | After the Filter Column variable is selected, the Source field is populated with all possible sources of value. The list of values in this field is dependent upon the type of form, for which the lookup field is being defined. For instance, the list displayed is different if the lookup query is for a Object Form or a Process Form. The Source field is a "user-friendly" name for the value that appears within the Filter Column combo box.
For example, Requester Information refers to the usr.USR portion of the Filter Column value. |
| Field | This field is populated based on what value is selected in the Source field. Use this field in creating the "select" statement, which is needed for the column name.
For example, the User Login corresponds to the _LOGIN part in the Filter Column value. |
|
Note: The menu items displayed within the Property Name combo box reflect the data type of the selected data field.Also, the Source and Field combo boxes of the Add Property dialog box are applicable only when Lookup Query appears within the Property Name. |
Set the parameters for the property and property value that you are adding to the data field.
To remove a property and property value from a data field, perform the following steps:
Highlight the property and property value that you want to remove.
Click Delete Property. The property and its associated value are removed from the data field.
Figure 9-12 displays the Administrators tab of the Form Designer Form. This tab is used to select the user groups that can view, modify, and delete the current record of the form that was created by a user using the Form Designer form.
Figure 9-12 The Administrators Tab of the Form Designer Form

In addition, the Write and Delete check boxes are visual indicators of the privileges that a user group has with the record. When the Write check box is selected, the corresponding user group can view and modify information for the current record of the form. If this check box is cleared, the user group cannot view or edit information for this record.
Similarly, when the Delete check box is selected, the associated user group can remove information from the current record of the form. If this check box is cleared, the user group cannot delete information from this record.
Now that we have reviewed the Administrators tab, you will learn how to assign administrative privileges to a user group for a record of a user-created form, and remove administrative privileges from a user group for a record of a user-created form.
To assign administrative privileges to a user group for a record of a user-created form:
Click Assign.The Assignment dialog box is displayed.
Select the user group, and assign it to the record of the user-created form.
Click OK. The user group appears in the Administrators tab.
If you want this user group to be able to create and/or modify information for the current record of the user-created form, double-click the corresponding Write check box. Otherwise, proceed to Step 5.
If you want this user group to be able to remove information from the current record of the user-created form, double-click the associated Delete check box. Otherwise, proceed to Step 6.
Click Save. The user group now has administrative privileges for this record of the user-created form.
To remove administrative privileges from a user group for a record of a user-created form, perform the following steps:
Highlight the user group that you want to remove.
Click Delete. The user group no longer has administrative privileges for this record of the user-created form.
Figure 9-13 displays the Usage tab of the Form Designer Form. In this tab, you can see the resource objects and/or processes to which the current form has been assigned.
Figure 9-13 The Usage Tab of the Form Designer Form
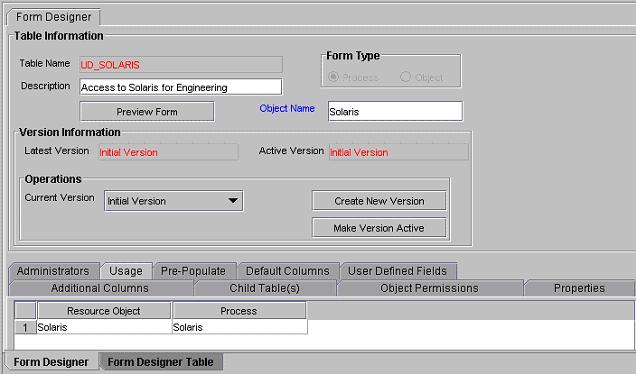
For this example, the Solaris form (represented by the UD_SOLARIS name in the Table Name field) has been created and assigned to both the Solaris resource object and provisioning process.
|
Note: The table name contains the UD_ prefix, followed by the form name. So, for this example, since the name of the form is Solaris, its table name is UD_SOLARIS.This tab will be populated with information only after you click the Make Version Active button, and attach the form to a resource object or provisioning process. |
This tab is used to:
Attach a pre-populate adapter to a data field of the user-created form.
Select the rule that will determine if this adapter will be executed to populate the designated data field with information.
Set the priority number for the selected rule.
Map the adapter variables of the pre-populate adapter to their proper locations.
|
Note: For more information on pre-populate adapters, attaching pre-populate adapters to fields of user-created forms, or mapping the variables of a pre-populate adapter, refer to Oracle Identity Manager Tools Reference Guide. |
A form, which is created by using the Form Designer form, is comprised of two types of data fields:
Data fields that are created by a user (using the Additional Columns tab)
Data fields that are created by Oracle Identity Manager, and added to the form, once the form is created
Through the Default Columns tab, you can see the names, variant types, and lengths of the data fields, which are added, by default, to a user-created form. As a result, by viewing these data fields, you can see all data fields for this type of form, without launching SQL*Plus, or a similar database application.
This tab is used to view and access any user-defined fields that have been created for the Form Designer form. Once a user-defined field has been created, it appears on this tab and be able to accept and supply data.
|
Note: For instructions on how to create fields for user-created forms, refer to "The User Defined Field Definition Form". |
Sometimes, when you create a form, and populate the tabs of the Form Designer form with information, so the form will work with the process or resource object to which it will be assigned, you may wish to create a different version of the form. This way, you can modify this version, without impacting the original version of the form.
The following procedure will show you how to create an additional version of a form.
Open the Form Designer form.
Query for the specific form of which you want to create a different version.
Click the Current Version combo box. From the drop-down menu that appears, select the version of the form of which you are creating an additional version.
Click the Create New Version button. The Create a New Version window is displayed.
In the Label field, enter the name of the additional version of the form.
From the Create a New Version window's Toolbar, click Save.
Then, from this Toolbar, click Close. The additional version of the form is created. When you click the Current Version combo box, the version's name, which you entered into the Label field in Step 5, appears. By selecting this version, you can populate the tabs of the Form Designer form with information, without impacting the original version of the form.
The Error Message Definition form, as shown in Figure 9-14, is located in the Development Tools folder. It is used to:
Create the error messages that appears in dialog boxes when certain problems.
Define the error messages that users can access when they create error handler tasks using the Adapter Factory form.
|
Note: For more information on creating error handler tasks, refer to Oracle Identity Manager Tools Reference Guide. |
Figure 9-14 The Error Message Definition Form
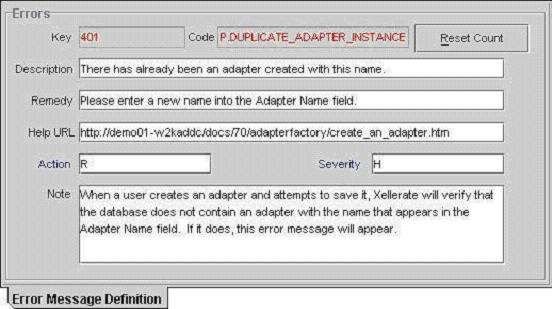
The following table describes the data fields of the Error Message Definition form.
Now that we have reviewed error message definitions and the data fields of the Error Message Definition form, you are ready to create an error message.
To create an error message, perform the following steps:
Open the Error Messaging Definition form.
In the Code field, enter a code that represents the error message definition.
In the Description field, enter a description of the error message.
In the Remedy field, you can enter a description of how to fix the condition that causes the error message to appear.
In the Help URL field, you can enter the link to the URL that contains an online Help topic for this error message.
Optional. Double-click the Action Lookup field. From the Lookup dialog box that appears, you can select a code that represents the seriousness of the condition that causes the error message to appear. These codes, listed by degree of seriousness (from lowest to highest), are:
Error (E). Oracle Identity Manager stores the error message, and stops any related operations from being triggered. Instead, it rolls back to the previous operation.
Reject (R). Oracle Identity Manager stores the rejection message, but does not prevent subsequent operations from being executed.
Fatal Reject (F). Oracle Identity Manager stores the rejection message, and stops any subsequent operations from being triggered. However, it keeps all operations that were executed up to the fatal rejection.
Optional. Double-click the Severity Lookup field. From the Lookup dialog box that appears, you can select a code (None (N), Low (L), Medium (M), High (H), or Crash (C)). This code represents a more-detailed classification of the code that appears in the Action lookup field.
In the Note field, you can enter explanatory information about the error message.
Click Save. The error message is created. Oracle Identity Manager will populate the Key field with a unique identification number. Once a condition arises that causes this error message to appear, the text in the Description field appears in a dialog box.
|
Tip: If you have created an error message definition, and you want to reset how many times the error message appears; you can do so by clicking the Reset Count button. Once you click this button, the counter will be reset to 0. |