| Oracle® Application Server Developer's Guide for Microsoft Office Interoperability 10g Release 3 (10.1.3.1.0) Part Number B28947-01 |
|
|
View PDF |
| Oracle® Application Server Developer's Guide for Microsoft Office Interoperability 10g Release 3 (10.1.3.1.0) Part Number B28947-01 |
|
|
View PDF |
This chapter shows how to invoke an enterprise application directly from a Microsoft Office document.
This chapter contains the following sections:
Microsoft Office 2003 Professional provides facilities for invoking enterprise Web applications. These facilities enable enterprises to combine the familiar user interface of Microsoft Office with the ability to invoke enterprise applications in context when the user needs access to more detailed information.
Users can use Microsoft Office as a familiar user interface to access enterprise information. Sometimes a casual user may discover that he or she needs access to more detailed information, typically accessed through a Web application hosted on an enterprise portal. Microsoft Office 2003 Professional offers a number of options such as the following for using an Internet browser in order to invoke a Web application from the context of a Microsoft Office document:
Static hyperlinks; for more information, refer to Section 11.3.1, "Embedding a Static Hyperlink to Invoke an Enterprise Portal".
Microsoft Visual Basic for Application (VBA) code; for more information, refer to Section 11.3.2, "Using VBA Code to Invoke an Enterprise Portal".
Smart tags; for more information, refer to Section 11.3.3, "Using Smart Tags to Invoke an Enterprise Portal".
To perform the steps outlined in this chapter, you must install the following software:
Oracle JDeveloper 10g Release 3 (10.1.3.1.0)
Microsoft Office 2003 Professional, specifically Microsoft Word 2003
Microsoft Internet Explorer 6.0, Mozilla Firefox 1.0, or equivalent browser
The smart document template created in Chapter 5, "Completing Forms and Entering Data Using Microsoft Office"
The support files in the smarttags demonstration folder. Refer to Accessing the Demonstration Support Files in the Preface for details about the demonstration support files. The support files in the smarttags demonstration folder are listed and described in Table 11-1.
Table 11-1 Smarttags Files
| File or Folder | Description |
|---|---|
|
unionloan_home.htm |
A dummy home page for the Union Loan Portal. Download this file to your local file system. We recommend that you download it to:
If you download this to another location, you must edit the code in Section 11.3.3, "Using Smart Tags to Invoke an Enterprise Portal" to point to the appropriate location. |
|
unionloan_menu.gif |
One of the graphics that makes up the Union Loan Portal home page. Download this file to the same location as |
|
unionloan_dashboard.gif |
One of the graphics that makes up the Union Loan Portal home page. Download this file to the same location as |
|
Employee Information.dot |
The template document created in Chapter 5, "Completing Forms and Entering Data Using Microsoft Office". Download this file to your local file system. We recommend that you download it to:
|
This chapter provides the following examples of how to enable a Microsoft Office smart document to invoke an enterprise portal:
These examples are based on the custom Human Resources enterprise application used by Union Loan Company. This application is used by HR and administrative personnel. You retrieve a subset of the enterprise data through a Microsoft Word 2003 Professional application (such as the smart document described in Chapter 5, "Completing Forms and Entering Data Using Microsoft Office"). Sometimes you need more data to perform their business task. For this reason, the ability to invoke the HR enterprise application hosted in the Union Loan Company portal must be added to the Microsoft Word smart document.
The most simple and direct way of adding browser invocation to a Microsoft Office template is by providing a static hyperlink (URL). When you move a mouse pointer over the hyperlink in the document, Microsoft Office displays a pop-up window telling you to press the CTRL key and click the link to open a browser and go to the specified address. The browser that is opened will be the default system browser, as defined by the operating system. One limitation of this approach of invoking a portal by means of static hyperlinks is that the URL can contain only static parameters as part of the string, that is, the destination of the hyperlink is fixed. However, for many enterprisewide portals this restriction will not be an issue.
To create a hyperlink in a Microsoft Office smart document, perform the following steps:
Start Microsoft Word.
Open the template you created in Chapter 5, "Completing Forms and Entering Data Using Microsoft Office" (Employee Information.dot).
|
Tip: If you have not created this template, use the template you downloaded in Section 11.2, "Prerequisites". |
If necessary, from the Tools menu, select Unprotect Document and enter the appropriate password when prompted.
|
Note: If a document is protected, you must remove the protection before attempting to edit the document, otherwise edits may have unexpected results. |
Place the cursor at the bottom of the template.
Enter the following text to introduce the hyperlink:
For more details, go to the
From the Insert menu, select Hyperlink.
In the Text to display field, enter Employee Portal. This text is displayed in underlined blue font in the template, and is the text that users will click to invoke the portal.
In the Address field, enter the URL of the portal that you want to invoke. For our example, you must select the page you installed in Section 11.2, "Prerequisites", but this could be any URL.
Click OK.
Save and close the template.
In Windows Explorer, double-click the template to create a document based on the template.
Move your mouse pointer over the hyperlink.
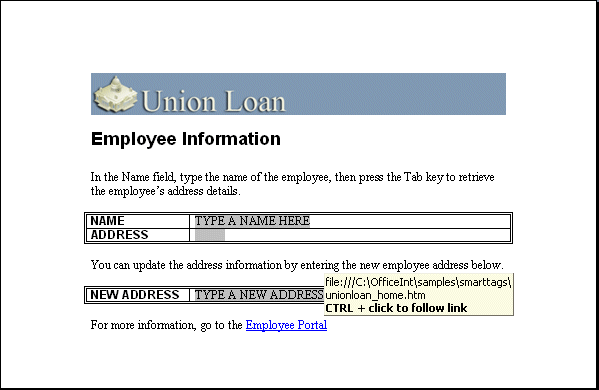
A pop-up appears indicating that you can press the CTRL key and click the URL, as shown in Figure 11-1.
Figure 11-1 Smart Document with Hyperlink that Invokes the Employee Portal

Another way of invoking an enterprise portal is to write VBA code. This code can be initiated by a button in the template document or in its task pane. One advantage of this approach is that it lets you programmatically structure the URL, enabling you to add parameters to the URL, which can be derived from data in the document, for example, from form fields.
To create a button in a Microsoft Office smart document that invokes a portal, perform the following steps:
Start Microsoft Word.
Open the template you created in Chapter 5, "Completing Forms and Entering Data Using Microsoft Office" (Employee Information.dot)
|
Tip: If you have not created this template, use the template you downloaded in Section 11.2, "Prerequisites". |
If necessary, from the Tools menu, select Unprotect Document and enter the appropriate password when prompted.
|
Note: If a document is protected, you must remove the protection before attempting to edit the document, otherwise edits may have unexpected results. |
Place the cursor at the bottom of the template.
From the View menu, select Toolbars, then select Control Toolbox.
In the Control Toolbox, click the Command Button icon (see Figure 11-2).
Figure 11-2 The Command Button Icon in the Control Toolbox

Right-click the new button and select Properties from the shortcut menu.
|
Tip: If the shortcut menu does not appear, make sure that you are in Design Mode, by clicking the Design Mode icon in the Control Toolbox. |
In Caption field, enter Employee Portal.
Close the Properties window.
Resize the button to show the caption.
Double-click the button. This opens the Microsoft Visual Basic Editor.
Replace the generated subroutine CommandButton1_Click() with the code shown in Example 11-1:
Example 11-1 VBA Code to Invoke Employee Portal
Private Declare Function ShellExecute Lib _
              "shell32.dll" Alias "ShellExecuteA" _
              (ByVal hwnd As Long, _
               ByVal lpOperation As String, _
               ByVal lpFile As String, _
               ByVal lpParameters As String, _
               ByVal lpDirectory As String, _
               ByVal nShowCmd As Long) As Long

Private Const SW_SHOW = 1

Public Sub Navigate(ByVal NavTo As String)

  Dim hBrowse As Long
  hBrowse = ShellExecute(0&, "open", NavTo, "", "", SW_SHOW)

End Sub

Private Sub CommandButton1_Click()

Navigate "<URL>"

End Sub
Replace <URL> in the body of the code with the URL of the portal you want to invoke. For our example, use the URL of the page you downloaded in Section 11.2, "Prerequisites", but this could be any URL:
C:\OfficeInt\samples\smarttags\unionloan_home.htm
Save the project.
Exit the Microsoft Visual Basic Editor and return to Microsoft Word.
Save and close the template.
In Windows Explorer, double-click the template to create a document based on the template.
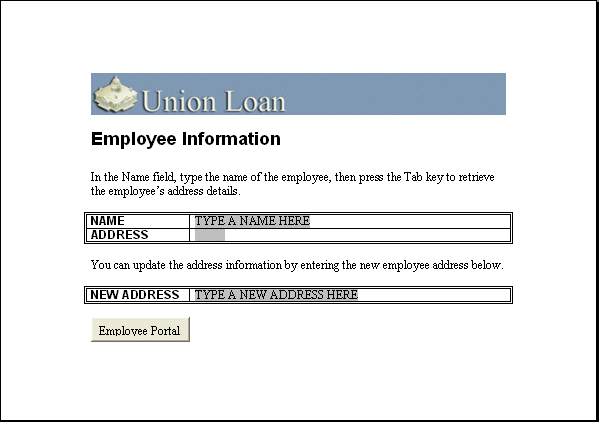
The document should look something like Figure 11-3.
Figure 11-3 Smart Document with Button that Invokes the Employee Portal

Click Employee Portal.
A new browser window opens at the specified URL address.
If you wanted to programmatically construct a URL in Visual Basic, you could write something like the code shown in Example 11-2:
Example 11-2 Programmatically Constructing a URL
Private Sub CommandButton1_Click()
ActiveDocument.Fields(1).Result.Text = "PersonalLoans.htm"
Navigate "file:///C:/OfficeInt/samples/smarttags/" &
 ActiveDocument.Fields(1).Result.Text
End Sub
This code constructs the URL from a static string to which the value of the first form field is appended. For the purposes of this example, the value of the field is set to PersonalLoans.htm, but it could be a user-entered value, or one retrieved from a Web service (see Chapter 5, "Completing Forms and Entering Data Using Microsoft Office".)
Another way of invoking an enterprise portal is to use the smart tag mechanism in Microsoft Office 2003 Professional. Smart tags are recognizers that scan the document as the user is typing. Whenever a specified phrase (that is, a literal text string, or a regular expression) for a smart tag is recognized, an associated action class is invoked. In principle, a newly developed smart tag is available to all document templates, but it must be enabled explicitly for each template to which it should apply.
Developing new smart tags typically involves Visual Studio to create the action class that must be packaged with an XML deployment descriptor that defines the tag. However, Microsoft Office Professional also comes with a set of standard tags and associated default actions, the Microsoft Office Smart Tag List (MOSTL). Using the MOSTL tags and actions simplifies the development process to authoring an XML document that conforms to the MOSTL schema and placing it in the Microsoft Office installation directory. This declarative approach does have some limitations, notably in terms of parameters that can be accessed dynamically. Standard MOSTL tags for URL invocation can access only the recognized strings, not other values in the document (such as field values).
For information on where to find additional documentation about smart tags, refer to Section 11.5, "Related Documentation".
In this section, you will create a simple MOSTL tag that uses the predefined action to invoke a Web browser.
To create a MOSTL tag:
Start a standard XML editor, for example, Oracle JDeveloper or Macromedia Dreamweaver.
Create the sample XML document using the code shown in Example 11-3, which adheres to the standard MOSTL schema:
Example 11-3 XML Code for MOSTL Smart Tag
<FL:smarttaglist xmlns:FL="urn:schemas-microsoft-com:smarttags:list">
  <FL:name>Employee Portal Invocation</FL:name>
  <FL:lcid>1033,0</FL:lcid>
  <FL:description>Invoke the employee portal</FL:description>
  <FL:moreinfourl>http://msdn.microsoft.com/msdnmag</FL:moreinfourl>
  <FL:updateable>false</FL:updateable>
  <FL:autoupdate>false</FL:autoupdate>
  <FL:lastcheckpoint>0</FL:lastcheckpoint>
  <FL:lastupdate>0</FL:lastupdate>
  <FL:updateurl></FL:updateurl>
  <FL:updatefrequency>0</FL:updatefrequency>
  <FL:smarttag type="urn:schemas-microsoft-com:office:smarttags#launch">
    <FL:caption>Launch Employee Portal</FL:caption>
      <FL:re>
        <FL:exp>Employee Portal</FL:exp>
      </FL:re>
    <FL:actions>
      <FL:action id="launch">
        <FL:caption>Launch Employee Portal</FL:caption>         <FL:url>
          file:///C:/OfficeInt/samples/smarttags/unionloan_home.htm
        </FL:url>
      </FL:action>
    </FL:actions>
  </FL:smarttag>
The first section of this XML file defines a set of general properties for the tag, for example, its location and if it is centrally updatable. The section <FL:exp>Employee Portal</FL:exp> defines the recognizer string, and the section <FL:url>file:///C:/OfficeInt/samples/smarttags/unionloan_home.htm</FL:url> defines that the standard URL action is to be invoked.
Save the file under the name loan app smart tag.xml in the smart tag installation directory, for example:
C:\Program Files\Common Files\Microsoft Shared\Smart Tag\LISTS
or in a local subdirectory of that folder (for example 1033).
Start Microsoft Word.
Open the template you created in Chapter 5, "Completing Forms and Entering Data Using Microsoft Office" (Employee Information.dot).
|
Tip: If you have not created this template, use the template you downloaded in Section 11.2, "Prerequisites". |
If necessary, from the Tools menu, select Unprotect Document and enter the appropriate password when prompted.
|
Note: If a document is protected, you must remove the protection before attempting to edit the document, otherwise edits may have unexpected results. |
Place the cursor at the bottom of the template.
Enter the following text:
For more information, go to the Employee Portal.
To enable the smart tag for the template:
From the Tools menu, select AutoCorrect Options. The AutoCorrect dialog box is displayed as shown in Figure 11-4.
Click the Smart Tags tab.
Select the Launch Employee Portal (Smart tag lists) option.
Click OK.
Save and close the template.
In Windows Explorer, double-click the template to create a document based on the template.
Move your mouse pointer over the text Employee Portal.
An icon is displayed, as shown in Figure 11-5.
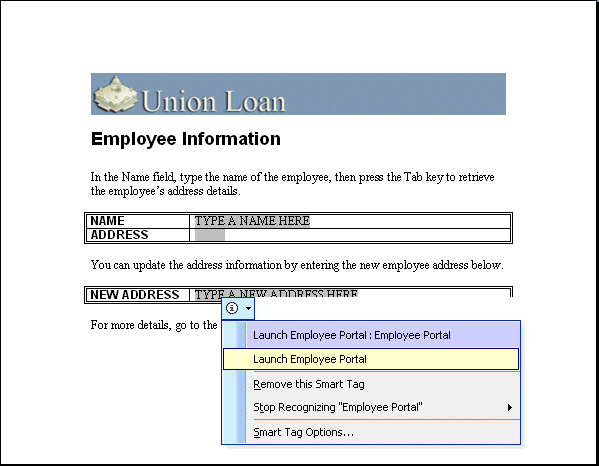
Click the icon to display a menu from which the browser can be invoked, as shown in Figure 11-6.
Figure 11-6 Smart Document with Smart Tag that Invokes the Employee Portal

The following information is a set of hints and tips that address potential issues:
Limitations on Using Smart Tags in Form Completing Documents
It does not appear to be possible to use smart tags in smart document templates that are restricted in editing actions to form filling mode only. Remove such restrictions in order to enable running smart tags with form fields (from the Tools menu, select Unprotect Document, and supply the appropriate password). Note that this does impact the usability of form completing for the end user (for example, be careful that tabbing does not add empty lines to a grid).
Editing an existing template in Microsoft Word
In order to run a form template, it must first be protected with a password (from the Tools menu, select Protect Document, then provide a password). When the document is run, remember to remove the document protection before attempting to edit the definition (from the Tools menu, select Unprotect Document, and supply the appropriate password), otherwise edits may have unexpected results.
Smart tags need security permission to run
Smart tags are considered a form of macros in terms of security. If the security level is set to High, then smart tags may not be able to run. Run the smart tags in Medium security level instead (From the Tools menu, select Macro, then select Security).
You can find further information on smart tags on the Microsoft MSDN site:
Introduction:
http://msdn.microsoft.com/msdnmag/issues/05/02/ManagedSmartTags/default.aspx
Smart tag end user guide:
http://office.microsoft.com/en-us/assistance/HP030833041033.aspx
Sample application:
MOSTL standard schema:
MOSTL sample: