| Oracle® Application Server Developer's Guide for Microsoft Office Interoperability 10g Release 3 (10.1.3.1.0) Part Number B28947-01 |
|
|
View PDF |
| Oracle® Application Server Developer's Guide for Microsoft Office Interoperability 10g Release 3 (10.1.3.1.0) Part Number B28947-01 |
|
|
View PDF |
This chapter shows how to use Microsoft Office templates and Web services to create forms for entering data into enterprise applications.
This chapter contains the following sections:
Microsoft Office 2003 Professional provides a familiar user interface for many users. Enterprise applications typically have their own specific user interface. For those types of users that only intermittently access enterprise information, Microsoft Office provides a set of facilities around smart documents (particularly templates, form fields, and Web service integration) that enable the development of Microsoft Office applications that manipulate enterprise information. Smart documents can automatically enter data, making it easier for users to complete forms or work with templates. Smart documents can also automatically access external data and place it appropriately in a document, or provide contextual help to assist users in the preparation of documents.
Oracle Application Server provides the ability to deploy and run JAX-RPC Web services that are based on Java, Enterprise Java Beans (EJB), or PL/SQL. Oracle JDeveloper provides a design-time environment for developing J2EE and Web service applications.
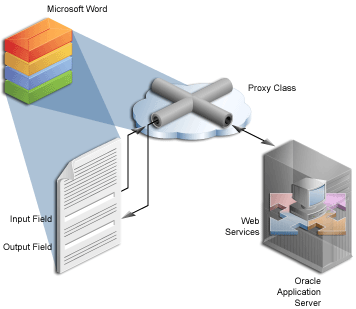
By following a set of guidelines discussed in this chapter, developers can use Oracle JDeveloper to create enterprise Web services that can be invoked from Microsoft Office applications, specifically Microsoft Word, Microsoft Excel, and Microsoft InfoPath (see Figure 5-1). Developers can use the Visual Basic editor included with these applications to invoke a proxy class to these Web services. This proxy class can be generated by using the Microsoft Office 2003 Web Services Toolkit as described in Section 5.2, "Prerequisites".
Figure 5-1 Manipulating Enterprise Information in Smart Documents
This chapter describes how to use Oracle JDeveloper, the Microsoft Office 2003 Web Services Toolkit, and Microsoft Office 2003 Professional to access enterprise applications.
To perform the steps outlined in this chapter, first install the following software:
Oracle JDeveloper 10g Release 3 (10.1.3.1.0)
Oracle JDeveloper contains an embedded Oracle Containers for J2EE that is sufficient for developing and testing the integration described in this chapter. For user testing and preproduction deployment, Oracle Application Server 10g Release 3 (10.1.3.1.0) is required.
Microsoft Office 2003 Professional, specifically Microsoft Word 2003
Microsoft Office 2003 Web Services Toolkit 2.01: refer to Section 1.3.3, "Microsoft Software Development Kits, Utilities, and References".
Microsoft Internet Explorer 6.0, Mozilla Firefox 1.0, or equivalent browser
The support files in the fillingforms demonstration folder. Refer to Accessing the Demonstration Support Files in the Preface for details about the demonstration support files. The support files in the fillingforms demonstration folder are listed and described in Table 5-1.
This section describes two step-by-step procedures that illustrate how Microsoft Office can interoperate with Web services hosted on Oracle Application Server:
The example in this section shows how to develop a Web service in JDeveloper and integrate it with Microsoft Word by using Visual Basic for Applications code, together with a wrapper class that is generated with the Microsoft Office 2003 Web Services Toolkit. The example covers a Web service built from a simple Java class.
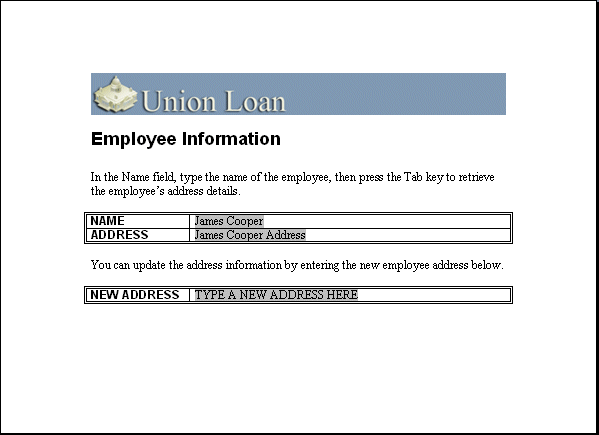
This example is based on the custom HR enterprise application used by Union Loan. This application is used by HR and administrative personnel. Recently, the need has arisen for other users to be able to view employee addresses, and be able to update them. Rather than providing access to the (fairly complicated) HR system, the company decides to quickly develop a Microsoft Word 2003 Professional application shown in Figure 5-2, using JDeveloper to expose an existing Java implementation as a Web service that provides access to employee addresses. This Web service provides two operations in its interface: GetAddress and SetAddress.
|
Note: The example in this section uses a Web service to access public data and therefore requires no security. If you require a more secure connection to your Web service, refer to Chapter 6, "Securing Smart Documents and Web Services". |
Figure 5-2 The Microsoft Word Application
To develop a form that communicates with a Web service, perform the steps in the following sections:
There is also an optional fifth step, as shown in the following section:
To create a Microsoft Office compatible Web service in Oracle JDeveloper 10g Release 3 (10.1.3.1.0), perform the following steps:
Start JDeveloper.
From the File menu, select New, select General, and then select Application.
|
Tip: You may need to make sure that you select All Items from the Filter By list. |
Click OK.
In the Application Name field, enter MSOffice.
|
Tip: You may need to choose No Template [All Technologies] from the Application Template list. |
Click OK.
In the Project Name field, enter Rpc-enc.
Click OK.
In the Applications Navigator, right-click the Rpc-enc project, and select New from the shortcut menu.
Select General, then select Java Class.
Click OK.
In the Name field, enter EmpService (see Figure 5-3).
Click OK.
The class is now visible in the code editor.
Replace the existing code with that shown in Example 5-1:
Example 5-1 EmpService Java Class
package rpcenc;

public class EmpService {

private String adr = null;

    public EmpService() {
    }

    public void setAddress (String address) {
        adr = address;
        return;
    }

    public String getAddress (String empno) {
        if (adr == null) {
        return empno + " Address"; }
        else return adr;
    }
}
This Java class declares an internal variable (adr) to hold the employee address data. The operation setAddress takes an input string and assigns it to this variable. The operation getAddress takes an employee number as input and returns a concatenated string consisting of the employee number and the address string as output. In anything except this very simple example, this class would likely call a database or enterprise application API to retrieve the data.
Save your application.
From the File menu, select New.
Expand the Business Tier node and select Web Services, then select Java Web Service.
Click OK.
Ensure that J2EE 1.4 (JAX-RPC) Web Service is selected, then click OK.
Click Next, if necessary, to move past the Welcome page of the wizard.
From the Component To Publish list, select the EmpService class (see Figure 5-4).
Click Next.
From the SOAP Message Format list, select RPC/Encoded (see Figure 5-5).
The SOAP message format can also be RPC/Literal. You can also use the document style.
Click Next.
For this example, you do not have to specify a mapping file, so click Next again.
In the Available Methods list, select both the getAddress and setAddress methods.
Click Next.
Click Next again.
Select the Stateful service check box.
|
Note: Web services called from Microsoft Office 2003 may be stateful or stateless. The Web service in this example is stateful. |
From the State Scope list, select Session.
In the Session Timeout(s) field, enter 1000.
Click Finish.
|
Note: You can define further details for the JAX-RPC Web service, but these are optional and are not necessary for this example. |
You can now see the Web Services Description Language (WSDL) document that is generated by the wizard (see Figure 5-6). In the Application Navigator, a Web Service node named MyWebService1 has been added, as well as a Java endpoint interface named MyWebService1.java. This file is required for JAX-RPC, but does not have to be edited for this example.
In the Application Navigator, right-click the MyWebService1 node, and select Run from the menu.
JDeveloper automatically deploys the service to its embedded OC4J container and displays the message shown in Figure 5-7 in the log window.
Figure 5-7 The Oracle JDeveloper Log Window

Click the URL in the log window.
The resulting page displays the running Web service (see Figure 5-8).
To define a template document in Microsoft Word 2003 Professional that invokes the Web service developed in Section 5.3.1.1, "Developing a Web Service in Oracle JDeveloper", perform the following steps:
Start Microsoft Word.
From the Insert menu, select Picture, then select From File. Select the unionloan_banner.gif image you downloaded in Section 5.2, "Prerequisites".
Add the title Employee Information in bold font, size 18point.
Enter the following text to describe how to look up an employee address:
In the Name field, enter the name of the employee, then press the Tab key to retrieve the employee's address details.
From the Table menu, select Insert, then select Table. Create a table with 2 rows and 2 columns.
In the first column of the first row, enter NAME.
In the first column of the second row, enter ADDRESS (see Figure 5-9).
Figure 5-9 Table for Looking Up an Employee's Address

Enter the following text to describe how to update an employee address:
You can update the address information by entering the new employee address below.
From the Table menu, select Insert, then select Table. Create a table with 1 row and 2 columns.
In the first column, enter NEW ADDRESS (see Figure 5-10).
Figure 5-10 Table for Specifying a New Employee Address

Your document should now look something like Figure 5-11.
Next, add form fields to the document to display the live data from the Web service.
From the View menu, select Toolbars, then select Forms.
Place the cursor in the table cell that will contain the value of the employee name.
In the Forms Toolbar, click the Text Form Field button (see Figure 5-12).
Figure 5-12 The Text Form Field Icon on the Forms Toolbar

This inserts a grey area in the cell to indicate the position of the form field.
Place the cursor in the table cell that will contain the retrieved value of the employee address, and click the Text Form Field button.
Place the cursor in the table cell that will contain the new employee address, and click the Text Form Field button.
Before you save the document, protect it to control the template definition, and to enable the form completion process for the user.
From the Tools menu, select Protect Document.
In the task pane that appears:
In the Editing Restrictions section, select the Allow only this type of editing in the document check box.
From the list, select Filling in forms.
Click Yes, Start Enforcing Protection.
Enter a password to protect the document.
From the File menu, select Save As.
From the Save as type list, select Document Template (*.dot).
Use the default file name.
Click Save.
You will edit this document in Section 5.3.1.4, "Mapping Template Fields to Web Service Parameters" to connect the fields to the actual running Web service using VBA code.
To create VBA code that invokes the deployed Web service, you must use the Microsoft Office 2003 Web Services Toolkit (see Section 5.2, "Prerequisites") to generate a class that serves as a proxy, or wrapper, class to the Web service. The VBA code developed in Section 5.3.1.4, "Mapping Template Fields to Web Service Parameters" calls the proxy class generated in this section.
To generate the proxy class, perform the following steps:
Start Microsoft Word and open the template you created in Section 5.3.1.2, "Defining a Template Document in Microsoft Word".
From the Tools menu, select Macro, and then select Visual Basic Editor.
Make sure the Employee Information project is selected in the Project Navigator.
From the Tools menu of the Visual Basic Editor, select Web Service References to invoke the Microsoft Office 2003 Web Services Toolkit.
In the Microsoft Office 2003 Web Services Toolkit dialog, select the Web Services URL radio button.
In the URL field, enter the URL of the running Web service.
|
Tip: You can copy this URL from the Address field of the browser window you opened at the end of Section 5.3.1.1, "Developing a Web Service in Oracle JDeveloper". |
Add ?wsdl to the end of the URL. The URL should look something like the following:
http://mymachine:8988/MSOffice-Rpc-enc-context-root/MyWebService1SoapHttpPort?wsdl
Click Search. This adds the Web service to the top right pane (see Figure 5-13).
Select MyWebService1, then click Add.
The Toolkit dialog closes and a generated class with the name clsws_mywebservice1 is added to the Project Explorer under the Class Modules node.
From the Insert menu, select Module.
In the Properties window, change the name to GetEmployeeInfo.
Add the code shown in Example 5-2 to the module, by entering it in the editor window:
Example 5-2 GetEmployeeInfo Module
Public Sub GetEmployeeInfo()

    Dim ename As String
    ename = ActiveDocument.Fields(1).Result.Text

    Dim employeeWS As clsws_MyWebService1
    Set employeeWS = New clsws_MyWebService1

    'Send the service the employee name
    Dim eadr As String
    eadr = employeeWS.wsm_getAddress(ename)
    ActiveDocument.Fields(2).Result.Text = eadr

End Sub
The GetEmployeeInfo subroutine declares an employee name string (ename) and assigns the value of the Name field in the document to this variable (ename = ActiveDocument.Fields(1).Result.Text). It then creates a reference to the Web service and calls it. The output of the service is assigned to the Address field in the document (ActiveDocument.Fields(2).Result.Text=eadr).
If you are using REST the code should be as shown in Example 5-3:
Example 5-3 GetEmployeeInfo Module for REST Services
Public Sub GetEmployeeInfo()

    Dim eid As String
    eid = ActiveDocument.Fields(1).Result.Text

        Dim query As String
    query = "http://mymachine:8988/MSOffice-Rpc-enc-context-root/MyWebService1SoapHttpPort/getAddress?empno=" + eid

    'define xml and http components
    Dim queryResult As New MSXML2.DOMDocument
    Dim employeeService As New MSXML2.XMLHTTP
        'create HTTP request
    employeeService.Open "GET", query, False

    'send the request
    employeeService.send

    'parse result
    queryResult.LoadXml(employeeService.responseText)
    ActiveDocument.Fields(2).Result.Text = queryResult.SelectSingleNode("//ns0:result").Text

End Sub
Add another subroutine with the name SetEmployeeInfo and enter the code shown in Example 5-4:
Example 5-4 SetEmployeeInfo Module
Public Sub SetEmployeeInfo()

    Dim eadr As String
    eadr = ActiveDocument.Fields(3).Result.Text

    Dim employeeWS As clsws_MyWebService1
    Set employeeWS = New clsws_MyWebService1

    'Send the service the new emp address
    employeeWS.wsm_setAddress(eadr)

End Sub
The SetEmployeeInfo subroutine declares a variable (eadr) and assigns it the value of the Address field in the document. It then initializes the Web service and calls the setAddress operation with this value.
If you are using REST, the code should be as shown in Example 5-5:
Example 5-5 SetEmployeeInfo Module for REST Services
Public Sub SetEmployeeInfo()

    Dim address As String
    address = ActiveDocument.Fields(3).Result.Text

    Dim query As String
    query = "http://mymachine:8988/MSOffice-Rpc-enc-context-root/MyWebService1SoapHttpPort/setAddress?address=" + address

    'define xml and http components
    Dim queryResult As New MSXML2.DOMDocument
    Dim employeeService As New MSXML2.XMLHTTP

    'create HTTP request
    employeeService.Open "GET", query, False

    'sent the request
    employeeService.send

End Sub
Save the project.
Exit the Visual Basic Editor and return to Microsoft Word.
To link the VBA code developed in Section 5.3.1.3, "Generating a Proxy Class with Microsoft Office 2003 Web Services Toolkit" with the template document created in Section 5.3.1.2, "Defining a Template Document in Microsoft Word", perform the following steps:
Start Microsoft Word.
Open the template you created in Section 5.3.1.2, "Defining a Template Document in Microsoft Word".
From the Tools menu, select Unprotect Document, and enter the password when prompted.
Right-click the form field where the user will enter a value for the employee name, and select Properties from the shortcut menu.
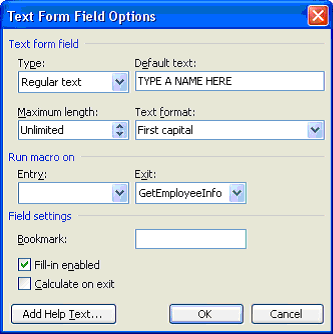
In the Default text field, enter TYPE A NAME HERE.
From the Text format list, select First capital.
From the Exit list, select GetEmployeeInfo (see Figure 5-14). This invokes the VBA code created in Section 5.3.1.4, "Mapping Template Fields to Web Service Parameters" when the user enters a value in the field and then leaves the field (typically by pressing the Tab key).
Figure 5-14 Options for the Employee Name Field
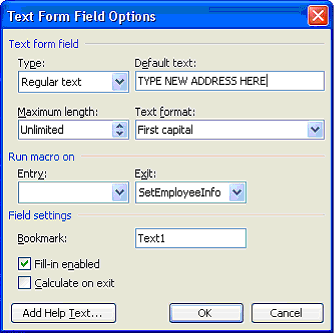
Enter similar properties for the form field where the user will update the address, but this time invoke the SetEmployeeInfo subroutine (see Figure 5-15).
Figure 5-15 Options for the New Address Field
Protect the document, as described at the end of Section 5.3.1.2, "Defining a Template Document in Microsoft Word".
Save and close the document.
In Windows Explorer, double-click the template to create a document based on the template.
The cursor will be placed in the first form field, so enter the name of an employee, for example, James Cooper.
Press the Tab key to move to the next field.
The second field is populated with the value James Cooper Address.
Press Tab again to move to the field where you can specify a new address.
Enter a new address for the employee.
Press the Tab key again to move to the first field.
The employee's address now reflects the new address.
You can automatically load and save data in your document. To do this in Microsoft Word, perform the following steps:
Start Microsoft Word.
Open the template you created in Section 5.3.1.2, "Defining a Template Document in Microsoft Word".
From the Tools menu, select Unprotect Document, and enter the password when prompted.
From the Tools menu, select Macro, and then select Visual Basic Editor.
In the Project Explorer, under your template project, double-click ThisDocument.
From the Object list, select Document.
From the Procedure list, select Open.
An empty subroutine is added to the class module.
Add the Visual Basic instructions shown in Example 5-6 to invoke the getAddress Web service.
Example 5-6 Invoking the getAddress Web Service
Private Sub Document_Open()

    Dim ename As String
    ename = ActiveDocument.Fields(1).Result.Text

    Dim employeeWS As clsws_MyWebService1
    Set employeeWS = New clsws_MyWebService1

    'Send the service the employee name
    Dim eadr As String
    eadr = employeeWS.wsm_getAddress(ename)
    ActiveDocument.Fields(2).Result.Text = eadr

End Sub
This code is identical to the GetAddressInfo subroutine you created in Section 5.3.1.3, "Generating a Proxy Class with Microsoft Office 2003 Web Services Toolkit", that is, it calls the getAddress Web service to retrieve the address of a given employee. Because this code is declared as an onOpen procedure for the document, it will be automatically executed when the document is opened. The default value for the Name field will be passed into the Web service. The result is a default address value that is computed by adding the string address to the name. In a real application, you would not want to pass in default values. It is used in this example only for demonstrating automatic Web service invocation on opening a template document.
Save the project.
Exit the Visual Basic Editor and return to Microsoft Word.
Protect the document, as described at the end of Section 5.3.1.2, "Defining a Template Document in Microsoft Word".
Save and close the document.
To run the document, open the file in Microsoft Word.
On opening, the Web service is invoked by passing in the default value for the Name field: TYPE A NAME HERE. In this example, the default value returned is therefore TYPE A NAME HERE Address.
Microsoft InfoPath enables the form designer to quickly add fields to a form that are mapped to Web service invocations.
To develop a form that communicates with a Web service, perform the following tasks:
To create a Web service in JDeveloper to be used with Microsoft InfoPath, perform the following steps:
Follow the steps as described in Section 5.3.1.1, "Developing a Web Service in Oracle JDeveloper".
If you are not using Microsoft Visual Studio .NET, make the following change:
In the Message Format step (step 2) of the Create Java J2EE 1.4 Web Service Wizard, make sure that the SOAP Message Format is set to Document/Wrapped.
To define a form in Microsoft InfoPath that calls an Oracle Web service, perform the following steps:
Start Microsoft InfoPath.
On the left hand side of the dialog, select Design a Form.
The InfoPath main window displays as shown in Figure 5-16.
Figure 5-16 Microsoft InfoPath Main Window
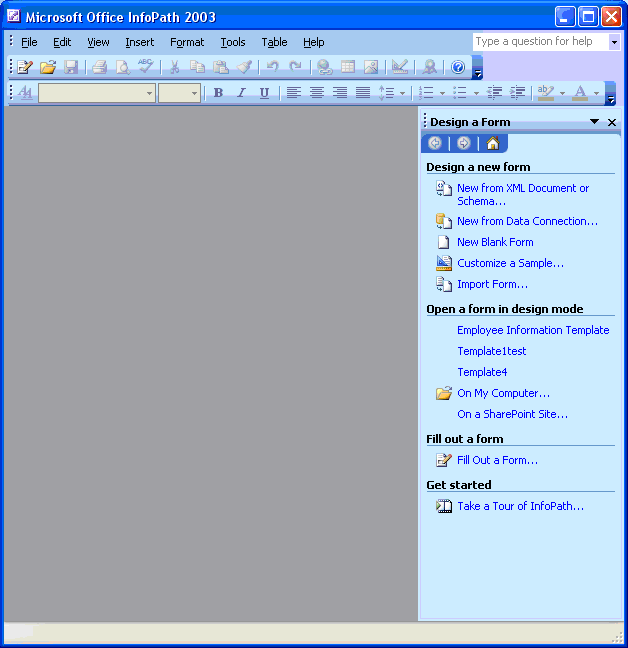
Under Design a new form, click New from Data Connection.
On the first step of the Data Connection Wizard, select Web Service as the type of connection.
Click Next.
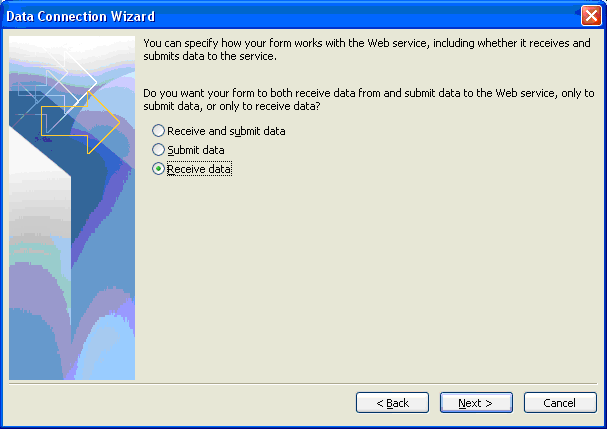
Select Receive data (see Figure 5-17).
Figure 5-17 Receive Data from the Web Service
Click Next.
Enter the URL of the deployed Web service, adding ?WSDL to the end.
Click Next.
In the Select an operation list, select getAddress (see Figure 5-18).
Click Next.
Enter Get Address as the name for the data connection (see Figure 5-19).
Click Finish.
Microsoft InfoPath generates a default form as shown in Figure 5-20.
Figure 5-20 Microsoft InfoPath Default Form
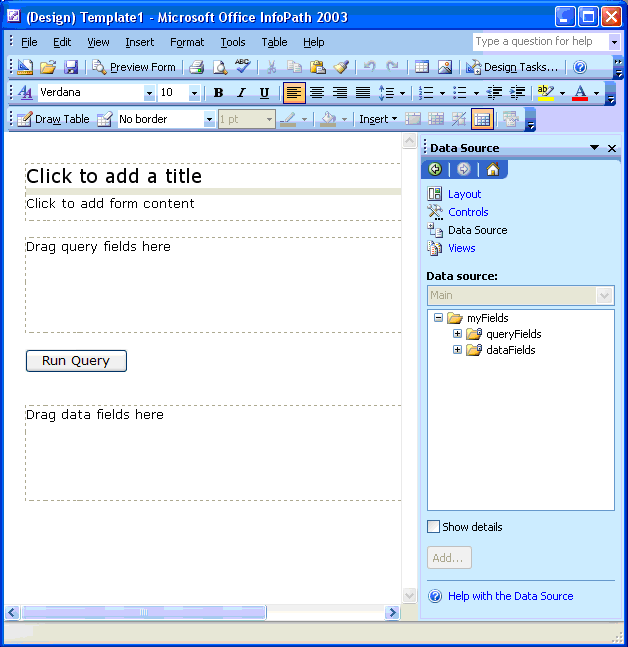
In the Data Source panel, expand the queryFields node.
Drag the ns1:getAddressElement element onto the area of the form labeled Drag query fields here, and select Section with Controls.
Expand the dataFields node.
Drag the ns1:getAddressResponse element onto the area of the form labeled Drag data fields here.
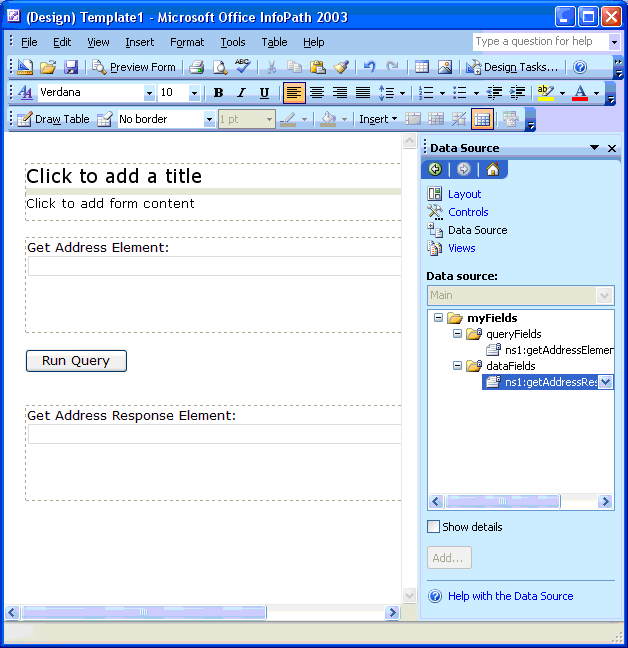
The form now looks like Figure 5-21.
Figure 5-21 Form with Input and Output Fields
Place the cursor at the top of the form.
From the Insert menu, select Picture, then select From File. Select the image you downloaded in Section 5.2, "Prerequisites".
Change the title of the form to Employee Information.
Enter the following descriptive text in the area labeled Click to add form content:
Enter the name of the employee and click the Get Address button to retrieve the employee address.
Change the label of the input field (Get Address Element) to Enter Employee Name.
Change the label of the output field (Get Address Response Element) to Employee Address.
Double-click the Run Query button and change the label to Get Address.
Reduce the area of the form for the input and output fields by selecting them and dragging the outline with the mouse.
The form should now look like Figure 5-22.
Save the template form and close Microsoft InfoPath.
Open Microsoft InfoPath and select your new template form in the Fill out a Form dialog.
In the Enter Employee Name field, enter James Cooper.
Click Get Address.
The Employee Address field is populated with the value James Cooper Address.
This section lists hints and tips that address potential issues that you might encounter.
Making sure the endpoint URL in the WSDL is pointing to the correct service
JDeveloper generates a default endpoint URL that will work with a standalone server. Since release 10.1.3, the application server to which the service is deployed will update this URL. It is therefore important to insert the WSDL reference to the running service in the Microsoft Office 2003 Web Services Toolkit and Microsoft InfoPath Data Connection Wizard. In the log window, JDeveloper will always report the URL to the deployed service. Copy and paste this URL into dialog boxes, and append ?wsdl to the endpoint. This can also be done in a browser to retrieve the WSDL.
Editing an existing template in Microsoft Word
To use a template, it must first be protected with a password (Tools menu, Protect Document option). When the document is opened, remember to remove the document protection (Tools menu, Unprotect Document option) first before attempting to edit the definition, otherwise edits will have unexpected results.