| Oracle® Application Server Developer's Guide for Microsoft Office Interoperability 10g Release 3 (10.1.3.1.0) Part Number B28947-01 |
|
|
View PDF |
| Oracle® Application Server Developer's Guide for Microsoft Office Interoperability 10g Release 3 (10.1.3.1.0) Part Number B28947-01 |
|
|
View PDF |
This chapter describes how you can create a smart document that interacts with a BPEL process that sends an e-mail message with a Microsoft Word XML file as an attachment.
It contains the following sections:
You can perform self-service tasks from within Microsoft Office applications by using Smart documents, avoiding the need to switch between browsers and your applications. Smart documents can automatically enter data, making it easier for users to complete forms or work with templates. Smart documents can also automatically access external data and place it in the right place in a document, or provide contextual help to assist you in the preparation of documents. For more details, see section Section 2.2.1, "Smart Documents".
Oracle BPEL Process Manager provides a user-friendly and reliable solution for designing, deploying, and managing BPEL business processes. The built-in integration services let you use advanced connectivity and transformation capabilities of standard BPEL processes, which support XSLT and XQuery transformation, and bindings to legacy systems through J2EE Connector Architecture (JCA) adapters and native protocols. A user task service is provided as a built-in BPEL service to enable you to participate in BPEL workflows. For more details, see http://www.oracle.com/technology/bpel.
To perform the steps outlined in this chapter, the following software must be installed:
Oracle BPEL Process Manager 10g Release 2 (10.1.2.0.2)
Microsoft Office 2003 Professional
|
Note: You must install the .NET Framework before you install Microsoft Office. If you have installed Microsoft Office first, then you must refer to the "Getting the Office 2003 PIAs When Installing .NET Framework 1.1 After Installing Office 2003" section in the article titled "Installing and Using the Office 2003 Primary Interop Assemblies" athttp://msdn.microsoft.com/library/default.asp?url=/library/en-us/dno2k3ta/html/OfficePrimaryInteropAssembliesFAQ.asp. |
The .NET Framework and Software Developer Kit (version 1.1 or later)
Refer to Section 1.3.3, "Microsoft Software Development Kits, Utilities, and References" for details about downloading this software.
The Microsoft Office WordprocessingML Transform Inference Tool (wml2xslt.exe)
Refer to Section 1.3.3, "Microsoft Software Development Kits, Utilities, and References" for details about downloading this software.
E-mail Server Configuration. This business process sends e-mail notifications and requires e-mail settings. Refer to Section 4.3.1, "Configuring the E-Mail Server" for details.
The support files in the selfservice demonstration folder. Refer to Accessing the Demonstration Support Files in the Preface for details about the demonstration support files. The support files and folders in the selfservice demonstration folder are listed and described in Table 4-1.
Table 4-1 Self-Service Files
| File or Folder | Description |
|---|---|
|
|
The readme file for this demonstration. Contains instructions on installation and configuration of files. |
|
|
ANT build script file |
|
|
This folder contains the code examples needed to build the smart document solution. |
|
|
This folder contains the AutoLoanCreditRatingService BPEL files. |
|
|
This folder contains the AutoLoanFlow BPEL files. |
|
|
This folder contains the UnionLoan BPEL files. |
|
|
This folder contains the UnionLoanUI BPEL files. |
|
|
This folder contains the WesternLoan BPEL files. |
|
Note: Download the contents of theselfservice folder into a new folder named MSOfficeIntegration under the BPEL_ORACLE_HOME\integration\orabpel\samples\demos folder, for example, C:\OraBPELPM_1\integration\orabpel\samples\demos\MSOfficeIntegration\. |
In this scenario, a loan applicant seeking a car loan from the Fast Loan broker submits a loan application using a Microsoft Word smart document. The Word document initiates a BPEL process workflow that first gets the applicant's credit rating.
If the applicant has a good credit rating, the BPEL process sends the loan application details to two different loan companies - Western Loan and Union Loan. In one company, the loan approval process is automated. In the other, loans are approved manually.
The BPEL process takes the replies from the two loan companies, and sends the one with the lowest APR to the loan applicant using a Microsoft Word 2003 XML document.
If the loan applicant has negative credit rating, the process sends an e-mail to the loan applicant with a loan rejection message.
This chapter describes how you can create a smart document loan application form, create a Microsoft Word template for the loan result notification, configure your e-mail server, and deploy required BPEL processes.
Figure 4-1 gives an overview of the BPEL process used by the smart document for processing this sample loan application scenario, which is explained in detail in this chapter. The smart document invokes a BPEL process and provides the expected input. The BPEL process takes the input and passes it to the getAutoLoanCreditRating function, which sends the details to the creditRatingService. The loan application details are then passed to WesternLoanService and UnionLoanService. The loan offers from the two loan services are evaluated and the best offer is passed to the NotificationService that sends the reply to the loan applicant.
Perform the steps in the following sections to create a smart document template that interacts with a BPEL workflow process:
The ns_emails.xml file in the directory BPEL_ORACLE_HOME\integration\orabpel\system\services\config contains the configuration for e-mail accounts. Each EmailAccount element sets the configuration of a specific e-mail account. The name attribute in the EmailAccount element is the name of the account.
A default e-mail account is specified in the e-mail configuration file. This account is used when there is no account specified to which to send an e-mail notification. This account is also used for task-related notifications. A default e-mail account must always be specified in the configuration file.
The EmailAccount element contains the OutgoingServerSettings and IncomingServerSettings attributes. For notifications that require action in a workflow process, both IncomingServerSettings and OutgoingServerSettings attributes are required.
Table 4-2 describes the XML elements for the e-mail notification configuration stored in the ns_emails.xml file.
Table 4-2 XML Elements for E-Mail Server Configuration
| Name | Description |
|---|---|
|
EmailAccount/Name |
Name of the account. This can be any name, but must be unique within this server. |
|
EmailAccount/GeneralSettings/FromName |
Name of the |
|
EmailAccount/GeneralSettings/FromAddress |
E-mail address for the |
|
EmailAccount/OutgoingServerSettings/SMTPHost |
Name of the outgoing SMTP server. |
|
EmailAccount/OutgoingServerSettings/SMTPPort |
Port of the outgoing SMTP server. |
|
EmailAccount/IncomingServerSettings/Server |
Name of the incoming e-mail server. |
|
EmailAccount/IncomingServerSettings/Port |
Port of the incoming e-mail server. |
|
EmailAccount/IncomingServerSettings/UserName |
User ID of the e-mail address. |
|
EmailAccount/IncomingServerSettings/Password |
User password. |
|
EmailAccount/IncomingServerSettings/Password[encrypted] |
Encrypted attribute of the password. It is |
|
EmailAccount/IncomingServerSettings/UseSSL |
Secure sockets layer (SSL) attribute. It is |
|
EmailAccount/IncomingServerSettings/Folder |
Name of the folder from which to read the incoming messages. |
|
EmailAccount/IncomingServerSettings/PollingFrequency |
Polling interval for reading messages from the incoming messages folder. |
|
See Also: The information about configuring an e-mail server in the Oracle BPEL Process Manager Developer's Guide, located in Oracle Application Server 10g Release 2 (10.1.2.0.2) Documentation library athttp://www.oracle.com/technology/documentation/appserver101202.html
Click View Library in the Oracle Application Server 10g Release 2 (10.1.2.0.2) table, and then click the E-Business Integration tab. |
To deploy the BPEL process, perform the following steps:
Download the sample demonstration support files from OTN and save it in the BPEL_ORACLE_HOME\integration\orabpel\samples\demos folder, for example, C:\OraBPELPM_1\integration\orabpel\samples\demos\.
Refer to "Accessing the Demonstration Support Files" in the Preface for details about downloading the demonstration ZIP file.
Start the Oracle BPEL Process Manager server. Click Start, All Programs, Oracle - ORACLE_HOME, Oracle BPEL Process Manager 10.1.2, and then Start BPEL PM Server.
Open a command prompt window, or start the Oracle BPEL Process Manager developer prompt. Click Start, All Programs, Oracle - ORACLE_HOME, Oracle BPEL Process Manager 10.1.2, and then Developer Prompt.
Navigate to the BPEL_ORACLE_HOME\integration\orabpel\samples\demos\MSOfficeIntegration\ folder.
Run the following command:
BPEL_ORACLE_HOME\integration\orabpel\bin\obant
You will see a BUILD SUCCESSFUL message in the command prompt. For example:
BUILD SUCCESSFUL
Total time: 33 seconds
Verify and test that the BPEL processes are deployed by performing the following steps:
Click Start, All Programs, Oracle - ORACLE_HOME, Oracle BPEL Process Manager 10.1.2, and then BPEL Console.
Log in by specifying the BPEL developer credentials.
You will see the Oracle BPEL Control page, as shown in Figure 4-2. Ensure that the AutoLoanFlow, UnionLoan, WesternLoan, and AutoLoanCreditRatingService processes are displayed in the list of deployed processes.
Smart documents are solutions that enhance the user experience when working with Microsoft Office documents. In this section, the steps involved in creating a loan application form that can be used by the auto loan process are discussed.
To create a smart document, perform the following steps:
Navigate to the BPEL_ORACLE_HOME\integration\orabpel\samples\demo\MSOfficeIntegration\LoanDemoWordSD folder. For this example, you can use the LoanDemo.doc file provided, or create a new document in Microsoft Word.
Start Microsoft Word.
Save a blank document as LoanDemo.doc in the LoanDemoWordSD folder, or use the LoanDemo.doc file provided.
Attach the AutoLoanTypes.xsd schema to LoanDemo.doc. To do this, perform the following steps:
From the Microsoft Word menu bar, click Tools, and then select Templates and Add-Ins.
In the Templates and Add-ins dialog box, select the XML Schema tab.
Click Schema Library.
Remove any schema that uses the namespace http://www.autoloan.com/ns/autoloan. If there is such a schema, then select it and click Delete Schema.
Click Add Schema, and browse to BPEL_ORACLE_HOME\integration\orabpel\samples\demo\MSOfficeIntegration\LoanDemoWordSD\AutoLoanTypes.xsd. Name the schema AutoLoan, and click OK as shown in Figure 4-3.
Click OK, and then OK again to exit.
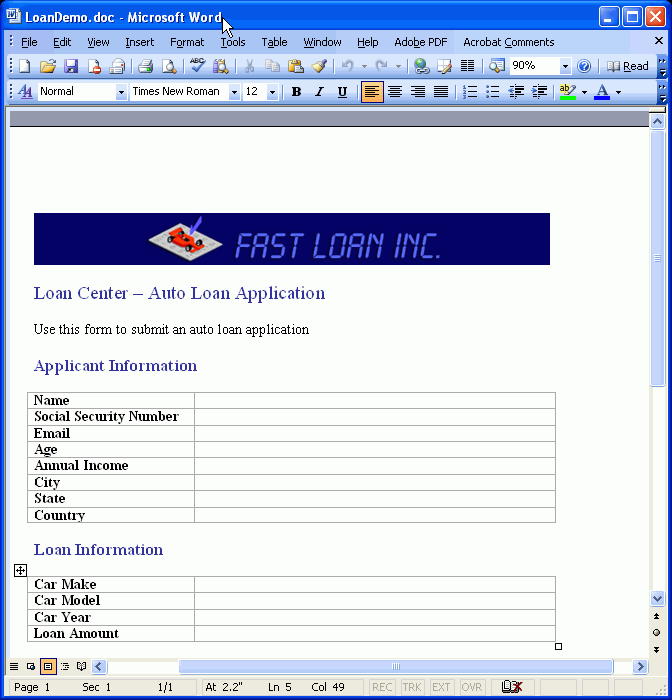
Add content to the LoanDemo.doc file in the form of banners, tables, and so on, as shown in figure Figure 4-4.
Figure 4-4 Adding Content to LoanDemo.doc
Add structure to your word document by mapping XML elements to the word document. To do this, perform the following steps:
Click View, Task Pane, and then select XML Structure in the Task Pane.
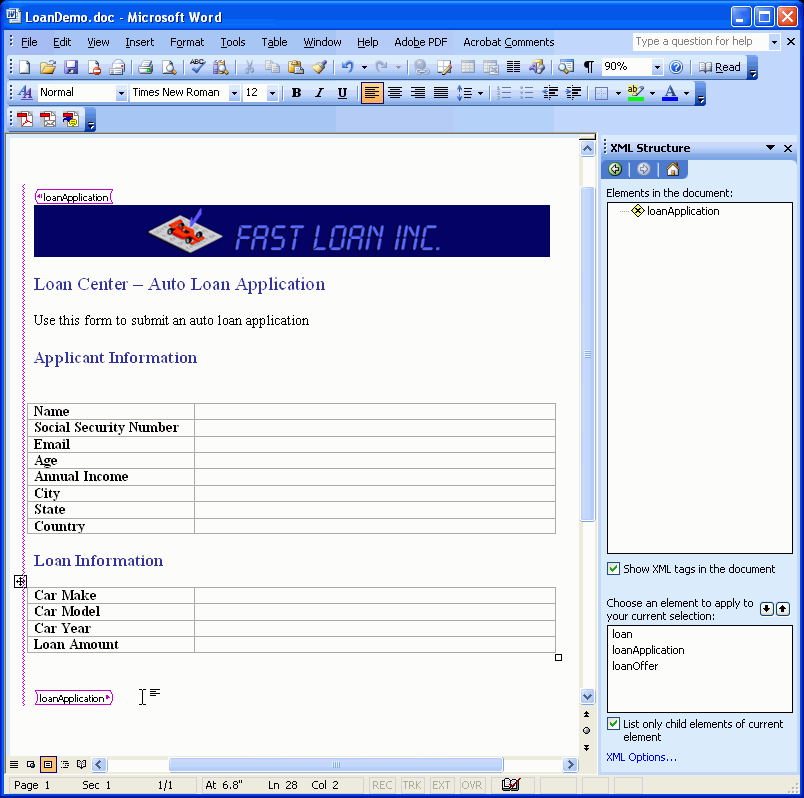
Add the correct elements into the document, as shown in Figure 4-5. Place the cursor just below the image. When the cursor is in this position, you can map only three elements that are the root elements defined in the XML Schema Document (XSD).
Click the loanApplication element. When prompted, click Apply to Entire Document.
Figure 4-5 XML Structure Pane Showing Available Root Elements
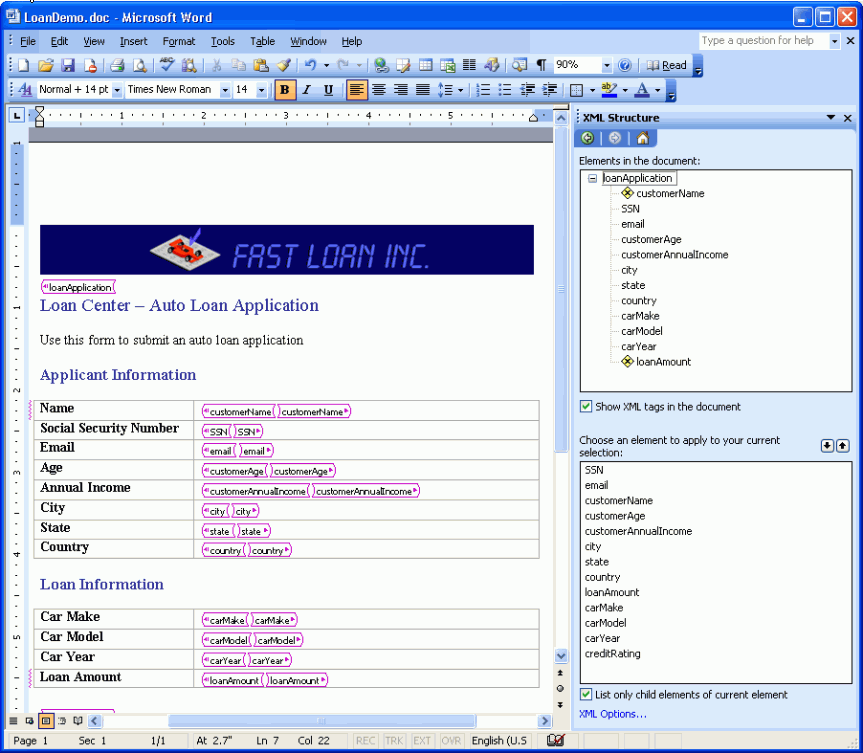
When the cursor is placed anywhere within the <loanApplication> tag, the XML Structure pane shows the child elements of the loanApplication element. Add the child elements to the corresponding table cells, as shown in Figure 4-6.
Figure 4-6 XML Structure Pane Showing Available Child Elements
Set XML options by performing the following steps:
In the XML Structure pane, click the XML Options link. The XML Options dialog box is displayed as shown in Figure 4-7.
If the document contains both unstructured text and XML elements, then select Ignore Mixed Content.To hide the XML elements in the document, select Show placeholder text for all empty elements.If you want to save XML that does not conform to the schema, then select Allow saving as XML even if not valid.
Click OK.
In the XML Structure pane, clear the Show XML tags in the document option to hide the XML structures.
Create an XML file called ManagedManifest.xml, and add the code from Section A.2, "ManagedManifest.xml for Chapter 4" to this file.
Enable or disable the manifest security check of the smart document manifest file. To enable the manifest security check, follow the steps described in Section 6.3.4.2, "Enabling Manifest Security Check".
To disable the manifest security check, perform the following steps:
|
Important: You must disable XML expansion pack manifest security checking within a testing environment only and not on the end users' computers. The option to disable XML expansion pack security checking helps developers to easily test smart documents in the development phase. For more information about security checking for XML expansion packs, see "Security for XML Expansion Packs" at |
Back up the Windows registry. In the Registry Editor, click Registry, and then click Export Registry File, and save it in a suitable location.
Navigate to HKEY_LOCAL_MACHINE/Software/Microsoft/Office.
Create a key called Common.
Under Common, create a key called Smart Tag.
In the right pane, right-click and select New, and then select DWORD Value.
Enter DisableManifestSecurityCheck in the Name field.
Right-click DisableManifestSecurityCheck, and select Modify.
Enter 00000001 in the Value data field.
Save the document.
Generate a Web service proxy by using the Microsoft WSDL.exe tool. To do this, open the Windows command prompt window, and navigate to C:\OraBPELPM_1\integration\orabpel\samples\demos\MSOfficeIntegration\LoanDemoWordSD folder, and run the following command:
"C:\Program Files\Microsoft.NET\SDK\v1.1\Bin\WSDL" /l:CS /protocol:SOAP http://localhost:9700/orabpel/default/AutoLoanFlow/1.0/AutoLoanFlow?wsdl
This creates the proxy class file AutoLoanFlow.cs in the LoanDemoWordSD folder.
Include the root element of the WSDL in the AutoLoanFlow.cs file for serialization. Place the text in bold, just below the line as shown in Example 4-1:
Example 4-1 WSDL Root Element in the AutoLoanFlow.cs File
/// <remarks/>
[System.Xml.Serialization.XmlTypeAttribute(Namespace="http://www.autoloan.com/ns/autoloan")]
[XmlRoot (ElementName="loanApplication", Namespace="http://www.autoloan.com/ns/autoloan")]
public class LoanApplicationType {
The smart document invokes this Web service proxy, which in turn invokes the Web service as if it were local.
The Web service proxy assumes that the BPEL server is running on the same host at port 9700. If this is incorrect, then change it in the BPEL_ORACLE_HOME\integration\orabpel\samples\demos\MSOfficeIntegration\LoanDemoWordSD\AutoLoanFlow.cs file. The file must be updated with the correct port number, as shown in bold, in Example 4-2:
Example 4-2 Host and Port Entries in the AutoLoanFlow.cs File
public class AutoLoanFlowBinding : System.Web.Services.Protocols.SoapHttpClientProtocol {

    public EndpointReferenceType ReplyTo;

    public AttributedURI MessageID;

    /// <remarks/>
    public AutoLoanFlowBinding() {
        this.Url = "http://localhost:9700/orabpel/default/AutoLoanFlow/1.0";
    }
If you change the values, then you must re-create the DLL file, as described in Step 16.
Create the smart document implementation class file AutoLoanSmartDocument.cs by pasting the code from Section A.1, "AutoLoanSmartDocument.cs" into a text file, and saving it in the LoanDemoWordSD folder. Alternatively, you can use the AutoLoanSmartDocument.cs file provided in the LoanDemoWordSD folder.
Run the following command from a command prompt window:
%WINDIR%\Microsoft.NET\Framework\v1.1.4322\csc /t:library ^
/reference:"%WINDIR%\assembly\GAC\Microsoft.Office.Interop.SmartTag\
11.0.0.0__71e9bce111e9429c\Microsoft.Office.Interop.SmartTag.dll";
"%WINDIR%\assembly\GAC\Microsoft.Office.Interop.Word\
11.0.0.0__71e9bce111e9429c\Microsoft.Office.Interop.Word.dll" ^
AutoLoanSmartDocument.cs AutoLoanFlow.cs
Verify that the csc path and .NET Framework SDK version are correct. See the text in bold in the preceding command.
This creates the AutoLoanSmartDocument.dll file, which makes up the brains of your smart document.
From the LoanDemoWordSD folder, run the following commands from a command prompt window:
%WINDIR%\Microsoft.NET\Framework\v1.1.4322\caspol -pp off -ag 1.1 -url ^
"C:\OraBPELPM_1\integration\orabpel\samples\demos\MSOfficeIntegration\LoanDemoWordSD\*" ^
FullTrust -n LoanDemo

%WINDIR%\Microsoft.NET\Framework\v1.1.4322\caspol -pp on
Verify the path of the MSOfficeIntegration\LoanDemoWordSD directory and caspol, if required.
This gives full trust to the smart document library file.
Attach the XML expansion pack to the document. To do this, perform the following steps:
From the Microsoft Word menu bar, click Tools, and then click 'Templates and Add-Ins.
In the Templates and Add-ins dialog box, select the XML Expansion Packs tab.
Click Add and select BPEL_ORACLE_HOME\integration\orabpel\samples\demos\MSOfficeIntegration\LoanDemoWordSD\ManagedManifest.xml.
In the security dialog box, decide whether you want to enable or disable XML expansion pack security. If you disabled the manifest security check earlier, then you must click No.
Click OK.
Go to the Document Actions pane to see the document. Place the cursor within the <loanApplication> tags to see the Submit for Approval button, as shown in Figure 4-8.
This section provides information on how to create a Microsoft Word template based on the smart document form created, as explained in Section 4.3.3, "Creating a Smart Document Form". This template is used by the AutoLoanFlow process to create a Microsoft Word document with the loan details and sends it to the e-mail address of the loan applicant.
To create a Microsoft Word template, perform the following steps:
Start Microsoft Word.
Save a blank document as LoanResult.doc in the BPEL_ORACLE_HOME\integration\orabpel\samples\demo\MSOfficeIntegration\LoanDemoWordSD folder. Alternatively, you can use the LoanResult.doc file provided in the LoanDemoWordSD folder.
Attach AutoLoanTypes.xsd to the document. To do this, perform the following steps:
From the Microsoft Word menu bar, click Tools, and then select Templates and Add-Ins.
In the Templates and Add-ins dialog box, select the XML Schema tab.
Click Schema Library.
Remove any schema that uses the namespace http://www.autoloan.com/ns/autoloan. If there is such a schema, then select it and click Delete Schema.
Click Add Schema, and browse to BPEL_ORACLE_HOME\integration\orabpel\samples\demo\MSOfficeIntegration\LoanDemoWordSD\AutoLoanTypes.xsd. Name the schema AutoLoan, and click OK.
|
Note: Alternatively, you can create a new XSD file, copy the code from Section A.4, "Contents of the AutoLoanTypes.xsd File" into it, and save it asAutoLoadTypes.xsd. You can then add this schema. |
Click OK, and then OK again to exit.
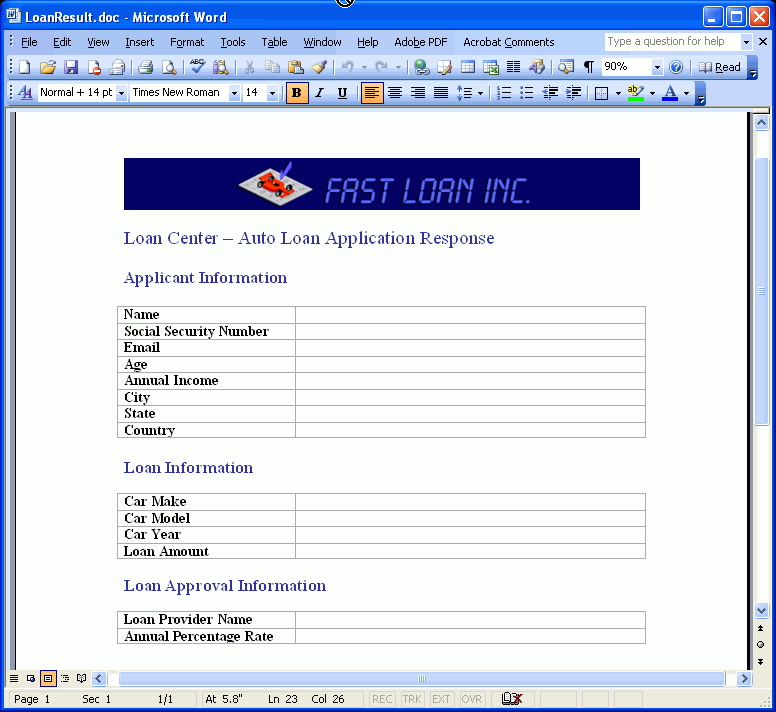
Add content to the LoanResult.doc file in the form of banners, tables, and so on, as shown in Figure 4-9.
Figure 4-9 Adding Content to LoanResult.doc
Add structure to your word document by mapping XML elements to the word document. To do this, perform the following steps:
Click View, Task Pane, and then XML Structure.
Place the cursor just below the banner image and click the loan element. When prompted, click Apply to Entire Document. The document displays data from both children of the loan element – loanApplication and loanOffer.
Place the cursor below the image and select the content up to the second table in the document. Click the loanApplication element.
Select the text Loan Approval Information and the subsequent table. Click the loanOffer element.
Add the child elements to the corresponding table cells, as shown in Figure 4-10
Figure 4-10 XML Structure of the Loan Result Document
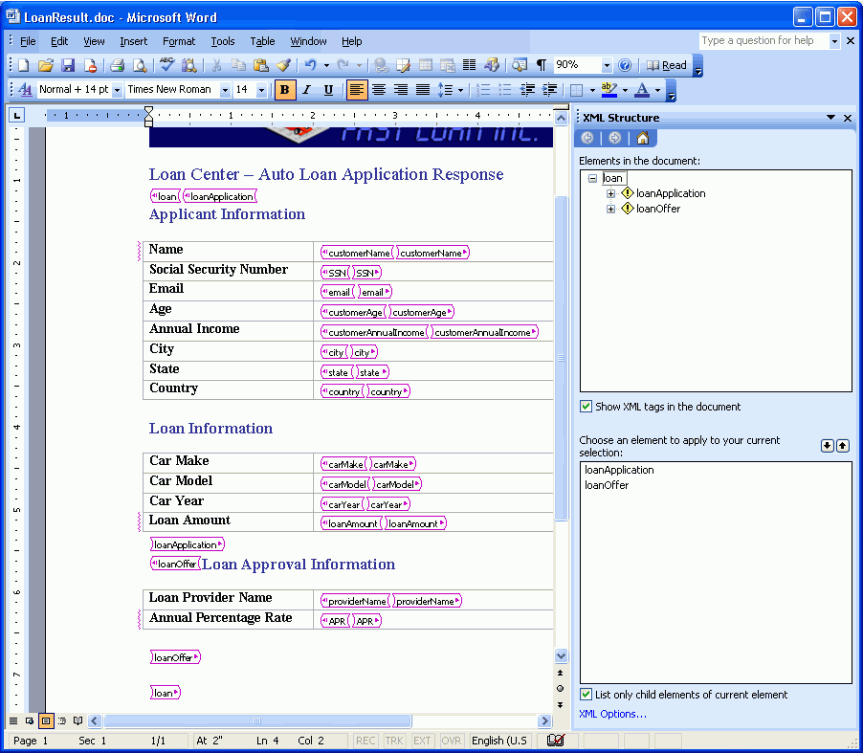
Set XML options by performing the following steps:
In the XML Structure pane, click the XML Options link. The XML Options dialog box is displayed as shown in Figure 4-7.
If the document contains both unstructured text and XML elements, then select Ignore Mixed Content.To hide the XML elements in the document, select Show placeholder text for all empty elements.If you want to save XML that does not conform to the schema, then select Allow saving as XML even if not valid.
Click OK.
In the XML Structure pane, clear the Show XML tags in the document option to hide the XML structures.
Save the document as LoanResultWordML.xml, as shown in Figure 4-11.
Navigate to BPEL_ORACLE_HOME\integration\orabpel\samples\demos\MSOfficeIntegration\LoanDemoWordSD, and run the following command in a command prompt window:
wml2xslt LoanResultWordML.xml
The XSLT for the LoanResultWordML.xml document is created. By default, wml2xslt.exe is located in the C:\Program Files\Microsoft Office 2003 Developer Resources\ directory.
Copy the LoanResultWordML.xsl file from Step 9 to the BPEL_ORACLE_HOME\integration\orabpel\samples\demos\MSOfficeIntegration\AutoLoanFlow directory and run the obant.bat file from the AutoLoanFlow directory, as follows:
BPEL_ORACLE_HOME\integration\orabpel\bin\obant
You will see a BUILD SUCCESSFUL message in the command prompt. For example:
BUILD SUCCESSFUL
Total time: 15 seconds
The auto loan process is used to process a loan application. The user submits the loan application from a Microsoft Word document. The word document invokes a BPEL process that gets the credit rating of the loan applicant from the AutoLoanCreditRatingService process, and performs either of the following:
If the applicant has a good credit rating, then the process sends queries to two loan processing business processes:
UnionLoan
WesternLoan
Upon receiving replies from these two processes, the AutoLoanFlow process chooses the loan offer with the lowest APR and creates a Microsoft Word document with the loan details, and sends the document by e-mail to the loan applicant.
If the loan applicant has a bad credit rating, the process sends an e-mail to the loan applicant with the loan application rejection message.
To test the loan application process using the smart documents created in Section 4.3.3, "Creating a Smart Document Form" and Section 4.3.4, "Creating the Microsoft Word Template for the Loan Result Notification", perform the following steps:
Open LoanDemo.doc.
Fill in the loan application details, as shown in Figure 4-12.
In the Task pane, click Submit for Approval.
You can monitor the BPEL process in the Oracle BPEL Control page.
A Loan Result document is created with the Loan Approval information, as shown in Figure 4-13.
Log in to the Union Loan Console at http://localhost:9700/bpelconsole.
Check for e-mail messages from who was requesting the loan. A sample mail that includes a Word document as an attachment is shown in Figure 4-14.
Refer to the following documents at the Oracle BPEL Process Manager home page at http://www.oracle.com/technology/bpel/:
BPEL: Learn by Example
Quick Start Tutorial - JDeveloper 10g
Quick Start Tutorial - Eclipse