| Oracle® WebCenter Framework Tutorial 10g (10.1.3.2.0) Part Number B31072-02 |
|
|
View PDF |
| Oracle® WebCenter Framework Tutorial 10g (10.1.3.2.0) Part Number B31072-02 |
|
|
View PDF |
This Appendix describes how to set up an identity store—a requirement for Chapter 8, "Providing Security".
Oracle ADF Security authenticates users against a given resource provider. In this tutorial, we make use of the lightweight XML resource provider system-jazn-data.xml supplied with the embedded OC4J. Well-suited to small scale applications like this tutorial, this resource provider is located at: JDEVHOME\jdev\system\oracle.j2ee.10.1.3.xx.xx\embedded-oc4j\config
Note:
The system directory is created when you open JDeveloper for the first time.For your convenience, we supply a sample system-jazn-data.xml file containing all the user data required to complete this tutorial (see Chapter 2 Downloading Sample Tutorial Files and Copying the Sample system-jazn-data.xml File). The following table outlines the users/roles our sample file provides:
| Role Name | Users | Description |
|---|---|---|
| page-viewer | Singh | This user may view secured pages. |
| page-personalizer | Cho | This user may personalize portlets on a secured page. |
| page-customizer | Harvey | This user may customize secured pages. |
| restricted-user | King | This user may not view secured pages. |
| users | Singh, Cho, King, Harvey, JtaAdmin, oc4jadmin | The users role maintains a list of every valid user. |
Only follow the instructions in this Appendix if you would like to enter these tutorial users/roles from scratch for yourself. Maybe you want to learn more about the process, or perhaps you are already building secure applications with JDeveloper and you do not want to overwrite the users, roles, and policies that you've added.
To set up the identity store, completing the steps in the following sections:
In this step, you'll add four users named Singh, Cho, Harvey, and King to the embedded OC4J's system-jazn-data.xml file.
From the Tools menu, choose Embedded OC4J Server Preferences.
If the information message Embedded Server Currently Running displays, click No, and then shut down the embedded OC4J Server (choose Run, Terminate - Embedded OC4J Server from the main menu).
Under the Global branch, expand Authentication (JAZN), Realms, and then jazn.com.
jazn.com is the default security realm for the tutorial application.
Don't select the branch called Authentication (JAZN) under the Current Workspace node. This branch lets you define user data at the application-level but it would not be used by the tutorial application — WebCenter applications only make use of data defined under the global realm.
Select Users.
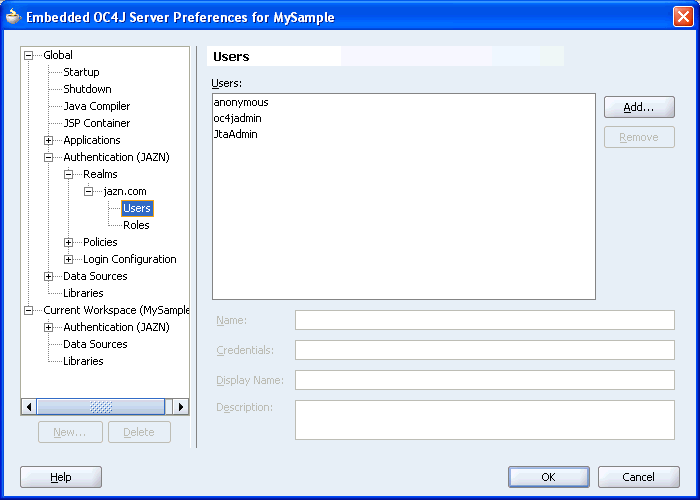
You should see three predefined users for the default global security realm, jazn.com as shown in Figure A-1.
Figure A-1 Default Users for Global Security Realm jazn.com

anonymous, a default guest/anonymous user
oc4jadmin, an OC4J administrator
JtaAdmin, another user for recovering propagated OC4J transactions
Do not remove any of these users or some administrative functions will not work.
Create a new user named Singh:
Click Add.
For Name, enter Singh.
In the Credentials field, enter the password welcome.
Click OK. Singh should appear in the Users list.
For Description, enter This User may view pages.
Now repeat Step 4. Create three more users named Cho, Harvey, and King. Use the credentials and descriptions shown in the following table:
| User Name | Credentials | Display Name | Description |
|---|---|---|---|
| Singh | welcome | Singh | This user may view secured pages. |
| Cho | welcome | Cho | This user may personalize portlets on a secured page. |
| Harvey | welcome | Harvey | This user may customize secured pages. |
| King | welcome | Harvey | This user may not view secured pages. |
All four new users should appear in the Users list as shown in Figure A-2.
Click OK to save the user definitions in the embedded OC4J's system-jazn-data.xml.
In this step, you'll add four roles named page-viewer, page-personalizer, page-customizer, and restricted-user to the embedded OC4J's system-jazn-data.xml file.
From the Tools menu, choose Embedded OC4J Server Preferences.
Expand Authentication (JAZN), Realms, and jazn.com.
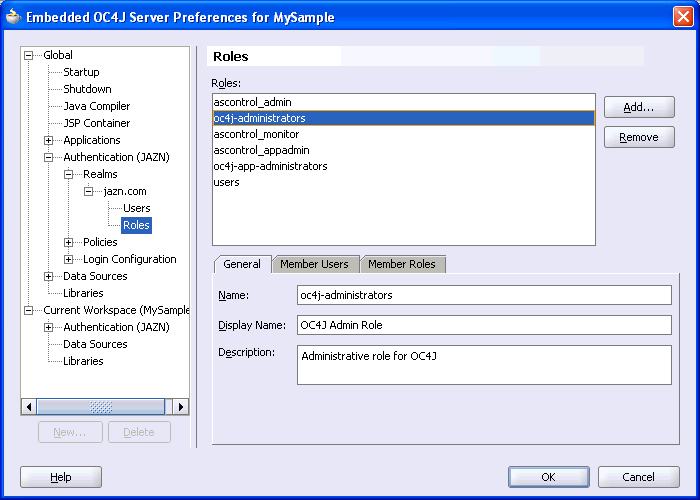
You'll see several predefined roles for the default global security realm jazn.com, as shown in Figure A-3:
oc4j-administrators, an OC4J administrator role
oc4j-app-administrators, an OC4J application administrator role
users, a generic group to map all users in the system.
ascontrol_admin, an Enterprise Manager Application Server Control administrator role
ascontrol_appadmin, an Enterprise Manager application administrator role
ascontrol_monitor, an Enterprise Manager monitoring role
Do not remove any of these roles, or some administrative functions will not work. For more information, see Oracle Application Server Administrator's Guide.
Figure A-3 Default Roles for the Global Security Realm jazn.com

Create a new role named page-viewer, and assign user Singh to this role.
Click Add.
Enter the Name page-viewer, and click OK.
Click the Member Users tab, and move Singh to the list on the right.
Now repeat Step 4. Add three more roles and assign a member user to each role as outlined in this table:
| Role | Member Users |
|---|---|
| page-viewer | Singh |
| page-personalizer | Cho |
| page-customizer | Harvey |
| restricted-user | King |
Add roles named page-personalizer, page-customizer, and restricted-user.
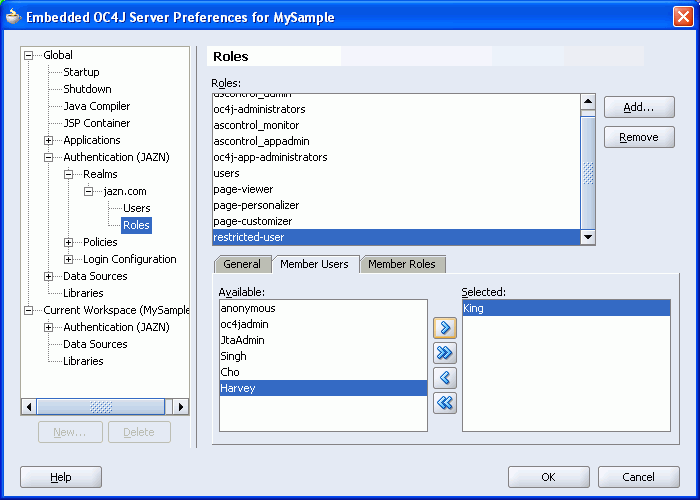
Assign member Cho to the page-personalizer role, member Harvey to the page-customizer role, and member King to the restricted-user role as shown in Figure A-4.
Figure A-4 Member Users Assigned to New Roles

Place all the users (except anonymous) into the users role:
Select the users role.
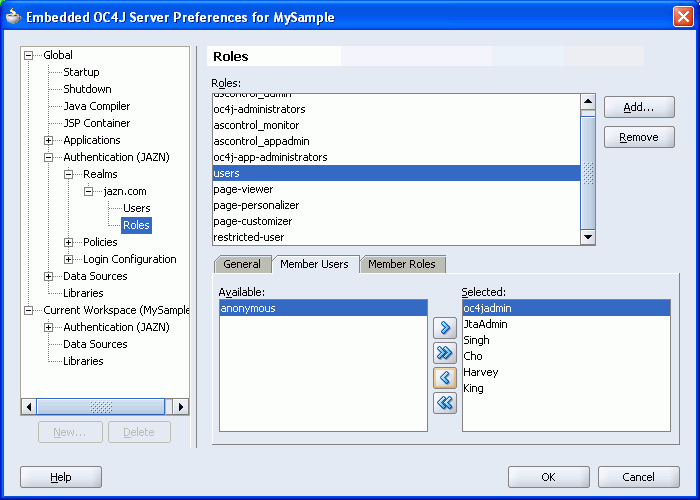
Click the Member Users tab, and move users (Singh, Cho, Harvey, King, JtaAdmin, and oc4jadmin) to the list on the right as shown in Figure A-5.
Figure A-5 Assigning Members to the Users Role

The users role maintains a list of every valid user. In Chapter 8, "Providing Security", you map this role to a J2EE security role called ValidUsers (for details, see Step 2: Configuring ADF Security Settings).
Click OK to save the role definitions to the embedded OC4J's system-jazn-data.xml file.
In the next step, you'll make these users/roles available through the Authorization Editor in Oracle JDeveloper. You assign page permissions through this editor in Chapter 8 Step 4: Securing Pages.
In this step you'll copy the tutorial users/roles to JDeveloper' home directory so they are available to JDeveloper design-time dialogs.
Before making any modifications for the purposes of this tutorial, back up the system-jazn-data.xml file located at JDEVHOME\j2ee\home\config.
Copy the system-jazn-data.xml file from the embedded OC4J directory JDEVHOME\jdev\system\oracle.j2ee.10.1.3.xx.xx\embedded-oc4j\config to JDEVHOME\j2ee\home\config.
Note:
If you already have a populatedsystem-jazn-data.xml file at this location you must merge the files rather than overwriting the original. Run the JAZN Migration Tool in realm mode to merge the users and roles:
First, set the CLASSPATH to: JDEVHOME\j2ee\home\jazn.jar;JDEVHOME\BC4J\lib\adfshare.jar
Run the JAZN Migration Tool with the following syntax: java oracle.security.jazn.tools.JAZNMigrationTool -sr jazn.com -dr jazn.com -st xml -dt xml -sf JDEVHOME\jdev\system\oracle.j2ee.10.1.3.xx.xx\embedded-oc4j\config\system-jazn-data.xml -df JDEVHOME\j2ee\home\config\system-jazn-data.xml -m realm
Where JDEVHOME points to your JDeveloper installation, for example C:\myjdev, and 10.1.3.xx.xx refers to the version number For more information, see the Oracle WebCenter Framework Developer's Guide.