| Oracle® WebCenter Framework Building a WebCenter Application Step by Step 10g (10.1.3.2.0) Part Number B31073-01 |
|
|
View PDF |
| Oracle® WebCenter Framework Building a WebCenter Application Step by Step 10g (10.1.3.2.0) Part Number B31073-01 |
|
|
View PDF |
In this chapter you will create the new login page that users are redirected to for authentication. WebCenter applications typically have a notion of public pages and allow for explicit as well as implicit authentication. This means that users can log into the application by clicking the login link before they navigate to secured content (explicit), or they can navigate to a secured page, which will redirect them to the login page for the application (implicit). See "Securing your WebCenter Application" in the Oracle WebCenter Framework Developer's Guide for more information about implicit and explicit authentication. Figure 6-1 shows a sample login page you are going to build in this chapter.
Figure 6-1 Login Page From the SRDemo Application
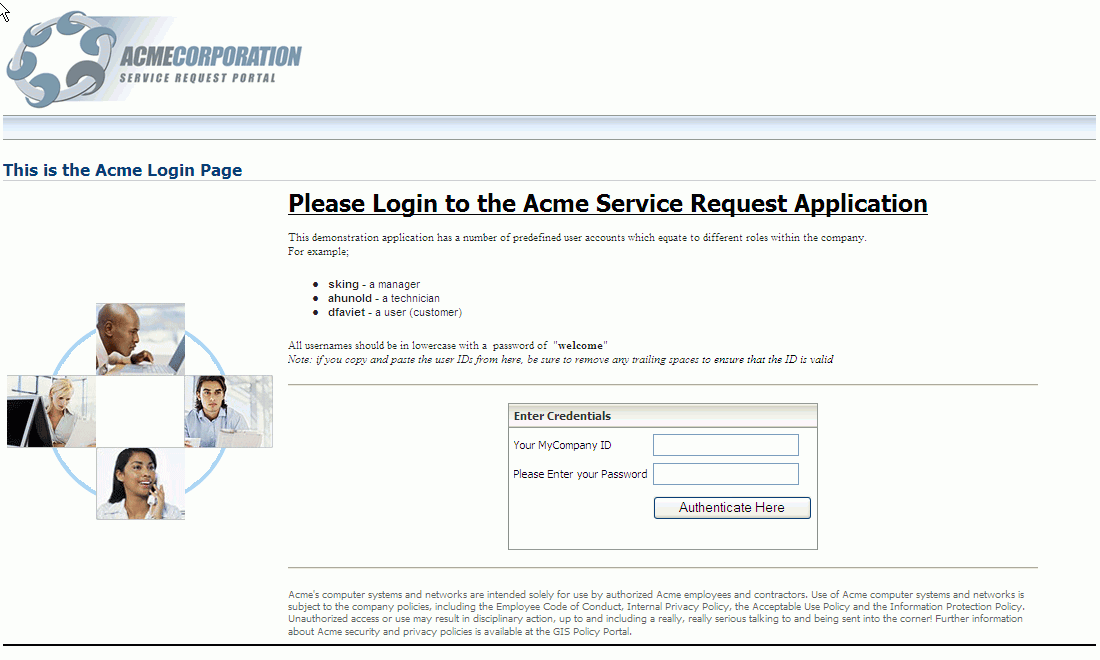
The SRDemoSample_Starter application already contains a login page, SRLogin.jspx, which is located as shown in Figure 6-2.
Since the login page uses a login form, you do not typically use an ADF Faces page for a login page, because the ADF Faces lifecycle will remap the login form's submit action and its form fields to internal references, which would break the login functionality. However, the login page is an important part of the application. It can contain customizable information such as portlets and data controls and it can also benefit from skinning features that are available to ADF Faces pages. Alternatively, you may also want to implement a login portlet. In this chapter you will learn how you can build an ADF Faces-based login page for the SRDemo application. This login page's form also uses the J2EE security container login method, j_security_check. This chapter includes the following sections:
To create the ADF Faces-based login page, perform the following steps:
In the Applications Navigator, under the UserInterface project, expand the Web Content folder if necessary.
Right-click the infrastructure folder (shown in Figure 6-2) and select New.
In the New Gallery dialog box, expand the Web Tier node.
Select JSF.
In the Items list, select JSF JSP.
Click OK to display the Create JSF JSP dialog box.
If you are on the Welcome page of the wizard, click Next to display the JSP File page.
In the File Name field, enter SRLoginADF.jspx.
Select JSP Document (*.jspx).
Click Next to display the Component Binding page.
Select Automatically Expose UI Components in a New Managed Bean.
Click Next to display the Tag Libraries page and select ALL Libraries.
Make sure that the following libraries are listed in Selected Libraries:
JSF Core
JSF HTML
ADF Faces Components
ADF Faces HTML
ADF Portlet Components
Customizable Components Core
Click Finish to create the page.
Save the page.
In the Source View of the SRLoginADF.jspx page, copy the code shown in Example 6-1 and paste just before the f:view tag.
Save the file.
Switch to Design View.
From the Component Palette, select ADF Faces Core.
Select a PanelPage component and drag it on to the body element in the Structure pane. When prompted, do not add a form, because we will add our own form later and delete the default form element.
Change the Title property, by binding it to a string from the resource bundle that ships with the application. In the Property Inspector, click Title.
Click the Bind to Data icon (the database icon at the top of the Property Inspector). This displays the Bind to Data dialog box.
Under JSP objects, select res and find the srlogin.pageTitle variable.
Move it to the Expression field and click OK.
Add some facets in the page title key, srlogin.pageTitle. To do so, find the existing branding facet code shown in Example 6-2.
Replace the branding image facet code with the facet code shown in Example 6-3. This will set the logo image within the branding facet to reflect the appropriate company branding logo for the chosen skin.
Next, add the copyright facet to the new login page. In the SRLoginADF.jspx page, find the existing copyright facet code shown in Example 6-4.
Replace this copyright facet with the facet shown in Example 6-5. This will load the branding image from the skin bean, which ensures that it can be changed at run time, when the skin is changed.
Now that you have created the login page as an ADF Faces page, you cannot just add the login form using form elements from the Component Palette. This would cause the form elements to be serialized and remapped at runtime by the ADF Faces lifecycle. Instead, we will design the page such that the login component is independent from the form surrounding the active JSF components (Those that submit back to the Faces lifecycle). While this could be achieved by using verbatim tags inside the JSF page, it greatly increases the complexity and limits the flexibility available. To allow the login component to be treated as a single element (rather than a series of escaped HTML tags), which can be moved around the page and easily skinned, you can separate the HTML form from the User Interface and inject it dynamically at runtime. This can be achieved by including it in the backing bean and exposing the returned HTML in an OutputText object that is rendered in the User Interface. To do this, perform the following steps:
Note:
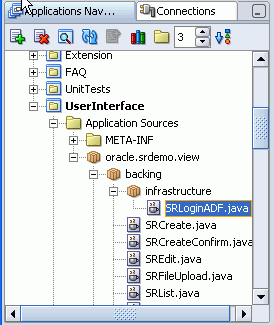
The code is available in theSRLoginADF_Backing_Code.txt file located in the starter ZIP file (in the root directory).Open the Backing Bean, SRLoginADF.java, located in the backing/infrastructure folder, as shown in Figure 6-3, to add the HTML injection code to the Backing Bean so that it can be pulled into the page at runtime. The basis for this code is to generate the appropriate HTML directly in the page. As such, the various getter methods return the appropriately marked up HTML as a simple string. The advantage of using this dynamically generated HTML is the ability to include references to the skin information. The integration of the HTML into the Faces page is simplified by removing the need for verbatim tags and CDATA escapes within the page.
Figure 6-3 Location of SRLoginADF.java in the Applications Navigator
Now add the Java code to the file. To do so, add the import statements shown in Example 6-6.
Add Backing Bean properties to top of SRLoginADF.java, as shown in Example 6-7. These getter methods for these properties will later be referenced in Expression Language in the login page.
Example 6-7 Backing Bean Properties
private String  _loginStyleBlock   = null;
private String  _loginScriptBlock  = null;
private String  _loginFormBlock    = null;
private boolean _validLoginAttempt = true;
Table 6-1 describes these properties.
Table 6-1 Backing Bean Properties in the SRLoginADF.java File
| Variable | Description |
|---|---|
|
loginStyleBlock |
Contains the HTML for defining a CSS class |
|
loginScriptBlock |
Contains the HTML for the required JavaScript used by the login form |
|
loginFormBlock |
Contains the HTML for the login form itself |
|
validLoginAttempt |
A boolean value that indicates whether the current user is able to perform another login attempt or not. This is set to |
Insert the getloginStyleBlock getter method in the Backing Bean. See Example 6-8.
This generates a simple stylesheet that defines flashing text that is used by the login form to indicate that the authentication process is taking place. The HTML that is generated by this method is invisible, and as such, the output string can be rendered outside of the body of the page.
Example 6-8 getloginStyleBlock Getter Methods
/**
  * ============================================================================
  * Function to generate the CSS style class referenced in Login Form
  * ============================================================================
  * @return
  */
public String getloginStyleBlock()
{
  _loginStyleBlock = "\n\n"
                   + "<!--
========= CSS Style Block Generated in Backing Bean ========= -->\n"
                   + "<style type=\"text/css\">\n"
                   + ".VP_Blink {text-decoration: blink;}\n"
                   + "</style>\n"
                   + "<!--
 ============================================================= -->"
                   + "\n\n";
  return (_loginStyleBlock);
}
Insert the getloginScriptBlock getter method the Backing Bean. See Example 6-9.
This method generates the <script> block that contains the JavaScript functions that are used by the login form. These include field validation and form-submission actions. As the JavaScript is dynamically generated, it is possible to include the references to the current skin as well as appropriate strings from the resource bundle. For example, if the current skin is set to myCompany, then the following line sets the JavaScript alert message to be the value that is defined in the resource bundle key: SRLoginADF.myCompany.jsAlert.
String alertMsg    = JSFUtils.getStringFromBundle("SRLoginADF." +
currentSkin + ".jsAlert");
In a similar way, the method determines the correct icon to indicate that the authentication is in progress and generates the URL to that icon based on the Faces external context.
Example 6-9 getloginScriptBlock Getter Methods
/**
 * ============================================================================
 * Method getloginScriptBlock() to generate a JScript Submit form block.
 * This function implements the current skin and generates simple JavaScript
 * to validation the user input prior to the Authentication submit action.
 * ============================================================================
 * @return
 */
public String getloginScriptBlock()
{
 String currentSkin = (String)
 JSFUtils.getManagedBeanValue("skinBean.currentSkin");
 String alertMsg    = JSFUtils.getStringFromBundle("SRLoginADF."
                                                   + currentSkin +
                                                   ".jsAlert");
 String valPwdMsg   = JSFUtils.getStringFromBundle("SRLoginADF."
                                                   + currentSkin +
                                                   ".AuthMsg");
 String urlBaseRef  =
FacesContext.getCurrentInstance().getCurrentInstance().getExternalContext().getRequestContextPath();
 String processIcon = urlBaseRef + "/skins/" + currentSkin + "/skin_images/process_animation.gif";
      _loginScriptBlock = "\n\n"
                   + "<!--
======== JavaScript Block Generated in Backing Bean ========= -->\n"
                   + "<SCRIPT language=\"JavaScript\" type=\"text/JavaScript\">\n"
                   + "(new Image(32,32)).src=\"" + processIcon +"\";\n"
                   + "function SubmitForm(AuthFrm){\n"
                   + "var alertMsg =\""   + alertMsg  + "\";\n"
                   + "var valPwdMsg = \"" + valPwdMsg + "\";\n\n"
                   + "if (((AuthFrm.j_username.value == null) || (AuthFrm.j_username.value ==\"\")) ||\n"
                   + "    ((AuthFrm.j_password.value == null) || (AuthFrm.j_password.value ==\"\")))\n"
                   + " {\n  alert(alertMsg);\n  return false;\n }\n else\n {\n"
                   + " var divTag = document.getElementById(\"vp\");\n"
                   + " divTag.innerHTML = '<table width=\"50\" border=\"0\"><tr>' +\n"
                   + "                    '<td align=\"center\"><img src=\""
                                           + processIcon + "\" width=\"32\"
                                           height=\"32\"></td>' +\n"
                   + "                    '<td align=\"left\"><font size=\"-2\"
                                           class=\"VP_Blink\">' + valPwdMsg +
                                           '</font></td>' +\n"
                   + "                    '</tr></table>';\n"
                   + " return true;\n"
                   + " }\n}\n"
                   + "</SCRIPT>\n"
                   + "<!--
 ============================================================= -->"
                   + "\n\n";
return (_loginScriptBlock);
}
Insert the getLoginFormBlock getter method in the Backing Bean. See Example 6-10.
This method generates a string that defines the HTML login form that is rendered inside the page. As the HTML is dynamic it is able to include references to the current skin as well as keys in the resource bundle. Furthermore, as the login page is designed to be customized after login, the HTML is sensitive to the authenticated state of the user in that the HTML disabled property is dynamically set using the ADF security context's isAuthenticated(); method.
In this case, if the login page is accessed once the user is authenticated, then the login page (while rendered) is deactivated to prevent subsequent login attempts. For example, this is the case when the page is accessed from the site administration page, as discussed in Chapter 9, "Building a Site Administration Page".
In the following example, you can see that the string variable htmlDisable is either "disabled="true"", or null, based on the ADF Security context's isAuthenticated state:
String htmlDisable =(ADFContext.getCurrent().getSecurityContext().isAuthenticated() ? "disabled=\"true\"" : null);
The following code snippet shows you how the htmlDisable string is subsequently used to activate or disable the form elements, such as input fields and Submit button:
<input type=\"text\" name=\"j_username\" "+ htmlDisable + "/></td>\n"
Example 6-10 getLoginFormBlock Getter Method
/**
 * ===========================================================================
 * Method getLoginFormBlock() generates the standard Credential Form used
 * by container security. The function implements the current skin values and
 * returns the required HTML which is subsequently output using an OutputText
 * object populated using EL. While this could also have been achieved by
 * directly using the Verbatim tags within the JSPX itself, this would require the
 * use of CDATA escapes and complicates the design of the page (the login form
 * is exposed through a faces component in this case.)
 *
 * Note as the Login Page contains customizable components, the HTML form elements
 * generated are disabled if the user is currently authenticated.
 * ==========================================================================
 * @return
 */

public String getLoginFormBlock()
{
  String currentSkin       = (String)
JSFUtils.getManagedBeanValue("skinBean.currentSkin");
  String userNameLabel     = JSFUtils.getStringFromBundle("SRLoginADF."
                                                          + currentSkin +
                                                          ".userName");
  String passwordLabel     = JSFUtils.getStringFromBundle("SRLoginADF."
                                                          + currentSkin +
                                                          ".password");
  String submitButtonLabel = JSFUtils.getStringFromBundle("SRLoginADF." +
                                                           currentSkin +
                                                          ".buttonLabel");
  String htmlDisable       =
(ADFContext.getCurrent().getSecurityContext().isAuthenticated() ? "disabled=\"true\"" : null);
       _loginFormBlock = "\n\n"
                  + "<!--
======== Login Form Block Generated in Backing Bean ========= -->\n"
                  + "<form name=\"LoginForm\" id=\"LoginForm\" \n"
                  + " action=\"j_security_check\" method=\"POST\"
                      onSubmit=\"return SubmitForm(this)\" >\n"
                  + "<table cellspacing=\"5\" cellpadding=\"0\" border=\"0\"
                     width=\"50%\" bgcolor=\"#FFFFFF\" width=\"240\" >\n"
                  + " <tr>\n"
                  + "  <td nowrap>" + userNameLabel + "</td>\n"
                  + "  <td nowrap><input type=\"text\" name=\"j_username\"
                    "  + htmlDisable + "/></td>\n"
                  + " </tr>\n"
                  + " <tr>\n"
                  + "  <td nowrap>" + passwordLabel + "</td>\n"
                  + "  <td nowrap><input type=\"password\" name=\"j_password\"
                    " + htmlDisable + "/></td>\n"
                  + " </tr>\n"
                  + " <tr>\n"
                  + "  <td nowrap height=\"34\"><DIV id=\"vp\"></DIV></td>\n"
                  + "  <td nowrap>\n"
                  + "    <input type=\"submit\" value=\"" + submitButtonLabel +
                    "\" " + htmlDisable + "/></td>\n"
                  + "  </td>\n"
                  + " </tr>\n"
                  + "</table>\n"
                  + "</form>\n"
                  + "<!--
 ============================================================= -->"
                  + "\n\n" ;
  return ( _loginFormBlock);
}
Save the file.
From the Component Palette, select ADF Faces Core.
Select PanelHorizontal and drag it on to the page component.
Set the Valign property to middle in the Property Inspector.
Select ObjectImage from the ADF Faces Core Component Palette and drag it onto the PanelHorizontal component. Set the source attribute to the following value:
/skins/#{skinBean.currentSkin}/skin_images/LoginSplash.gif
Select ObjectSpacer and drag it on to the page just below the ObjectImage component.
From the Component Palette, select Customizable Components Core.
Select PanelCustomizable and drag it below the ObjectSpacer element you just added in the Structure pane. When prompted, do not add a form, because we will add our own form later and delete the default form element.
Set the Layout property for the PanelCustomizable component to vertical.
From the Component Palette, select ADF Faces Core.
Now add the following to the PanelCustomizable component:
an objectSpacer
an objectSeparator
an objectSpacer
a panelHorizontal
set the Halign property to center
an objectSpacer
an objectSeparator
an objectSpacer
Select PanelBox and drag it onto the PanelHorizontal component.
Set the Text property of the PanelBox to be the login component header by referencing the resource bundle, using expression language (EL). To do this, click the Bind to Data icon. This displays the Bind to Data dialog box.
Under JSP objects, select res and find the SRLoginADF.credentialHeader variable.
Select OutputText from the ADF Faces Core Component Palette and drag it onto the PanelBox component.
In the Property Inspector, bind the Value property of the OutputText component to data from a managed bean by selecting JSF Managed Beans, backing_infrastructure_SRLoginADF, and then loginFormBlock as shown in Figure 6-4.
Set the OutputText component's Escape property to false.
Drag another OutputText component above the body tag in the Structure pane, just below the top of the page, as shown in Figure 6-5.
Bind the Value property to data from the backing bean by selecting JSF Managed Beans, backing_infrastructure_SRLoginADF, and loginStyleBlock and set the Escape property to false.
Drag another OutputText component onto the Structure pane, just above the body tag.
Bind the Value property to data from the backing bean by selecting JSF Managed Beans, backing_infrastructure_SRLoginADF, and loginScriptBlock, and then set the Escape property to false.
In the SRLoginADF.jspx page, open the panelPage node in the Structure pane, then drag the Messages component onto the messages facet.
Save the file.
To create a login error page, perform the following steps:
In the Applications Navigator, under the UserInterface project, expand the Web Content node, if necessary.
Right-click the infrastructure folder (shown in Figure 6-2) and select New.
In the New Gallery dialog box, expand the Web Tier node.
Select JSP.
In the Items list, select JSP.
Click OK to display the Create JSP dialog box.
If you are on the Welcome page of the wizard, click Next to display the Create JSP page.
In the File Name field, enter SRLoginErrorPage.jsp.
On the Error Page Options page of the wizard, select Do Not Use an Error Page to Handle Uncaught Exceptions in This File.
On the Tag Libraries page, select All Libraries, and then select JSTL Core 1.1 and move it to the Selected Libraries list.
Click Finish.
Add the JSTL code shown in Example 6-11 just before the <html> element to track the login attempts.
Example 6-11 JSTL Code to Track the Number of Login Attempts
<!-- ===========================================================================
 For the SRDemo Demo we will track the number of Login Attempts against the file
 based repository (In a deployed system this would be handled by the IdM system).
 This counter is then used in the backing bean to define if the login attempt
 is valid (referenced in EL as "loginAttemptValid").
 =========================================================================== -->
<c:set var="LoginErrorCount"
       scope="session"
       value="${sessionScope.LoginErrorCount == null ? 1 :sessionScope.LoginErrorCount + 1}"/>
<c:redirect url="/faces/infrastructure/SRLoginADF.jspx"/>
This JSTL code stores in a simple session variable the number of times the error page is called (due to invalid login) and redirects the user back to the original login page where the actual processing takes place.
Save the SRLoginErrorPage.jsp file.
Open the backing bean, SRLoginADF.java and add the getMessages1() method shown in Example 6-12.
The following two methods use the Faces external context to return the session variable that was set by the JSTL in the error page, to determine the number of times the user has attempted to log in.
The following code snippet shows you how to return the session variable based on the Faces context and the associated HTTP session. The returned object is converted to a local integer to evaluate whether the user's login attempt is valid or not. For example, a three-attempt limit can thus be enforced.
FacesContext facesContext = FacesContext.getCurrentInstance();
HttpSession  session = (HttpSession)facesContext.getExternalContext().getSession(true);
Object loginAttempts  = session.getAttribute("LoginErrorCount");
Integer loginAttemptCount = (loginAttempts == null)? 0 : Integer.parseInt(loginAttempts.toString());
Note:
ThegetMessages1 method is the default getter method created for the message component of the PanelPage. If your message component is not messages1, you must change the name of the method.Having determined the current number of logging attempts, the getMessages1 method sets the appropriate error string (returned from the resource bundle) for the Faces message component. In this case greater than one attempt indicates an invalid username and password combination and greater than three attempts indicate that the user has exceeded the legal limit.Example 6-12 getMessage1() Method
/**
     * ===========================================================================
     * Function getMessages1() determines the current number of login failures and
     * sets the appropriate error message in the Faces Context
     * ===========================================================================
     * @return
     */
    public CoreMessages getMessages1()
    {
     if (!ADFContext.getCurrent().getSecurityContext().isAuthenticated())
     {
       String       currentSkin       = (String)
       JSFUtils.getManagedBeanValue("skinBean.currentSkin");
       FacesContext facesContext      = FacesContext.getCurrentInstance();
       HttpSession  session           = (HttpSession)
       facesContext.getExternalContext().getSession(true);
       Object       loginAttempts     = session.getAttribute("LoginErrorCount");
       Integer      loginAttemptCount = (loginAttempts == null)? 0 :
       Integer.parseInt(loginAttempts.toString());
       String       loginErrorMessage = null;
       if (loginAttemptCount >0)
       {
        if (loginAttemptCount >2) {
         loginErrorMessage = JSFUtils.getStringFromBundle(
                             "SRLoginADF." + currentSkin +
                             ".tooManyLoginAttempts");
        }
        else {
         loginErrorMessage = JSFUtils.getStringFromBundle(
                    "SRLoginADF." + currentSkin + ".invalidLogin");
        }
        FacesMessage fm =  new FacesMessage(
                   FacesMessage.SEVERITY_INFO,loginErrorMessage,null);
        facesContext.addMessage(null, fm );
       }
     }
     return messages1;
    }
Open the backing bean, SRLoginADF.java and add the isValidLoginAttempt method shown in Example 6-13.
The boolean value returned by the isValidLoginAttempt method is referenced in the rendered property of the output text component which holds the login form HTML code. In this case, when the number of valid attempts is greater than three, the login form is not rendered on the page and the user is prevented from logging in again.
Example 6-13 isValidLoginAttempt Method
/**
     * ===========================================================================
     * Method isValidLoginAttempt() evaluates the number of invalid login attempts
     * performed by the user and returns false if greater than 3. (used in EL to
     * show/hide the Login Page components.
     * ===========================================================================
     * @return
     */
    public boolean isValidLoginAttempt()
    {
      _validLoginAttempt = true;
      if (!ADFContext.getCurrent().getSecurityContext().isAuthenticated()) {
         FacesContext facesContext      = FacesContext.getCurrentInstance();
         HttpSession  session           = (HttpSession)
         facesContext.getExternalContext().getSession(true);
         Object       loginAttempts     = session.getAttribute("LoginErrorCount");
         Integer      loginAttemptCount = (loginAttempts == null)? 0
        : Integer.parseInt(loginAttempts.toString());

         if (loginAttemptCount >2){ _validLoginAttempt = false; }
      }
      return (_validLoginAttempt);
    }
Save the file.
Open SRLoginADF.jspx.
Drag an ObjectImage into the PanelBox below the OutputText object, and set the source property to the following value:
source="/skins/#{skinBean.currentSkin}/skin_images/BadLoginAttempt.gif"
Bind the rendered property to the negated (opposite) value of the isValidLoginAttempt() method in the backing bean. Set the rendered property to the following value:
#{!backing_infrastructure_SRLoginADF.validLoginAttempt}
By doing this, the image will be rendered only if the login attempt is invalid.
Set the rendered property of the OutputText object to the value of the isValidLoginAttempt() method as follows:
#{backing_infrastructure_SRLoginADF.validLoginAttempt}
This ensures the login form is rendered only when it is valid for a user to try to login.
In this section, you will add a Rich Text portlet to the login page. To do this, perform the following steps:
Make sure your Rich Text portlet has been registered before proceeding. Refer to "Step 1: Adding a Rich Text Component" in Chapter 5, "Creating a Public Welcome Page" for the details.
From the Component Palette, choose RichTextPortletProducer, then select Rich Text from the list. In the Structure pane, drag the Rich Text Portlet above the top-most objectSpacer within the panelCustomizable.
Select the Rich Text portlet and open the Property Inspector.
Set the following properties:
| Properties | Value |
|---|---|
| AllModesSharedScreen | true |
| IsMinimizable | false |
| IsMaximizable | false |
| DisplayHeader | false |
From the Component Palette, choose RichTextPortletProducer, then select Rich Text from the list. In the Structure pane, drag the Rich Text Portlet below the last objectSpacer within the panelCustomizable.
Select the Rich Text portlet and open the Property Inspector.
Set the following properties:
| Properties | Value |
|---|---|
| AllModesSharedScreen | true |
| IsMinimizable | false |
| IsMaximizable | false |
| DisplayHeader | false |
Save the page.
You can now customize this Rich Text Portlet by going back to the login page after you have logged in. Chapter 9, "Building a Site Administration Page" describes how you can do this.
Next, we need to define the appropriate privileges for the login page. All users should be able to view the page and managers should also be able to edit the page, so that they can update the Rich Text portlet, for example. To set the security on the login page, perform the following steps:
In the Applications Navigator, right-click SRLoginADF.jspx.
Select Go to Page Definition.
Click Yes, if you are prompted to create a new page definition. The page definition file opens in the Structure pane.
Right-click the Page Definition file and select Edit Authorization. This displays the Authorization Editor.
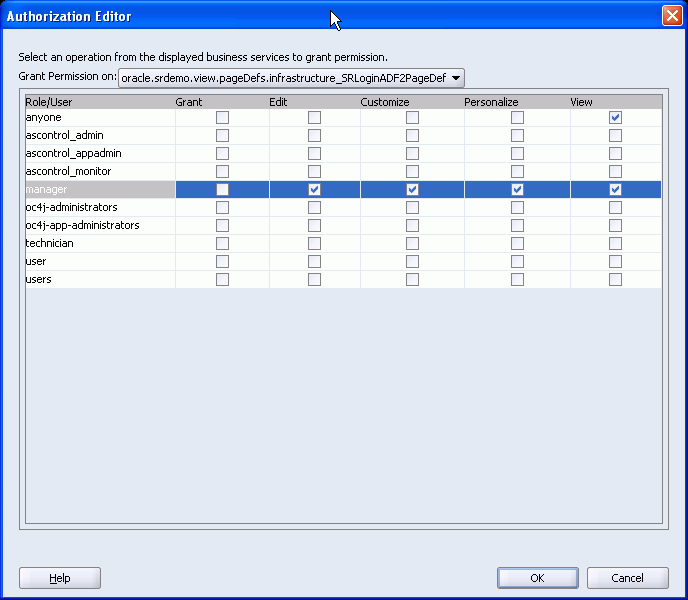
Grant View privilege to anyone and Edit privilege to manager, as shown in Figure 6-6.
Figure 6-6 Authorization Editor to define Security for the Login Page
In this step, you will use the Oracle ADF Security Wizard to configure authentication settings for the SRDemo application. All the options that you select are recorded in web.xml. To configure authentication settings, you must perform the following configuration tasks:
Enable Oracle ADF authentication
Choose the lightweight XML resource provider for user authentication
Specify Form-Based as the protocol for authentication
Grant authenticated users (ValidUser) access to the adfAuthentication servlet
To configure the SRDemo application to use ADF Security and the login page, perform the following steps:
In the Applications Navigator, select UserInterface.
From the Tools menu, choose ADF Security Wizard. The ADF Security wizard will guide you through the configuration process.
If needed, click Next to skip the Welcome page.
Ensure that Enforce Authorization is selected. This option configures the adfAuthentication servlet and configures authorization rules (appropriate filters to allow for checking of the current user's permissions on the page).
Click Next to move to the next page of the wizard.
Choose Lightweight XML Provider. Oracle ADF Security authenticates users against a given resource provider. For the SRDemo we will use the lightweight resource provider system-jazn-data.xml that you copied while following the steps in the install.html file located in the sample files you downloaded.
Click Next to display the next page of the wizard.
On this page, set the Location to Application Repository, Default Realm to jazn.com, JAAS Mode to doAsPrivileged, and then click Next.
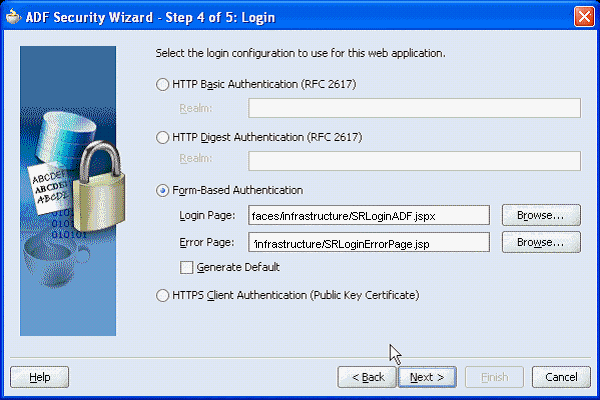
On the login page, choose Form-Based Authentication (Figure 7-8). This specifies that the SRDemo application will use a form to facilitate authentication.
There is no need to generate default pages for the login form and login error message (login.html and error.html) because we will be using the login form we built earlier in SRLoginADF.jspx.
In the Login Page field, enter /infrastructure/SRLoginADF.jspx.
In the Error Page field, you can also enter faces/infrastructure/SRLoginErrorPage.jsp, as shown in Figure 6-7.
Figure 6-7 Form-Based Authentication Details
Click Next to display the final page of the wizard.
This page defines resources within your application that should be secured, and specifies which J2EE security roles can access each resource. The adfAuthentication resource (the authentication servlet) is defined for you. You cannot edit or delete this resource, but you can specify the set of roles that may access this resource. One J2EE role, named oc4j-administrators, is selected by default, but we want any valid user to be able to access the adfAuthentication resource, so you will need to create another J2EE role, which you will name ValidUser, and grant access to this role.
Remove the Web resource J2EE-Secured-Application, if it shows up.
Click Manage Roles.
Click Add, and enter the name ValidUser.
Later on, you will map this J2EE role to one of the identity store roles, users, which you defined at the start of this lesson. This role maintains a list of every valid user. From a security perspective, allocating permissions to this role effectively defines an authenticated Public resource. That is, it would be available to all users without a need for the definition of specific permissions.
Click OK. The ValidUser role should appear in the list.
Click Close.
Click the double arrow (Add All) to move everything in the Available Roles list to the Selected Roles list.
This completes ADF Security wizard settings, so click Next and then Finish.
You can now run the application's SRWelcome.jspx page and this should take you to the publicly accessible welcome page.
Click the login link. This will take you to the login page you built in this chapter.
Log in as a manager (sking). The contents of the RTP would normally be defined in a site administration page. This page will be built later.
Note:
Prior to creating the site administration, you can customize the login page by directly accessing the page URL as a user with Customize privilege on the page.The steps to update web.xml to call the new login page are as follows:
In the Applications Navigator, expand the WEB-INF node and open the web.xml property palette (choose Properties from the right-click menu).
Select Filter Mappings in the left panel and add a new filter mapping for the adfBindings Filter as shown Figure 6-8.
Figure 6-8 New Filter Mappings for the adfBindings Filter
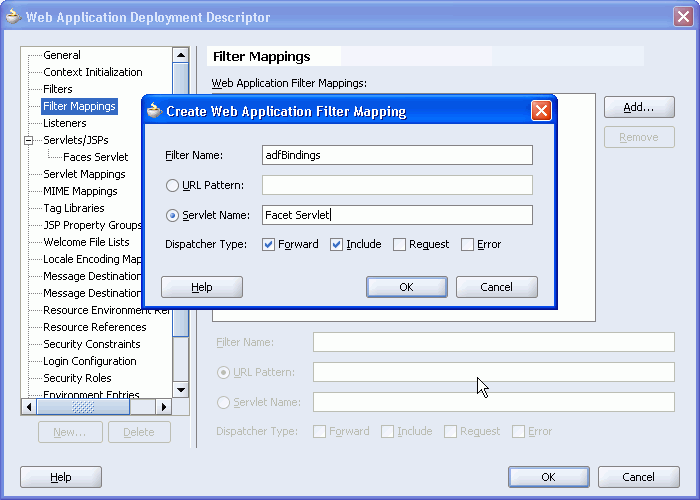
Make sure that the Servlet Name = Faces Servlet and that the Forward and Include dispatcher types are set.
Click OK to save the changes to web.xml.
Note:
As the login page is also a JSPX page (and hence secured by ADF security) it must be defined as a public page. If the page is not defined as public then the container will continually redirect to the defined authentication point before allowing access to this page (which of course is this page resulting in a continuous loop).Right-click the SRLoginADF.jspx page in the application navigator and select Go to Page Definition. Confirm creation of the page definition file if it currently does not exist.
Right-click the page definition file and select Edit Authorization.
Grant View privilege to the anyone role, as shown in Figure 6-9.
As the login page contains customizable portlets, the appropriate role must have customize privilege on the page.
You can now run the application and test whether the login and error pages you created are displayed correctly. To do this, perform the following steps:
Run the SRWelcome.jspx page.
Click the login link. This displays the login page.
Log in using a valid username and password.
You are logged in to the demo application successfully.
Log out from the application.
To test whether the error page is displayed correctly, login using incorrect credentials three times. The error page is displayed.
In this chapter, you learned how to build an ADF Faces-based login page and configure the SRDemo application to use this login page. You can now enable administrators to customize the login page at run time. Chapter 9, "Building a Site Administration Page" describes the steps involved in enabling this type of customization.