|
Siebel Business Process Framework: Workflow Guide > About Siebel Tools and Process Properties > About the Process Designer >
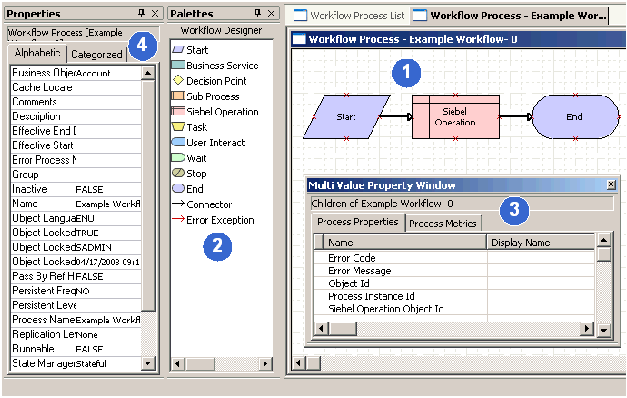
About the Process Designer GUI
Figure 12 illustrates the main elements in the Process Designer GUI.
Figure 12. Screen Capture of Process Designer Graphical User Interface
|
The Process Designer includes elements you use frequently when building a workflow process:
- Process Designer Canvas. A work area where you build the workflow process. You right-click the canvas to access a context-sensitive menu that allows you to take several actions related to the workflow process displayed in the canvas.
- Workflow Designer Palette. A window that contains icons which represent the various step types you can add to a workflow process. To add a step to a workflow, you drag then drop an icon from the palette to the design canvas.
- Multi Value Property Window (MVPW). A window that allows you to define arguments used with a process property. For more information, see About the Multi Value Property Window.
- Properties Window. A window that allows you to define properties for an individual workflow process step, or for the overall workflow process. The window is context-sensitive. If a step or connector is chosen in the canvas, properties for the step or connector are displayed in the Properties window. If no step or connector is chosen in the canvas, properties for the workflow process are displayed in the Properties window. For more information, see About Workflow Steps.
About Process Designer Functionality
You use the Process Designer in Siebel Tools to build your workflow process. While diagramming a workflow process in the Process Designer, tasks you can perform include:
- Copy and paste. Copy and paste objects in the Workflow Designer canvas as you are building a workflow process.
- Edit shape properties and layout. Define shape colors and other attributes such as the look of the line, the fill pattern, and the font for labels. Create consistency by controlling alignment of shapes and by making shapes the same size as other shapes in the workflow process.
- Zoom. Zoom in and out on the Process Designer canvas to view the workflow process you are diagramming at various magnifications.
- Copy drawings. Copy a workflow diagram into another application, such as a Microsoft Word document. In the canvas, you right-click and choose Copy Drawing.
- Print. Print a diagram of the workflow process.
- Hide connector and error exception names. You can choose to hide the names of connectors and error exceptions within a workflow process. Hiding a connector name can be helpful to clarify the meaning of conditional branching emanating from a Start step or a Decision Point.
The copy and paste functionality works as Windows applications do with the CTRL+C and CTRL+V key combinations. The rest of the design functionality is employed by right-clicking the Process Designer Canvas.
|