|
Siebel Business Rules Administration Guide > Implementing Rules in Siebel Task-Based UI > Scenario for Using Rules to Provide Dynamic Navigation in a Siebel Task >
Creating UI Elements
This topic is a task in the development process that is listed in Scenario for Using Rules to Provide Dynamic Navigation in a Siebel Task. For each of the four views in your task, you define the applet and the view. To create the applet for the Opportunity General Info view
- In Siebel Tools, choose File > New Object, then click the Applets tab.
- Click Form Applet, then click OK to invoke the Form Applet Wizard. In the General dialog box, create a form applet with the following settings, then click Next.
|
|
Project |
Rules Call Back |
Applet name |
Opportunity General Info |
Applet display title |
Opportunity General Info |
Business Component |
Opportunity |
Upgrade behavior |
Admin |
Use Grid Layout |
Checked |
- In the Web Layout - Form dialog box select Edit Mode and click Next.
- Choose the following fields to add to your applet, then click Next.
- Name
- Committed
- Sales Stage
- Close Date
- Revenue
- Choose Next to decline adding controls to your applet, then click Finish.
The Web Template Layout Editor opens.
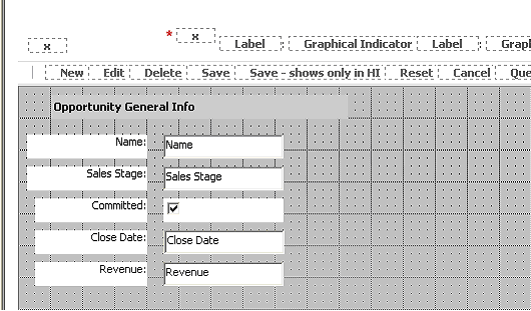
- Layout the Opportunity General Info applet to be similar to the following layout.
NOTE: You can add the Opportunity General Info title as a Form Section.
For information about using the Web Layout Editor, see Using Siebel Tools.
- In the Object Explorer, expand the Applet object to display the Applet Message object.
If the Applet Message object is not displayed, then choose View > Options > Object Explorer and select Applet Message.
- Add a salutation message to the applet by adding a new Applet Message record with the following properties:
Name = Salutation Message
Text Message - String Override = %1, please enter the Name, Sales Stage, Committed Flag, Close Date, and Revenue.
- In the Object Explorer, expand the Applet Message object to display the Applet Message Variable object.
If the Applet Message Variable object is not displayed, then choose View > Options > Object Explorer and select Applet Message Variable.
- Define the variable in your applet message by adding a new Applet Message Variable record with the following properties:
Field = Updated By Login
Value = 1
- Return to the Web Layout Editor and add the new Salutation Message to the applet by dragging a Text control to the canvas. In the Properties window, set the following properties for the control. Unless noted, leave other properties as their default values.
- Field Type = Message
- Field = Salutation Message
- HTML Type = Plain text
- HTML Only = FALSE
- Name = Salutation Message (or other descriptive name)
- Choose File > Save.
You now create a task view that includes the Opportunity General Info applet. To create the task view that uses the Opportunity General Info applet:
- In Siebel Tools, choose File > New Object, then click the Task tab.
- Click Task View, then click OK to invoke the Task View Wizard. In the New View dialog box, create a task view with following settings, then click Next.
|
|
Project |
Rules Call Back |
View name |
Opportunity General Info |
View title |
Opportunity General Info |
Business Object |
Opportunity |
Upgrade behavior |
Admin |
- In the View Web Layout - Select Template dialog box, select View Detail 2 (Parent With Pointer) and click Next.
- In the Web Layout - Applets dialog box, select Opportunity General Info and click Next.
- In the Task View - Pick Tasks dialog box, when asked if you wish to specify a task applet, select No and click Next.
- In the Task View - Select Playbar Applet dialog box, select Task Playbar Applet - Bottom, then click the appropriate right arrow to populate the bottom playbar applet text box. Click Next.
NOTE: Choose the Forward Button type Submit, instead of Next. Submit commits the Opportunity record to the database before the subsequent call of Business Rule Service. Because Business Rule Service is then assured of acting on existing data only, the GetMoreData and PerformAction input properties of Business Rule Service can be set to Y. as you can see in Providing Calls to the Rules Engine.
For requirements for setting the GetMoreData and PerformAction input properties, see Setting the GetMoreData Input Property and Setting the PerformAction Input Property.
- In the Finish dialog box, confirm settings and click Finish.
The Web Template Layout Editor opens, showing the layout of this task view.
Create the following three views by repeating the procedures To create the applet for the Opportunity General Info view and To create the task view that uses the Opportunity General Info applet: with the following data:
- Excellent Lead Info view. The view you create should be similar to the view shown in Figure 8. Use the values in Table 10 in your procedures.
Figure 8. Excellent Lead Info view
|
|
Table 10. Data for Excellent Lead Info view
|
|
|
Form Applet Wizard |
Project |
Rules Call Back |
Applet name |
Opportunity Excellent Lead |
Applet display title |
Opportunity Excellent Lead |
Applet business component |
Opportunity |
Applet upgrade behavior |
Admin |
Use grid layout |
Yes (checked) |
Web Layout - Form dialog box |
Mode |
Edit Mode |
Web Layout - Fields dialog box |
Add field |
Profile |
Web Template Layout Editor |
|
Form applet should resemble the applet shown in Figure 8 |
Task View Wizard |
Project |
Rules Call Back |
View name |
Excellent Lead Info |
View title |
Excellent Lead Info |
View business object |
Opportunity |
View upgrade behavior |
Admin |
View Web Layout - Select Template dialog box |
View template |
View Detail 2 (Parent With Pointer) |
Web Layout - Applets dialog box |
Applet |
Opportunity Excellent Lead applet |
Task View - Pick Tasks dialog box |
Task applet |
No |
Task View - Select Playbar Applet dialog box |
Playbar applet |
Task Playbar Applet - Bottom, placed at bottom position |
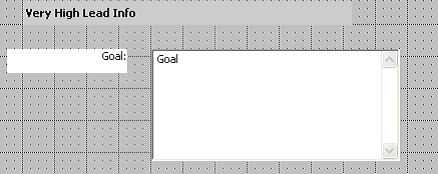
- Very High Lead Info view. The view you create should be similar to the view shown in Figure 9. Use the values in Table 11 in your procedures.
Figure 9. Very High Lead Info view
|
|
Table 11. Data for Very High Lead Info view
|
|
|
Form Applet Wizard |
Project |
Rules Call Back |
Applet name |
Opportunity Very High Lead |
Applet display title |
Opportunity Very High Lead |
Applet business component |
Opportunity |
Applet upgrade behavior |
Admin |
Use grid layout |
Yes (checked) |
Web Layout - Form dialog box |
Mode |
Edit Mode |
Web Layout - Fields dialog box |
Add field |
Goal |
Web Template Layout Editor |
|
Form applet should resemble the applet shown in Figure 9 |
Task View Wizard |
Project |
Rules Call Back |
View name |
Very High Lead Info |
View title |
Very High Lead Info |
View business object |
Opportunity |
View upgrade behavior |
Admin |
View Web Layout - Select Template dialog box |
View template |
View Detail 2 (Parent With Pointer) |
Web Layout - Applets dialog box |
Applet |
Opportunity Very High Lead applet |
Task View - Pick Tasks dialog box |
Task applet |
No |
Task View - Select Playbar Applet dialog box |
Playbar applet |
Task Playbar Applet - Bottom, placed at bottom position |
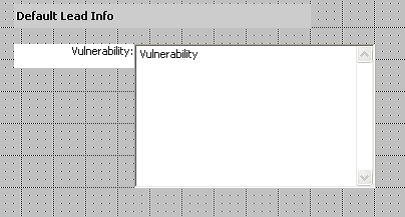
- Default Lead Info view. The view you create should be similar to the view shown in Figure 10. Use the values in Table 11 in your procedures.
Figure 10. Default Lead Info view
|
|
Table 12. Data for Default Lead Info view
|
|
|
Form Applet Wizard |
Project |
Rules Call Back |
Applet name |
Opportunity Default Lead |
Applet display title |
Opportunity Default Lead |
Applet business component |
Opportunity |
Applet upgrade behavior |
Admin |
Use grid layout |
Yes (checked) |
Web Layout - Form dialog box |
Mode |
Edit Mode |
Web Layout - Fields dialog box |
Add field |
Vulnerability |
Web Template Layout Editor |
|
Form applet should resemble the applet shown in Figure 10 |
Task View Wizard |
Project |
Rules Call Back |
View name |
Default Lead Info |
View title |
Default Lead Info |
View business object |
Opportunity |
View upgrade behavior |
Admin |
View Web Layout - Select Template dialog box |
View template |
View Detail 2 (Parent With Pointer) |
Web Layout - Applets dialog box |
Applet |
Opportunity Default Lead applet |
Task View - Pick Tasks dialog box |
Task applet |
No |
Task View - Select Playbar Applet dialog box |
Playbar applet |
Task Playbar Applet - Bottom, placed at bottom position |
|


