|
Siebel Business Rules Administration Guide > Implementing Rules in Siebel Workflows > Scenario for Using Rules in a Siebel Workflow to Do Batch Processing >
Creating the Workflow
This topic is a task in the development process that is listed in Scenario for Using Rules in a Siebel Workflow to Do Batch Processing. To allow you to assign display names to workflow objects, confirm that the following parameter is set in the [Siebel] section of \TOOLS_ROOT\bin\LANGUAGE\tools.cfg: EnableToolsConstrain = FALSE
If either parameter is not present, add it. This process consists of the following tasks:
- Determine a project in Siebel Tools to associate all the metadata for this business process.
- Create a business component that is a clone of the Opportunity business component, to meet the requirements of a looping workflow process.
- Create the workflow process structure.
- Configure the workflow process steps.
Determining a Project
You can create a new project with which to associate the metadata artifacts for this business process, or you can use a pre-existing project. If you use a pre-existing project, lock the project. To create a new project
- In Siebel Tools, navigate to Project in the Object Explorer.
- Choose Edit > New Record.
- Enter a name for the project, for example, Business Rule.
- Click the Locked checkbox to lock the project.
- Step off the new Project record to save the record.
Creating a New Business Component
Siebel workflow processes have the following requirements:
- The workflow process must process a record from the primary business component of the business object on which the workflow process is based.
- A looping workflow process that processes a batch of records can only loop through records that are of a non-primary business component of the business object on which the workflow process is based.
The Opportunity business component is the primary business component of the Opportunity business object, so to satisfy these requirements you create a new business component, Opportunity No Link, that is a clone of the Opportunity business component. The new business component contains the minimum number of fields required for this business process, and those fields point to the same table columns as their counterparts in the Opportunity business component. Thus, when a field is modified in the clone, the same field is modified in the Opportunity business component record. To create the Opportunity No Link business component
- In Siebel Tools, verify that the Business Rule project is still locked.
- Navigate to Business Component in the Object Explorer.
- Choose Edit > New Record.
- In the Business Components list, enter the following property values for the new business component. Accept default values for other properties.
|
|
Name |
Opportunity No Link |
Project |
Business Rule |
Class |
CSSBCBase |
Table |
S_OPTY |
- With Opportunity No Link selected in the Business Components list, expand the Business Component object in the Object Explorer, then click Field.
- Choose Edit > New Record to add each of the following fields to the Opportunity No Link business component. Use the following guidelines to enter each field's properties. Accept default values for other properties.
NOTE: These fields correspond to the fields with the same names on the Opportunity business component.
|
|
|
|
Status |
STATUS_CD |
30 |
DTYPE_TEXT |
Quality |
LEAD_QUALITY_CD |
30 |
DTYPE_TEXT |
Primary Revenue Win Probability |
SUM_WIN_PROB |
not applicable |
DTYPE_NUMBER |
Description |
DESC_TEXT |
255 |
DTYPE_TEXT |
- Choose Tools > Compile Selected Objects, and compile the Opportunity No Link business component to the repository that is used by your sample database (typically <Siebel client root directory>\OBJECTS\<language>\siebel.srf.
Creating the Workflow Process Structure
This workflow process:
- Accepts a record of the Opportunity business component, which is not processed.
- Queries the Opportunity No Link business component for records whose Status is Accepted.
- Loops through records in the query result set, applying the business logic.
To create the workflow process structure
- In Siebel Tools, verify that the Business Rule project is still locked.
- In the Siebel Tools Object Explorer select the Workflow Process object.
- Choose Edit > New Record.
- In the Workflow Processes list, enter the following property values for the new workflow process. Other properties' values are read only or should be left empty.
|
|
Process Name |
Opportunity Rules Batch Processing |
Workflow Mode |
Service Flow |
Business Object |
Opportunity |
Project |
Business Rule |
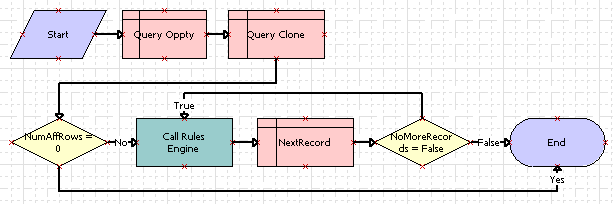
- In the Workflow Processes list, right-click the Opportunity Rules Batch Processing workflow process and choose Edit Workflow Process. In the gridded canvas, model a workflow process similar to the following by clicking and dragging steps and connectors from the palette.
If the palette is not visible, choose View > Windows > Palette.
Note that you are simply drawing a picture of steps and connectors at this point. You configure the metadata in subsequent steps.
Enter names for steps and labels for connectors as shown.
- Click on a step and enter the name of a step in the Name field of the Properties window for the step.
- Click on a connector between steps and enter the label for the connector in the Name field of the Properties window for the connector.
- Click anywhere on the canvas away from steps and connectors to display the Multi Value Property Window for the entire workflow process. Right click in the Process Properties window and choose New Record, then add the following process properties to the default list. Accept default values for fields not listed.
|
|
|
NoRecord |
Opportunity |
String |
NumberOfRows |
Opportunity |
Number |
vRowId |
Opportunity |
String |
- Choose File > Save.
To configure the workflow process steps
- On the canvas, select each step and connector one by one and add the following metadata. For properties not noted, accept defaults.
|
|
Start |
No entries |
Connector:
Start to Query Oppty |
No entries |
Query Oppty |
In the Properties window, pick from each picklist:
- Business Component: Opportunity
- Operation: QueryBiDirectional
NOTE: This step does an empty query that returns all Opportunity records to provide the one required record that is described in Creating a New Business Component. In practice, devise a query that returns one or a few records for better performance.
|
Connector:
Query Oppty to Query Clone |
No entries |
Query Clone |
In the Properties window, pick from each picklist:
- Business Component: Opportunity No Link
- Operation: Query
In Multi Value Property Window > Search Spec Input Arguments, right click and choose New Record. Pick or enter the following field values only:
In the Multi Value Property Window > Output Arguments, right click and choose New Record. Pick or enter the following field values only:
- Property Name: NumberOfRows
- Type: Output Argument
- Output Argument: NumAffRows
In the Multi Value Property Window > Output Arguments, create a second record with the following field values:
- Property Name: vRowID
- Type: Business Component
- Business Component Name: Opportunity No Link
- Business Component Field: Id
|
Connector:
Query Clone to NumAffRows = 0 |
No entries |
NumAffRows = 0 |
No entries |
Connector:
NumAffRows = 0 Yes branch |
In the Properties window, verify that Type is Default. |
Connector:
NumAffRows = 0 No branch |
In the Properties window, set Type to Condition. Select the connector and right-click, then choose Edit Condition. Define the following condition, and click OK:
- Compare To = Process Property
- Operation = Greater Than
- Object = NumberOfRows
- Value = 0
|
Call Rules Engine |
You make entries for this step later in Providing Calls to the Rules Engine. |
Connector:
Call Rules Engine to NextRecord |
No entries |
NextRecord |
In the Properties window, set Operation to NextRecord. In the Multi Value Property Window > Output Arguments, right click and choose New Record. Pick or enter the following field values only:
- Property Name: NoRecord
- Type: Output Argument
- Output Argument: NoMoreRecords
|
Connector
(NextRecord to NoMoreRecords = False) |
No entries |
NoMoreRecords = False |
No entries |
Connector:
NoMoreRecords = False True branch |
In the Properties window, set Type to Condition. Select the connector and right-click, then choose Edit Condition. Define the following condition, and click OK:
- Compare To: Process Property
- Operation: All Must Match (Ignore Case)
- Object: NoRecord
- Value: false
|
Connector:
NoMoreRecords = False False branch |
In the Properties window, verify that Type is Default. |
End |
No entries. |
- Choose File > Save.
- In the Workflow Processes list applet, select Opportunity Rules Batch Processing, then choose Tools > Unlock Project.
|